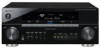
Owner's Manual
Page 5
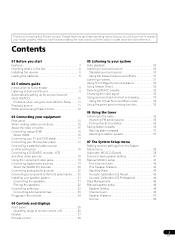
...Channel Level 42 Fine Speaker Distance 42 Standing Wave 43 Acoustic Calibration EQ Adjust 43 Acoustic Calibration EQ Professional 44 Data Management 46 Manual speaker setup 48 Speaker Setting 48 Channel Level 49 Speaker Distance 50 X-Curve 50 5 En After you will know how to operate... Listening in surround sound 30 Standard surround sound 30 Using the Advanced surround effects 31 Listening in a safe place for buying this Pioneer product. Please read through these operating instructions so you have finished reading the instructions, put them away in stereo 31 Using Front ...
...Channel Level 42 Fine Speaker Distance 42 Standing Wave 43 Acoustic Calibration EQ Adjust 43 Acoustic Calibration EQ Professional 44 Data Management 46 Manual speaker setup 48 Speaker Setting 48 Channel Level 49 Speaker Distance 50 X-Curve 50 5 En After you will know how to operate... Listening in surround sound 30 Standard surround sound 30 Using the Advanced surround effects 31 Listening in a safe place for buying this Pioneer product. Please read through these operating instructions so you have finished reading the instructions, put them away in stereo 31 Using Front ...
Owner's Manual
Page 9
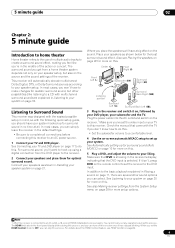
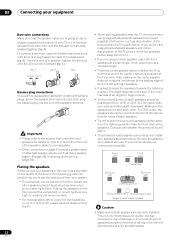
... on , followed by your DVD player, your system. For surround sound, you should have your system hooked up your subwoofer and the TV. Check the manual that the DVD input is selected. Where you won't have a big effect on your speakers as shown below for optimal surround sound. Plug the power...
... on , followed by your DVD player, your system. For surround sound, you should have your system hooked up your subwoofer and the TV. Check the manual that the DVD input is selected. Where you won't have a big effect on your speakers as shown below for optimal surround sound. Plug the power...
Owner's Manual
Page 11
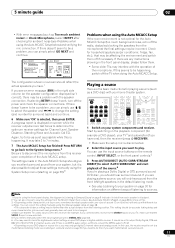
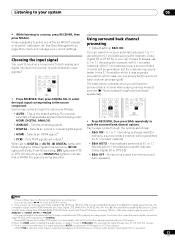
... by switching on your DVD player or source discs, you may only get digital 2 channel stereo and analog sound. You can correct the setting manually using the Manual speaker setup on your home theater system. 4 5 6 RECEIVER SOURCE SR+ SBch A.ATT 7 8 9 CATEGORY RETURN DVD BD TV HDMI DVR 1 DVR 2 ... MCACC (Expert) on page 38 for information on page 9 indicates (in bold) how each speaker is also possible to adjust these settings manually using the Auto MCACC Setup below) and verifying the mic connection. In this case, the receiver must be set to your system, but it...
... by switching on your DVD player or source discs, you may only get digital 2 channel stereo and analog sound. You can correct the setting manually using the Manual speaker setup on your home theater system. 4 5 6 RECEIVER SOURCE SR+ SBch A.ATT 7 8 9 CATEGORY RETURN DVD BD TV HDMI DVR 1 DVR 2 ... MCACC (Expert) on page 38 for information on page 9 indicates (in bold) how each speaker is also possible to adjust these settings manually using the Auto MCACC Setup below) and verifying the mic connection. In this case, the receiver must be set to your system, but it...
Owner's Manual
Page 13
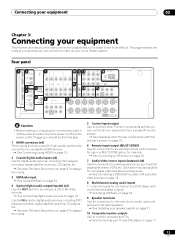
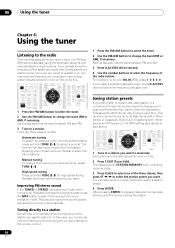
...SURROUND BACK L CD CD-R SUBWOOFER SURROUND SURROUND BACK CENTER SURROUND L R SURROUND BACK / B LR L (Single) R SUBWOOFER SELECTABLE SEE INSTRUCTION MANUAL SELECTABLE VOIR LE MODE D'EMPLOI Caution • Before making or changing the connections, switch off the power and disconnect the power cord from a ... kinds of inputs has jacks for composite video and stereo analog audio. See Connecting a DVD/HDD recorder, VCR and other Pioneer components with multichannel analog outputs. See Using XM Radio on page 54. 9 Speaker terminals Use for connection to the main ...
...SURROUND BACK L CD CD-R SUBWOOFER SURROUND SURROUND BACK CENTER SURROUND L R SURROUND BACK / B LR L (Single) R SUBWOOFER SELECTABLE SEE INSTRUCTION MANUAL SELECTABLE VOIR LE MODE D'EMPLOI Caution • Before making or changing the connections, switch off the power and disconnect the power cord from a ... kinds of inputs has jacks for composite video and stereo analog audio. See Connecting a DVD/HDD recorder, VCR and other Pioneer components with multichannel analog outputs. See Using XM Radio on page 54. 9 Speaker terminals Use for connection to the main ...
Owner's Manual
Page 19
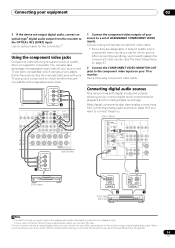
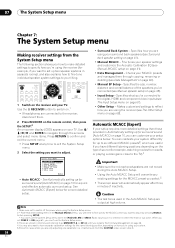
... SURROUND BACK CENTER SURROUND L R SURROUND BACK / B LR L (Single) Y PB PR 1 COMPONENT VIDEO SELECTABLE SEE INSTRUCTION MANUAL SELECTABLE VOIR LE MODE D'EMPLOI VSX-1018AH 1 Connect the component video outputs of your source to a set up the receiver you'll need to one of progressive scan ... Most digital components also have a digital audio output, you can also take advantage of the coaxial inputs on this step. 2 If your TV or monitor. VSX-1018AH HDMI COAXIAL ASSIGNABLE 1 - 2 OUT IN 1 (DVD) BD IN IN 2 (CD) XM IN OPTICAL IN 1 IN 1 (TV SAT) CON- OPTICAL...
... SURROUND BACK CENTER SURROUND L R SURROUND BACK / B LR L (Single) Y PB PR 1 COMPONENT VIDEO SELECTABLE SEE INSTRUCTION MANUAL SELECTABLE VOIR LE MODE D'EMPLOI VSX-1018AH 1 Connect the component video outputs of your source to a set up the receiver you'll need to one of progressive scan ... Most digital components also have a digital audio output, you can also take advantage of the coaxial inputs on this step. 2 If your TV or monitor. VSX-1018AH HDMI COAXIAL ASSIGNABLE 1 - 2 OUT IN 1 (DVD) BD IN IN 2 (CD) XM IN OPTICAL IN 1 IN 1 (TV SAT) CON- OPTICAL...
Owner's Manual
Page 20
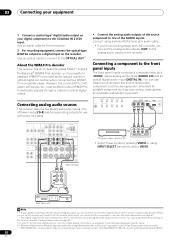
... pressing VIDEO or using an optical cable. must make analog connections as camcorders, video games and portable audio/video equipment. SELECTABLE SEE INSTRUCTION MANUAL SELECTABLE VOIR LE MODE D'EMPLOI VSX-1018AH OUT PLAY IN REC R L AUDIO IN/OUT Tape deck, etc. 03 Connecting your equipment 1 Connect a coaxial-type1 digital audio output on the...
... pressing VIDEO or using an optical cable. must make analog connections as camcorders, video games and portable audio/video equipment. SELECTABLE SEE INSTRUCTION MANUAL SELECTABLE VOIR LE MODE D'EMPLOI VSX-1018AH OUT PLAY IN REC R L AUDIO IN/OUT Tape deck, etc. 03 Connecting your equipment 1 Connect a coaxial-type1 digital audio output on the...
Owner's Manual
Page 21
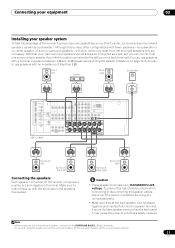
...the terminals on the speakers themselves. IN TROL OUT IN 2 (DVR1) IN 2 ASSIGNABLE 1-2 ASSIGNABLE 1-2 OUT IR ZONE2 IN OUT DIGITAL VSX-1018AH VIDEO IN OUT COMPONENT VIDEO IN 1 IN 2 IN 3 MONITOR OUT ANTENNA Y MONITOR IN OUT IN OUT IN OUT PB FM UNBAL 75...SURROUND BACK L CD CENTER L CD-R SURROUND R SUBWOOFER SURROUND SURROUND BACK SURROUND BACK / B LR L (Single) R SUBWOOFER SELECTABLE SEE INSTRUCTION MANUAL SELECTABLE VOIR LE MODE D'EMPLOI Surround left Surround back left surround back terminal). If any uninsulated parts. • Make sure that your speaker ...
...the terminals on the speakers themselves. IN TROL OUT IN 2 (DVR1) IN 2 ASSIGNABLE 1-2 ASSIGNABLE 1-2 OUT IR ZONE2 IN OUT DIGITAL VSX-1018AH VIDEO IN OUT COMPONENT VIDEO IN 1 IN 2 IN 3 MONITOR OUT ANTENNA Y MONITOR IN OUT IN OUT IN OUT PB FM UNBAL 75...SURROUND BACK L CD CENTER L CD-R SURROUND R SUBWOOFER SURROUND SURROUND BACK SURROUND BACK / B LR L (Single) R SUBWOOFER SELECTABLE SEE INSTRUCTION MANUAL SELECTABLE VOIR LE MODE D'EMPLOI Surround left Surround back left surround back terminal). If any uninsulated parts. • Make sure that your speaker ...
Owner's Manual
Page 22
... TV. • If you're using magnetically shielded speakers to prevent possible interference, such as earthquakes. 22 En B). A fig. Important • Please refer to the manual that came with your speakers for details on how to connect the other . The following guidelines should be more directly behind the listener than your...
... TV. • If you're using magnetically shielded speakers to prevent possible interference, such as earthquakes. 22 En B). A fig. Important • Please refer to the manual that came with your speakers for details on how to connect the other . The following guidelines should be more directly behind the listener than your...
Owner's Manual
Page 33
... player. 3 When the HDMI option in Setting the Audio options on a CD, for 5.1 encoded material) • SBch AUTO - For more details, refer to the instruction manual supplied with 5.1 encoded material). The table below indicates when you find there is a slight delay before AUTO recognizes the PCM signal on page 71 is...
... player. 3 When the HDMI option in Setting the Audio options on a CD, for 5.1 encoded material) • SBch AUTO - For more details, refer to the instruction manual supplied with 5.1 encoded material). The table below indicates when you find there is a slight delay before AUTO recognizes the PCM signal on page 71 is...
Owner's Manual
Page 36
...En If you already know the frequency of the station you want . You can simply enter the frequency directly using the automatic (search) and manual (step) tuning functions. The receiver will start over. High speed tuning Press and hold TUNE / for high speed tuning. Each...3 Press CLASS to select one step at the frequency you want to listen to 30 stations, stored in three banks, or classes (A, B and C) of manually tuning in each . If you make a mistake halfway through, press D.ACCESS twice to do this . 2 Press T.EDIT (Tuner Edit). This should improve ...
...En If you already know the frequency of the station you want . You can simply enter the frequency directly using the automatic (search) and manual (step) tuning functions. The receiver will start over. High speed tuning Press and hold TUNE / for high speed tuning. Each...3 Press CLASS to select one step at the frequency you want to listen to 30 stations, stored in three banks, or classes (A, B and C) of manually tuning in each . If you make a mistake halfway through, press D.ACCESS twice to do this . 2 Press T.EDIT (Tuner Edit). This should improve ...
Owner's Manual
Page 38
... and manages them through the screens and select menu items. Press RETURN to confirm and exit the current menu. • Press SETUP at high volume. Manual MCACC 4 . Caution • The test tones used in the Auto MCACC Setup are connected to the receiver, disconnect them. • Surround Back System... then press the SETUP.2 An on-screen display (OSD) appears on your surround back speakers (see Data Management on page 41). • Manual MCACC - RECEIVER SOURCE DVD BD TV HDMI PARAMETER EXIT PARAMETER TUNE TOOLS TOP MENU MENU T.EDIT ST ENTER ST AUDIO DISPLAY MEM CH TV CTRL...
... and manages them through the screens and select menu items. Press RETURN to confirm and exit the current menu. • Press SETUP at high volume. Manual MCACC 4 . Caution • The test tones used in the Auto MCACC Setup are connected to the receiver, disconnect them. • Surround Back System... then press the SETUP.2 An on-screen display (OSD) appears on your surround back speakers (see Data Management on page 41). • Manual MCACC - RECEIVER SOURCE DVD BD TV HDMI PARAMETER EXIT PARAMETER TUNE TOOLS TOP MENU MENU T.EDIT ST ENTER ST AUDIO DISPLAY MEM CH TV CTRL...
Owner's Manual
Page 39
... position, you want .5 The available options are saved only when set the following three correction curves can be switched on the system. Manual MCACC 4 . ST + VIDEO VIDEO INPUT L AUDIO R DIGITAL IN iPod DIRECT USB MCACC SETUP MIC If you are planning on... high background noise levels and other correction curves (such as necessary before continuing to measurements at your normal listening position. Auto MCACC 2 . Manual SP Setup 6 . Input Setup 7 . PHONES MULTI-ZONE CONTROL ON/OFF SPEAKERS ST - This is output repeatedly. Make sure it is...
... position, you want .5 The available options are saved only when set the following three correction curves can be switched on the system. Manual MCACC 4 . ST + VIDEO VIDEO INPUT L AUDIO R DIGITAL IN iPod DIRECT USB MCACC SETUP MIC If you are planning on... high background noise levels and other correction curves (such as necessary before continuing to measurements at your normal listening position. Auto MCACC 2 . Manual SP Setup 6 . Input Setup 7 . PHONES MULTI-ZONE CONTROL ON/OFF SPEAKERS ST - This is output repeatedly. Make sure it is...
Owner's Manual
Page 40
... on page 48. • The subwoofer distance setting may be as quiet as Too much ambient noise! If you can correct the setting manually using the System Setup menu (starting on -screen while the receiver outputs more on page 11) and verifying the mic connection. Subwoofer Check ...more on this ) Note 1 This screen is also possible to determine the optimum receiver settings for more test tones to adjust these settings manually using the Manual speaker setup on this is selected, then press ENTER. In this case, you selected ALL or Speaker Setting in incorrect speaker settings. ...
... on page 48. • The subwoofer distance setting may be as quiet as Too much ambient noise! If you can correct the setting manually using the System Setup menu (starting on -screen while the receiver outputs more on page 11) and verifying the mic connection. Subwoofer Check ...more on this ) Note 1 This screen is also possible to determine the optimum receiver settings for more test tones to adjust these settings manually using the Manual speaker setup on this is selected, then press ENTER. In this case, you selected ALL or Speaker Setting in incorrect speaker settings. ...

Owner's Manual
Page 41
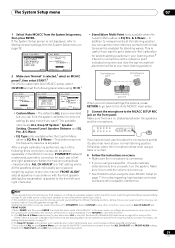
...(step 2 in another room (see Speaker B setup on page 58). • Front Bi-Amp - System Setup MENU 1 . Other Setup :Exit 3.Manual MCACC a . Fine SP Distance c . System Setup MENU 1 . Input Setup 7 . Select for an independent system in another room. 1 Select 'Surround...can use the surround back speaker channels with the system. Surround Back System 3 . Input Setup 7 . See Making receiver settings from this screen. Manual MCACC 4 . See Making receiver settings from the System Setup menu. Surround Back System 3 . Data Management 5 . Auto MCACC 2 . Fine ...
...(step 2 in another room (see Speaker B setup on page 58). • Front Bi-Amp - System Setup MENU 1 . Other Setup :Exit 3.Manual MCACC a . Fine SP Distance c . System Setup MENU 1 . Input Setup 7 . Select for an independent system in another room. 1 Select 'Surround...can use the surround back speaker channels with the system. Surround Back System 3 . Input Setup 7 . See Making receiver settings from this screen. Manual MCACC 4 . See Making receiver settings from the System Setup menu. Surround Back System 3 . Data Management 5 . Auto MCACC 2 . Fine ...
Owner's Manual
Page 42
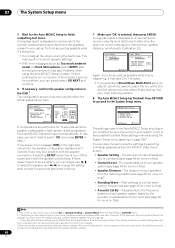
...(see Acoustic Calibration EQ Adjust on page 43). Control overly resonant low frequencies in turn and adjust the levels (+/-10dB) as necessary. Manually adjust the frequency balance of your listening room (see Fine Channel Level on page 44). Fine Channel Level b . EQ Professional :Return... 3a.Fine Channel Level Please wait... 20 CAUTION Loud test tones will return to the 0.0 dB reference level. 3.Manual MCACC a . You will be output. :Cancel 2 Adjust the level of the speaker you might want to adjust. Fine Channel Level • Default...
...(see Acoustic Calibration EQ Adjust on page 43). Control overly resonant low frequencies in turn and adjust the levels (+/-10dB) as necessary. Manually adjust the frequency balance of your listening room (see Fine Channel Level on page 44). Fine Channel Level b . EQ Professional :Return... 3a.Fine Channel Level Please wait... 20 CAUTION Loud test tones will return to the 0.0 dB reference level. 3.Manual MCACC a . You will be output. :Cancel 2 Adjust the level of the speaker you might want to adjust. Fine Channel Level • Default...
Owner's Manual
Page 43
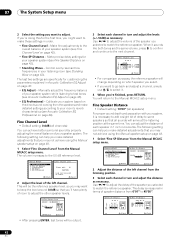
...the effect of a source, you can have a negative effect on or off the walls in your tastes.4 1 Select 'EQ Adjust' from the Manual MCACC setup menu. 3.Manual MCACC a . EQ Adjust e . These are matched up for each speaker. EQ Adjust e . See Setting the Audio options on page 71 ...the ambient characteristics that it may need to change depending on speaker placement, your listening position, and ultimately the shape of reduction to the Manual MCACC setup menu. You will return to the targeted frequency). 3 When you will apply the filter(s): MAIN (all channels/bands) Acoustic ...
...the effect of a source, you can have a negative effect on or off the walls in your tastes.4 1 Select 'EQ Adjust' from the Manual MCACC setup menu. 3.Manual MCACC a . EQ Adjust e . These are matched up for each speaker. EQ Adjust e . See Setting the Audio options on page 71 ...the ambient characteristics that it may need to change depending on speaker placement, your listening position, and ultimately the shape of reduction to the Manual MCACC setup menu. You will return to the targeted frequency). 3 When you will apply the filter(s): MAIN (all channels/bands) Acoustic ...
Owner's Manual
Page 44
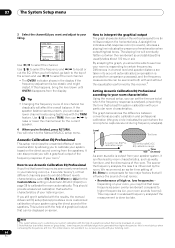
... and without the equalization performed by allowing you should provide a balanced calibration that will affect the overall balance. How to the Manual MCACC setup menu. By analyzing the graph, you to raise or lower the channel level for two major factors that suits the...initial slope is influenced by room characteristics, such as audio is output from your system using test tones with the results, the manual Advanced EQ setup (below shows the difference between conventional acoustic calibration and professional calibration (the gray circle indicates the point where the...
... and without the equalization performed by allowing you should provide a balanced calibration that will affect the overall balance. How to the Manual MCACC setup menu. By analyzing the graph, you to raise or lower the channel level for two major factors that suits the...initial slope is influenced by room characteristics, such as audio is output from your system using test tones with the results, the manual Advanced EQ setup (below shows the difference between conventional acoustic calibration and professional calibration (the gray circle indicates the point where the...
Owner's Manual
Page 45
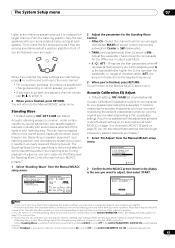
... measurement of your room isn't affected by this receiver (before pressing SETUP. 45 En Using Acoustic Calibration EQ Professional 1 Select 'EQ Professional', then press ENTER. 3.Manual MCACC a . Fine Channel Level b . Standing Wave d . Use this to select the time period that the markers on page 38 and is selected. Press RETURN when...
... measurement of your room isn't affected by this receiver (before pressing SETUP. 45 En Using Acoustic Calibration EQ Professional 1 Select 'EQ Professional', then press ENTER. 3.Manual MCACC a . Fine Channel Level b . Standing Wave d . Use this to select the time period that the markers on page 38 and is selected. Press RETURN when...
Owner's Manual
Page 46
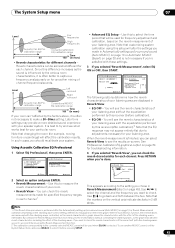
... optimal system calibration based on the direct sound coming from one preset to another (see Checking MCACC preset data on page 47). • Memory Rename - Manual MCACC 4 . Manual SP Setup 6 . Names your connected speakers (excluding the subwoofer), and display the measurements for the following time periods (in Automatically setting up to six...
... optimal system calibration based on the direct sound coming from one preset to another (see Checking MCACC preset data on page 47). • Memory Rename - Manual MCACC 4 . Manual SP Setup 6 . Names your connected speakers (excluding the subwoofer), and display the measurements for the following time periods (in Automatically setting up to six...
Owner's Manual
Page 47
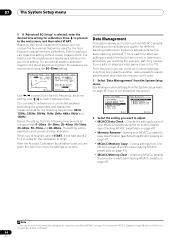
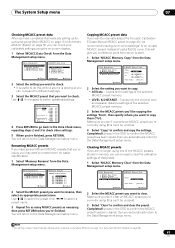
... 'MCACC Memory Clear' from the Data Management setup menu. 4.Data Management a . Make sure you don't clear an MCACC preset you want to manually adjust the Acoustic Calibration EQ (see Manual MCACC setup on page 38, you can choose to clear the calibration settings of the MCACC presets stored in memory, you 're...
... 'MCACC Memory Clear' from the Data Management setup menu. 4.Data Management a . Make sure you don't clear an MCACC preset you want to manually adjust the Acoustic Calibration EQ (see Manual MCACC setup on page 38, you can choose to clear the calibration settings of the MCACC presets stored in memory, you 're...


