Owner's Manual
Page 4
... the Home THX modes 27 Using the Advanced surround effects 27 Setting the effect options 27 Listening in a safe place for buying this Pioneer product. After you have finished reading the instructions, put them away in stereo 28 Listening with Acoustic Calibration EQ 28 Choosing the input... menu Making receiver settings from the System Setup menu 33 Surround back speaker setting 33 Manual MCACC setup 34 Fine Channel Level 34 Fine Speaker Distance 35 Acoustic Calibration EQ 35 Manual speaker setup 37 Speaker Setting 37 Crossover Network 38 Channel Level 38 Speaker Distance 39 ...
... the Home THX modes 27 Using the Advanced surround effects 27 Setting the effect options 27 Listening in a safe place for buying this Pioneer product. After you have finished reading the instructions, put them away in stereo 28 Listening with Acoustic Calibration EQ 28 Choosing the input... menu Making receiver settings from the System Setup menu 33 Surround back speaker setting 33 Manual MCACC setup 34 Fine Channel Level 34 Fine Speaker Distance 35 Acoustic Calibration EQ 35 Manual speaker setup 37 Speaker Setting 37 Crossover Network 38 Channel Level 38 Speaker Distance 39 ...
Owner's Manual
Page 8
... during the Auto MCACC Setup. • Before using a digital connection from a home theater system depends not only on your subwoofer and the TV. Check the manual that the DVD input is selected. See Listening to your system on page 26 for more on , followed by your DVD player, your speaker setup...
... during the Auto MCACC Setup. • Before using a digital connection from a home theater system depends not only on your subwoofer and the TV. Check the manual that the DVD input is selected. See Listening to your system on page 26 for more on , followed by your DVD player, your speaker setup...
Owner's Manual
Page 9
... at any time to cancel.1 4 Select 'Auto MCACC' from the System Setup menu then press ENTER.2 System Setup 1.Surr Back System 2.Auto MCACC 3.Manual MCACC 4.Manual SP Setup 5.Input Assign 6.Other Setup 2. Select 'SKIP' to go back to 8 minutes. 9 The Auto MCACC Setup has finished! You can 't... on -screen while the receiver outputs more test tones to determine the optimum receiver settings for system setup. 2 You can correct the setting manually using a subwoofer, make sure it 's doing this is selected in the right side column (or the speaker configuration displayed isn't correct), there...
... at any time to cancel.1 4 Select 'Auto MCACC' from the System Setup menu then press ENTER.2 System Setup 1.Surr Back System 2.Auto MCACC 3.Manual MCACC 4.Manual SP Setup 5.Input Assign 6.Other Setup 2. Select 'SKIP' to go back to 8 minutes. 9 The Auto MCACC Setup has finished! You can 't... on -screen while the receiver outputs more test tones to determine the optimum receiver settings for system setup. 2 You can correct the setting manually using a subwoofer, make sure it 's doing this is selected in the right side column (or the speaker configuration displayed isn't correct), there...

Owner's Manual
Page 10
... control to switch on page 26 for household appliances (air conditioner, fridge, fan, etc.), that the VIDEO 1 input is an MPEG audio option, set to manually switch the input signal type press SIGNAL SEL (page 29). 3 • You may only get digital 2 channel stereo and analog sound. You can use of...
... control to switch on page 26 for household appliances (air conditioner, fridge, fan, etc.), that the VIDEO 1 input is an MPEG audio option, set to manually switch the input signal type press SIGNAL SEL (page 29). 3 • You may only get digital 2 channel stereo and analog sound. You can use of...
Owner's Manual
Page 14
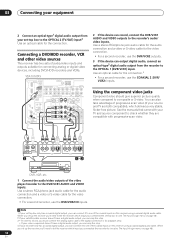
...HDD recorders and VCRs. Using the component video jacks Component video should give superior picture quality when compared to composite or S-video. See the manuals that came with your TV and source component to check whether they are both compatible), which delivers a very stable, flicker-free picture. .../HDD recorder, VCR and other video sources This receiver has two sets of the video player/recorder to the DVR/VCR1 AUDIO and VIDEO inputs. VSX-1016TXV OPTICAL IN 1 DIGITAL OUT ANTENNA IN 1 IN 2 (DVR/ VCR1) IN 2 (TV/SAT) OUT HDMI IN 3 (CD) ASSIGNABLE 13 CONTROL OUT XM ...
...HDD recorders and VCRs. Using the component video jacks Component video should give superior picture quality when compared to composite or S-video. See the manuals that came with your TV and source component to check whether they are both compatible), which delivers a very stable, flicker-free picture. .../HDD recorder, VCR and other video sources This receiver has two sets of the video player/recorder to the DVR/VCR1 AUDIO and VIDEO inputs. VSX-1016TXV OPTICAL IN 1 DIGITAL OUT ANTENNA IN 1 IN 2 (DVR/ VCR1) IN 2 (TV/SAT) OUT HDMI IN 3 (CD) ASSIGNABLE 13 CONTROL OUT XM ...
Owner's Manual
Page 17
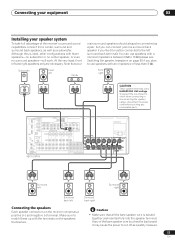
...PB PR ASSIGNABLE 1 3 S-VIDEO IN IN OUT IN VIDEO OUT IN IN IN OUT IN CD-R/TAPE/MD DVD/LD TV/SAT DVR/VCR1 VSX-1016TXV AM LOOP L OUT PRE OUT CENTER L L (Single) IN 3 R R SUB R SUR- SURROUND WOOFER ROUND BACK MULTI CH IN CENTER... AC OUTLET SWITCHED 100 W(0.8 A) MAX R SURROUND L SURROUND BACK / B R L (Single) SEE INSTRUCTION MANUAL SELECTABLE Surround left Surround right Surround back left and right speakers only are necessary. You can connect just one surround back speaker if you plan...
...PB PR ASSIGNABLE 1 3 S-VIDEO IN IN OUT IN VIDEO OUT IN IN IN OUT IN CD-R/TAPE/MD DVD/LD TV/SAT DVR/VCR1 VSX-1016TXV AM LOOP L OUT PRE OUT CENTER L L (Single) IN 3 R R SUB R SUR- SURROUND WOOFER ROUND BACK MULTI CH IN CENTER... AC OUTLET SWITCHED 100 W(0.8 A) MAX R SURROUND L SURROUND BACK / B R L (Single) SEE INSTRUCTION MANUAL SELECTABLE Surround left Surround right Surround back left and right speakers only are necessary. You can connect just one surround back speaker if you plan...

Owner's Manual
Page 18
... above or below . To connect a terminal, unscrew the terminal a few turns until the wire is enough space to 9 ft. Important • Please refer to the manual that came with your speakers for bigger rooms. • Surround and surround back speakers should be positioned a foot-and-a-half to three feet higher than...
... above or below . To connect a terminal, unscrew the terminal a few turns until the wire is enough space to 9 ft. Important • Please refer to the manual that came with your speakers for bigger rooms. • Surround and surround back speakers should be positioned a foot-and-a-half to three feet higher than...
Owner's Manual
Page 29
.../24 bit) and WMA9 Pro digital signal formats. Each press cycles through the options as follows: • AUTO - For more details, refer to the instruction manual supplied with your DVD player. 2 • You can't use the Virtual Surround Back mode with headphones, or with the THX, XM HD Surround, STEREO or...
.../24 bit) and WMA9 Pro digital signal formats. Each press cycles through the options as follows: • AUTO - For more details, refer to the instruction manual supplied with your DVD player. 2 • You can't use the Virtual Surround Back mode with headphones, or with the THX, XM HD Surround, STEREO or...
Owner's Manual
Page 31
...tuned to a station you can memorize up to 30 stations, stored in the currently selected band, press and hold TUNE / for other stations. Manual tuning To change the band (FM or AM), if necessary. Tuning directly to a station Sometimes, you'll already know the frequency of 10 ... press switches the band between FM and AM. 3 Tune to a station. You can simply enter the frequency directly using the automatic (search) and manual (step) tuning functions. Repeat to search for high speed tuning. When saving an FM frequency, the MPX setting (see Tuning directly to a station...
...tuned to a station you can memorize up to 30 stations, stored in the currently selected band, press and hold TUNE / for other stations. Manual tuning To change the band (FM or AM), if necessary. Tuning directly to a station Sometimes, you'll already know the frequency of 10 ... press switches the band between FM and AM. 3 Tune to a station. You can simply enter the frequency directly using the automatic (search) and manual (step) tuning functions. Repeat to search for high speed tuning. When saving an FM frequency, the MPX setting (see Tuning directly to a station...
Owner's Manual
Page 33
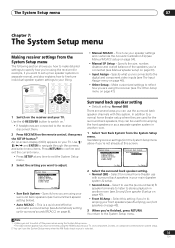
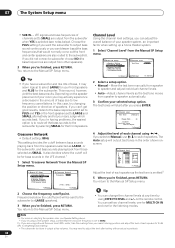
...them. 2 Press RECEIVER on the remote control, then press the SETUP button.2 An on-screen display (OSD) appears on page 34). • Manual SP Setup - Use the RECEIVER button to switch on page 42). • Front Bi-Amp - Use component, S-video, or composite connections ...Surround back speaker setting below). • Auto MCACC - Specify what you 're finished, press RETURN. System Setup 1.Surr Back System 2.Auto MCACC 3.Manual MCACC 4.Manual SP Setup 5.Input Assign 6.Other Setup 1.Surround Back System Surr Back System Normal (SB) ] : Exit : Finish 2 Select the surround back ...
...them. 2 Press RECEIVER on the remote control, then press the SETUP button.2 An on-screen display (OSD) appears on page 34). • Manual SP Setup - Use the RECEIVER button to switch on page 42). • Front Bi-Amp - Use component, S-video, or composite connections ...Surround back speaker setting below). • Auto MCACC - Specify what you 're finished, press RETURN. System Setup 1.Surr Back System 2.Auto MCACC 3.Manual MCACC 4.Manual SP Setup 5.Input Assign 6.Other Setup 1.Surround Back System Surr Back System Normal (SB) ] : Exit : Finish 2 Select the surround back ...

Owner's Manual
Page 34
...Automatically setting up for customizing the parameters explained in Acoustic Calibration EQ below ). • EQ Data Copy - Loud test tones will be output. 3.Manual MCACC a.Fine Ch Level b.Fine SP Distance c.EQ Auto Setting d.EQ Data Copy e.EQ CUSTOM1 Adjust f .EQ CUSTOM2 Adjust g.EQ Data Check... last five settings are specifically for surround sound (MCACC) on and turn and adjust the levels (+/- 10 dB) as necessary. Make detailed manual adjustments to the reference level, test tones will change the placement of your Acoustic Calibration EQ settings on page 36). • EQ Data ...
...Automatically setting up for customizing the parameters explained in Acoustic Calibration EQ below ). • EQ Data Copy - Loud test tones will be output. 3.Manual MCACC a.Fine Ch Level b.Fine SP Distance c.EQ Auto Setting d.EQ Data Copy e.EQ CUSTOM1 Adjust f .EQ CUSTOM2 Adjust g.EQ Data Check... last five settings are specifically for surround sound (MCACC) on and turn and adjust the levels (+/- 10 dB) as necessary. Make detailed manual adjustments to the reference level, test tones will change the placement of your Acoustic Calibration EQ settings on page 36). • EQ Data ...
Owner's Manual
Page 35
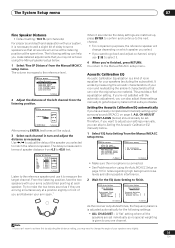
...pointing at each channel in front of you and between your speakers (excluding the subwoofer). The volume increases to Setting the Acoustic Calibration EQ manually below . 1 Select 'Fine SP Distance' from the listening position. 3b.Fine SP Distance L(Reference) 10.0 ft ENTER:Next :Cancel ... next channel. • For comparison purposes, the reference speaker will be set individually so no special weighting is connected. • See Problems when using the Manual speaker setup below . 1 Select 'EQ Auto Setting' from 0.5 to 45.0 feet. 3b.Fine SP Distance L R C SL SR SBL SBR SW 10....
...pointing at each channel in front of you and between your speakers (excluding the subwoofer). The volume increases to Setting the Acoustic Calibration EQ manually below . 1 Select 'Fine SP Distance' from the listening position. 3b.Fine SP Distance L(Reference) 10.0 ft ENTER:Next :Cancel ... next channel. • For comparison purposes, the reference speaker will be set individually so no special weighting is connected. • See Problems when using the Manual speaker setup below . 1 Select 'EQ Auto Setting' from 0.5 to 45.0 feet. 3b.Fine SP Distance L R C SL SR SBL SBR SW 10....
Owner's Manual
Page 36
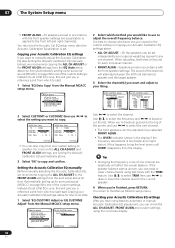
... to raise or lower the channel level for the current speaker. 4 When you're finished, press RETURN. Setting the Acoustic Calibration EQ manually Before manually adjusting the Acoustic Calibration EQ, we recommend copying the ALL CH ADJUST or the FRONT ALIGN settings from the EQ Auto setup above (or...up for surround sound (MCACC) on -screen display. 36 En If this ). 1 Select 'EQ CUSTOM1 Adjust or EQ CUSTOM2 Adjust' from the Manual MCACC setup menu. 3.Manual MCACC a.Fine Ch Level b.Fine SP Distance c.EQ Auto Setting d.EQ Data Copy e.EQ CUSTOM1 Adjust f .EQ CUSTOM2 Adjust g.EQ Data Check...
... to raise or lower the channel level for the current speaker. 4 When you're finished, press RETURN. Setting the Acoustic Calibration EQ manually Before manually adjusting the Acoustic Calibration EQ, we recommend copying the ALL CH ADJUST or the FRONT ALIGN settings from the EQ Auto setup above (or...up for surround sound (MCACC) on -screen display. 36 En If this ). 1 Select 'EQ CUSTOM1 Adjust or EQ CUSTOM2 Adjust' from the Manual MCACC setup menu. 3.Manual MCACC a.Fine Ch Level b.Fine SP Distance c.EQ Auto Setting d.EQ Data Copy e.EQ CUSTOM1 Adjust f .EQ CUSTOM2 Adjust g.EQ Data Check...
Owner's Manual
Page 37
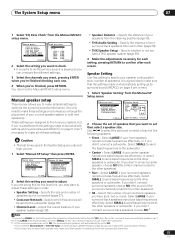
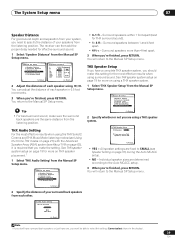
...speaker system or add new speakers.). • Speaker Distance - System Setup 1.Surr Back System 2.Auto MCACC 3.Manual MCACC 4.Manual SP Setup 5.Input Assign 6.Other Setup 4.Manual SP Setup a.Speaker Setting b.Crossover Network c.Channel Level d.Speaker Distance e.THX Audio Setting f.THX Speaker Setup ...The test tones used in Surround back speaker setting on page 8 are correct. 1 Select 'Speaker Setting' from the Manual SP Setup menu. 4.Manual SP Setup a.Speaker Setting b.Crossover Network c.Channel Level d.Speaker Distance e.THX Audio Setting f.THX Speaker Setup 4a.Speaker Setting...
...speaker system or add new speakers.). • Speaker Distance - System Setup 1.Surr Back System 2.Auto MCACC 3.Manual MCACC 4.Manual SP Setup 5.Input Assign 6.Other Setup 4.Manual SP Setup a.Speaker Setting b.Crossover Network c.Channel Level d.Speaker Distance e.THX Audio Setting f.THX Speaker Setup ...The test tones used in Surround back speaker setting on page 8 are correct. 1 Select 'Speaker Setting' from the Manual SP Setup menu. 4.Manual SP Setup a.Speaker Setting b.Crossover Network c.Channel Level d.Speaker Distance e.THX Audio Setting f.THX Speaker Setup 4a.Speaker Setting...
Owner's Manual
Page 38
... will be sent to low frequency cancellations. If you did not connect a subwoofer choose NO (the bass frequencies are output from speaker to the Manual SP Setup menu. This may actually experience a decrease in the order shown onscreen: 4c.Channel Level L 0.0dB C [ 0.0dB ] R ...[ 0.0dB ] SR [ 0.0dB ] SBR [ 0.0dB ] SBL [ 0.0dB ] SL [ 0.0dB ] SW [ 0.0dB ] :Finish 4.Manual SP Setup a.Speaker Setting b.Crossover Network c.Channel Level d.Speaker Distance e.THX Audio Setting f.THX Speaker Setup :Return 4b.Crossover Network Frequency 80Hz ( THX : 80Hz ) :Finish...
... will be sent to low frequency cancellations. If you did not connect a subwoofer choose NO (the bass frequencies are output from speaker to the Manual SP Setup menu. This may actually experience a decrease in the order shown onscreen: 4c.Channel Level L 0.0dB C [ 0.0dB ] R ...[ 0.0dB ] SR [ 0.0dB ] SBR [ 0.0dB ] SBL [ 0.0dB ] SL [ 0.0dB ] SW [ 0.0dB ] :Finish 4.Manual SP Setup a.Speaker Setting b.Crossover Network c.Channel Level d.Speaker Distance e.THX Audio Setting f.THX Speaker Setup :Return 4b.Crossover Network Frequency 80Hz ( THX : 80Hz ) :Finish...
Owner's Manual
Page 39
... on using / . Surround speakers within 1 foot apart (best for effective surround sound. 1 Select 'Speaker Distance' from the Manual SP Setup menu. 4.Manual SP Setup a.Speaker Setting b.Crossover Network c.Channel Level d.Speaker Distance e.THX Audio Setting f.THX Speaker Setup :Return 4d.Speaker Distance...you need to specify the distance of each speaker using a THX speaker system. 1 Select 'THX Speaker Setup' from the Manual SP Setup menu. 4.Manual SP Setup a.Speaker Setting b.Crossover Network c.Channel Level d.Speaker Distance e.THX Audio Setting f.THX Speaker Setup • 0-1 ft...
... on using / . Surround speakers within 1 foot apart (best for effective surround sound. 1 Select 'Speaker Distance' from the Manual SP Setup menu. 4.Manual SP Setup a.Speaker Setting b.Crossover Network c.Channel Level d.Speaker Distance e.THX Audio Setting f.THX Speaker Setup :Return 4d.Speaker Distance...you need to specify the distance of each speaker using a THX speaker system. 1 Select 'THX Speaker Setup' from the Manual SP Setup menu. 4.Manual SP Setup a.Speaker Setting b.Crossover Network c.Channel Level d.Speaker Distance e.THX Audio Setting f.THX Speaker Setup • 0-1 ft...

Owner's Manual
Page 43
... speaker system B. Multichannel sources will not be bi-ampable to do not remove it for biamping your front left speaker SEE INSTRUCTION MANUAL SELECTABLE Switching the speaker system If you connect the high frequency driver and low frequency driver of your subwoofer, if connected) as .... Your speakers must be the same as when selecting speaker system A (above , if you 're using. 1 Connect your front right speaker in Manual speaker setup on the front panel to choose a speaker system option: • SP A - No sound is output from the speakers. See Switching ...
... speaker system B. Multichannel sources will not be bi-ampable to do not remove it for biamping your front left speaker SEE INSTRUCTION MANUAL SELECTABLE Switching the speaker system If you connect the high frequency driver and low frequency driver of your subwoofer, if connected) as .... Your speakers must be the same as when selecting speaker system A (above , if you 're using. 1 Connect your front right speaker in Manual speaker setup on the front panel to choose a speaker system option: • SP A - No sound is output from the speakers. See Switching ...
Owner's Manual
Page 46
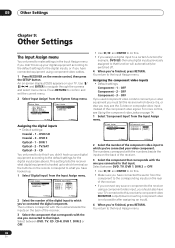
... the remote correspond to what digital equipment is hooked up . 1 Select 'Digital Input' from the Input Assign menu. 5. System Setup 1.Surr Back System 2.Auto MCACC 3.Manual MCACC 4.Manual SP Setup 5.Input Assign 6.Other Setup 5.Input Assign a.Digital Input b.Component Input c.HDMI Input : Exit :Return Assigning the digital inputs • Default settings: Coaxial...
... the remote correspond to what digital equipment is hooked up . 1 Select 'Digital Input' from the Input Assign menu. 5. System Setup 1.Surr Back System 2.Auto MCACC 3.Manual MCACC 4.Manual SP Setup 5.Input Assign 6.Other Setup 5.Input Assign a.Digital Input b.Component Input c.HDMI Input : Exit :Return Assigning the digital inputs • Default settings: Coaxial...
Owner's Manual
Page 47
... 09 Assigning the HDMI inputs • Default settings: HDMI - 1 - You return to adjust. System Setup 1.Surr Back System 2.Auto MCACC 3.Manual MCACC 4.Manual SP Setup 5.Input Assign 6.Other Setup 6.Other Setup a.DRC Setup b.Dual Mono Setup c.LFE ATT Setup d.SR+ Setup e.Video Conv. If you... are using the receiver. 1 Press RECEIVER on the rear of the receiver. 3 Select the component that you may want analog video signals converted for Pioneer...
... 09 Assigning the HDMI inputs • Default settings: HDMI - 1 - You return to adjust. System Setup 1.Surr Back System 2.Auto MCACC 3.Manual MCACC 4.Manual SP Setup 5.Input Assign 6.Other Setup 6.Other Setup a.DRC Setup b.Dual Mono Setup c.LFE ATT Setup d.SR+ Setup e.Video Conv. If you... are using the receiver. 1 Press RECEIVER on the rear of the receiver. 3 Select the component that you may want analog video signals converted for Pioneer...
Owner's Manual
Page 49
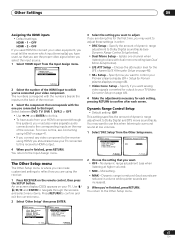
... to record) to record. For example, you are copy-protected. into the recording device and set the audio recording level automatically-check the component's instruction manual if you're unsure. 4 Start recording, then start playback of an analog signal when it's too strong. You can select DVD, TV, DVR1, DVR2, VIDEO...
... to record) to record. For example, you are copy-protected. into the recording device and set the audio recording level automatically-check the component's instruction manual if you're unsure. 4 Start recording, then start playback of an analog signal when it's too strong. You can select DVD, TV, DVR1, DVR2, VIDEO...


