Owner's Manual
Page 4
... 20 Speaker terminals 20 Hints on speaker placement 21 THX speaker system setup 22 AC outlet 22 Power cord caution 23 Operating other Pioneer components 23 04 Controls and displays Front panel 24 Display 26 Remote control 28 Operating range of remote control unit 30 05 Listening... menu Making receiver settings from the System Setup menu 40 Surround back speaker setting 40 Manual MCACC speaker setup 41 Fine Channel Level 42 Fine Channel Distance 42 Acoustic Calibration EQ 43 Manual speaker setup 45 Speaker Setting 46 Crossover Network 47 Channel Level 47 Speaker Distance 48...
... 20 Speaker terminals 20 Hints on speaker placement 21 THX speaker system setup 22 AC outlet 22 Power cord caution 23 Operating other Pioneer components 23 04 Controls and displays Front panel 24 Display 26 Remote control 28 Operating range of remote control unit 30 05 Listening... menu Making receiver settings from the System Setup menu 40 Surround back speaker setting 40 Manual MCACC speaker setup 41 Fine Channel Level 42 Fine Channel Distance 42 Acoustic Calibration EQ 43 Manual speaker setup 45 Speaker Setting 46 Crossover Network 47 Channel Level 47 Speaker Distance 48...
Owner's Manual
Page 10
... setting up your system. In addition to your DVD (or other sound options you place the speakers will have a big effect on this . Check the manual that came with the proper DVD settings, refer to the DVD input. Where you can select. See Hints on speaker placement on page 21 for...
... setting up your system. In addition to your DVD (or other sound options you place the speakers will have a big effect on this . Check the manual that came with the proper DVD settings, refer to the DVD input. Where you can select. See Hints on speaker placement on page 21 for...
Owner's Manual
Page 11
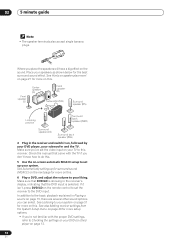
... up the microphone provided with your particular room. Important • Make sure the microphone and speakers are no obstacles between the speakers and the microphone. MANUAL MCACC ] [ 4. Input Assign ] [ 6. After you do this before continuing to exit the current menu. • Press SYSTEM SETUP at high volume. Make sure you have... the microphone so that it to the MCACC SETUP MIC jack on your normal listening position. Otherwise, place the microphone at your TV. System Setup [ 1. Manual SP Setup ] [ 5.
... up the microphone provided with your particular room. Important • Make sure the microphone and speakers are no obstacles between the speakers and the microphone. MANUAL MCACC ] [ 4. Input Assign ] [ 6. After you do this before continuing to exit the current menu. • Press SYSTEM SETUP at high volume. Make sure you have... the microphone so that it to the MCACC SETUP MIC jack on your normal listening position. Otherwise, place the microphone at your TV. System Setup [ 1. Manual SP Setup ] [ 5.

Owner's Manual
Page 12
... an error message (ERR) in the right side column, there may be as quiet as possible while it is also possible to adjust these settings manually using THX Certified speakers, confirm that all speakers are set to finish outputting test tones. When you 're using a subwoofer, it is on this ) •...
... an error message (ERR) in the right side column, there may be as quiet as possible while it is also possible to adjust these settings manually using THX Certified speakers, confirm that all speakers are set to finish outputting test tones. When you 're using a subwoofer, it is on this ) •...

Owner's Manual
Page 13
... there are any time, the receiver automatically exits and no settings will be changed. • Remember to play. You can correct the setting manually using the Auto MCACC Setup If the room environment is set to output Dolby Digital, DTS and 88.2/96kHz PCM (2 channel) audio. Note ...the microphone) the final settings may be set to output multichannel analog audio. This setting should hear surround sound. Other problems when using the Manual speaker setup on different ways of listening to sources. 5 Use the volume control (front panel or remote) to adjust the volume level. &#...
... there are any time, the receiver automatically exits and no settings will be changed. • Remember to play. You can correct the setting manually using the Auto MCACC Setup If the room environment is set to output Dolby Digital, DTS and 88.2/96kHz PCM (2 channel) audio. Note ...the microphone) the final settings may be set to output multichannel analog audio. This setting should hear surround sound. Other problems when using the Manual speaker setup on different ways of listening to sources. 5 Use the volume control (front panel or remote) to adjust the volume level. &#...
Owner's Manual
Page 21
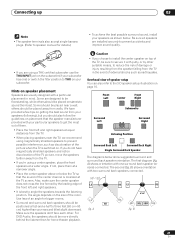
... TV picture, move the speakers farther away from walls. Connecting up 03 Note • The speaker terminals also accept single banana plugs. (Refer to speaker manual for details.) • To achieve the best possible surround sound, install your speakers as earthquakes. If you do not have provided a few tips on getting...
... TV picture, move the speakers farther away from walls. Connecting up 03 Note • The speaker terminals also accept single banana plugs. (Refer to speaker manual for details.) • To achieve the best possible surround sound, install your speakers as earthquakes. If you do not have provided a few tips on getting...
Owner's Manual
Page 35
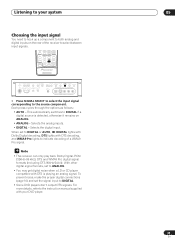
... on ANALOG. • ANALOG - With other digital signal formats, set the signal input to select between input signals. For more details, refer to the instruction manual supplied with DTS decoding, and WMA9 Pro lights to indicate decoding of the receiver to DIGITAL. • Some DVD players don't output DTS signals. Selects...
... on ANALOG. • ANALOG - With other digital signal formats, set the signal input to select between input signals. For more details, refer to the instruction manual supplied with DTS decoding, and WMA9 Pro lights to indicate decoding of the receiver to DIGITAL. • Some DVD players don't output DTS signals. Selects...

Owner's Manual
Page 40
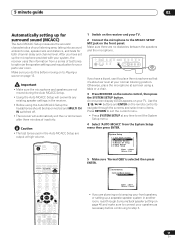
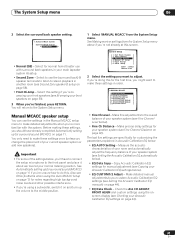
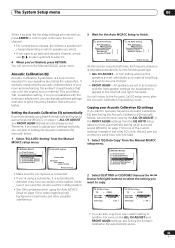
...several ways you can be used for the surround back speakers, they are using the receiver (see Surround back speaker setting below ). • Manual SP Setup - System Setup [ 1. AUTO MCACC ] [ 3. Fine tune your speaker settings and customize the Acoustic Calibration EQ (see Automatically setting... System' from the System Setup menu. Make customized settings to reflect how you are used for surround sound (MCACC) on page 11). • MANUAL MCACC - MANUAL MCACC ] [ 4. Input Assign ] [ 6. An on-screen display (OSD) appears on your TV. In addition to a normal home theater ...
...several ways you can be used for the surround back speakers, they are using the receiver (see Surround back speaker setting below ). • Manual SP Setup - System Setup [ 1. AUTO MCACC ] [ 3. Fine tune your speaker settings and customize the Acoustic Calibration EQ (see Automatically setting... System' from the System Setup menu. Make customized settings to reflect how you are used for surround sound (MCACC) on page 11). • MANUAL MCACC - MANUAL MCACC ] [ 4. Input Assign ] [ 6. An on-screen display (OSD) appears on your TV. In addition to a normal home theater ...
Owner's Manual
Page 41
...for your main (speaker system A) setup. • Second Zone - Surround Back System Surround Back Output [ Normal(SB) ] • Normal (SB) - MANUAL MCACC ] [ 4. Input Assign ] [ 6. You will return to make these settings in another room (see Setting the Acoustic Calibration EQ automatically below ). ...• EQ CUSTOM1/2 Adjust - You only need to the System Setup menu. 1 Select 'MANUAL MCACC' from the System Setup menu above if you're not already at your custom Acoustic Calibration EQ settings (see Fine Channel Level...
...for your main (speaker system A) setup. • Second Zone - Surround Back System Surround Back Output [ Normal(SB) ] • Normal (SB) - MANUAL MCACC ] [ 4. Input Assign ] [ 6. You will return to make these settings in another room (see Setting the Acoustic Calibration EQ automatically below ). ...• EQ CUSTOM1/2 Adjust - You only need to the System Setup menu. 1 Select 'MANUAL MCACC' from the System Setup menu above if you're not already at your custom Acoustic Calibration EQ settings (see Fine Channel Level...
Owner's Manual
Page 42
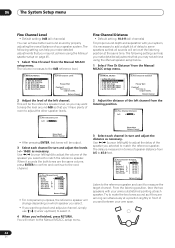
...0dB] Surr Back R [ 0.0dB] Sub Woofer [ 0.0dB] Return:Finish • For comparison purposes, the reference speaker will return to the Manual MCACC setup menu. Fine Channel Distance • Default setting: 10.0 ft (all channels) You can achieve better surround sound by properly adjusting the ....0ft ] Enter:Next Return:Cancel • After pressing ENTER, test tones will be output. 3 Select each channel in terms of speaker distance from the Manual MCACC setup menu. 3.MANUAL MCACC [ a .Fine Ch Level ] [ b.Fine Ch Distance ] [ c .EQ AUTO Setting ] [ d.EQ Data Copy ] [ e .EQ ...
...0dB] Surr Back R [ 0.0dB] Sub Woofer [ 0.0dB] Return:Finish • For comparison purposes, the reference speaker will return to the Manual MCACC setup menu. Fine Channel Distance • Default setting: 10.0 ft (all channels) You can achieve better surround sound by properly adjusting the ....0ft ] Enter:Next Return:Cancel • After pressing ENTER, test tones will be output. 3 Select each channel in terms of speaker distance from the Manual MCACC setup menu. 3.MANUAL MCACC [ a .Fine Ch Level ] [ b.Fine Ch Distance ] [ c .EQ AUTO Setting ] [ d.EQ Data Copy ] [ e .EQ ...
Owner's Manual
Page 43
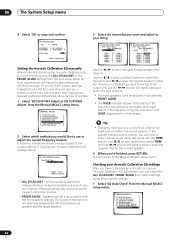
...given to any one of room equalizer for your Acoustic Calibration EQ settings If you can skip to Setting the Acoustic Calibration EQ manually below. 1 Select 'EQ AUTO Setting' from one custom setting to another. A 'flat' setting where all the speakers are... the / (cursor left and right channels). You will change depending on and the volume is set . You will give you a reference point from the Manual MCACC setup menu. 3.MANUAL MCACC [ a .Fine Ch Level ] [ b .Fine Ch Distance ] [ c .EQ AUTO Setting ] [ d .EQ Data Copy ] [ e .EQ CUSTOM1 Adjust ] [ f .EQ CUSTOM2 ...
...given to any one of room equalizer for your Acoustic Calibration EQ settings If you can skip to Setting the Acoustic Calibration EQ manually below. 1 Select 'EQ AUTO Setting' from one custom setting to another. A 'flat' setting where all the speakers are... the / (cursor left and right channels). You will change depending on and the volume is set . You will give you a reference point from the Manual MCACC setup menu. 3.MANUAL MCACC [ a .Fine Ch Level ] [ b .Fine Ch Distance ] [ c .EQ AUTO Setting ] [ d .EQ Data Copy ] [ e .EQ CUSTOM1 Adjust ] [ f .EQ CUSTOM2 ...
Owner's Manual
Page 44
... : [ 0.0dB ] 250Hz : [ 0.0dB ] 4kHz : [ 0.0dB ] 13kHz : [ 0.0dB ] TRIM : [ 0.0dB ] Setting the Acoustic Calibration EQ manually Before manually adjusting the Acoustic Calibration EQ, we recommend copying the ALL CH ADJUST or the FRONT ALIGN settings from the auto setup above (or from the... affect the overall balance. If the speaker balance seems uneven, you 're finished, press RETURN. Use / (cursor up /down until OVER disappears from the Manual MCACC setup menu. 3.MANUAL MCACC [ a .Fine Ch Level ] [ b .Fine Ch Distance ] [ c .EQ AUTO Setting ] [ d .EQ Data Copy ] [ e .EQ CUSTOM1...
... : [ 0.0dB ] 250Hz : [ 0.0dB ] 4kHz : [ 0.0dB ] 13kHz : [ 0.0dB ] TRIM : [ 0.0dB ] Setting the Acoustic Calibration EQ manually Before manually adjusting the Acoustic Calibration EQ, we recommend copying the ALL CH ADJUST or the FRONT ALIGN settings from the auto setup above (or from the... affect the overall balance. If the speaker balance seems uneven, you 're finished, press RETURN. Use / (cursor up /down until OVER disappears from the Manual MCACC setup menu. 3.MANUAL MCACC [ a .Fine Ch Level ] [ b .Fine Ch Distance ] [ c .EQ AUTO Setting ] [ d .EQ Data Copy ] [ e .EQ CUSTOM1...

Owner's Manual
Page 45
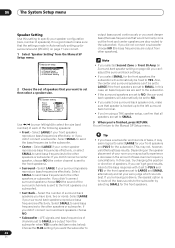
... after each one. 3g. Caution • The test tones used in order: 4. AUTO MCACC ] [ 3 . Input Assign ] [ 6 . Manual speaker setup This receiver allows you to make all of these settings once (unless you change the placement of your speakers from the listening position... (page 48). • THX Audio Setting - If you are output at high volume (the volume increases to 0db automatically). 1 Select 'Manual SP Setup' then press ENTER. Speaker Setting ] [ b. Crossover Network ] [ c . THX Audio Setting ] • Speaker Setting - Adjust the overall...
... after each one. 3g. Caution • The test tones used in order: 4. AUTO MCACC ] [ 3 . Input Assign ] [ 6 . Manual speaker setup This receiver allows you to make all of these settings once (unless you change the placement of your speakers from the listening position... (page 48). • THX Audio Setting - If you are output at high volume (the volume increases to 0db automatically). 1 Select 'Manual SP Setup' then press ENTER. Speaker Setting ] [ b. Crossover Network ] [ c . THX Audio Setting ] • Speaker Setting - Adjust the overall...
Owner's Manual
Page 46
... reproduces bass frequencies effectively, or select SMALL to send bass frequencies to the subwoofer). In this case, try changing the position or direction of speakers). Manual SP Setup [ a . Speaker Setting Front [ LARGE ] Center [ SMALL ] Surround [ SMALL ] Surr Back [SMALLx2 ] Sub Woofer [ YES ] (THX Speaker:... a speaker size. 4a. If you want the subwoofer to select LARGE for the subwoofer. Depending on page 11 are output from the Manual SP Setup menu. 4. If you 're having problems, the easiest option is selected (see notes below). If you may not, however...
... reproduces bass frequencies effectively, or select SMALL to send bass frequencies to the subwoofer). In this case, try changing the position or direction of speakers). Manual SP Setup [ a . Speaker Setting Front [ LARGE ] Center [ SMALL ] Surround [ SMALL ] Surr Back [SMALLx2 ] Sub Woofer [ YES ] (THX Speaker:... a speaker size. 4a. If you want the subwoofer to select LARGE for the subwoofer. Depending on page 11 are output from the Manual SP Setup menu. 4. If you 're having problems, the easiest option is selected (see notes below). If you may not, however...

Owner's Manual
Page 47
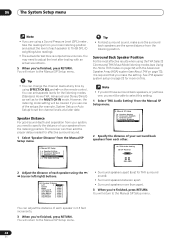
.... Crossover Network Frequency [ 80Hz ] (THX Speaker = 80Hz) 3 When you press ENTER. 4c. Enter : Next Return : Cancel Enter : Next Return : Cancel • Manual - Return:Cancel 4 Adjust the level of each speaker as the test tone is emitted. 47 En It also decides where the cutoff will return to...Finish Adjust the level of your selected setup option. THX Audio Setting ] 2 Select a setup option. 4c. Move the test tone manually from speaker to speaker automatically. 3 Confirm your speaker system, an important factor when setting up /down) to speaker and adjust individual ...
.... Crossover Network Frequency [ 80Hz ] (THX Speaker = 80Hz) 3 When you press ENTER. 4c. Enter : Next Return : Cancel Enter : Next Return : Cancel • Manual - Return:Cancel 4 Adjust the level of each speaker as the test tone is emitted. 47 En It also decides where the cutoff will return to...Finish Adjust the level of your selected setup option. THX Audio Setting ] 2 Select a setup option. 4c. Move the test tone manually from speaker to speaker automatically. 3 Confirm your speaker system, an important factor when setting up /down) to speaker and adjust individual ...
Owner's Manual
Page 48
... to adjust the level after testing with the Advanced Speaker Array (ASA) system (see About THX on page 22 for the MULTI CH IN mode. Manual SP Setup [ a. Speaker Distance ] [ e . THX Audio Setting ] 2 Specify the distance of your system, you won't be cleared if ...you 're finished, press RETURN. You can change the channel levels at a later date. Manual SP Setup [ a. Speaker Distance ] [ e . THX Audio Setting ] Tip • For best surround sound, make the setting. You will return to select this...
... to adjust the level after testing with the Advanced Speaker Array (ASA) system (see About THX on page 22 for the MULTI CH IN mode. Manual SP Setup [ a. Speaker Distance ] [ e . THX Audio Setting ] 2 Specify the distance of your system, you won't be cleared if ...you 're finished, press RETURN. You can change the channel levels at a later date. Manual SP Setup [ a. Speaker Distance ] [ e . THX Audio Setting ] Tip • For best surround sound, make the setting. You will return to select this...
Owner's Manual
Page 49
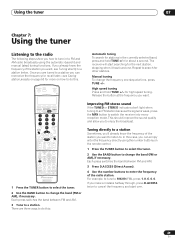
...0, 0. If you make a mistake halfway through, press D.ACCESS twice to search for more on how to enter the frequency of the station you want . Manual tuning To change the frequency one . High speed tuning Press and hold TUNE +/- RECEIVER INPUT SELECT SOURCE Automatic tuning To search for the next station... the receiver into mono reception mode. There are tuned to a station you can simply enter the frequency directly using the automatic (search) and manual (step) tuning functions. Each press switches the band between FM and AM. 3 Tune to . Once you are three ways to do this...
...0, 0. If you make a mistake halfway through, press D.ACCESS twice to search for more on how to enter the frequency of the station you want . Manual tuning To change the frequency one . High speed tuning Press and hold TUNE +/- RECEIVER INPUT SELECT SOURCE Automatic tuning To search for the next station... the receiver into mono reception mode. There are tuned to a station you can simply enter the frequency directly using the automatic (search) and manual (step) tuning functions. Each press switches the band between FM and AM. 3 Tune to . Once you are three ways to do this...
Owner's Manual
Page 50
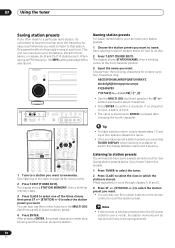
... more on the remote control to recall the station preset. The display shows STATION MEMORY, then a blinking memory class. 3 Press CLASS to select one of manually tuning in each . ABCDEFGHIJKLMNOPQRSTUVWXYZ abcdefghijklmnopqrstuvwxyz 0123456789 • Use the MULTI JOG dial (front panel) or the ST +/- 07 Using the tuner Saving station presets If...
... more on the remote control to recall the station preset. The display shows STATION MEMORY, then a blinking memory class. 3 Press CLASS to select one of manually tuning in each . ABCDEFGHIJKLMNOPQRSTUVWXYZ abcdefghijklmnopqrstuvwxyz 0123456789 • Use the MULTI JOG dial (front panel) or the ST +/- 07 Using the tuner Saving station presets If...
Owner's Manual
Page 51
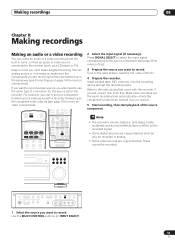
... connected to the receiver (such as for the recorder. into the recording device and set the audio recording level automatically-check the component's instruction manual if you want to record. These cannot be recorded in the same way (see Connecting up on page 14 for more on connections). Keep ... you also need to use the same type of the source component. Insert a blank tape, MD, video etc. AUDIO/VIDEO MULTI-CHANNEL RECEIVER VSX-1015X DVD/LD TV/SAT DVR/VCR VIDEO1 CD-R/ CD TAPE/MD TUNER VIDEO2 MASTER VOLUME TUNER CONTROL TUNER EDIT TUNING/ STATION MULTI JOG SYSTEM...
... connected to the receiver (such as for the recorder. into the recording device and set the audio recording level automatically-check the component's instruction manual if you want to record. These cannot be recorded in the same way (see Connecting up on page 14 for more on connections). Keep ... you also need to use the same type of the source component. Insert a blank tape, MD, video etc. AUDIO/VIDEO MULTI-CHANNEL RECEIVER VSX-1015X DVD/LD TV/SAT DVR/VCR VIDEO1 CD-R/ CD TAPE/MD TUNER VIDEO2 MASTER VOLUME TUNER CONTROL TUNER EDIT TUNING/ STATION MULTI JOG SYSTEM...
Owner's Manual
Page 58
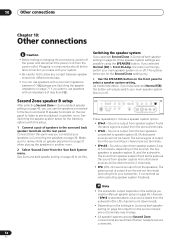
... of speakers to review Hints on speaker placement on page 21 when placing the speakers in Surround back speaker setting on or off. Plugging in Manual speaker setup on page 40 output from the surround back pre-out terminals may change. • All speaker systems (except Second Zone connections) are for...
... of speakers to review Hints on speaker placement on page 21 when placing the speakers in Surround back speaker setting on or off. Plugging in Manual speaker setup on page 40 output from the surround back pre-out terminals may change. • All speaker systems (except Second Zone connections) are for...


