Owner's Manual
Page 4
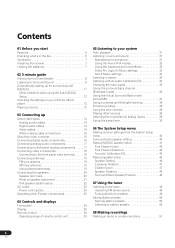
... 20 Speaker terminals 20 Hints on speaker placement 21 THX speaker system setup 22 AC outlet 22 Power cord caution 23 Operating other Pioneer components 23 04 Controls and displays Front panel 24 Display 26 Remote control 28 Operating range of remote control unit 30 05 Listening ... Midnight listening 38 Enhancing dialog 38 Using the tone controls 38 Playing other sources 39 Selecting the multichannel analog inputs 39 Using the sleep timer 39 06 The System Setup menu Making receiver settings from the System Setup menu 40 Surround back speaker setting 40 Manual MCACC speaker ...
... 20 Speaker terminals 20 Hints on speaker placement 21 THX speaker system setup 22 AC outlet 22 Power cord caution 23 Operating other Pioneer components 23 04 Controls and displays Front panel 24 Display 26 Remote control 28 Operating range of remote control unit 30 05 Listening ... Midnight listening 38 Enhancing dialog 38 Using the tone controls 38 Playing other sources 39 Selecting the multichannel analog inputs 39 Using the sleep timer 39 06 The System Setup menu Making receiver settings from the System Setup menu 40 Surround back speaker setting 40 Manual MCACC speaker ...
Owner's Manual
Page 5
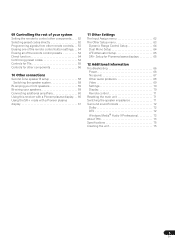
09 Controlling the rest of your system Setting the remote to control other components . . . . 52 Selecting preset codes directly 52 Programming signals from other remote controls. . . 53 Erasing one of the remote control button settings. . . 54 Erasing all of the ...the speaker system 58 Bi-amping your front speakers 59 Bi-wiring your speakers 59 Connecting additional amplifiers 60 Using this receiver with a Pioneer plasma display. . . 60 Using the SR+ mode with a Pioneer plasma display 61 11 Other Settings The Input Assign menu 62 The Other Setup menu 63 Dynamic Range Control Setup...
09 Controlling the rest of your system Setting the remote to control other components . . . . 52 Selecting preset codes directly 52 Programming signals from other remote controls. . . 53 Erasing one of the remote control button settings. . . 54 Erasing all of the ...the speaker system 58 Bi-amping your front speakers 59 Bi-wiring your speakers 59 Connecting additional amplifiers 60 Using this receiver with a Pioneer plasma display. . . 60 Using the SR+ mode with a Pioneer plasma display 61 11 Other Settings The Input Assign menu 62 The Other Setup menu 63 Dynamic Range Control Setup...
Owner's Manual
Page 6
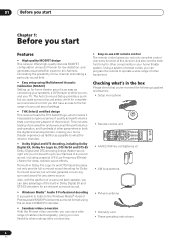
...one channel dominating a particular sound field. • Easy setup using the on-board WMA9 Pro decoder. • Seamless video conversion With the Pioneer video converter, you can take advantage of the built-in Dolby Pro Logic IIx and DTS Neo:6 decoders not only provide full surround sound ...MENU INPUT ATT FL DIMMER +10 D.ACCESS TOP MENU TUNE DVD/LD TV/SAT DVR/VCR TVCONT MULTI CONTROL CD CD-R/TAPE TUNER RECEIVER SOURCE INPUT SELECT RECEIVER 6 En The Auto Surround Setup provides a quick but will also generate convincing surround sound for complete surround sound control you more ...
...one channel dominating a particular sound field. • Easy setup using the on-board WMA9 Pro decoder. • Seamless video conversion With the Pioneer video converter, you can take advantage of the built-in Dolby Pro Logic IIx and DTS Neo:6 decoders not only provide full surround sound ...MENU INPUT ATT FL DIMMER +10 D.ACCESS TOP MENU TUNE DVD/LD TV/SAT DVR/VCR TVCONT MULTI CONTROL CD CD-R/TAPE TUNER RECEIVER SOURCE INPUT SELECT RECEIVER 6 En The Auto Surround Setup provides a quick but will also generate convincing surround sound for complete surround sound control you more ...
Owner's Manual
Page 8
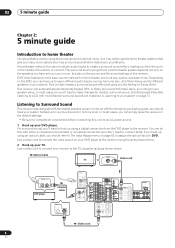
... guide Chapter 2: 5 minute guide Introduction to home theater You are explained in your system. Listening to Surround Sound This receiver was designed with the easiest possible setup in mind, so with multichannel surround sound) are probably used to using stereo equipment...SELECTABLE Video cord DVD-Video has become the basic source material for home theater due to its size, quality, and ease of use of multiple audio tracks to create a surround sound effect, making you feel like listening to a CD with the following quick setup guide, you don't need to soundtracks. This receiver...
... guide Chapter 2: 5 minute guide Introduction to home theater You are explained in your system. Listening to Surround Sound This receiver was designed with the easiest possible setup in mind, so with multichannel surround sound) are probably used to using stereo equipment...SELECTABLE Video cord DVD-Video has become the basic source material for home theater due to its size, quality, and ease of use of multiple audio tracks to create a surround sound effect, making you feel like listening to a CD with the following quick setup guide, you don't need to soundtracks. This receiver...
Owner's Manual
Page 9
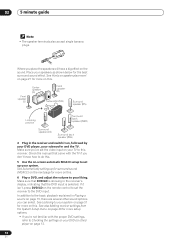
... the surround back left terminal. You can use speakers with just two stereo speakers (the front speakers in the manner shown below. fig. A fig. The receiver will vary. R L MULTI CH IN AUDIO SURROUND L VIDEO1 IN IN DVR / VCR OUT TV/ SAT IN M DVD/ LD IN VICDEEONV-IDEO S-VIDEO ...) SELECTABLE INPUT Powered subwoofer SW • If you 're going to use is firmly clamped (fig. Make sure that all the bare speaker wire is enough space to the receiver. To connect a terminal, unscrew the terminal a few turns until the wire is properly prepared with an impedance of...
... the surround back left terminal. You can use speakers with just two stereo speakers (the front speakers in the manner shown below. fig. A fig. The receiver will vary. R L MULTI CH IN AUDIO SURROUND L VIDEO1 IN IN DVR / VCR OUT TV/ SAT IN M DVD/ LD IN VICDEEONV-IDEO S-VIDEO ...) SELECTABLE INPUT Powered subwoofer SW • If you 're going to use is firmly clamped (fig. Make sure that all the bare speaker wire is enough space to the receiver. To connect a terminal, unscrew the terminal a few turns until the wire is properly prepared with an impedance of...
Owner's Manual
Page 10
.... Make sure you place the speakers will have a big effect on , followed by your DVD player, your system on page 31 for more on this receiver. Front speaker (L) Center speaker (C) Front speaker (R) Subwoofer (SW) Surround speaker (RS) Listening position Surround back speaker (SBR) Surround speaker (LS) Surround back ...also accept single banana plugs. Check the manual that DVD/LD is selected. Make sure that came with the proper DVD settings, refer to Checking the settings on page 13. 10 En See also Making receiver settings from the System Setup menu on page 40 for more on...
.... Make sure you place the speakers will have a big effect on , followed by your DVD player, your system on page 31 for more on this receiver. Front speaker (L) Center speaker (C) Front speaker (R) Subwoofer (SW) Surround speaker (RS) Listening position Surround back speaker (SBR) Surround speaker (LS) Surround back ...also accept single banana plugs. Check the manual that DVD/LD is selected. Make sure that came with the proper DVD settings, refer to Checking the settings on page 13. 10 En See also Making receiver settings from the System Setup menu on page 40 for more on...
Owner's Manual
Page 11
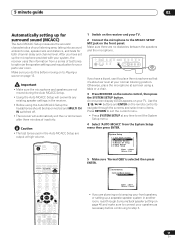
... SP Setup ] [ 5. After you have set up the microphone provided with your system, the receiver uses the information from the System Setup menu then press ENTER. Surr Back System ] [ 2. RECEIVER INPUT SELECT SOURCE 1 Switch on bi-amping your front speakers, or setting up for surround sound (MCACC) ... Press SYSTEM SETUP at your normal listening position. Other Setup ] Enter : Select Return : Exit DVD/LD TV/SAT DVR/VCR TVCONT MULTI CONTROL CD CD-R/TAPE TUNER RECEIVER 5 Make sure 'Normal (SB)' is selected then press ENTER. 2. An on-screen display (OSD) appears on the ...
... SP Setup ] [ 5. After you have set up the microphone provided with your system, the receiver uses the information from the System Setup menu then press ENTER. Surr Back System ] [ 2. RECEIVER INPUT SELECT SOURCE 1 Switch on bi-amping your front speakers, or setting up for surround sound (MCACC) ... Press SYSTEM SETUP at your normal listening position. Other Setup ] Enter : Select Return : Exit DVD/LD TV/SAT DVR/VCR TVCONT MULTI CONTROL CD CD-R/TAPE TUNER RECEIVER 5 Make sure 'Normal (SB)' is selected then press ENTER. 2. An on-screen display (OSD) appears on the ...

Owner's Manual
Page 12
... try to 80Hz. When you are using THX Certified speakers, confirm that all speakers are complete. 2. A progress report is displayed on-screen while the receiver outputs more on this ) • Channel Level - Return : Cancel • Make sure the microphone is connected. • If you're using... [c.Channel Level ] [d.Acoustic Cal EQ ] [ Skip ] The settings made in the OSD. You can also choose to view the settings by selecting individual parameters from the listening position (see page 43 for more test tones to the next step. The size and number of your setup. Adjustments...
... try to 80Hz. When you are using THX Certified speakers, confirm that all speakers are complete. 2. A progress report is displayed on-screen while the receiver outputs more on this ) • Channel Level - Return : Cancel • Make sure the microphone is connected. • If you're using... [c.Channel Level ] [d.Acoustic Cal EQ ] [ Skip ] The settings made in the OSD. You can also choose to view the settings by selecting individual parameters from the listening position (see page 43 for more test tones to the next step. The size and number of your setup. Adjustments...

Owner's Manual
Page 13
...the operation of the player to this receiver to the VIDEO 1 jacks on your TV, make sure that the VIDEO 1 input is now selected.) 2 If the receiver isn't already on, press RECEIVER to switch it on. 3 Change the receiver input to the source you connected this receiver, make sure that the TV's video ...input is set to this receiver. (For example, if you want to play. If ...
...the operation of the player to this receiver to the VIDEO 1 jacks on your TV, make sure that the VIDEO 1 input is now selected.) 2 If the receiver isn't already on, press RECEIVER to switch it on. 3 Change the receiver input to the source you connected this receiver, make sure that the TV's video ...input is set to this receiver. (For example, if you want to play. If ...
Owner's Manual
Page 17
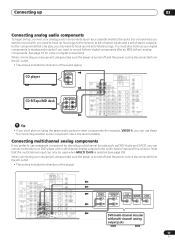
... your digital components to analog audio jacks if you want to record with, you need to hook up four plugs to the receiver (a set of stereo inputs and a set of stereo outputs), but for components that the multichannel input can use a separate ...SURROUND OUTPUT SUB WOOFER L CENTER R SURROUND L L OUTPUT SURROUND BACK / B R SELECTABLE R R CENTER OUTPUT L (Single) VIDEO OUTPUT SELECTABLE DVD/multi-channel decoder with multichannel analog outputs to /from the AC outlet. • The arrows indicate the direction of this receiver. VIDEO VIDEO PR Y IN 1 PB PR Y IN 2 PB PR Y PB IN...
... your digital components to analog audio jacks if you want to record with, you need to hook up four plugs to the receiver (a set of stereo inputs and a set of stereo outputs), but for components that the multichannel input can use a separate ...SURROUND OUTPUT SUB WOOFER L CENTER R SURROUND L L OUTPUT SURROUND BACK / B R SELECTABLE R R CENTER OUTPUT L (Single) VIDEO OUTPUT SELECTABLE DVD/multi-channel decoder with multichannel analog outputs to /from the AC outlet. • The arrows indicate the direction of this receiver. VIDEO VIDEO PR Y IN 1 PB PR Y IN 2 PB PR Y PB IN...
Owner's Manual
Page 18
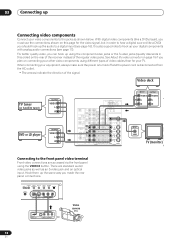
... connecting your other video components using the VIDEO2 button. See About the video converter on page 15 if you plan on the rear of the receiver instead of the signal. Video deck TV tuner (or Satellite tuner) OUTPUT VIDEO L R DVD or LD player OUTPUT VIDEO L R OUT CD IN... OUT TV/ SAT IN R L AUDIO MULTI CH IN SURROUND L DVD/ LD IN VIDEO S - TONE ACOUSTIC DIALOG MULTI CH EQ ENHANCEMENT IN MULTI JOG SIGNAL SELECT EXTENDED MODE SPEAKERS MCACC SETUP MIC VIDEO2 INPUT DIGITAL IN S-VIDEO VIDEO L AUDIO R DIGITAL OUT V L R VIDEO OUTPUT Video camera (etc.) 18 En CONTROL PB...
... connecting your other video components using the VIDEO2 button. See About the video converter on page 15 if you plan on the rear of the receiver instead of the signal. Video deck TV tuner (or Satellite tuner) OUTPUT VIDEO L R DVD or LD player OUTPUT VIDEO L R OUT CD IN... OUT TV/ SAT IN R L AUDIO MULTI CH IN SURROUND L DVD/ LD IN VIDEO S - TONE ACOUSTIC DIALOG MULTI CH EQ ENHANCEMENT IN MULTI JOG SIGNAL SELECT EXTENDED MODE SPEAKERS MCACC SETUP MIC VIDEO2 INPUT DIGITAL IN S-VIDEO VIDEO L AUDIO R DIGITAL OUT V L R VIDEO OUTPUT Video camera (etc.) 18 En CONTROL PB...
Owner's Manual
Page 20
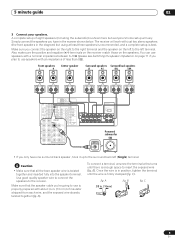
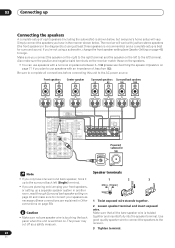
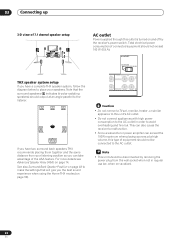
...sound. AC OUTLET AC 120 V 60Hz SWITCHED 100W (0 . 8A) MAX SPEAKERS A R FRONT L CENTER R SURROUND L SURROUND BACK / B R SELECTABLE L (Single) SELECTABLE INPUT Powered subwoofer SW Note Speaker terminals • If you only have in the manner shown below , but using a subwoofer, change the front speaker setting...in another room, read through Surround back speaker setting on page 40 and make sure the positive and negative (+/-) terminals on the receiver match those on the speakers. • You can use speakers with a nominal impedance between 6-16Ω (please see Switching the...
...sound. AC OUTLET AC 120 V 60Hz SWITCHED 100W (0 . 8A) MAX SPEAKERS A R FRONT L CENTER R SURROUND L SURROUND BACK / B R SELECTABLE L (Single) SELECTABLE INPUT Powered subwoofer SW Note Speaker terminals • If you only have in the manner shown below , but using a subwoofer, change the front speaker setting...in another room, read through Surround back speaker setting on page 40 and make sure the positive and negative (+/-) terminals on the receiver match those on the speakers. • You can use speakers with a nominal impedance between 6-16Ω (please see Switching the...
Owner's Manual
Page 22
ND L SURROUND BACK / B R SELECTABLE L (Single) SELECTABLE Caution • Do not connect a TV set, monitor, heater, or similar appliance to this type...can take advantage of the ASA feature. Note • This unit should not be disconnected by the receiver's power switch. For more details see Advanced Speaker Array (ASA) on vacation). 22 En This can also cause the... receiver to malfunction. • Since a subwoofer or power amplifier can exceed the 100W maximum when playing sources...
ND L SURROUND BACK / B R SELECTABLE L (Single) SELECTABLE Caution • Do not connect a TV set, monitor, heater, or similar appliance to this type...can take advantage of the ASA feature. Note • This unit should not be disconnected by the receiver's power switch. For more details see Advanced Speaker Array (ASA) on vacation). 22 En This can also cause the... receiver to malfunction. • Since a subwoofer or power amplifier can exceed the 100W maximum when playing sources...
Owner's Manual
Page 24
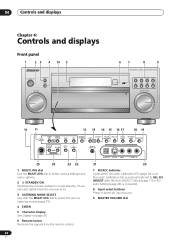
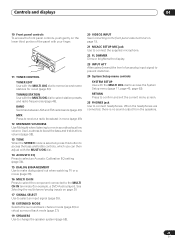
04 Controls and displays Chapter 4: Controls and displays Front panel 1 23 4 10 5 STANDBY/ON LISTENING MODE SELECT ENTER MULTI JOG 67 8 9 AUDIO/VIDEO MULTI-CHANNEL RECEIVER VSX-1015TX DVD/LD TV/SAT DVR/VCR VIDEO1 CD-R/ CD TAPE/MD TUNER VIDEO2 MASTER VOLUME 10 11 12 13 14 15 16...25 24 23 22 1 MULTI JOG dial Use the MULTI JOG dial to select an input source. 9 MASTER VOLUME dial 24 En Power indicator lights when the receiver is on. 3 LISTENING MODE SELECT Use with the MULTI JOG dial to select the various listening modes (page 31). 4 ENTER 5 Character display See ...
04 Controls and displays Chapter 4: Controls and displays Front panel 1 23 4 10 5 STANDBY/ON LISTENING MODE SELECT ENTER MULTI JOG 67 8 9 AUDIO/VIDEO MULTI-CHANNEL RECEIVER VSX-1015TX DVD/LD TV/SAT DVR/VCR VIDEO1 CD-R/ CD TAPE/MD TUNER VIDEO2 MASTER VOLUME 10 11 12 13 14 15 16...25 24 23 22 1 MULTI JOG dial Use the MULTI JOG dial to select an input source. 9 MASTER VOLUME dial 24 En Power indicator lights when the receiver is on. 3 LISTENING MODE SELECT Use with the MULTI JOG dial to select the various listening modes (page 31). 4 ENTER 5 Character display See ...
Owner's Manual
Page 25
... to connect headphones. RETURN Press to confirm and exit the current menu screen. 25 PHONES jack Use to select station presets and radio frequencies (page 49). MPX Press to receive a radio broadcast in mono (page 49). 12 MIDNIGHT/LOUDNESS Use Midnight when listening to memorize and name ...MULTI JOG ENTER AUDIO/VIDEO MULTI-CHANNEL DVD/LD TV/SAT RECEIVER VSX-1015TX CD DVR/VCR TACPDE-R/M/ D VIDEO1 TUNER MASTER VOLUME VIDEO2 11 TUNER CONTROL TUNER EDIT Use with the MULTI JOG dial. 14 ACOUSTIC EQ Press to select an Acoustic Calibration EQ setting (page 34). 15 DIALOG ENHANCEMENT...
... to connect headphones. RETURN Press to confirm and exit the current menu screen. 25 PHONES jack Use to select station presets and radio frequencies (page 49). MPX Press to receive a radio broadcast in mono (page 49). 12 MIDNIGHT/LOUDNESS Use Midnight when listening to memorize and name ...MULTI JOG ENTER AUDIO/VIDEO MULTI-CHANNEL DVD/LD TV/SAT RECEIVER VSX-1015TX CD DVR/VCR TACPDE-R/M/ D VIDEO1 TUNER MASTER VOLUME VIDEO2 11 TUNER CONTROL TUNER EDIT Use with the MULTI JOG dial. 14 ACOUSTIC EQ Press to select an Acoustic Calibration EQ setting (page 34). 15 DIALOG ENHANCEMENT...

Owner's Manual
Page 26
... 6 THX DVD TV DVR AUTO ANALOG DTS LS S RS ADV. WMA9 Pro Lights to indicate decoding of the Advanced Surround modes has been selected. ADV.SURR Lights when one of input signal assigned for more on , the corresponding indicator shows in Dolby and DTS encoded sources. Right surround... channel • LFE - Neo:6 When one of the Neo:6 modes of the receiver is on, this ). SURR VIR.SB CD CD-R TUNER SP A B SLEEP SR WMA9 Pro AUTO SURR MONO STEREO TUNED DE MIDNIGHT LOUDNESS VIDEO1 VIDEO2 ...
... 6 THX DVD TV DVR AUTO ANALOG DTS LS S RS ADV. WMA9 Pro Lights to indicate decoding of the Advanced Surround modes has been selected. ADV.SURR Lights when one of input signal assigned for more on , the corresponding indicator shows in Dolby and DTS encoded sources. Right surround... channel • LFE - Neo:6 When one of the Neo:6 modes of the receiver is on, this ). SURR VIR.SB CD CD-R TUNER SP A B SLEEP SR WMA9 Pro AUTO SURR MONO STEREO TUNED DE MIDNIGHT LOUDNESS VIDEO1 VIDEO2 ...
Owner's Manual
Page 28
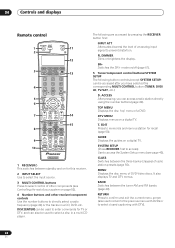
... ACOUSTIC SIGNAL MIDNIGHT/ AUTO SURR EQ SELECT LOUDNESS SHIFT EFFECT /CH SEL SLEEP DIALOG E 15 RECEIVER 1 RECEIVER This switches between standby and on for this receiver. 2 INPUT SELECT Use to select the input source. 3 MULTI CONTROL buttons Press to select control of other receiver/component controls Use the number buttons to directly select a radio frequency (page 49) or the...
... ACOUSTIC SIGNAL MIDNIGHT/ AUTO SURR EQ SELECT LOUDNESS SHIFT EFFECT /CH SEL SLEEP DIALOG E 15 RECEIVER 1 RECEIVER This switches between standby and on for this receiver. 2 INPUT SELECT Use to select the input source. 3 MULTI CONTROL buttons Press to select control of other receiver/component controls Use the number buttons to directly select a radio frequency (page 49) or the...
Owner's Manual
Page 29
...(page 49). The controls above these adjustments. 29 En If the signal is weak then switching to select the TV input signal. AUTO SURR Press to have the receiver automatically detect what kind of a double cassette deck player. Also used to the TV CONT button (see... Neo:6 Music parameters (page 34). Direct playback bypasses the tone controls and any other signal processing for DVD/HDD recorders. 9 RECEIVER CONTROL buttons THX Press to select channels when using the MULTI CONTROL buttons. Also adjusts the level of FM broadcasts. Controls and displays 04 6 (TUNE/ST ...
...(page 49). The controls above these adjustments. 29 En If the signal is weak then switching to select the TV input signal. AUTO SURR Press to have the receiver automatically detect what kind of a double cassette deck player. Also used to the TV CONT button (see... Neo:6 Music parameters (page 34). Direct playback bypasses the tone controls and any other signal processing for DVD/HDD recorders. 9 RECEIVER CONTROL buttons THX Press to select channels when using the MULTI CONTROL buttons. Also adjusts the level of FM broadcasts. Controls and displays 04 6 (TUNE/ST ...
Owner's Manual
Page 34
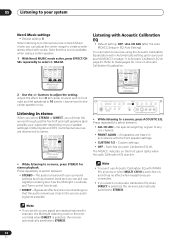
...on, and it has no effect when headphones are heard in accordance with WMA9 Pro sources or when MULTI CH IN is selected, the receiver automatically switches to the source audio signal as channel level) and you switch on Acoustic Calibration Equalization. Listening with vocals. ...front speaker settings. • CUSTOM 1/2 - All speakers are connected. • If you switch on Acoustic Calibration EQ when DIRECT is selected, the receiver automatically switches to these pages for surround sound (MCACC) on page 11 or Acoustic Calibration EQ on page 43. Bypass all center channel...
...on, and it has no effect when headphones are heard in accordance with WMA9 Pro sources or when MULTI CH IN is selected, the receiver automatically switches to the source audio signal as channel level) and you switch on Acoustic Calibration Equalization. Listening with vocals. ...front speaker settings. • CUSTOM 1/2 - All speakers are connected. • If you switch on Acoustic Calibration EQ when DIRECT is selected, the receiver automatically switches to these pages for surround sound (MCACC) on page 11 or Acoustic Calibration EQ on page 43. Bypass all center channel...
Owner's Manual
Page 38
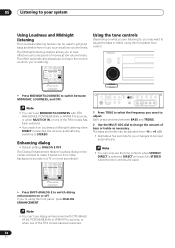
... the volume at low volume levels. Note • You can 't use the tone controls when STEREO/ DIRECT is selected, the receiver automatically switches to change the amount of the THX modes has been selected. • If you 're using the front panel tone control. Note • You can 't use MIDNIGHT/LOUDNESS.../ 24 bit, PCM 96/88.2kHz or WMA9 Pro sources, or when one of bass or treble as necessary. STANDBY/ON LISTENING MODE SELECT ENTER MULTI JOG RECEIVER • Press MIDNIGHT/LOUDNESS to switch between BASS and TREBLE. 2 Use the MULTI JOG dial to STEREO. The bass and treble can...
... the volume at low volume levels. Note • You can 't use the tone controls when STEREO/ DIRECT is selected, the receiver automatically switches to change the amount of the THX modes has been selected. • If you 're using the front panel tone control. Note • You can 't use MIDNIGHT/LOUDNESS.../ 24 bit, PCM 96/88.2kHz or WMA9 Pro sources, or when one of bass or treble as necessary. STANDBY/ON LISTENING MODE SELECT ENTER MULTI JOG RECEIVER • Press MIDNIGHT/LOUDNESS to switch between BASS and TREBLE. 2 Use the MULTI JOG dial to STEREO. The bass and treble can...


