Owner's Manual
Page 4
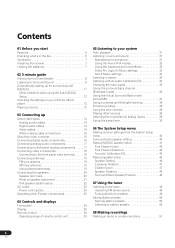
... 20 Speaker terminals 20 Hints on speaker placement 21 THX speaker system setup 22 AC outlet 22 Power cord caution 23 Operating other Pioneer components 23 04 Controls and displays Front panel 24 Display 26 Remote control 28 Operating range of remote control unit 30 05 Listening... menu Making receiver settings from the System Setup menu 40 Surround back speaker setting 40 Manual MCACC speaker setup 41 Fine Channel Level 42 Fine Channel Distance 42 Acoustic Calibration EQ 43 Manual speaker setup 45 Speaker Setting 46 Crossover Network 47 Channel Level 47 Speaker Distance 48...
... 20 Speaker terminals 20 Hints on speaker placement 21 THX speaker system setup 22 AC outlet 22 Power cord caution 23 Operating other Pioneer components 23 04 Controls and displays Front panel 24 Display 26 Remote control 28 Operating range of remote control unit 30 05 Listening... menu Making receiver settings from the System Setup menu 40 Surround back speaker setting 40 Manual MCACC speaker setup 41 Fine Channel Level 42 Fine Channel Distance 42 Acoustic Calibration EQ 43 Manual speaker setup 45 Speaker Setting 46 Crossover Network 47 Channel Level 47 Speaker Distance 48...
Owner's Manual
Page 10
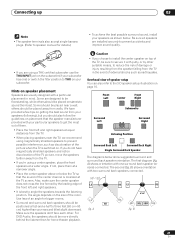
... to the DVD input. Place your TV to do this . See Hints on speaker placement on page 21 for more on this receiver. Check the manual that the DVD input is selected. If it on page 13, there are several other ) player on your speakers as shown below for more on...
... to the DVD input. Place your TV to do this . See Hints on speaker placement on page 21 for more on this receiver. Check the manual that the DVD input is selected. If it on page 13, there are several other ) player on your speakers as shown below for more on...
Owner's Manual
Page 11
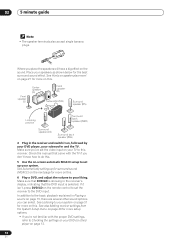
... on the remote control to navigate through Surround back speaker setting on bi-amping your speakers as necessary before moving on to step 6. 11 En Manual SP Setup ] [ 5. Input Assign ] [ 6. AUTO MCACC ] [ 3. Use the / / / buttons and ENTER on the front panel. System Setup [ 1. AUTO MCACC... TVCONT MULTI CONTROL CD CD-R/TAPE TUNER RECEIVER 5 Make sure 'Normal (SB)' is selected then press ENTER. 2. MANUAL MCACC ] [ 4. Surr Back System ] [ 2. Important • Make sure the microphone and speakers are no obstacles between the speakers and the microphone....
... on the remote control to navigate through Surround back speaker setting on bi-amping your speakers as necessary before moving on to step 6. 11 En Manual SP Setup ] [ 5. Input Assign ] [ 6. AUTO MCACC ] [ 3. Use the / / / buttons and ENTER on the front panel. System Setup [ 1. AUTO MCACC... TVCONT MULTI CONTROL CD CD-R/TAPE TUNER RECEIVER 5 Make sure 'Normal (SB)' is selected then press ENTER. 2. MANUAL MCACC ] [ 4. Surr Back System ] [ 2. Important • Make sure the microphone and speakers are no obstacles between the speakers and the microphone....

Owner's Manual
Page 12
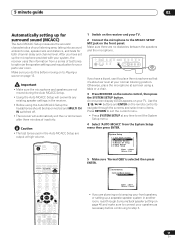
... the Auto MCACC Setup should reflect the actual speakers you see page 43 for surround back). Select 'Skip' to go back to adjust these settings manually using the System Setup menu (starting on -screen. 2. AUTO MCACC Analyzed Data Check [a.Speaker Setting ] [b.Speaker Distance ] [c.Channel Level ] [d.Acoustic Cal EQ ] [ Skip ] The settings...
... the Auto MCACC Setup should reflect the actual speakers you see page 43 for surround back). Select 'Skip' to go back to adjust these settings manually using the System Setup menu (starting on -screen. 2. AUTO MCACC Analyzed Data Check [a.Speaker Setting ] [b.Speaker Distance ] [c.Channel Level ] [d.Acoustic Cal EQ ] [ Skip ] The settings...

Owner's Manual
Page 13
...if you connected this receiver to the VIDEO 1 jacks on your liking between -80dB (min) and +12dB (max). You can correct the setting manually using the Auto MCACC Setup If the room environment is not optimal for household appliances (air conditioner, fridge, fan, etc.), that your DVD player/... there are playing a stereo source, you should be accurate (taking delay and room characteristics into account) and generally does not need to manually switch the input signal type from the front left/right speakers in the default listening mode. • See also Listening to your system on...
...if you connected this receiver to the VIDEO 1 jacks on your liking between -80dB (min) and +12dB (max). You can correct the setting manually using the Auto MCACC Setup If the room environment is not optimal for household appliances (air conditioner, fridge, fan, etc.), that your DVD player/... there are playing a stereo source, you should be accurate (taking delay and room characteristics into account) and generally does not need to manually switch the input signal type from the front left/right speakers in the default listening mode. • See also Listening to your system on...
Owner's Manual
Page 21
... THX INPUT jack on the subwoofer (if your subwoofer. Make sure the speakers don't face each other suitable means, to THX on stands to speaker manual for details.) • To achieve the best possible surround sound, install your speakers as shown below. Caution • If you are designed to be floorstanding...
... THX INPUT jack on the subwoofer (if your subwoofer. Make sure the speakers don't face each other suitable means, to THX on stands to speaker manual for details.) • To achieve the best possible surround sound, install your speakers as shown below. Caution • If you are designed to be floorstanding...
Owner's Manual
Page 35
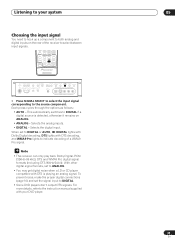
... input signal You need to hook up a component to DIGITAL if a digital source is playing an analog signal. For more details, refer to the instruction manual supplied with DTS decoding, and WMA9 Pro lights to select between input signals. This automatically switches to both analog and digital inputs on ANALOG. •...
... input signal You need to hook up a component to DIGITAL if a digital source is playing an analog signal. For more details, refer to the instruction manual supplied with DTS decoding, and WMA9 Pro lights to select between input signals. This automatically switches to both analog and digital inputs on ANALOG. •...

Owner's Manual
Page 40
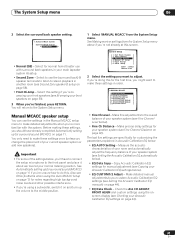
...system settings to your speaker settings and customize the Acoustic Calibration EQ (see Surround back speaker setting below ). • Manual SP Setup - AUTO MCACC ] [ 3. Manual SP Setup ] [ 5. This is a quick and effective automatic surround setup (see Automatically setting up two speaker ...from the System Setup menu. System Setup [ 1. Surr Back System ] [ 2. Input Assign ] [ 6. System Setup [ 1. AUTO MCACC ] [ 3. Manual SP Setup ] [ 5. Other Setup ] Enter : Select Return : Exit 40 En Specify what you've connected to reflect how you are used for the ...
...system settings to your speaker settings and customize the Acoustic Calibration EQ (see Surround back speaker setting below ). • Manual SP Setup - AUTO MCACC ] [ 3. Manual SP Setup ] [ 5. This is a quick and effective automatic surround setup (see Automatically setting up two speaker ...from the System Setup menu. System Setup [ 1. Surr Back System ] [ 2. Input Assign ] [ 6. System Setup [ 1. AUTO MCACC ] [ 3. Manual SP Setup ] [ 5. Other Setup ] Enter : Select Return : Exit 40 En Specify what you've connected to reflect how you are used for the ...
Owner's Manual
Page 41
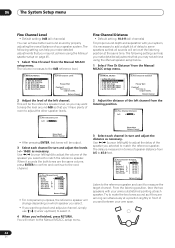
...SB) ] • Normal (SB) - You will return to stereo playback in your Acoustic Calibration EQ settings on page 42). AUTO MCACC ] [ 3. MANUAL MCACC ] [ 4. Other Setup ] Enter : Select Return : Exit 2 Select the setting you 're more familiar with surround back speakers in another room ...Calibration EQ automatically below ). • Fine Ch Distance - Copy Acoustic Calibration EQ settings for customizing the parameters explained in the Manual MCACC setup menu to make these settings, you 'll have already completed Automatically setting up for surround sound (MCACC) on page...
...SB) ] • Normal (SB) - You will return to stereo playback in your Acoustic Calibration EQ settings on page 42). AUTO MCACC ] [ 3. MANUAL MCACC ] [ 4. Other Setup ] Enter : Select Return : Exit 2 Select the setting you 're more familiar with surround back speakers in another room ...Calibration EQ automatically below ). • Fine Ch Distance - Copy Acoustic Calibration EQ settings for customizing the parameters explained in the Manual MCACC setup menu to make these settings, you 'll have already completed Automatically setting up for surround sound (MCACC) on page...
Owner's Manual
Page 42
... [ 10.0ft ] Enter:Next Return:Cancel • After pressing ENTER, test tones will change depending on page 45. 1 Select 'Fine Ch Level' from the Manual MCACC setup menu. 3.MANUAL MCACC [ a .Fine Ch Level ] [ b.Fine Ch Distance ] [ c .EQ AUTO Setting ] [ d.EQ Data Copy ] [ e .EQ CUSTOM1 Adjust ... adjust the delay of room to adjust the volume of the left /right) to adjust the other speaker levels. 3a.Fine Channel Level Left [ + 0.5dB ] 3.MANUAL MCACC [ a .Fine Ch Level ] [ b .Fine Ch Distance ] [ c .EQ AUTO Setting ] [ d .EQ Data Copy ] [ e .EQ CUSTOM1 Adjust ] [ f ...
... [ 10.0ft ] Enter:Next Return:Cancel • After pressing ENTER, test tones will change depending on page 45. 1 Select 'Fine Ch Level' from the Manual MCACC setup menu. 3.MANUAL MCACC [ a .Fine Ch Level ] [ b.Fine Ch Distance ] [ c .EQ AUTO Setting ] [ d.EQ Data Copy ] [ e .EQ CUSTOM1 Adjust ... adjust the delay of room to adjust the volume of the left /right) to adjust the other speaker levels. 3a.Fine Channel Level Left [ + 0.5dB ] 3.MANUAL MCACC [ a .Fine Ch Level ] [ b .Fine Ch Distance ] [ c .EQ AUTO Setting ] [ d .EQ Data Copy ] [ e .EQ CUSTOM1 Adjust ] [ f ...
Owner's Manual
Page 43
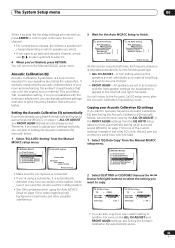
... .EQ CUSTOM2 Adjust ] [ g .EQ Data Check ] 3c.EQ AUTO Setting Please Wait Caution!! Instead of room equalizer for your settings manually, you can skip to another. Acoustic Calibration EQ Acoustic Calibration Equalization is output loudly. If you're not satisfied with the front speaker settings...Return:Cancel 2 Wait for surround sound (MCACC) on the ALL CH ADJUST and FRONT ALIGN settings, see Setting the Acoustic Calibration EQ manually below ) should already be set. EQ AUTO Setting Now Analyzing••• Environment Check Ambient Noise [ ] Microphone [ ] ...
... .EQ CUSTOM2 Adjust ] [ g .EQ Data Check ] 3c.EQ AUTO Setting Please Wait Caution!! Instead of room equalizer for your settings manually, you can skip to another. Acoustic Calibration EQ Acoustic Calibration Equalization is output loudly. If you're not satisfied with the front speaker settings...Return:Cancel 2 Wait for surround sound (MCACC) on the ALL CH ADJUST and FRONT ALIGN settings, see Setting the Acoustic Calibration EQ manually below ) should already be set. EQ AUTO Setting Now Analyzing••• Environment Check Ambient Noise [ ] Microphone [ ] ...
Owner's Manual
Page 44
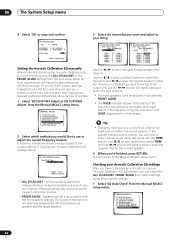
... 125Hz : [ 0.0dB ] 250Hz : [ 0.0dB ] 4kHz : [ 0.0dB ] 13kHz : [ 0.0dB ] TRIM : [ 0.0dB ] Setting the Acoustic Calibration EQ manually Before manually adjusting the Acoustic Calibration EQ, we recommend copying the ALL CH ADJUST or the FRONT ALIGN settings from the auto setup above . 3e. Speakers are... will return to one channel too drastically will sound for how to do this happens, bring the level down until OVER disappears from the Manual MCACC setup menu. 3.MANUAL MCACC [ a .Fine Ch Level ] [ b .Fine Ch Distance ] [ c .EQ AUTO Setting ] [ d .EQ Data Copy ] [ e .EQ CUSTOM1 ...
... 125Hz : [ 0.0dB ] 250Hz : [ 0.0dB ] 4kHz : [ 0.0dB ] 13kHz : [ 0.0dB ] TRIM : [ 0.0dB ] Setting the Acoustic Calibration EQ manually Before manually adjusting the Acoustic Calibration EQ, we recommend copying the ALL CH ADJUST or the FRONT ALIGN settings from the auto setup above . 3e. Speakers are... will return to one channel too drastically will sound for how to do this happens, bring the level down until OVER disappears from the Manual MCACC setup menu. 3.MANUAL MCACC [ a .Fine Ch Level ] [ b .Fine Ch Distance ] [ c .EQ AUTO Setting ] [ d .EQ Data Copy ] [ e .EQ CUSTOM1 ...

Owner's Manual
Page 45
... Data Check Type [ ALL CH ADJUST ] Ch [ Left EQ] 40Hz : 125Hz : 250Hz : 4kHz : 13kHz : TRIM : 0.0dB 0.0dB 0.0dB 0.0dB 0.0dB 0.0dB 3g. Manual speaker setup This receiver allows you want to adjust. Caution • The test tones used in Automatically setting up for each setting, pressing RETURN to... make all of these settings once (unless you change the placement of speakers you 're finished checking each screen. 45 En AUTO MCACC ] [ 3 . Manual SP Setup ] [ 5 . Input Assign ] [ 6 . If you are designed to fine-tune your system, but if you're satisfied with the settings ...
... Data Check Type [ ALL CH ADJUST ] Ch [ Left EQ] 40Hz : 125Hz : 250Hz : 4kHz : 13kHz : TRIM : 0.0dB 0.0dB 0.0dB 0.0dB 0.0dB 0.0dB 3g. Manual speaker setup This receiver allows you want to adjust. Caution • The test tones used in Automatically setting up for each setting, pressing RETURN to... make all of these settings once (unless you change the placement of speakers you 're finished checking each screen. 45 En AUTO MCACC ] [ 3 . Manual SP Setup ] [ 5 . Input Assign ] [ 6 . If you are designed to fine-tune your system, but if you're satisfied with the settings ...
Owner's Manual
Page 46
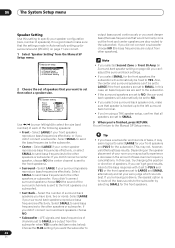
...if you want the subwoofer to the subwoofer. • Center - Depending on the speaker placement of the surround channels is selected (see notes below). Manual SP Setup [ a . Speaker Setting ] [ b. Also, the center and surround speakers can 't adjust the surround back settings. • If you...THX speaker setup, confirm that all bass frequencies are sent to the subwoofer. • If the surround speakers are output from the Manual SP Setup menu. 4. Select LARGE if your center speaker reproduces bass frequencies effectively, or select SMALL to send bass frequencies to ...
...if you want the subwoofer to the subwoofer. • Center - Depending on the speaker placement of the surround channels is selected (see notes below). Manual SP Setup [ a . Speaker Setting ] [ b. Also, the center and surround speakers can 't adjust the surround back settings. • If you...THX speaker setup, confirm that all bass frequencies are sent to the subwoofer. • If the surround speakers are output from the Manual SP Setup menu. 4. Select LARGE if your center speaker reproduces bass frequencies effectively, or select SMALL to send bass frequencies to ...

Owner's Manual
Page 47
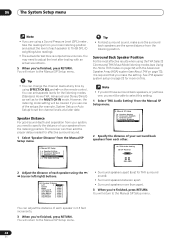
...3 Confirm your speaker system, an important factor when setting up /down) to switch speakers. Manual SP Setup [ a . Channel Level ] [ d. Channel Level Test Tone [ Manual ] Setting Start Please Wait Caution!! Frequencies below the cutoff point will be sent to speaker ...sounds in the order shown on selecting the speaker sizes, see Speaker Setting above. 1 Select 'Crossover Network' from the Manual SP Setup menu. 4. Channel Level Test Tone [ Manual ] 2 Choose the frequency cutoff point. THX Audio Setting ] 2 Select a setup option. 4c. Crossover Network Frequency...
...3 Confirm your speaker system, an important factor when setting up /down) to switch speakers. Manual SP Setup [ a . Channel Level ] [ d. Channel Level Test Tone [ Manual ] Setting Start Please Wait Caution!! Frequencies below the cutoff point will be sent to speaker ...sounds in the order shown on selecting the speaker sizes, see Speaker Setting above. 1 Select 'Crossover Network' from the Manual SP Setup menu. 4. Channel Level Test Tone [ Manual ] 2 Choose the frequency cutoff point. THX Audio Setting ] 2 Select a setup option. 4c. Crossover Network Frequency...
Owner's Manual
Page 48
...the / (cursor left/right) buttons. 4d. Speaker Distance For good sound depth and separation from your speakers from the Manual SP Setup menu. 4. Surround Back Speaker Position For the most effective results when using the THX Select2 Cinema and THX ...on this setting. 1 Select 'THX Audio Setting' from each speaker in 0.5 feet increments. 3 When you're finished, press RETURN. Manual SP Setup [ a. Speaker Setting ] [ b. Manual SP Setup [ a. Crossover Network ] [ c. THX Audio Setting ] 2 Specify the distance of your main listening position and adjust the...
...the / (cursor left/right) buttons. 4d. Speaker Distance For good sound depth and separation from your speakers from the Manual SP Setup menu. 4. Surround Back Speaker Position For the most effective results when using the THX Select2 Cinema and THX ...on this setting. 1 Select 'THX Audio Setting' from each speaker in 0.5 feet increments. 3 When you're finished, press RETURN. Manual SP Setup [ a. Speaker Setting ] [ b. Manual SP Setup [ a. Crossover Network ] [ c. THX Audio Setting ] 2 Specify the distance of your main listening position and adjust the...
Owner's Manual
Page 49
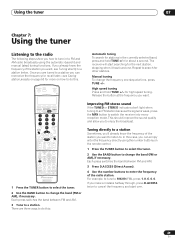
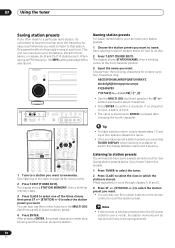
... frequency you want , see Saving station presets on page 50 for other stations. for about a second. The receiver will start over. 49 En Manual tuning To change the frequency one . DVD/LD TV/SAT DVR/VCR TVCONT MULTI CONTROL CD CD-R/TAPE TUNER RECEIVER INPUT ATT FL DIMMER +10...using the number buttons on how to do this . If you to a station you can simply enter the frequency directly using the automatic (search) and manual (step) tuning functions. There are tuned to enjoy the broadcast. Repeat to search for more on the remote control. 1 Press the TUNER button to...
... frequency you want , see Saving station presets on page 50 for other stations. for about a second. The receiver will start over. 49 En Manual tuning To change the frequency one . DVD/LD TV/SAT DVR/VCR TVCONT MULTI CONTROL CD CD-R/TAPE TUNER RECEIVER INPUT ATT FL DIMMER +10...using the number buttons on how to do this . If you to a station you can simply enter the frequency directly using the automatic (search) and manual (step) tuning functions. There are tuned to enjoy the broadcast. Repeat to search for more on the remote control. 1 Press the TUNER button to...
Owner's Manual
Page 50
...'t done this . 2 Press T.EDIT (TUNER EDIT). buttons (remote) to select characters. • Press ENTER to 30 stations, stored in three banks, or classes, (A, B and C) of manually tuning in which the station is also stored. Note • If the receiver is pressed after choosing the fourth character. STANDBY/ON LISTENING MODE SELECT...
...'t done this . 2 Press T.EDIT (TUNER EDIT). buttons (remote) to select characters. • Press ENTER to 30 stations, stored in three banks, or classes, (A, B and C) of manually tuning in which the station is also stored. Note • If the receiver is pressed after choosing the fourth character. STANDBY/ON LISTENING MODE SELECT...
Owner's Manual
Page 51
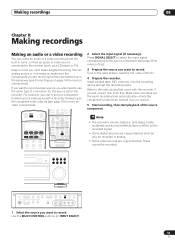
... video etc. Most video recorders set the recording levels. into the recording device and set the audio recording level automatically-check the component's instruction manual if you can't record a component hooked up to S-video jacks with the recorder if you want to record a video source, you also...in analog. • Some video sources are copy-protected, and can only be recorded. Tune to record. AUDIO/VIDEO MULTI-CHANNEL RECEIVER VSX-1015X DVD/LD TV/SAT DVR/VCR VIDEO1 CD-R/ CD TAPE/MD TUNER VIDEO2 MASTER VOLUME TUNER CONTROL TUNER EDIT TUNING/ STATION MULTI JOG...
... video etc. Most video recorders set the recording levels. into the recording device and set the audio recording level automatically-check the component's instruction manual if you can't record a component hooked up to S-video jacks with the recorder if you want to record a video source, you also...in analog. • Some video sources are copy-protected, and can only be recorded. Tune to record. AUDIO/VIDEO MULTI-CHANNEL RECEIVER VSX-1015X DVD/LD TV/SAT DVR/VCR VIDEO1 CD-R/ CD TAPE/MD TUNER VIDEO2 MASTER VOLUME TUNER CONTROL TUNER EDIT TUNING/ STATION MULTI JOG...
Owner's Manual
Page 58
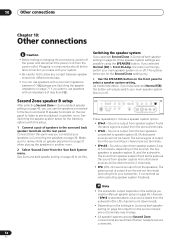
... in speaker system B, and the subwoofer. Sound is not downmixed). • Depending on the settings in another room. 2 Select 'Second Zone' from your speakers in Manual speaker setup on the rear panel. Second Zone speaker B setup After selecting Second Zone in Surround back speaker setting on page 40 to choose a speaker...
... in speaker system B, and the subwoofer. Sound is not downmixed). • Depending on the settings in another room. 2 Select 'Second Zone' from your speakers in Manual speaker setup on the rear panel. Second Zone speaker B setup After selecting Second Zone in Surround back speaker setting on page 40 to choose a speaker...


