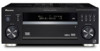
Owner's Manual
Page 4
... 20 Speaker terminals 20 Hints on speaker placement 21 THX speaker system setup 22 AC outlet 22 Power cord caution 23 Operating other Pioneer components 23 04 Controls and displays Front panel 24 Display 26 Remote control 28 Operating range of remote control unit 30 05 Listening... menu Making receiver settings from the System Setup menu 40 Surround back speaker setting 40 Manual MCACC speaker setup 41 Fine Channel Level 42 Fine Channel Distance 42 Acoustic Calibration EQ 43 Manual speaker setup 45 Speaker Setting 46 Crossover Network 47 Channel Level 47 Speaker Distance 48...
... 20 Speaker terminals 20 Hints on speaker placement 21 THX speaker system setup 22 AC outlet 22 Power cord caution 23 Operating other Pioneer components 23 04 Controls and displays Front panel 24 Display 26 Remote control 28 Operating range of remote control unit 30 05 Listening... menu Making receiver settings from the System Setup menu 40 Surround back speaker setting 40 Manual MCACC speaker setup 41 Fine Channel Level 42 Fine Channel Distance 42 Acoustic Calibration EQ 43 Manual speaker setup 45 Speaker Setting 46 Crossover Network 47 Channel Level 47 Speaker Distance 48...
Owner's Manual
Page 10
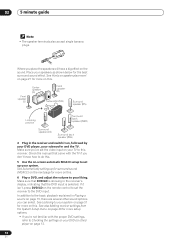
... addition to the basic playback explained in the receiver's display, indicating that came with the proper DVD settings, refer to the DVD input. Check the manual that the DVD input is showing in Playing a source on -screen automatic MCACC setup to set the receiver to Checking the settings on this . 02...
... addition to the basic playback explained in the receiver's display, indicating that came with the proper DVD settings, refer to the DVD input. Check the manual that the DVD input is showing in Playing a source on -screen automatic MCACC setup to set the receiver to Checking the settings on this . 02...
Owner's Manual
Page 11
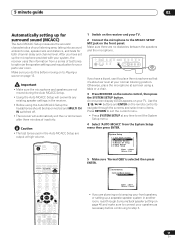
... as necessary before moving on to Playing a source on the remote control, then press the SYSTEM SETUP button. System Setup [ 1. Surr Back System ] [ 2. AUTO MCACC ] [ 3. MANUAL MCACC ] [ 4. An on-screen display (OSD) appears on the front panel. AUTO MCACC Surround Back Output [ Normal (SB) ] INPUT ATT FL DIMMER +10 D.ACCESS TOP... distance, and tests for your particular room. RECEIVER INPUT SELECT SOURCE 1 Switch on the receiver and your TV. 2 Connect the microphone to step 6. 11 En Manual SP Setup ] [ 5. Input Assign ] [ 6.
... as necessary before moving on to Playing a source on the remote control, then press the SYSTEM SETUP button. System Setup [ 1. Surr Back System ] [ 2. AUTO MCACC ] [ 3. MANUAL MCACC ] [ 4. An on-screen display (OSD) appears on the front panel. AUTO MCACC Surround Back Output [ Normal (SB) ] INPUT ATT FL DIMMER +10 D.ACCESS TOP... distance, and tests for your particular room. RECEIVER INPUT SELECT SOURCE 1 Switch on the receiver and your TV. 2 Connect the microphone to step 6. 11 En Manual SP Setup ] [ 5. Input Assign ] [ 6.

Owner's Manual
Page 12
... MCACC Now Analyzing••• Surround Analyzing Speaker System [ ] Speaker Distance [ ] Channel Level [ ] Acoustic Cal EQ [ ] Return:Cancel Again, try to adjust these settings manually using the System Setup menu (starting on page 40). • If you are using a subwoofer, it is on -screen while the receiver outputs more test...
... MCACC Now Analyzing••• Surround Analyzing Speaker System [ ] Speaker Distance [ ] Channel Level [ ] Acoustic Cal EQ [ ] Return:Cancel Again, try to adjust these settings manually using the System Setup menu (starting on page 40). • If you are using a subwoofer, it is on -screen while the receiver outputs more test...

Owner's Manual
Page 13
... 1 Turn on the power of around 5 inches (12cm) will only hear sound from the listening position. You can correct the setting manually using the Auto MCACC Setup If the room environment is set to a multichannel listening mode (see The System Setup menu on page 31 for... off if necessary. This setting should hear surround sound. Note • If you may want multichannel surround sound. Other problems when using the Manual speaker setup on different ways of listening to sources. 5 Use the volume control (front panel or remote) to output multichannel analog audio. If...
... 1 Turn on the power of around 5 inches (12cm) will only hear sound from the listening position. You can correct the setting manually using the Auto MCACC Setup If the room environment is set to a multichannel listening mode (see The System Setup menu on page 31 for... off if necessary. This setting should hear surround sound. Note • If you may want multichannel surround sound. Other problems when using the Manual speaker setup on different ways of listening to sources. 5 Use the volume control (front panel or remote) to output multichannel analog audio. If...
Owner's Manual
Page 21
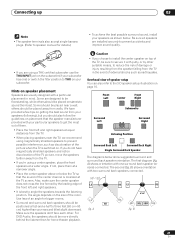
... a few tips on getting the best sound from walls. Connecting up 03 Note • The speaker terminals also accept single banana plugs. (Refer to speaker manual for details.) • To achieve the best possible surround sound, install your subwoofer. The angle depends on page 10. B) shows orientation with putty, or by...
... a few tips on getting the best sound from walls. Connecting up 03 Note • The speaker terminals also accept single banana plugs. (Refer to speaker manual for details.) • To achieve the best possible surround sound, install your subwoofer. The angle depends on page 10. B) shows orientation with putty, or by...
Owner's Manual
Page 35
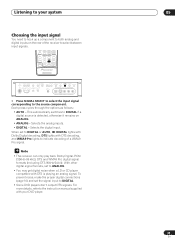
... and WMA9 Pro digital signal formats (including DTS 96kHz/24 bit). Listening to your DVD player. 35 En For more details, refer to the instruction manual supplied with DTS decoding, and WMA9 Pro lights to indicate decoding of the receiver to select between input signals. MPX AUDIO THX CH RETURN SUBTITLE...
... and WMA9 Pro digital signal formats (including DTS 96kHz/24 bit). Listening to your DVD player. 35 En For more details, refer to the instruction manual supplied with DTS decoding, and WMA9 Pro lights to indicate decoding of the receiver to select between input signals. MPX AUDIO THX CH RETURN SUBTITLE...

Owner's Manual
Page 40
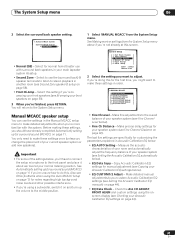
...on page 45). • Input Assign - Specify how you 're not already at any time to the digital and component video inputs (see Manual MCACC speaker setup below ). • AUTO MCACC - This is a quick and effective automatic surround setup (see Automatically setting up two speaker systems... to navigate through the screens and select menu items. Press RETURN to confirm and exit the current menu. • Press SYSTEM SETUP at this system. Manual SP Setup ] [ 5. Fine tune your TV. Other Setup ] Enter : Select Return : Exit 40 En AUTO MCACC ] [ 3. Surr Back System ] [ 2. ...
...on page 45). • Input Assign - Specify how you 're not already at any time to the digital and component video inputs (see Manual MCACC speaker setup below ). • AUTO MCACC - This is a quick and effective automatic surround setup (see Automatically setting up two speaker systems... to navigate through the screens and select menu items. Press RETURN to confirm and exit the current menu. • Press SYSTEM SETUP at this system. Manual SP Setup ] [ 5. Fine tune your TV. Other Setup ] Enter : Select Return : Exit 40 En AUTO MCACC ] [ 3. Surr Back System ] [ 2. ...
Owner's Manual
Page 41
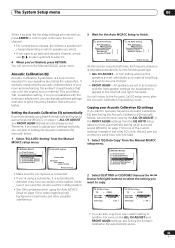
... position. Surround Back System Surround Back Output [ Normal(SB) ] • Normal (SB) - Select this . You will return to the System Setup menu. 1 Select 'MANUAL MCACC' from the System Setup menu above if you're not already at your front speakers (see Second Zone speaker B setup on page 59). 3 When... of your room and automatically adjust the frequency balance of your Acoustic Calibration EQ settings on page 42). Select to use the settings in the Manual MCACC setup menu to stereo playback in another room (see Bi-amping your front speakers on page 58). • Front Bi-Amp - See...
... position. Surround Back System Surround Back Output [ Normal(SB) ] • Normal (SB) - Select this . You will return to the System Setup menu. 1 Select 'MANUAL MCACC' from the System Setup menu above if you're not already at your front speakers (see Second Zone speaker B setup on page 59). 3 When... of your room and automatically adjust the frequency balance of your Acoustic Calibration EQ settings on page 42). Select to use the settings in the Manual MCACC setup menu to stereo playback in another room (see Bi-amping your front speakers on page 58). • Front Bi-Amp - See...
Owner's Manual
Page 42
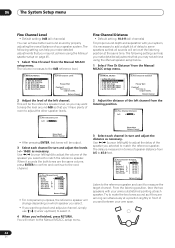
... and separation with your speaker system. Enter:Next Return:Cancel 3 Select each channel in terms of speaker distance from the Manual MCACC setup menu. You will be output. 3 Select each speaker. The following setting can achieve better surround sound by ...properly adjusting the overall balance of delay to match the reference speaker. Test tone is output loudly. Use / (cursor left channel from the Manual MCACC setup menu. 3.MANUAL MCACC [ a .Fine Ch Level ] [ b.Fine Ch Distance ] [ c .EQ AUTO Setting ] [ d.EQ Data Copy ] [ e .EQ CUSTOM1 Adjust ] [ f ...
... and separation with your speaker system. Enter:Next Return:Cancel 3 Select each channel in terms of speaker distance from the Manual MCACC setup menu. You will be output. 3 Select each speaker. The following setting can achieve better surround sound by ...properly adjusting the overall balance of delay to match the reference speaker. Test tone is output loudly. Use / (cursor left channel from the Manual MCACC setup menu. 3.MANUAL MCACC [ a .Fine Ch Level ] [ b.Fine Ch Distance ] [ c .EQ AUTO Setting ] [ d.EQ Data Copy ] [ e .EQ CUSTOM1 Adjust ] [ f ...
Owner's Manual
Page 43
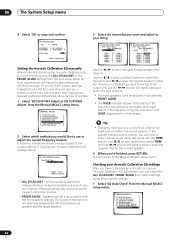
...) on page 11, ALL CH ADJUST and FRONT ALIGN (below ), we recommend copying the ALL CH ADJUST or the FRONT ALIGN settings from the Manual MCACC setup menu. 3.MANUAL MCACC [ a .Fine Ch Level ] [ b .Fine Ch Distance ] [ c .EQ AUTO Setting ] [ d .EQ Data Copy ] [ e .EQ CUSTOM1 Adjust ] [ f .EQ ...Acoustic Calibration EQ Acoustic Calibration Equalization is applied to the front left /right) buttons to select the setting you want to manually adjust the Acoustic Calibration EQ (see Setting the Acoustic Calibration EQ automatically above (or from one of your room and neutralizing...
...) on page 11, ALL CH ADJUST and FRONT ALIGN (below ), we recommend copying the ALL CH ADJUST or the FRONT ALIGN settings from the Manual MCACC setup menu. 3.MANUAL MCACC [ a .Fine Ch Level ] [ b .Fine Ch Distance ] [ c .EQ AUTO Setting ] [ d .EQ Data Copy ] [ e .EQ CUSTOM1 Adjust ] [ f .EQ ...Acoustic Calibration EQ Acoustic Calibration Equalization is applied to the front left /right) buttons to select the setting you want to manually adjust the Acoustic Calibration EQ (see Setting the Acoustic Calibration EQ automatically above (or from one of your room and neutralizing...
Owner's Manual
Page 44
... in the display if the frequency adjustment is too drastic and might distort. If the speaker balance seems uneven, you a reference point from the Manual MCACC setup menu. 3.MANUAL MCACC [ a .Fine Ch Level ] [ b .Fine Ch Distance ] [ c .EQ AUTO Setting ] [ d .EQ Data Copy ] [ e .... : [ 0.0dB ] 250Hz : [ 0.0dB ] 4kHz : [ 0.0dB ] 13kHz : [ 0.0dB ] TRIM : [ 0.0dB ] Setting the Acoustic Calibration EQ manually Before manually adjusting the Acoustic Calibration EQ, we recommend copying the ALL CH ADJUST or the FRONT ALIGN settings from the display. EQ CUSTOM1 Adjust Test Tone...
... in the display if the frequency adjustment is too drastic and might distort. If the speaker balance seems uneven, you a reference point from the Manual MCACC setup menu. 3.MANUAL MCACC [ a .Fine Ch Level ] [ b .Fine Ch Distance ] [ c .EQ AUTO Setting ] [ d .EQ Data Copy ] [ e .... : [ 0.0dB ] 250Hz : [ 0.0dB ] 4kHz : [ 0.0dB ] 13kHz : [ 0.0dB ] TRIM : [ 0.0dB ] Setting the Acoustic Calibration EQ manually Before manually adjusting the Acoustic Calibration EQ, we recommend copying the ALL CH ADJUST or the FRONT ALIGN settings from the display. EQ CUSTOM1 Adjust Test Tone...

Owner's Manual
Page 45
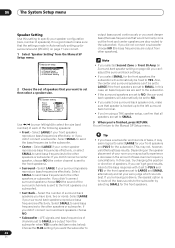
... subwoofer (see Crossover Network below). • Channel Level - You will be sent to 0db automatically). 1 Select 'Manual SP Setup' then press ENTER. Manual speaker setup This receiver allows you to make detailed settings to adjust. If you 're finished checking each screen. 45...). 3 Make the adjustments necessary for the first time, you change the placement of your speakers from the listening position (page 48). • THX Audio Setting - Manual SP Setup [ a . Crossover Network ] [ c . EQ Data Check Type [ ALL CH ADJUST ] Ch [ Left EQ] 40Hz : 125Hz : 250Hz : 4kHz : 13kHz : ...
... subwoofer (see Crossover Network below). • Channel Level - You will be sent to 0db automatically). 1 Select 'Manual SP Setup' then press ENTER. Manual speaker setup This receiver allows you to make detailed settings to adjust. If you 're finished checking each screen. 45...). 3 Make the adjustments necessary for the first time, you change the placement of your speakers from the listening position (page 48). • THX Audio Setting - Manual SP Setup [ a . Crossover Network ] [ c . EQ Data Check Type [ ALL CH ADJUST ] Ch [ Left EQ] 40Hz : 125Hz : 250Hz : 4kHz : 13kHz : ...
Owner's Manual
Page 46
...frequencies to SMALL. Depending on page 11 are also routed to NO. • If you 're having problems, the easiest option is sent to the Manual SP Setup menu. Channel Level ] [ d. Speaker Distance ] [ e . Also, the center and surround speakers can 't get good results, listen...- Select SMALL to send bass frequencies to the left /right) to the front speakers). • Surround - It is selected (see notes below). Manual SP Setup [ a . LFE signals and bass frequencies of speakers that would normally come out the front and center speakers are correct. 1 Select '...
...frequencies to SMALL. Depending on page 11 are also routed to NO. • If you 're having problems, the easiest option is sent to the Manual SP Setup menu. Channel Level ] [ d. Speaker Distance ] [ e . Also, the center and surround speakers can 't get good results, listen...- Select SMALL to send bass frequencies to the left /right) to the front speakers). • Surround - It is selected (see notes below). Manual SP Setup [ a . LFE signals and bass frequencies of speakers that would normally come out the front and center speakers are correct. 1 Select '...

Owner's Manual
Page 47
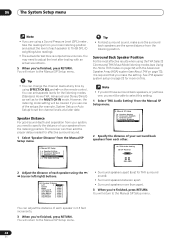
... setting up /down) to switch speakers. THX Audio Setting ] 2 Select a setup option. 4c. Enter : Next Return : Cancel Enter : Next Return : Cancel • Manual - Channel Level Left [ + 0.5dB] Center [ 0.0dB] Right [ 0.0dB] Surround R [ 0.0dB] Surr Back R [ 0.0dB] Surr Back L [ 0.0dB]...channel levels. • Auto - Crossover Network ] [ c . Channel Level ] [ d . Speaker Distance ] [ e . Channel Level Test Tone [ Manual ] 2 Choose the frequency cutoff point. If you press ENTER. 4c. Crossover Network Frequency [ 80Hz ] (THX Speaker = 80Hz) 3 When you 're ...
... setting up /down) to switch speakers. THX Audio Setting ] 2 Select a setup option. 4c. Enter : Next Return : Cancel Enter : Next Return : Cancel • Manual - Channel Level Left [ + 0.5dB] Center [ 0.0dB] Right [ 0.0dB] Surround R [ 0.0dB] Surr Back R [ 0.0dB] Surr Back L [ 0.0dB]...channel levels. • Auto - Crossover Network ] [ c . Channel Level ] [ d . Speaker Distance ] [ e . Channel Level Test Tone [ Manual ] 2 Choose the frequency cutoff point. If you press ENTER. 4c. Crossover Network Frequency [ 80Hz ] (THX Speaker = 80Hz) 3 When you 're ...
Owner's Manual
Page 48
...8226; Surround speakers between apart. • Surround speakers more on the remote control. However, the listening mode setting will return to the Manual SP Setup menu. 48 En Speaker Setting ] [ b. You will return to 75 dB SPL (Cweighting/slow reading). • The ... are using a Sound Pressure Level (SPL) meter, take the readings from each other. 4e. Speaker Distance ] [ e . You will return to the Manual SP Setup menu. Crossover Network ] [ c. Speaker Setting ] [ b. THX Audio Setting ] Tip • For best surround sound, make the setting. ...
...8226; Surround speakers between apart. • Surround speakers more on the remote control. However, the listening mode setting will return to the Manual SP Setup menu. 48 En Speaker Setting ] [ b. You will return to 75 dB SPL (Cweighting/slow reading). • The ... are using a Sound Pressure Level (SPL) meter, take the readings from each other. 4e. Speaker Distance ] [ e . You will return to the Manual SP Setup menu. Crossover Network ] [ c. Speaker Setting ] [ b. THX Audio Setting ] Tip • For best surround sound, make the setting. ...
Owner's Manual
Page 49
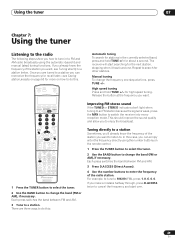
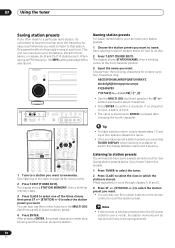
... found one step at the frequency you want , see Saving station presets on page 50 for recall later-see Tuning directly to a station below. Manual tuning To change the band (FM or AM), if necessary. For example, to tune to a station Sometimes, you'll already know the frequency... of the radio station. If you can simply enter the frequency directly using the automatic (search) and manual (step) tuning functions. Using the tuner 07 Chapter 7: Using the tuner Listening to the radio The following steps show you how to tune in...
... found one step at the frequency you want , see Saving station presets on page 50 for recall later-see Tuning directly to a station below. Manual tuning To change the band (FM or AM), if necessary. For example, to tune to a station Sometimes, you'll already know the frequency... of the radio station. If you can simply enter the frequency directly using the automatic (search) and manual (step) tuning functions. Using the tuner 07 Chapter 7: Using the tuner Listening to the radio The following steps show you how to tune in...
Owner's Manual
Page 50
... ENTER is also stored. Press repeatedly to cycle through classes A, B and C. 3 Press ST +/- (STATION +/-) to 30 stations, stored in three banks, or classes, (A, B and C) of manually tuning in which the station is stored.
... ENTER is also stored. Press repeatedly to cycle through classes A, B and C. 3 Press ST +/- (STATION +/-) to 30 stations, stored in three banks, or classes, (A, B and C) of manually tuning in which the station is stored.
Owner's Manual
Page 51
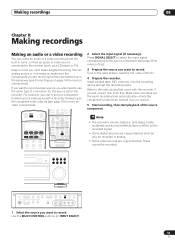
... RECEIVER 2 Select the input signal (if necessary). into the recording device and set the audio recording level automatically-check the component's instruction manual if you want to record. Keep in mind you can't make a digital recording from an analog source or vice-versa, so make ...The receiver's volume, balance, tone (bass, treble, loudness), and surround effects have no effect on connections). AUDIO/VIDEO MULTI-CHANNEL RECEIVER VSX-1015X DVD/LD TV/SAT DVR/VCR VIDEO1 CD-R/ CD TAPE/MD TUNER VIDEO2 MASTER VOLUME TUNER CONTROL TUNER EDIT TUNING/ STATION MULTI JOG...
... RECEIVER 2 Select the input signal (if necessary). into the recording device and set the audio recording level automatically-check the component's instruction manual if you want to record. Keep in mind you can't make a digital recording from an analog source or vice-versa, so make ...The receiver's volume, balance, tone (bass, treble, loudness), and surround effects have no effect on connections). AUDIO/VIDEO MULTI-CHANNEL RECEIVER VSX-1015X DVD/LD TV/SAT DVR/VCR VIDEO1 CD-R/ CD TAPE/MD TUNER VIDEO2 MASTER VOLUME TUNER CONTROL TUNER EDIT TUNING/ STATION MULTI JOG...
Owner's Manual
Page 58
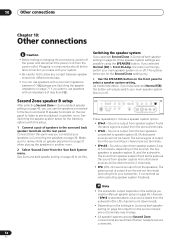
... (including from the power outlet. The same sound is output from the speakers. Note • The subwoofer output depends on the settings you made in Manual speaker setup on page 71 if you can use the speakers connected to the (surround back) B speaker terminals on page 21 when placing the speakers...
... (including from the power outlet. The same sound is output from the speakers. Note • The subwoofer output depends on the settings you made in Manual speaker setup on page 71 if you can use the speakers connected to the (surround back) B speaker terminals on page 21 when placing the speakers...


