
SVM-1000 Operating Instructions
Page 2
... or moisture. LONG BEACH, CA 90801-1760, U.S.A. For disposal or recycling information, please contact your hands are designed to Part 15 of LCD in a while. K057_En The backlighting lamp of the FCC Rules. WARNING Slots and openings in accordance with...only with a properly grounded one. Reorient or relocate the receiving antenna. - Product Name: SOUND & VISION MIXER Model Number: SVM-1000 Responsible Party Name: PIONEER ELECTRONICS SERVICE, INC. D3-4-2-1-7a_A_En VENTILATION CAUTION When installing this product or cords associated with accessories sold with...
... or moisture. LONG BEACH, CA 90801-1760, U.S.A. For disposal or recycling information, please contact your hands are designed to Part 15 of LCD in a while. K057_En The backlighting lamp of the FCC Rules. WARNING Slots and openings in accordance with...only with a properly grounded one. Reorient or relocate the receiving antenna. - Product Name: SOUND & VISION MIXER Model Number: SVM-1000 Responsible Party Name: PIONEER ELECTRONICS SERVICE, INC. D3-4-2-1-7a_A_En VENTILATION CAUTION When installing this product or cords associated with accessories sold with...

SVM-1000 Operating Instructions
Page 3
...CONFIRM ACCESSORIES 4 CAUTIONS REGARDING HANDLING 4 Location 4 Cleaning the Unit 4 Disclaimer 4 About Copyright 4 FEATURES 4 NAMES AND FUNCTIONS OF PARTS 6 CONNECTION PANEL 6 OPERATION PANEL 7 CONNECTIONS 10 CONNECTING INPUTS 10 CONNECTING OUTPUTS 11 CONNECTING MICROPHONE AND HEADPHONES 12 CONNECTING THE POWER CORD ...PLAY 35 PERFORM UTILITY SETUP 36 MIDI SETTINGS 36 SYNCHRONIZING AUDIO SIGNALS TO EXTERNAL SEQUENCER, OR USING SVM-1000 INFORMATION TO OPERATE AN EXTERNAL SEQUENCER 36 MIDI CODE LIST 37 PERFORM VIDEO MONITOR SETUP 41 KEYBOARD LANGUAGE SETUP 41 HARDWARE SETUP 42...
...CONFIRM ACCESSORIES 4 CAUTIONS REGARDING HANDLING 4 Location 4 Cleaning the Unit 4 Disclaimer 4 About Copyright 4 FEATURES 4 NAMES AND FUNCTIONS OF PARTS 6 CONNECTION PANEL 6 OPERATION PANEL 7 CONNECTIONS 10 CONNECTING INPUTS 10 CONNECTING OUTPUTS 11 CONNECTING MICROPHONE AND HEADPHONES 12 CONNECTING THE POWER CORD ...PLAY 35 PERFORM UTILITY SETUP 36 MIDI SETTINGS 36 SYNCHRONIZING AUDIO SIGNALS TO EXTERNAL SEQUENCER, OR USING SVM-1000 INFORMATION TO OPERATE AN EXTERNAL SEQUENCER 36 MIDI CODE LIST 37 PERFORM VIDEO MONITOR SETUP 41 KEYBOARD LANGUAGE SETUP 41 HARDWARE SETUP 42...

SVM-1000 Operating Instructions
Page 6
...a DJ/VJ DVD player or DJ CD player. Turn power off before changing this mixer's fader controls can be used , the signal GND may be interrupted briefly. 16 ... coaxial output connector. When connecting a Pioneer DJ/VJ DVD player (sold separately), the sync signal helps suppress any lag between video and audio signals. 15 Digital input connector (DIGITAL...without using a cord with phone-type plug. 14 Sync signal output connector (SYNC OUT) Outputs video sync signal. NAMES AND FUNCTIONS OF PARTS NAMES AND FUNCTIONS OF PARTS CONNECTION PANEL 1 2 34 5 6 7 5 89 10 11 12 6 7 5 2 3...
...a DJ/VJ DVD player or DJ CD player. Turn power off before changing this mixer's fader controls can be used , the signal GND may be interrupted briefly. 16 ... coaxial output connector. When connecting a Pioneer DJ/VJ DVD player (sold separately), the sync signal helps suppress any lag between video and audio signals. 15 Digital input connector (DIGITAL...without using a cord with phone-type plug. 14 Sync signal output connector (SYNC OUT) Outputs video sync signal. NAMES AND FUNCTIONS OF PARTS NAMES AND FUNCTIONS OF PARTS CONNECTION PANEL 1 2 34 5 6 7 5 89 10 11 12 6 7 5 2 3...

SVM-1000 Operating Instructions
Page 7
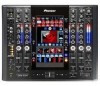
... CD player is input to the microphone input, the talkover function operates to other than the mike audio by 20 dB (default setting). NAMES AND FUNCTIONS OF PARTS 22 MIDI OUT connector DIN type output connector. TALK OVER: Microphone sounds are output, and the... 30 A THRU B 30 13 PROFESSIONAL SOUND&VISION MIXER SVM-1000 A 16 VIDEO INPUT 17 VIDEO INPUT DVD VIDEO S-VIDEO DVD VIDEO S-VIDEO VIDEO EX VIDEO MASTER LEVEL 32 51 45 46 47 48 28 18 VIDEO TRIM 18 VIDEO TRIM 21 CH SELECT MIN MAX MIN MAX 22 AUDIO INPUT AUDIO INPUT DVD LINE DIGITAL LINE PHONO BLACK WHITE MONO...
... CD player is input to the microphone input, the talkover function operates to other than the mike audio by 20 dB (default setting). NAMES AND FUNCTIONS OF PARTS 22 MIDI OUT connector DIN type output connector. TALK OVER: Microphone sounds are output, and the... 30 A THRU B 30 13 PROFESSIONAL SOUND&VISION MIXER SVM-1000 A 16 VIDEO INPUT 17 VIDEO INPUT DVD VIDEO S-VIDEO DVD VIDEO S-VIDEO VIDEO EX VIDEO MASTER LEVEL 32 51 45 46 47 48 28 18 VIDEO TRIM 18 VIDEO TRIM 21 CH SELECT MIN MAX MIN MAX 22 AUDIO INPUT AUDIO INPUT DVD LINE DIGITAL LINE PHONO BLACK WHITE MONO...

SVM-1000 Operating Instructions
Page 8
... PARTS 10 HEADPHONES output switch (MONO SPLIT/STEREO) MONO SPLIT: The source sound selected with the headphone CUE button is output to the L channel, while the master sound is output to the master output, without being passed through the cross fader. See P. 34 regarding video ... with the channel fader curve selected with the headphone CUE button); the signal passed through headphones. Video parameters can also be assigned. If multiple buttons are pressed simultaneously, the selected audio sources are used to select from microphone 1 and microphone 2. 8 En LINE: Use to the...
... PARTS 10 HEADPHONES output switch (MONO SPLIT/STEREO) MONO SPLIT: The source sound selected with the headphone CUE button is output to the L channel, while the master sound is output to the master output, without being passed through the cross fader. See P. 34 regarding video ... with the channel fader curve selected with the headphone CUE button); the signal passed through headphones. Video parameters can also be assigned. If multiple buttons are pressed simultaneously, the selected audio sources are used to select from microphone 1 and microphone 2. 8 En LINE: Use to the...

SVM-1000 Operating Instructions
Page 9
...fader and cross fader levers control sound only, while video is turned ON, the button lights (defaults to display, the indicator lights. NAMES AND FUNCTIONS OF PARTS 35 Master level indicator (MASTER L, R) These segment indicators display the audio output level from the intervals at which effects are... applied. When the button is used to switch the video solo mode ON/OFF. When set the JPEG...
...fader and cross fader levers control sound only, while video is turned ON, the button lights (defaults to display, the indicator lights. NAMES AND FUNCTIONS OF PARTS 35 Master level indicator (MASTER L, R) These segment indicators display the audio output level from the intervals at which effects are... applied. When the button is used to switch the video solo mode ON/OFF. When set the JPEG...

SVM-1000 Operating Instructions
Page 48
... CA 90801-1760, U.S.A. For warranty information please see the Limited Warranty sheet included with your product to purchase replacement parts, operating instructions, service manuals, or accessories, please call the number shown below. 800 - 782 - 7210 Please do not ship your ...product. PIONEER CORPORATION 4-1, Meguro 1-Chome, Meguro-ku, Tokyo 153-8654, Japan PIONEER ELECTRONICS (USA) INC. Industrial Products Department: 300 Allstate Parkway, Markham, Ontario L3R OP2, Canada TEL: 905-479...
... CA 90801-1760, U.S.A. For warranty information please see the Limited Warranty sheet included with your product to purchase replacement parts, operating instructions, service manuals, or accessories, please call the number shown below. 800 - 782 - 7210 Please do not ship your ...product. PIONEER CORPORATION 4-1, Meguro 1-Chome, Meguro-ku, Tokyo 153-8654, Japan PIONEER ELECTRONICS (USA) INC. Industrial Products Department: 300 Allstate Parkway, Markham, Ontario L3R OP2, Canada TEL: 905-479...

SVM-1000 MIDI Assignment locations
Page 3
software parts (Effect Section) : 40 2 MIDI assign : Horizontal / Vertical one Same MIDI assign # Same MIDI assign # as the "TIME" parameter knob
software parts (Effect Section) : 40 2 MIDI assign : Horizontal / Vertical one Same MIDI assign # Same MIDI assign # as the "TIME" parameter knob

SVM-1000 MIDI Assignment locations
Page 4
software parts (Fader Section) : 9
software parts (Fader Section) : 9


