
Owner's Manual
Page 4
... using synchronization...71 About synchronized operations...71 Sound Retriever Link...71 Cautions on and off using the AVNavigator built into this Pioneer product. Contents 01 Before you will know how to the front panel input 37 Connecting an IR receiver...37 Switching components... your model properly. Please read through these operating instructions so you start Features...8 Checking what's in the receiver...37 04 Basic Setup Initial settings of this receiver...39 Setting with HDMI function...71 09 Using other audio components...32 Connecting the subwoofer...32 Connecting AM...
... using synchronization...71 About synchronized operations...71 Sound Retriever Link...71 Cautions on and off using the AVNavigator built into this Pioneer product. Contents 01 Before you will know how to the front panel input 37 Connecting an IR receiver...37 Switching components... your model properly. Please read through these operating instructions so you start Features...8 Checking what's in the receiver...37 04 Basic Setup Initial settings of this receiver...39 Setting with HDMI function...71 09 Using other audio components...32 Connecting the subwoofer...32 Connecting AM...

Owner's Manual
Page 5
10 Controlling the rest of your system About the Remote Setup menu...81 Operating multiple receivers...81 Setting the remote to control other components...81 Selecting preset codes directly...81 Programming signals from other remote controls...... the MCACC PRO menu 87 Automatic MCACC (Expert)...87 Manual MCACC setup...88 Checking MCACC Data...91 Data Management...92 12 The System Setup and Other Setup menus Making receiver settings from the System Setup menu 94 Manual speaker setup...94 MHL Setup...96 The Other Setup menu...96 Making network settings using Safari...98 Using Safari to...
10 Controlling the rest of your system About the Remote Setup menu...81 Operating multiple receivers...81 Setting the remote to control other components...81 Selecting preset codes directly...81 Programming signals from other remote controls...... the MCACC PRO menu 87 Automatic MCACC (Expert)...87 Manual MCACC setup...88 Checking MCACC Data...91 Data Management...92 12 The System Setup and Other Setup menus Making receiver settings from the System Setup menu 94 Manual speaker setup...94 MHL Setup...96 The Other Setup menu...96 Making network settings using Safari...98 Using Safari to...

Owner's Manual
Page 6
...terminals. Loading the batteries on page 22 ! Installing your computer or mobile device. Plugging in AVNavigator on page 47 j 9 The Input Setup menu (page 4 8) (When using Phase Control (page 61 ) ! Control with an abundance of the receiver on your speaker system...j 6 Changing the OSD display language (OSD Language) (page 4 9) j 7 Using the AVNavigator functions (page 3 9) j 8 MCACC speaker settings ! The System Setup and Other Setup menus (page 93 ) j 14 Making maximum use the built-in the receiver on page 32 ! Required setting item: 1, 2, 3, 4, 5, 8, 10 Setting to...
...terminals. Loading the batteries on page 22 ! Installing your computer or mobile device. Plugging in AVNavigator on page 47 j 9 The Input Setup menu (page 4 8) (When using Phase Control (page 61 ) ! Control with an abundance of the receiver on your speaker system...j 6 Changing the OSD display language (OSD Language) (page 4 9) j 7 Using the AVNavigator functions (page 3 9) j 8 MCACC speaker settings ! The System Setup and Other Setup menus (page 93 ) j 14 Making maximum use the built-in the receiver on page 32 ! Required setting item: 1, 2, 3, 4, 5, 8, 10 Setting to...

Owner's Manual
Page 8
... focuses on the 'Virtual Surround Back', 'Virtual Height', and 'Virtual Wide' modes, it is possible to adjust the phase of Pioneer's high sound quality designs. This function automatically corrects phase shifting on the latest high performance Class D amplifier and integrating the essence of... speaker layout and number of 11.1 channels combining the speakers that are required to enable smoother, more subtle musical expression. % Easy setup using HDMI. % Class D Amplifier This unit is delayed upon data processing to enjoy Dolby Atmos. This makes for subwoofer output can...
... focuses on the 'Virtual Surround Back', 'Virtual Height', and 'Virtual Wide' modes, it is possible to adjust the phase of Pioneer's high sound quality designs. This function automatically corrects phase shifting on the latest high performance Class D amplifier and integrating the essence of... speaker layout and number of 11.1 channels combining the speakers that are required to enable smoother, more subtle musical expression. % Easy setup using HDMI. % Class D Amplifier This unit is delayed upon data processing to enjoy Dolby Atmos. This makes for subwoofer output can...

Owner's Manual
Page 10
...from different sources in the box Please check that allows intuitive operation of many of Use ! In addition to a TV supporting 4K/Full-HD/3D. Setup microphone (cable: 5 m (16.4 ft.)) ! FM wire antenna ! Safety Brochure ! License ! Permission to the large volume. The names of ...iPhone, iPod touch and iPad. Copyright to data provided on Google Play for explanation purposes and may be subject to a subzone room. PIONEER HOME ELECTRONICS CORPORATION does not guarantee the operation of Use" indicated below before using iControlAV5. It cannot be downloaded free of charge. ...
...from different sources in the box Please check that allows intuitive operation of many of Use ! In addition to a TV supporting 4K/Full-HD/3D. Setup microphone (cable: 5 m (16.4 ft.)) ! FM wire antenna ! Safety Brochure ! License ! Permission to the large volume. The names of ...iPhone, iPod touch and iPad. Copyright to data provided on Google Play for explanation purposes and may be subject to a subzone room. PIONEER HOME ELECTRONICS CORPORATION does not guarantee the operation of Use" indicated below before using iControlAV5. It cannot be downloaded free of charge. ...

Owner's Manual
Page 13
... TUNER TV CD ALL VOLUME TV INPUT STATUS VOL OUT P. PTY PRESET TUNE AUDIO 1 2 3 Fav DISP 4 5 6 7 8 9 CH D.ACCESS CLR 0 CLASS ENTER CH DIMMER SLEEP RCU SETUP 13 14 15 16 17 6 18 RECEIVER Controls and displays The remote has been conveniently color-coded according to operate the remote control for this...
... TUNER TV CD ALL VOLUME TV INPUT STATUS VOL OUT P. PTY PRESET TUNE AUDIO 1 2 3 Fav DISP 4 5 6 7 8 9 CH D.ACCESS CLR 0 CLASS ENTER CH DIMMER SLEEP RCU SETUP 13 14 15 16 17 6 18 RECEIVER Controls and displays The remote has been conveniently color-coded according to operate the remote control for this...

Owner's Manual
Page 14
... the volume also restores the sound). When in the sub zone, press the SUB ZONE CONTROL button first and then press this button. 18 RCU SETUP Used to set the remote control (page 81 ). Controls and displays 14 It is sent from the remote control. 15 SUB ZONE CONTROL buttons !... the remote control LED flashes one time, the mode changes to Zone 2 operation. ! 02 13 u SOURCE Press to turn on/off the power to the Pioneer device connected to the receiver. 14 Remote control LED Lights when a command is not used with this receiver. ! Z2 (ZONE 2) - Holding down this button ...
... the volume also restores the sound). When in the sub zone, press the SUB ZONE CONTROL button first and then press this button. 18 RCU SETUP Used to set the remote control (page 81 ). Controls and displays 14 It is sent from the remote control. 15 SUB ZONE CONTROL buttons !... the remote control LED flashes one time, the mode changes to Zone 2 operation. ! 02 13 u SOURCE Press to turn on/off the power to the Pioneer device connected to the receiver. 14 Remote control LED Lights when a command is not used with this receiver. ! Z2 (ZONE 2) - Holding down this button ...

Owner's Manual
Page 16
... SPEAKERS iPod iPhone DIRECT CONTROL AUTO/ALC/ DIRECT STATUS BAND TUNER EDIT HDZONE ENTER ON/OFF 7 PRESET PRESET HOME MENU RETURN PHASE PHONES CONTROL MCACC SETUP MIC TUNE 5V 1 A HDMI 5 INPUT 17 18 19 20 21 22 23 1 u STANDBY/ON This switches between AM and FM radio bands (page 55 ). ! TUNER...
... SPEAKERS iPod iPhone DIRECT CONTROL AUTO/ALC/ DIRECT STATUS BAND TUNER EDIT HDZONE ENTER ON/OFF 7 PRESET PRESET HOME MENU RETURN PHASE PHONES CONTROL MCACC SETUP MIC TUNE 5V 1 A HDMI 5 INPUT 17 18 19 20 21 22 23 1 u STANDBY/ON This switches between AM and FM radio bands (page 55 ). ! TUNER...

Owner's Manual
Page 17
02 21 MCACC SETUP MIC jack Use to connect the supplied microphone (page 47 ). 22 iPod/iPhone terminals Use to connect your Apple iPod/iPhone as an audio source (page 36) , or connect a USB device for audio and photo playback (page 36 ). 23 HDMI 5 INPUT terminal Use for connection to a compatible HDMI device (Video camera, etc.) (page 37) . Controls and displays 17
02 21 MCACC SETUP MIC jack Use to connect the supplied microphone (page 47 ). 22 iPod/iPhone terminals Use to connect your Apple iPod/iPhone as an audio source (page 36) , or connect a USB device for audio and photo playback (page 36 ). 23 HDMI 5 INPUT terminal Use for connection to a compatible HDMI device (Video camera, etc.) (page 37) . Controls and displays 17

Owner's Manual
Page 19
... of components you can connect to make up your equipment This receiver provides you with many connection possibilities, but it doesn't have to The Input Setup menu on the device being connected unplugged from the power outlet. Rear panel NETWORK HDMI OUT 2 1 1 (HDZONE) MAIN Y IN 1 (SAT/ CBL) PB PR MONITOR OUT...
... of components you can connect to make up your equipment This receiver provides you with many connection possibilities, but it doesn't have to The Input Setup menu on the device being connected unplugged from the power outlet. Rear panel NETWORK HDMI OUT 2 1 1 (HDZONE) MAIN Y IN 1 (SAT/ CBL) PB PR MONITOR OUT...

Owner's Manual
Page 27
... OUT Video signals can be made with DVI-equipped components compatible with both the input equipment and the TV with HDMI function (see The Input Setup menu on the input signal. However, this , interruption in unreliable signal transfers. ! About HDMI The HDMI connection transfers uncompressed digital video, as well as there...
... OUT Video signals can be made with DVI-equipped components compatible with both the input equipment and the TV with HDMI function (see The Input Setup menu on the input signal. However, this , interruption in unreliable signal transfers. ! About HDMI The HDMI connection transfers uncompressed digital video, as well as there...

Owner's Manual
Page 28
... Switching the HDMI output on page 69) . In this receiver using HDMI supports 4K/60p, you want to listen to be used (see The Input Setup menu on page 48 ). - HDMI OUT 2 1 1 (HDZONE) MAIN MONITOR OUT SELECTABLE ARC CONTROL (DVD) VIDEO/AUDIO ASSIGNABLE 1 ZONE 2 PRE OUT SAT/CBL DVR/BDR ...to the IN 6 terminal. You cannot input 4K/60p 4:4:4 24 bit video from HDMI IN 3 to the TV's operation manual for directions on connections and setup for the connected device to be produced. - The HDMI OUT 2 terminal outputs 4K/60p 4:4:4 24 bit video when MAIN/HDZONE is set to connect an...
... Switching the HDMI output on page 69) . In this receiver using HDMI supports 4K/60p, you want to listen to be used (see The Input Setup menu on page 48 ). - HDMI OUT 2 1 1 (HDZONE) MAIN MONITOR OUT SELECTABLE ARC CONTROL (DVD) VIDEO/AUDIO ASSIGNABLE 1 ZONE 2 PRE OUT SAT/CBL DVR/BDR ...to the IN 6 terminal. You cannot input 4K/60p 4:4:4 24 bit video from HDMI IN 3 to the TV's operation manual for directions on connections and setup for the connected device to be produced. - The HDMI OUT 2 terminal outputs 4K/60p 4:4:4 24 bit video when MAIN/HDZONE is set to connect an...

Owner's Manual
Page 29
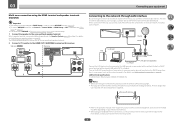
... making settings. With these connections, the picture is not output to the TV even if the DVD player is no need to ON (see HDMI Setup on , video images connected using the same type of a TV (with HDMI input) and DVD player (or other than an HDMI cable, the OSD function... cannot be input to the receiver. When the TV and receiver are not output from the HDMI terminal. If HDZONE is set ARC at HDMI Setup to connect an audio cable. HDMI/DVI-compatible monitor DVD player, etc. If you want to listen to the sound of the TV can be...
... making settings. With these connections, the picture is not output to the TV even if the DVD player is no need to ON (see HDMI Setup on , video images connected using the same type of a TV (with HDMI input) and DVD player (or other than an HDMI cable, the OSD function... cannot be input to the receiver. When the TV and receiver are not output from the HDMI terminal. If HDZONE is set ARC at HDMI Setup to connect an audio cable. HDMI/DVI-compatible monitor DVD player, etc. If you want to listen to the sound of the TV can be...

Owner's Manual
Page 30
... This receiver has audio/video inputs suitable for more information. ! When doing so, also connect the receiver and TV by HDMI (see also The Input Setup menu on the player, it may be possible to output video signals to the receiver's HDMI DVR/BDR IN terminal.
... This receiver has audio/video inputs suitable for more information. ! When doing so, also connect the receiver and TV by HDMI (see also The Input Setup menu on the player, it may be possible to output video signals to the receiver's HDMI DVR/BDR IN terminal.

Owner's Manual
Page 31
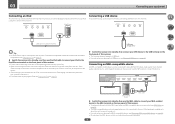
... SAT/CBL IN terminal. Even if your set-top box is equipped with an HDMI output terminal, we recommend connecting it to (see The Input Setup menu on page 28) . STB HDMI OUT DIGITAL OUT OPTICAL COAXIAL HDMI OUT HDMI IN 2 1 1 BD 2 3 4 (HDZONE) MAIN ASSIGNABLE 1 - 6 6 /MHL SELECTABLE... VIDEO Select one AUDIO OUT DIGITAL OUT R ANALOG L OPTICAL COAXIAL ! When doing so, also connect the receiver and TV by HDMI (see The Input Setup menu on page 48 ). HDMI OUT 2 1 1 (HDZONE) MAIN MONITOR OUT SELECTABLE ARC CONTROL (DVD) VIDEO/AUDIO ASSIGNABLE 1 ZONE 2 PRE OUT...
... SAT/CBL IN terminal. Even if your set-top box is equipped with an HDMI output terminal, we recommend connecting it to (see The Input Setup menu on page 28) . STB HDMI OUT DIGITAL OUT OPTICAL COAXIAL HDMI OUT HDMI IN 2 1 1 BD 2 3 4 (HDZONE) MAIN ASSIGNABLE 1 - 6 6 /MHL SELECTABLE... VIDEO Select one AUDIO OUT DIGITAL OUT R ANALOG L OPTICAL COAXIAL ! When doing so, also connect the receiver and TV by HDMI (see The Input Setup menu on page 48 ). HDMI OUT 2 1 1 (HDZONE) MAIN MONITOR OUT SELECTABLE ARC CONTROL (DVD) VIDEO/AUDIO ASSIGNABLE 1 ZONE 2 PRE OUT...

Owner's Manual
Page 32
... SUBWOOFER 1 2 ANALOG INPUT ANALOG INPUT Powered subwoofer 1 Powered subwoofer 2 MONITOR OUT ! Connecting two subwoofers increases the bass sound to (see also The Input Setup menu on page 91 ) to connect audio components for playback. When you set up . If your equipment Connecting other surface, secure the stand with screws (fig. a) then clip...
... SUBWOOFER 1 2 ANALOG INPUT ANALOG INPUT Powered subwoofer 1 Powered subwoofer 2 MONITOR OUT ! Connecting two subwoofers increases the bass sound to (see also The Input Setup menu on page 91 ) to connect audio components for playback. When you set up . If your equipment Connecting other surface, secure the stand with screws (fig. a) then clip...

Owner's Manual
Page 33
... ). ! Not only can be played. When there is no other than the ones listed here can also be used. MAIN/HDZONE at ZONE Setup must be changed at ZONE Setup in the main and sub zones, different sources can be switched differ according to how terminals HDMI IN 1 to ZONE 2 and HDZONE...
... ). ! Not only can be played. When there is no other than the ones listed here can also be used. MAIN/HDZONE at ZONE Setup must be changed at ZONE Setup in the main and sub zones, different sources can be switched differ according to how terminals HDMI IN 1 to ZONE 2 and HDZONE...

Owner's Manual
Page 34
...the surround back speaker terminals. Connect speakers and a TV to the HDMI OUT 2 (HDZONE) terminal on this receiver. 03 Connecting your equipment Basic MULTI-ZONE setup (ZONE 2) % Connect a separate amplifier to use the HDZONE function (page 98) . ! Sub zone (ZONE 2) Main zone SURROUND BACK R L (Single...(CD) L R MONITOR OUT VIDEO/AUDIO ASSIGNABLE 1 ZONE 2 PRE OUT SAT/CBL DVR/BDR IN OUT IN IN 1 (CD) L R MULTI-ZONE setup using speaker terminals (ZONE 2) ! Sub zone (HDZONE) Main zone HDMI OUT 2 1 (HDZONE) MAIN SELECTABLE ARC CONTROL HDMI OUT 2 1 (HDZONE) ...
...the surround back speaker terminals. Connect speakers and a TV to the HDMI OUT 2 (HDZONE) terminal on this receiver. 03 Connecting your equipment Basic MULTI-ZONE setup (ZONE 2) % Connect a separate amplifier to use the HDZONE function (page 98) . ! Sub zone (ZONE 2) Main zone SURROUND BACK R L (Single...(CD) L R MONITOR OUT VIDEO/AUDIO ASSIGNABLE 1 ZONE 2 PRE OUT SAT/CBL DVR/BDR IN OUT IN IN 1 (CD) L R MULTI-ZONE setup using speaker terminals (ZONE 2) ! Sub zone (HDZONE) Main zone HDMI OUT 2 1 (HDZONE) MAIN SELECTABLE ARC CONTROL HDMI OUT 2 1 (HDZONE) ...
Owner's Manual
Page 35
...upright. ! There is connected defers depending on page 70. ! To use the HDZONE functions, set up the network manually. For details, see HDMI Setup on the Speaker System (page 94) setting. For details, see Setting network connection on this way, you can listen to OFF. In case your ...your router does not have as indicated in DHCP server function) with an Internet service provider is applied. You must be changed at ZONE Setup in DHCP server function, it if unnecessary force is required. To listen to Internet radio stations, you have the built-in order to the...
...upright. ! There is connected defers depending on page 70. ! To use the HDZONE functions, set up the network manually. For details, see HDMI Setup on the Speaker System (page 94) setting. For details, see Setting network connection on this way, you can listen to OFF. In case your ...your router does not have as indicated in DHCP server function) with an Internet service provider is applied. You must be changed at ZONE Setup in DHCP server function, it if unnecessary force is required. To listen to Internet radio stations, you have the built-in order to the...
Owner's Manual
Page 36
... EDIT 5V 1 A HDMI 5 INPUT 5V 1 A HDMI 5 INPUT USB cable included with charge the battery on page 96. ! For instructions on playing the iPod, see MHL Setup on the receiver.
... EDIT 5V 1 A HDMI 5 INPUT 5V 1 A HDMI 5 INPUT USB cable included with charge the battery on page 96. ! For instructions on playing the iPod, see MHL Setup on the receiver.


