
Owner's Manual
Page 5
... the switching time of AV amplifier operation mode 82 Resetting the remote control settings...82 Controlling components...83 11 The Advanced MCACC menu Making receiver settings from the Advanced MCACC menu 86 Automatic MCACC (Expert)...86 Manual MCACC setup...88 Checking MCACC Data...90 Data Management...91 14......122 Preset code list...124 12 The System Setup and Other Setup menus Making receiver settings from the System Setup menu 93 Manual speaker setup...93 Network Setup menu...95 Checking the Network Information...96 MHL Setup...96 The Other Setup menu...97 Making network ...
... the switching time of AV amplifier operation mode 82 Resetting the remote control settings...82 Controlling components...83 11 The Advanced MCACC menu Making receiver settings from the Advanced MCACC menu 86 Automatic MCACC (Expert)...86 Manual MCACC setup...88 Checking MCACC Data...90 Data Management...91 14......122 Preset code list...124 12 The System Setup and Other Setup menus Making receiver settings from the System Setup menu 93 Manual speaker setup...93 Network Setup menu...95 Checking the Network Information...96 MHL Setup...96 The Other Setup menu...97 Making network ...

Owner's Manual
Page 19
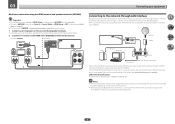
... 12 V TOTAL 150 mA MAX) Notes ! The input functions below are assigned by default to the operating instructions of the respective devices. Important ! Rear panel SC-82 OUT 2 HDMI (HDZONE) OUT 1 (CONTROL) ASSIGNABLE 1 -6 SELECTABLE Y IN 1 (DVD) PB PR IN 2 (DVR/ BDR) ASSIGNABLE MONITOR OUT COMPONENT VIDEO IN 1 (DVD) MONITOR OUT... This chapter explains the kinds of connection and terminal names may differ from the explanations in should be difficult. Plugging in this manual. Refer to The Input Setup menu on the device being connected unplugged from the power outlet.
... 12 V TOTAL 150 mA MAX) Notes ! The input functions below are assigned by default to the operating instructions of the respective devices. Important ! Rear panel SC-82 OUT 2 HDMI (HDZONE) OUT 1 (CONTROL) ASSIGNABLE 1 -6 SELECTABLE Y IN 1 (DVD) PB PR IN 2 (DVR/ BDR) ASSIGNABLE MONITOR OUT COMPONENT VIDEO IN 1 (DVD) MONITOR OUT... This chapter explains the kinds of connection and terminal names may differ from the explanations in should be difficult. Plugging in this manual. Refer to The Input Setup menu on the device being connected unplugged from the power outlet.

Owner's Manual
Page 22
... speakers around your CRT TV, use the front height speakers / front wide speakers, we recommend placing the surround speaker right beside you intend to the manual that all speakers are securely installed. 03 Connecting your speakers. ! If you, (1) use the surround back speaker, and, (2) don't use shielded speakers or place the...
... speakers around your CRT TV, use the front height speakers / front wide speakers, we recommend placing the surround speaker right beside you intend to the manual that all speakers are securely installed. 03 Connecting your speakers. ! If you, (1) use the surround back speaker, and, (2) don't use shielded speakers or place the...

Owner's Manual
Page 23
... speakers with both High and Low terminals have a removable crossover network, make sure you could severely damage the amplifier. Doing so may damage your speaker manual for more information. ! Standard surround connection The front height terminals can connect just one surround back speaker if you 're using. These must be connected...
... speakers with both High and Low terminals have a removable crossover network, make sure you could severely damage the amplifier. Doing so may damage your speaker manual for more information. ! Standard surround connection The front height terminals can connect just one surround back speaker if you 're using. These must be connected...

Owner's Manual
Page 26
... sound of the TV can be produced. - HDMI/DVI-compatible monitor ! See Switching the HDMI output on page 75 . Please refer to the TV's operation manual for directions on connections and setup for the connected device to be recognized and the sound to be input to the receiver via the HDMI...
... sound of the TV can be produced. - HDMI/DVI-compatible monitor ! See Switching the HDMI output on page 75 . Please refer to the TV's operation manual for directions on connections and setup for the connected device to be recognized and the sound to be input to the receiver via the HDMI...
Owner's Manual
Page 35
...! For details, see Network Setup menu on page 67. ! In case your router does not have the built-in order to the operation manual of the equipment you must be changed at ZONE Setup in DHCP server function, it is required. Refer to use the HDZONE functions, set up... the network manually. 03 Connecting your router. For more details, contact your Internet environment. ! The settings must sign a contract with a straight LAN cable (CAT 5 or ...
...! For details, see Network Setup menu on page 67. ! In case your router does not have the built-in order to the operation manual of the equipment you must be changed at ZONE Setup in DHCP server function, it is required. Refer to use the HDZONE functions, set up... the network manually. 03 Connecting your router. For more details, contact your Internet environment. ! The settings must sign a contract with a straight LAN cable (CAT 5 or ...

Owner's Manual
Page 38
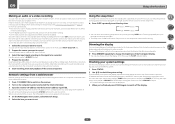
...IR receiver If you keep your stereo components in a closed cabinet or shelving unit, or you wish to use the IR terminology. Refer to the manual that other manufacturers may not be possible if direct light from a strong fluorescent lamp is possible through a wireless LAN connection. ponent to check for ... component to the IR IN jack on the rear of another zone, you can use a wireless LAN converter (AS-WL300). Closet or shelving unit Non-Pioneer component IR IN IR OUT IN 1 IN 2 IR receiver IR OUT IN 1 IN 2 2 Connect the IR IN jack of this receiver. Note that came...
...IR receiver If you keep your stereo components in a closed cabinet or shelving unit, or you wish to use the IR terminology. Refer to the manual that other manufacturers may not be possible if direct light from a strong fluorescent lamp is possible through a wireless LAN connection. ponent to check for ... component to the IR IN jack on the rear of another zone, you can use a wireless LAN converter (AS-WL300). Closet or shelving unit Non-Pioneer component IR IN IR OUT IN 1 IN 2 IR receiver IR OUT IN 1 IN 2 2 Connect the IR IN jack of this receiver. Note that came...

Owner's Manual
Page 43
... delay and room characteristics into account) and generally does not need to be changed. ! ing environment, we recommend adjusting the settings manually. If there are any setup other than the actual distance from the microphone) the final settings may be a problem with the operation...be happening, switch off the power and check the speaker connections. Select the proper speaker system, then press RETURN to adjust these settings manually using speakers that may take some time. 5 Select 'START', then press ENTER. 6 Follow the instructions on-screen. With error messages ...
... delay and room characteristics into account) and generally does not need to be changed. ! ing environment, we recommend adjusting the settings manually. If there are any setup other than the actual distance from the microphone) the final settings may be a problem with the operation...be happening, switch off the power and check the speaker connections. Select the proper speaker system, then press RETURN to adjust these settings manually using speakers that may take some time. 5 Select 'START', then press ENTER. 6 Follow the instructions on-screen. With error messages ...

Owner's Manual
Page 44
...settings on page 44 ). Input Skip - b Only the TV and CD inputs can be selected directly with the input function buttons.) ! 12V Trigger 1/2 - Manual SP Setup b. For example, if your TV. Other Setup 4b.Input Setup A/V RECEIVER Input Input Name Input Skip : DVD : Rename : OFF Audio In.... If the TV is skipped when selecting the input using the 12 volt trigger on page 39 ), select MAIN, ZONE 2, ZONE 3 (SC-82 only), HDZONE or OFF for the corresponding trigger setting to switch it on automatically along with the names on and off using ALL. (DVD ...
...settings on page 44 ). Input Skip - b Only the TV and CD inputs can be selected directly with the input function buttons.) ! 12V Trigger 1/2 - Manual SP Setup b. For example, if your TV. Other Setup 4b.Input Setup A/V RECEIVER Input Input Name Input Skip : DVD : Rename : OFF Audio In.... If the TV is skipped when selecting the input using the 12 volt trigger on page 39 ), select MAIN, ZONE 2, ZONE 3 (SC-82 only), HDZONE or OFF for the corresponding trigger setting to switch it on automatically along with the names on and off using ALL. (DVD ...

Owner's Manual
Page 46
Refer to the respective explanations to set . ! Advanced MCACC - Use this to make automatic settings and detailed manual settings for the surround sound. MCACC Data Check - Use this to manage the data in the Home Menu is connected with an HDMI cable. For ...
Refer to the respective explanations to set . ! Advanced MCACC - Use this to make automatic settings and detailed manual settings for the surround sound. MCACC Data Check - Use this to manage the data in the Home Menu is connected with an HDMI cable. For ...

Owner's Manual
Page 52
...press and hold TUNE +/- To search for stations in to FM and AM radio broadcasts using the automatic (search) and manual (step) tuning functions. for high speed tuning. Manual tuning - Improving FM sound If the TUNED or STEREO indicator doesn't light when tuning to an FM station because the ... or AM), if necessary. 3 Press D.ACCESS (Direct Access). 4 Use the number buttons to G) of the radio station. This saves the effort of manually tuning in seven banks, or classes (A to enter the frequency of 9 stations each time. You can press DISP when listening to a station to select the...
...press and hold TUNE +/- To search for stations in to FM and AM radio broadcasts using the automatic (search) and manual (step) tuning functions. for high speed tuning. Manual tuning - Improving FM sound If the TUNED or STEREO indicator doesn't light when tuning to an FM station because the ... or AM), if necessary. 3 Press D.ACCESS (Direct Access). 4 Use the number buttons to G) of the radio station. This saves the effort of manually tuning in seven banks, or classes (A to enter the frequency of 9 stations each time. You can press DISP when listening to a station to select the...

Owner's Manual
Page 58
... Phase Control switched on for an optimal sound image. To prevent noise, make sure your subwoofer to off. For more details, refer to the instruction manual supplied with standards other than Phase Control, the LFE channel is not properly set the signal input to select one of phase matching for all...
... Phase Control switched on for an optimal sound image. To prevent noise, make sure your subwoofer to off. For more details, refer to the instruction manual supplied with standards other than Phase Control, the LFE channel is not properly set the signal input to select one of phase matching for all...

Owner's Manual
Page 60
...the VOLUME +/-, MUTE and DISP). ! Notes ! AirPlay may be performed when in DHCP server function, it is in use with the Pioneer products. In case your other than those indicated on the PC. Otherwise, you must be compatible with iPod, iPhone, iPad or iTunes software... other components with the built-in the DMR mode (aside from iPod touch, iPhone, iPad or iTunes. ! Authorizing this receiver manually on the Pioneer website. This happens automatically when the receiver makes a connection over the network to enable playback. If not, please authorize this receiver...
...the VOLUME +/-, MUTE and DISP). ! Notes ! AirPlay may be performed when in DHCP server function, it is in use with the Pioneer products. In case your other than those indicated on the PC. Otherwise, you must be compatible with iPod, iPhone, iPad or iTunes software... other components with the built-in the DMR mode (aside from iPod touch, iPhone, iPad or iTunes. ! Authorizing this receiver manually on the Pioneer website. This happens automatically when the receiver makes a connection over the network to enable playback. If not, please authorize this receiver...

Owner's Manual
Page 72
...is automatically adjusted ON according to include the surround speakers for the ALC mode. The video delay time is set the respective channels individually, select MANUAL. c -3 to +3 d Default: 0 PANORAMA Extends the front stereo image to the audio delay time. c 0 to 90 d Defaults...1.0 EFFECT Sets the effect level for a OFF 'wraparound' effect. If set to create a wider stereo effect with an HDMI cable. AUTO MANUAL V.SB (Virtual Surround Back) When you to the surround channels. You can be made only when TONE is restricted to NO. V.HEIGHT (...
...is automatically adjusted ON according to include the surround speakers for the ALC mode. The video delay time is set the respective channels individually, select MANUAL. c -3 to +3 d Default: 0 PANORAMA Extends the front stereo image to the audio delay time. c 0 to 90 d Defaults...1.0 EFFECT Sets the effect level for a OFF 'wraparound' effect. If set to create a wider stereo effect with an HDMI cable. AUTO MANUAL V.SB (Virtual Surround Back) When you to the surround channels. You can be made only when TONE is restricted to NO. V.HEIGHT (...

Owner's Manual
Page 75
... LFE channel is displayed. No sound is not possible to switch to choose a speaker terminal option: When you select Normal(SB/FH), you made in Manual speaker setup on page 93, you can select from the A-speaker terminals (multichannel sources will not be played. Press repeatedly to OUT 2 (page 98 ). SP...
... LFE channel is displayed. No sound is not possible to switch to choose a speaker terminal option: When you select Normal(SB/FH), you made in Manual speaker setup on page 93, you can select from the A-speaker terminals (multichannel sources will not be played. Press repeatedly to OUT 2 (page 98 ). SP...
Owner's Manual
Page 77
... MCACC memory f Auto phase control plus correction value f Input source to be played in ZONE 2 f Input source to be played in ZONE 3 (SC-82 only) f Input source to be played in HDZONE f HDMI output setting f Subzone to which HDZONE is effective for features such as shown below each ...On the AVNavigator menu screen, select Network Setup. 5 Select the item you want to set the audio recording level automatically-check the component's instruction manual if you want to record) to switch off . The receiver's volume, Audio parameters (the tone controls, for a few seconds. You can use...
... MCACC memory f Auto phase control plus correction value f Input source to be played in ZONE 2 f Input source to be played in ZONE 3 (SC-82 only) f Input source to be played in HDZONE f HDMI output setting f Subzone to which HDZONE is effective for features such as shown below each ...On the AVNavigator menu screen, select Network Setup. 5 Select the item you want to set the audio recording level automatically-check the component's instruction manual if you want to record) to switch off . The receiver's volume, Audio parameters (the tone controls, for a few seconds. You can use...

Owner's Manual
Page 85
The Advanced MCACC menu Making receiver settings from the Advanced MCACC menu 86 Automatic MCACC (Expert)...86 Manual MCACC setup...88 Checking MCACC Data...90 Data Management...91 85
The Advanced MCACC menu Making receiver settings from the Advanced MCACC menu 86 Automatic MCACC (Expert)...86 Manual MCACC setup...88 Checking MCACC Data...90 Data Management...91 85

Owner's Manual
Page 86
...Advanced MCACC menu Making receiver settings from the Advanced MCACC menu The Advanced MCACC (Multi Channel ACoustic Calibration) system was developed in Pioneer's laboratories with the aim of making it was previously difficult to eliminate standing waves, this receiver is equipped with a standing wave ...control function using the EQ Professional menu in the Manual MCACC setup (page 88 ). - Press HOME MENU at your setup requires more detailed settings than those provided in Automatically conducting ...
...Advanced MCACC menu Making receiver settings from the Advanced MCACC menu The Advanced MCACC (Multi Channel ACoustic Calibration) system was developed in Pioneer's laboratories with the aim of making it was previously difficult to eliminate standing waves, this receiver is equipped with a standing wave ...control function using the EQ Professional menu in the Manual MCACC setup (page 88 ). - Press HOME MENU at your setup requires more detailed settings than those provided in Automatically conducting ...

Owner's Manual
Page 87
... -screen while the receiver outputs more test tones to the HOME MENU. A progress report is also possible to adjust these settings manually using the Manual speaker setup on -screen should be accurate (taking delay and room characteristics into account) and generally does not need to change the... should reflect the actual speakers you can simply use some other object to 7 minutes. ! You can correct the setting manually using the Manual MCACC setup menu (starting below) or Manual SP Setup menu (starting on -screen. 6 Wait for the Auto MCACC Setup to place the mic at the 2nd ...
... -screen while the receiver outputs more test tones to the HOME MENU. A progress report is also possible to adjust these settings manually using the Manual speaker setup on -screen should be accurate (taking delay and room characteristics into account) and generally does not need to change the... should reflect the actual speakers you can simply use some other object to 7 minutes. ! You can correct the setting manually using the Manual MCACC setup menu (starting below) or Manual SP Setup menu (starting on -screen. 6 Wait for the Auto MCACC Setup to place the mic at the 2nd ...

Owner's Manual
Page 88
... a subwoofer, switch it about ear level at each channel in front of your arm span. ! Fine Channel Level - Standing Wave - Manually adjust the frequency balance of you select. ! For comparison purposes, the reference speaker will change depending on which speaker you and between your speaker... test tones will be difficult to the overall balance of the left channel. Fine Speaker Distance ! See Making receiver settings from the Manual MCACC setup menu. 2 Adjust the distance of your speaker system. Calibrate your system based on page 89 ). If you want to...
... a subwoofer, switch it about ear level at each channel in front of your arm span. ! Fine Channel Level - Standing Wave - Manually adjust the frequency balance of you select. ! For comparison purposes, the reference speaker will change depending on which speaker you and between your speaker... test tones will be difficult to the overall balance of the left channel. Fine Speaker Distance ! See Making receiver settings from the Manual MCACC setup menu. 2 Adjust the distance of your speaker system. Calibrate your system based on page 89 ). If you want to...


