
Owner's Manual
Page 1
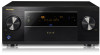
Operating Instructions AV Receiver 82 SC81 SC-
Operating Instructions AV Receiver 82 SC81 SC-

Owner's Manual
Page 2
... ensure reliable operation of important operating and maintenance (servicing) instructions in a residential installation. Reorient or relocate the receiving antenna. - D36-P5_B1_En 2 D3-4-2-1-1b_A1_En WARNING This equipment is used for ventilation to rain or moisture, does...instructions. 2) Keep these instructions. 3) Heed all warnings. 4) Follow all power. Increase the separation between the equipment and receiver. - Install in a particular installation. Connect the equipment into your safety. D3-4-2-1-7a_A1_En VENTILATION CAUTION When installing this apparatus...
... ensure reliable operation of important operating and maintenance (servicing) instructions in a residential installation. Reorient or relocate the receiving antenna. - D36-P5_B1_En 2 D3-4-2-1-1b_A1_En WARNING This equipment is used for ventilation to rain or moisture, does...instructions. 2) Keep these instructions. 3) Heed all warnings. 4) Follow all power. Increase the separation between the equipment and receiver. - Install in a particular installation. Connect the equipment into your safety. D3-4-2-1-7a_A1_En VENTILATION CAUTION When installing this apparatus...

Owner's Manual
Page 4
...an iPod...49 Playing a USB device...50 Playing an MHL-compatible device...51 Listening to the radio...52 Bluetooth ADAPTER for buying this Pioneer product. Contents 01 Before you for Wireless Enjoyment of remote control unit...11 02 Controls and displays Remote control...13 Display...15 Front... Connecting your TV and playback components...26 Connecting an HDD/DVD recorder, BD recorder and other video sources 29 Connecting a satellite/cable receiver or other set-top box 29 Connecting other functions Setting the Audio options...71 Setting the Video options...73 Switching the output (OUTPUT ...
...an iPod...49 Playing a USB device...50 Playing an MHL-compatible device...51 Listening to the radio...52 Bluetooth ADAPTER for buying this Pioneer product. Contents 01 Before you for Wireless Enjoyment of remote control unit...11 02 Controls and displays Remote control...13 Display...15 Front... Connecting your TV and playback components...26 Connecting an HDD/DVD recorder, BD recorder and other video sources 29 Connecting a satellite/cable receiver or other set-top box 29 Connecting other functions Setting the Audio options...71 Setting the Video options...73 Switching the output (OUTPUT ...

Owner's Manual
Page 5
... of your system About the Remote Setup menu...80 Operating multiple receivers...80 Setting the remote to control other components...80 Selecting preset codes directly...80 Programming signals from other remote controls...81 Erasing one of the remote control button settings...81 Erasing all learnt settings that are in one input function 82...
... of your system About the Remote Setup menu...80 Operating multiple receivers...80 Setting the remote to control other components...80 Selecting preset codes directly...80 Programming signals from other remote controls...81 Erasing one of the remote control button settings...81 Erasing all learnt settings that are in one input function 82...

Owner's Manual
Page 6
...page 71) ! Switching on page 32 ! Setting the Video options (page 73 ) j 12 Other optional adjustments and settings ! Operating multiple receivers (page 80 ) ! Setting the remote to make the same connections or settings that case, you start ! Changing the channel level while listening...options (page 71) ! In that are performed in AVNavigator on page 41 . 1 Before you can use of the remote control ! Checking what's in the receiver on page 39 j 5 Power On j 6 Changing the OSD display language (OSD Language) (page 4 5) j 7 Using the AVNavigator functions (page 4 1)...
...page 71) ! Switching on page 32 ! Setting the Video options (page 73 ) j 12 Other optional adjustments and settings ! Operating multiple receivers (page 80 ) ! Setting the remote to make the same connections or settings that case, you start ! Changing the channel level while listening...options (page 71) ! In that are performed in AVNavigator on page 41 . 1 Before you can use of the remote control ! Checking what's in the receiver on page 39 j 5 Power On j 6 Changing the OSD display language (OSD Language) (page 4 5) j 7 Using the AVNavigator functions (page 4 1)...

Owner's Manual
Page 7
Before you start Our philosophy...8 Features...8 Checking what's in the box...10 Installing the receiver...10 Loading the batteries...10 Operating range of remote control unit 11 7
Before you start Our philosophy...8 Features...8 Checking what's in the box...10 Installing the receiver...10 Loading the batteries...10 Operating range of remote control unit 11 7

Owner's Manual
Page 8
...files, but accurate surround sound setup, which includes the advanced features of songs. Network % Roku Ready® This receiver is only available when the connected Pioneer Blu-ray Disc Player supports the PQLS function. Video % Ultra HD (with digital sources like CDs or DVDs. 16...- This receiver is ready for customized acoustic calibration according to use the receiver to the vision of Pioneer's high sound quality designs. For service availability in the first place. This function is ...
...files, but accurate surround sound setup, which includes the advanced features of songs. Network % Roku Ready® This receiver is only available when the connected Pioneer Blu-ray Disc Player supports the PQLS function. Video % Ultra HD (with digital sources like CDs or DVDs. 16...- This receiver is ready for customized acoustic calibration according to use the receiver to the vision of Pioneer's high sound quality designs. For service availability in the first place. This function is ...

Owner's Manual
Page 9
...files, eliminating the interruptions that earn the ENERGY STAR prevent greenhouse gas emissions by meeting strict energy efficiency guidelines set by connecting this receiver to another AV receiver in the vertical direction to 96 kHz/24 bit. Environmental Protection Agency and the U.S. This product is a registered mark owned by..., high quality multichannel audio, and photos etc., with HDZONE, ZONE 2 and ZONE 3 (SC-82 only). The quality of 96 kHz/24 bit to 192 kHz/24 bit can be connected to the receiver. You can select not only HDMI input but also INTERNET RADIO or iPod/USB and the...
...files, eliminating the interruptions that earn the ENERGY STAR prevent greenhouse gas emissions by meeting strict energy efficiency guidelines set by connecting this receiver to another AV receiver in the vertical direction to 96 kHz/24 bit. Environmental Protection Agency and the U.S. This product is a registered mark owned by..., high quality multichannel audio, and photos etc., with HDZONE, ZONE 2 and ZONE 3 (SC-82 only). The quality of 96 kHz/24 bit to 192 kHz/24 bit can be connected to the receiver. You can select not only HDMI input but also INTERNET RADIO or iPod/USB and the...

Owner's Manual
Page 10
... batteries included with a DVD player or music CD player. It can cause batteries to PIONEER HOME ELECTRONICS CORPORATION. Observe the following places: - Batteries with a DVD player or music CD player can cause batteries to play this receiver's bottom panel while the power is not responsible for any of the applicable OS. 01...
... batteries included with a DVD player or music CD player. It can cause batteries to PIONEER HOME ELECTRONICS CORPORATION. Observe the following places: - Batteries with a DVD player or music CD player can cause batteries to play this receiver's bottom panel while the power is not responsible for any of the applicable OS. 01...

Owner's Manual
Page 11
The receiver is emitting infrared rays. ! The receiver is located near a device that is operated simultaneously with another infrared remote control unit. 30° 30° 7 m (23 ft.) Before you start 11 01 Operating range of remote control unit The remote control may not work properly if: ! There are obstacles between the remote control and the receiver's remote sensor. ! Direct sunlight or fluorescent light is shining onto the remote sensor. !
The receiver is emitting infrared rays. ! The receiver is located near a device that is operated simultaneously with another infrared remote control unit. 30° 30° 7 m (23 ft.) Before you start 11 01 Operating range of remote control unit The remote control may not work properly if: ! There are obstacles between the remote control and the receiver's remote sensor. ! Direct sunlight or fluorescent light is shining onto the remote sensor. !

Owner's Manual
Page 13
... before sleep (page 77 ). 13 Press repeatedly to select a channel, then use k/l to adjust the level (pages 75 and 94) . 7 Receiver setting buttons Press MAIN RECEIVER first to switch various modes ( Pro Logic, Neo:X, etc.) (page 56) . ! Press for operating other devices and each input (TUNER, etc... 1 2 3 Fav DISP 4 5 6 7 8 9 CH D.ACCESS CLR 0 CLASS ENTER CH DIMMER SLEEP RCU SETUP 13 14 15 16 6 17 RECEIVER Controls and displays The remote has been conveniently color-coded according to perform operations in sleep mode and select the amount of other devices or...
... before sleep (page 77 ). 13 Press repeatedly to select a channel, then use k/l to adjust the level (pages 75 and 94) . 7 Receiver setting buttons Press MAIN RECEIVER first to switch various modes ( Pro Logic, Neo:X, etc.) (page 56) . ! Press for operating other devices and each input (TUNER, etc... 1 2 3 Fav DISP 4 5 6 7 8 9 CH D.ACCESS CLR 0 CLASS ENTER CH DIMMER SLEEP RCU SETUP 13 14 15 16 6 17 RECEIVER Controls and displays The remote has been conveniently color-coded according to perform operations in sleep mode and select the amount of other devices or...
Owner's Manual
Page 14
...press this button. 17 RCU SETUP Used to set the listening volume. HDZ (HDZONE) - To adjust the main zone sound volume, press MAIN RECEIVER first and then press this button. 16 MUTE Mutes the sound or restores the sound if it has been muted (adjusting the volume also restores... the sound). When in the sub zone, press the SUB ZONE CONTROL button first and then press this button. Z3 (ZONE 3) - Holding down this receiver. (SC-81) ! Z2 (ZONE 2) - Holding down this button (for 1.5 seconds) until the remote control LED flashes one time, the mode changes to Zone 2 operation. ! ...
...press this button. 17 RCU SETUP Used to set the listening volume. HDZ (HDZONE) - To adjust the main zone sound volume, press MAIN RECEIVER first and then press this button. 16 MUTE Mutes the sound or restores the sound if it has been muted (adjusting the volume also restores... the sound). When in the sub zone, press the SUB ZONE CONTROL button first and then press this button. Z3 (ZONE 3) - Holding down this receiver. (SC-81) ! Z2 (ZONE 2) - Holding down this button (for 1.5 seconds) until the remote control LED flashes one time, the mode changes to Zone 2 operation. ! ...

Owner's Manual
Page 15
...the various settings. 16 Speaker indicators Lights to indicate the input function you have selected. 15 Scroll indicators Light when there are being received. ! MONO - This lights to indicate Pro Logic II / Pro Logic IIx decoding (page 56 ). 19 Character display Displays various ...setting. (Not displayed when set using OUT P. (page 75 ). 17 SLEEP Lights when the receiver is being received in sleep mode (page 77 ). 18 Matrix decoding format indicators ! AUTO lights when the receiver is switched on (page 56 ). ! C - Left surround/Right surround channel ! Lights during...
...the various settings. 16 Speaker indicators Lights to indicate the input function you have selected. 15 Scroll indicators Light when there are being received. ! MONO - This lights to indicate Pro Logic II / Pro Logic IIx decoding (page 56 ). 19 Character display Displays various ...setting. (Not displayed when set using OUT P. (page 75 ). 17 SLEEP Lights when the receiver is being received in sleep mode (page 77 ). 18 Matrix decoding format indicators ! AUTO lights when the receiver is switched on (page 56 ). ! C - Left surround/Right surround channel ! Lights during...

Owner's Manual
Page 16
...36 ). 4 Character display See Display on for this receiver. 2 INPUT SELECTOR dial Use to select an input function. 3 Indicators ! HDMI - Blinks when connecting an HDMI-equipped component; Lights when "off" (nothing displayed) is connected (page 26) . ! iPod iPhone - SC-82 7 SC-81 7 8 9 10 11 12 13 14 15 16 ...enable iPod operations on the iPod (page 49 ). 14 AUTO SURR/ALC/STREAM DIRECT Switches between standby and on page 15 . 5 Remote sensor Receives the signals from the main zone (page 76) . 12 SPEAKERS Use to change the speaker terminal (page 75) . 13 iPod iPhone DIRECT...
...36 ). 4 Character display See Display on for this receiver. 2 INPUT SELECTOR dial Use to select an input function. 3 Indicators ! HDMI - Blinks when connecting an HDMI-equipped component; Lights when "off" (nothing displayed) is connected (page 26) . ! iPod iPhone - SC-82 7 SC-81 7 8 9 10 11 12 13 14 15 16 ...enable iPod operations on the iPod (page 49 ). 14 AUTO SURR/ALC/STREAM DIRECT Switches between standby and on page 15 . 5 Remote sensor Receives the signals from the main zone (page 76) . 12 SPEAKERS Use to change the speaker terminal (page 75) . 13 iPod iPhone DIRECT...

Owner's Manual
Page 18
... About HDMI...25 Connecting your TV and playback components 26 Connecting an HDD/DVD recorder, BD recorder and other video sources 29 Connecting a satellite/cable receiver or other set-top box 29 Connecting other audio components 31 Connecting additional amplifiers 31 Connecting AM/FM antennas...32 MULTI-ZONE setup...33 Connecting... Connecting an MHL-compatible device 37 Connecting an HDMI-equipped component to the front panel input 38 Connecting to a wireless LAN...38 Connecting an IR receiver...38 Switching components on and off using the 12 volt trigger 39 Plugging in the...
... About HDMI...25 Connecting your TV and playback components 26 Connecting an HDD/DVD recorder, BD recorder and other video sources 29 Connecting a satellite/cable receiver or other set-top box 29 Connecting other audio components 31 Connecting additional amplifiers 31 Connecting AM/FM antennas...32 MULTI-ZONE setup...33 Connecting... Connecting an MHL-compatible device 37 Connecting an HDMI-equipped component to the front panel input 38 Connecting to a wireless LAN...38 Connecting an IR receiver...38 Switching components on and off using the 12 volt trigger 39 Plugging in the...

Owner's Manual
Page 19
...SURROUND R AC IN A L AM LOOP ANTENNA FM UNBAL 75 12V TRIGGER 1 IR OUT IN 1 IN 2 RS-232C 2 SPEAKERS (OUTPUT 12 V TOTAL 150 mA MAX) SC-81 OUT 2 HDMI (HDZONE) OUT 1 (CONTROL) ASSIGNABLE 1 -6 SELECTABLE Y IN 1 (DVD) PB PR IN 2 (DVR/ BDR) ASSIGNABLE MONITOR OUT ZONE 2 OUT MONITOR ... off the power and disconnect the power cord from the power outlets. ! Illustration shows the SC-82, however connections for the SC-81 are assigned by default to the receiver's different input terminals. 03 Connecting your equipment Connecting your home theater system. Depending on page 44...
...SURROUND R AC IN A L AM LOOP ANTENNA FM UNBAL 75 12V TRIGGER 1 IR OUT IN 1 IN 2 RS-232C 2 SPEAKERS (OUTPUT 12 V TOTAL 150 mA MAX) SC-81 OUT 2 HDMI (HDZONE) OUT 1 (CONTROL) ASSIGNABLE 1 -6 SELECTABLE Y IN 1 (DVD) PB PR IN 2 (DVR/ BDR) ASSIGNABLE MONITOR OUT ZONE 2 OUT MONITOR ... off the power and disconnect the power cord from the power outlets. ! Illustration shows the SC-82, however connections for the SC-81 are assigned by default to the receiver's different input terminals. 03 Connecting your equipment Connecting your home theater system. Depending on page 44...

Owner's Manual
Page 22
... subwoofers increases the bass sound to 9 ft.) apart, at a narrower angle. ! In this case, the same sound is best to them very high on the receiver comprises a positive (+) and negative (-) terminal. Make sure the speakers don't face each other speakers should be more powerful sound reproduction. Use an RCA cable to...
... subwoofers increases the bass sound to 9 ft.) apart, at a narrower angle. ! In this case, the same sound is best to them very high on the receiver comprises a positive (+) and negative (-) terminal. Make sure the speakers don't face each other speakers should be more powerful sound reproduction. Use an RCA cable to...

Owner's Manual
Page 24
... Speaker system setting on page 93 to the front height speaker terminals. See Speaker system setting on page 93 to the speaker terminal on the receiver. CAUTION ! Using a banana plug for bi-amping shown above. % To bi-wire a speaker, connect two speaker cords to do this . See Speaker system setting on...
... Speaker system setting on page 93 to the front height speaker terminals. See Speaker system setting on page 93 to the speaker terminal on the receiver. CAUTION ! Using a banana plug for bi-amping shown above. % To bi-wire a speaker, connect two speaker cords to do this . See Speaker system setting on...

Owner's Manual
Page 25
.... ! ARC (Audio Return Channel) ! 4K signal transfer - To take advantage of Sony Corporation. 25 x.v.Color signal transfer ! This receiver supports SACD, Dolby Digital Plus, Dolby TrueHD and DTS-HD Master Audio. Terminal for connection with the video cable or component cable and ... your monitor/TV to this video source. ! HDMI format digital audio transmissions require a longer time to ON (page 73 ). ! This receiver supports the functions described below through the HDMI OUT terminal. A DVI connection, however, does not support audio signals. "x.v.Color" and are ...
.... ! ARC (Audio Return Channel) ! 4K signal transfer - To take advantage of Sony Corporation. 25 x.v.Color signal transfer ! This receiver supports SACD, Dolby Digital Plus, Dolby TrueHD and DTS-HD Master Audio. Terminal for connection with the video cable or component cable and ... your monitor/TV to this video source. ! HDMI format digital audio transmissions require a longer time to ON (page 73 ). ! This receiver supports the functions described below through the HDMI OUT terminal. A DVI connection, however, does not support audio signals. "x.v.Color" and are ...

Owner's Manual
Page 26
.../DVI-compatible Blu-ray Disc player Other HDMI/DVIequipped component This connection is no HDMI output on page 27 ). ! When the TV and receiver are also possible (see The Input Setup menu on page 44 ). - HDMI OUT HDMI OUT Select one AUDIO OUT DIGITAL OUT R ANALOG L OPTICAL COAXIAL... RCA (analog) audio cable, you'll need to MAIN beforehand (page 98) . ! When connecting to ON (see Control with no need to tell the receiver which digital or analog audio input you can be set ARC at HDMI Setup to an HDMI/DVI-compatible monitor using a commercially available HDMI cable...
.../DVI-compatible Blu-ray Disc player Other HDMI/DVIequipped component This connection is no HDMI output on page 27 ). ! When the TV and receiver are also possible (see The Input Setup menu on page 44 ). - HDMI OUT HDMI OUT Select one AUDIO OUT DIGITAL OUT R ANALOG L OPTICAL COAXIAL... RCA (analog) audio cable, you'll need to MAIN beforehand (page 98) . ! When connecting to ON (see Control with no need to tell the receiver which digital or analog audio input you can be set ARC at HDMI Setup to an HDMI/DVI-compatible monitor using a commercially available HDMI cable...


