
Owner's Manual
Page 1
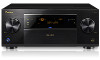
Operating Instructions AV Receiver 79 SC77 SC-
Operating Instructions AV Receiver 79 SC77 SC-

Owner's Manual
Page 2
... are provided for long periods of time. 14) Refer all servicing to +95 °F); Increase the separation between the equipment and receiver. - Consult the dealer or an experienced radio/TV technician for the unit, you to chemicals listed on a circuit different from that...the AC outlet in a particular installation. If this equipment does cause harmful interference to radio or television reception, which the receiver is connected. - Reorient or relocate the receiving antenna. - D8-10-1-2_A1_En Caution To prevent fire hazard, the Class 2 Wiring Cable should be used in a residential...
... are provided for long periods of time. 14) Refer all servicing to +95 °F); Increase the separation between the equipment and receiver. - Consult the dealer or an experienced radio/TV technician for the unit, you to chemicals listed on a circuit different from that...the AC outlet in a particular installation. If this equipment does cause harmful interference to radio or television reception, which the receiver is connected. - Reorient or relocate the receiving antenna. - D8-10-1-2_A1_En Caution To prevent fire hazard, the Class 2 Wiring Cable should be used in a residential...
Owner's Manual
Page 3
... level that may create a traffic hazard and is for connections. Sound can actually be deceiving. Product Name: AV Receiver Model Number: SC-79 Responsible Party Name: PIONEER ELECTRONICS (USA) INC. RECORD THESE NUMBERS ON YOUR ENCLOSED WARRANTY CARD AND KEEP IN A SAFE PLACE FOR FUTURE ...CAUTION: HOT SURFACE. The top surface over the internal heatsink may become hot when operating this device must accept any interference received, including interference that lets the sound come through clearly without affecting your hearing adapts. IMPORTANT NOTICE THE MODEL NUMBER AND ...
... level that may create a traffic hazard and is for connections. Sound can actually be deceiving. Product Name: AV Receiver Model Number: SC-79 Responsible Party Name: PIONEER ELECTRONICS (USA) INC. RECORD THESE NUMBERS ON YOUR ENCLOSED WARRANTY CARD AND KEEP IN A SAFE PLACE FOR FUTURE ...CAUTION: HOT SURFACE. The top surface over the internal heatsink may become hot when operating this device must accept any interference received, including interference that lets the sound come through clearly without affecting your hearing adapts. IMPORTANT NOTICE THE MODEL NUMBER AND ...

Owner's Manual
Page 4
......54 Playing an MHL-compatible device...55 Playing music from a computer...56 Listening to the radio...56 Bluetooth ADAPTER for buying this Pioneer product. Please read through these operating instructions so you will know how to your system Enjoying various types of playback using the listening...Connecting an HDD/DVD recorder, BD recorder and other video sources 35 Connecting a satellite/cable receiver or other set-top box 36 Connecting other functions Setting the Audio options...77 Setting the Video options...79 Switching the speaker terminals...81 Using the MULTI-ZONE controls...81 ...
......54 Playing an MHL-compatible device...55 Playing music from a computer...56 Listening to the radio...56 Bluetooth ADAPTER for buying this Pioneer product. Please read through these operating instructions so you will know how to your system Enjoying various types of playback using the listening...Connecting an HDD/DVD recorder, BD recorder and other video sources 35 Connecting a satellite/cable receiver or other set-top box 36 Connecting other functions Setting the Audio options...77 Setting the Video options...79 Switching the speaker terminals...81 Using the MULTI-ZONE controls...81 ...

Owner's Manual
Page 5
... and DISCRETE ON (Discrete On) functions 88 Resetting the remote control settings...89 Controlling components...89 11 The Advanced MCACC menu Making receiver settings from the Advanced MCACC menu 93 Automatic MCACC (Expert)...93 Manual MCACC setup...95 Checking MCACC Data...98 Data Management...99 14 ... unit...126 Glossary...127 Features index...130 Specifications...131 Preset code list...132 12 The System Setup and Other Setup menus Making receiver settings from the System Setup menu 101 Manual speaker setup...101 Network Setup menu...104 Checking the Network Information...105 MHL Setup......
... and DISCRETE ON (Discrete On) functions 88 Resetting the remote control settings...89 Controlling components...89 11 The Advanced MCACC menu Making receiver settings from the Advanced MCACC menu 93 Automatic MCACC (Expert)...93 Manual MCACC setup...95 Checking MCACC Data...98 Data Management...99 14 ... unit...126 Glossary...127 Features index...130 Specifications...131 Preset code list...132 12 The System Setup and Other Setup menus Making receiver settings from the System Setup menu 101 Manual speaker setup...101 Network Setup menu...104 Checking the Network Information...105 MHL Setup......

Owner's Manual
Page 6
...using Wiring Navi on the AVNavigator CD-ROM included with the receiver. Setting the Audio options (page 77) ! Flow of settings on the receiver Flow for connecting and setting the receiver The unit is a full-fledged AV receiver equipped with HDMI function (page 72) ! Connecting the speakers... on /off the Acoustic Calibration EQ, Auto Sound Retriever or Dialog Enhancement (page 77) ! Changing the channel level while listening (page 102) ! Checking what's in the receiver on page 45 j 5 Power On j 6 Changing the OSD display language (OSD Language) (page 50)...
...using Wiring Navi on the AVNavigator CD-ROM included with the receiver. Setting the Audio options (page 77) ! Flow of settings on the receiver Flow for connecting and setting the receiver The unit is a full-fledged AV receiver equipped with HDMI function (page 72) ! Connecting the speakers... on /off the Acoustic Calibration EQ, Auto Sound Retriever or Dialog Enhancement (page 77) ! Changing the channel level while listening (page 102) ! Checking what's in the receiver on page 45 j 5 Power On j 6 Changing the OSD display language (OSD Language) (page 50)...

Owner's Manual
Page 7
Before you start Checking what's in the box...8 Our philosophy...8 Features...8 Installing the receiver...10 Loading the batteries...10 Operating range of remote control unit 10 About using AVNavigator (included CD-ROM 10 7
Before you start Checking what's in the box...8 Our philosophy...8 Features...8 Installing the receiver...10 Loading the batteries...10 Operating range of remote control unit 10 About using AVNavigator (included CD-ROM 10 7

Owner's Manual
Page 8
... place. Setup microphone (cable: 5 m (16.4 ft.)) ! The Jitter Eliminators achieve clearer sound. % AIR Studios Sound Tuning The SC-79 and SC-77 have received the AIR Studios Monitor certification. This is required to adjust the phase of Pioneer's high sound quality designs. FM wire antenna ! This function is delayed upon data processing to confirm system...
... place. Setup microphone (cable: 5 m (16.4 ft.)) ! The Jitter Eliminators achieve clearer sound. % AIR Studios Sound Tuning The SC-79 and SC-77 have received the AIR Studios Monitor certification. This is required to adjust the phase of Pioneer's high sound quality designs. FM wire antenna ! This function is delayed upon data processing to confirm system...
Owner's Manual
Page 9
... a multi-channel environment can be created by connecting this receiver to the SC-79/SC-77 and play it is possible. Native DSD playback by connecting the receiver with power supply from your HTC phone. With USB-DACs (SC-79 only), USB devices and SACDs, DSD Direct playback bypassing...% iPod playback Your iPod, iPhone or iPad can be played by DoP (DSD over after compression. % Sound Retriever Link By connecting a Pioneer player supporting the Sound Retriever Link function, compressed audio files played on "Virtual Surround Back", "Virtual Height", and "Virtual Wide" modes realize...
... a multi-channel environment can be created by connecting this receiver to the SC-79/SC-77 and play it is possible. Native DSD playback by connecting the receiver with power supply from your HTC phone. With USB-DACs (SC-79 only), USB devices and SACDs, DSD Direct playback bypassing...% iPod playback Your iPod, iPhone or iPad can be played by DoP (DSD over after compression. % Sound Retriever Link By connecting a Pioneer player supporting the Sound Retriever Link function, compressed audio files played on "Virtual Surround Back", "Virtual Height", and "Virtual Wide" modes realize...

Owner's Manual
Page 10
...Windows version of batteries. Installing AVNavigator for Windows 1 Launch the desktop from http://www.pioneerelectronics.com. ! This may appear during this receiver's bottom panel while the power is on or just after it is no security problem, so continue the operation. ! Do not ...touch this operation, but there is turned off. Operating range of used batteries, please comply with the sound. - The receiver is located near a device that operates in dialog fashion. This can cause batteries to check initial operations; When disposing of remote control ...
...Windows version of batteries. Installing AVNavigator for Windows 1 Launch the desktop from http://www.pioneerelectronics.com. ! This may appear during this receiver's bottom panel while the power is on or just after it is no security problem, so continue the operation. ! Do not ...touch this operation, but there is turned off. Operating range of used batteries, please comply with the sound. - The receiver is located near a device that operates in dialog fashion. This can cause batteries to check initial operations; When disposing of remote control ...
Owner's Manual
Page 11
...translation, sales, lending or other entities described herein are special operating instructions for Windows 1 Click [AVNavigator 2013.V] on the receiver. puters using this CD-ROM belongs to launch AVNavigator. The language selection screen appears. Wiring Navi - High precision initial settings...The supported browser is located in the "Applications" folder just under the hard disk (Macintosh HD). 2 Delete the "jp.co.pioneer.AVNavigator 2013" folder. Attempting to make the connections and automatic settings. Displays glossary pages. ! AVNavigator is at times used with...
...translation, sales, lending or other entities described herein are special operating instructions for Windows 1 Click [AVNavigator 2013.V] on the receiver. puters using this CD-ROM belongs to launch AVNavigator. The language selection screen appears. Wiring Navi - High precision initial settings...The supported browser is located in the "Applications" folder just under the hard disk (Macintosh HD). 2 Delete the "jp.co.pioneer.AVNavigator 2013" folder. Attempting to make the connections and automatic settings. Displays glossary pages. ! AVNavigator is at times used with...

Owner's Manual
Page 13
... Use the arrow buttons when setting up your surround sound system (see page 93) and the Audio or Video options (page 77 or 79). 9 FEATURES buttons These let you operate the receiver's features directly. ! SIGNAL SEL - SLEEP - Use to access: ! The TV can be operated with these buttons regardless of the input...
... Use the arrow buttons when setting up your surround sound system (see page 93) and the Audio or Video options (page 77 or 79). 9 FEATURES buttons These let you operate the receiver's features directly. ! SIGNAL SEL - SLEEP - Use to access: ! The TV can be operated with these buttons regardless of the input...

Owner's Manual
Page 14
.../off the illumination for the buttons. The way the buttons light can be selected from the remote control. 12 Switches the remote to control the receiver (used to select the white commands). Controls and displays 14 Use to set up surround sound. 13 VOLUME +/- Switch to perform operations in ZONE 2, ZONE...
.../off the illumination for the buttons. The way the buttons light can be selected from the remote control. 12 Switches the remote to control the receiver (used to select the white commands). Controls and displays 14 Use to set up surround sound. 13 VOLUME +/- Switch to perform operations in ZONE 2, ZONE...

Owner's Manual
Page 15
... ! 2 DIGITAL PLUS - Lights when the Auto Surround feature is active (page 77). 21 Character display Displays various system information. 22 Remote control mode indicator Lights to indicate the receiver's remote control mode setting. (Not displayed when set to indicate the currently selected ...Direct Stream Digital) signals. ! Center channel ! THX - MONO - AUTO lights when the receiver is set using SPEAKERS (page 81). 18 SLEEP Lights when the receiver is selected (page 77). 14 Master volume level Shows the overall volume level. Left surround/Right surround channel ! ...
... ! 2 DIGITAL PLUS - Lights when the Auto Surround feature is active (page 77). 21 Character display Displays various system information. 22 Remote control mode indicator Lights to indicate the receiver's remote control mode setting. (Not displayed when set to indicate the currently selected ...Direct Stream Digital) signals. ! Center channel ! THX - MONO - AUTO lights when the receiver is set using SPEAKERS (page 81). 18 SLEEP Lights when the receiver is selected (page 77). 14 Master volume level Shows the overall volume level. Left surround/Right surround channel ! ...

Owner's Manual
Page 16
...HDMI-equipped component; Lights to indicate iPod/iPhone/iPad is connected (page 42). 4 Character display See Display on page 15. 5 Remote sensor Receives the signals from the speakers. 19 MCACC SETUP MIC jack Use to connect the supplied microphone (page 47). 16 Press to select a Home THX...mode (page 62). 15 TUNER controls ! When the headphones are connected, there is set to ON in the AUDIO PARAMETER menu (page 77). ! lights when the component is selected with your Home Menu. ISNEPLUETCTOR STANDBY /ON MVOALSUTMERE 8 AUDIO PARAMETER Use to access the Audio options (page...
...HDMI-equipped component; Lights to indicate iPod/iPhone/iPad is connected (page 42). 4 Character display See Display on page 15. 5 Remote sensor Receives the signals from the speakers. 19 MCACC SETUP MIC jack Use to connect the supplied microphone (page 47). 16 Press to select a Home THX...mode (page 62). 15 TUNER controls ! When the headphones are connected, there is set to ON in the AUDIO PARAMETER menu (page 77). ! lights when the component is selected with your Home Menu. ISNEPLUETCTOR STANDBY /ON MVOALSUTMERE 8 AUDIO PARAMETER Use to access the Audio options (page...

Owner's Manual
Page 18
... About HDMI...32 Connecting your TV and playback components 32 Connecting an HDD/DVD recorder, BD recorder and other video sources 35 Connecting a satellite/cable receiver or other set-top box 36 Connecting other audio components 37 Connecting additional amplifiers 37 Connecting AM/FM antennas...38 MULTI-ZONE setup...39 Connecting... HDMI-equipped component to the front panel input 43 Using a USB cable to connect to a computer 43 Connecting to a wireless LAN...44 Connecting an IR receiver...44 Switching components on and off using the 12 volt trigger 45 Plugging in the...
... About HDMI...32 Connecting your TV and playback components 32 Connecting an HDD/DVD recorder, BD recorder and other video sources 35 Connecting a satellite/cable receiver or other set-top box 36 Connecting other audio components 37 Connecting additional amplifiers 37 Connecting AM/FM antennas...38 MULTI-ZONE setup...39 Connecting... HDMI-equipped component to the front panel input 43 Using a USB cable to connect to a computer 43 Connecting to a wireless LAN...44 Connecting an IR receiver...44 Switching components on and off using the 12 volt trigger 45 Plugging in the...
Owner's Manual
Page 19
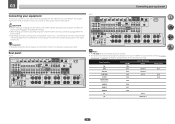
...SURROUND R L SURROUND BACK A R L (Single) AM LOOP ANTENNA FM UNBAL 75 IR RS-232C 12VTRIGGER 1 OUT IN 1 IN 2 2 SPEAKERS (OUTPUT 12 V TOTAL 150 mA MAX) SC-77 HDMI ASSIGNABLE 1 -8 ASSIGNABLE Y IN 1 (DVD) IN 2 (DVR/ BDR) IN 3 (VIDEO) MONITOR OUT ZONE 2 OUT OUT 3 (HD ZONE) IN 1 (DVD) BD IN ... IN 8 OUT 2 OUT 1 (CONTROL) LAN(10/100) DC OUTPUT for the SC-77 are the same except where noted. Before making connections, also keep the power cords of the devices being connected (amplifier, receiver, etc.), the methods of the respective devices. The RS-232C terminal is exclusively for ...
...SURROUND R L SURROUND BACK A R L (Single) AM LOOP ANTENNA FM UNBAL 75 IR RS-232C 12VTRIGGER 1 OUT IN 1 IN 2 2 SPEAKERS (OUTPUT 12 V TOTAL 150 mA MAX) SC-77 HDMI ASSIGNABLE 1 -8 ASSIGNABLE Y IN 1 (DVD) IN 2 (DVR/ BDR) IN 3 (VIDEO) MONITOR OUT ZONE 2 OUT OUT 3 (HD ZONE) IN 1 (DVD) BD IN ... IN 8 OUT 2 OUT 1 (CONTROL) LAN(10/100) DC OUTPUT for the SC-77 are the same except where noted. Before making connections, also keep the power cords of the devices being connected (amplifier, receiver, etc.), the methods of the respective devices. The RS-232C terminal is exclusively for ...

Owner's Manual
Page 24
... speakers must be bi-ampable to match these up with your speaker manual for high and low) and the sound improvement will depend on the receiver comprises a positive (+) and negative (-) terminal. In this (having separate terminals for more powerful sound reproduction. See your speakers for bi-amping...
... speakers must be bi-ampable to match these up with your speaker manual for high and low) and the sound improvement will depend on the receiver comprises a positive (+) and negative (-) terminal. In this (having separate terminals for more powerful sound reproduction. See your speakers for bi-amping...

Owner's Manual
Page 25
... for bi-amping shown above. % To bi-wire a speaker, connect two speaker cords to the SURROUND BACK L (Single) terminals. See Speaker system setting on the receiver. Don't connect different speakers from the Speaker System menu. Note that your main surround speakers should always be bi-wired if they support bi-amping...
... for bi-amping shown above. % To bi-wire a speaker, connect two speaker cords to the SURROUND BACK L (Single) terminals. See Speaker system setting on the receiver. Don't connect different speakers from the Speaker System menu. Note that your main surround speakers should always be bi-wired if they support bi-amping...

Owner's Manual
Page 31
Connecting your monitor/TV to the receiver's HDMI output when connecting this case, try adjusting the resolution settings on page 79) OFF. If several video components are 480i/576i, 480p/576p, 720p ... input resolutions that is only connected to HDMI, component, then composite (in Setting the Video options on page 48), the converter gives priority to the receiver's composite VIDEO MONITOR OUT jacks, all video sources are prohibited. 31 If the TV is protected by U.S. Reverse engineering and disassembly are output through composite...
Connecting your monitor/TV to the receiver's HDMI output when connecting this case, try adjusting the resolution settings on page 79) OFF. If several video components are 480i/576i, 480p/576p, 720p ... input resolutions that is only connected to HDMI, component, then composite (in Setting the Video options on page 48), the converter gives priority to the receiver's composite VIDEO MONITOR OUT jacks, all video sources are prohibited. 31 If the TV is protected by U.S. Reverse engineering and disassembly are output through composite...


