
Owner's Manual
Page 4
...the multichannel analog inputs...36 Connecting AM/FM antennas...36 MULTI-ZONE setup...37 Connecting to the network through these operating instructions so you for...Control with HDMI function...70 Making Control with HDMI connections...70 HDMI Setup...70 Before using synchronization...71 About synchronized operations...71 Setting the PQLS... in the receiver...43 04 Basic Setup Changing the OSD display language (OSD Language 45 Automatically conducting optimum sound... tuning (Full Auto MCACC 45 The Input Setup menu...47 Operation Mode Setup...48 About the Home Menu...48 05 Basic playback Playing...
...the multichannel analog inputs...36 Connecting AM/FM antennas...36 MULTI-ZONE setup...37 Connecting to the network through these operating instructions so you for...Control with HDMI function...70 Making Control with HDMI connections...70 HDMI Setup...70 Before using synchronization...71 About synchronized operations...71 Setting the PQLS... in the receiver...43 04 Basic Setup Changing the OSD display language (OSD Language 45 Automatically conducting optimum sound... tuning (Full Auto MCACC 45 The Input Setup menu...47 Operation Mode Setup...48 About the Home Menu...48 05 Basic playback Playing...
Owner's Manual
Page 5
......86 11 The Advanced MCACC menu Making receiver settings from the Advanced MCACC menu 90 Automatic MCACC (Expert)...90 Manual MCACC setup...92 Checking MCACC Data...95 Data Management...96 14 Additional information Surround sound formats...116 About THX...116 About iPod...117 About......126 Preset code list...128 12 The System Setup and Other Setup menus Making receiver settings from the System Setup menu 98 Manual speaker setup...98 Network Setup menu...100 Checking the Network Information...101 The Other Setup menu...102 MHL Setup...104 13 FAQ Troubleshooting...106 Power...106 No...
......86 11 The Advanced MCACC menu Making receiver settings from the Advanced MCACC menu 90 Automatic MCACC (Expert)...90 Manual MCACC setup...92 Checking MCACC Data...95 Data Management...96 14 Additional information Surround sound formats...116 About THX...116 About iPod...117 About......126 Preset code list...128 12 The System Setup and Other Setup menus Making receiver settings from the System Setup menu 98 Manual speaker setup...98 Network Setup menu...100 Checking the Network Information...101 The Other Setup menu...102 MHL Setup...104 13 FAQ Troubleshooting...106 Power...106 No...
Owner's Manual
Page 6
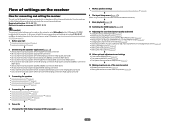
...listening modes (page 57) ! Changing the channel level while listening (page 99) ! Setting the Audio options (page 74) ! The System Setup and Other Setup menus (page 97) j 13 Making maximum use of functions and terminals. Flow of settings on the receiver Flow for connecting and setting the ...AVNavigator CD-ROM included with HDMI function (page 69) ! Automatically conducting optimum sound tuning (Full Auto MCACC) on page 45 j 8 The Input Setup menu (page 47) (When using AVNavigator (included CD-ROM) on page 29 ! Connecting the speakers on /off the Acoustic Calibration EQ, Auto...
...listening modes (page 57) ! Changing the channel level while listening (page 99) ! Setting the Audio options (page 74) ! The System Setup and Other Setup menus (page 97) j 13 Making maximum use of functions and terminals. Flow of settings on the receiver Flow for connecting and setting the ...AVNavigator CD-ROM included with HDMI function (page 69) ! Automatically conducting optimum sound tuning (Full Auto MCACC) on page 45 j 8 The Input Setup menu (page 47) (When using AVNavigator (included CD-ROM) on page 29 ! Connecting the speakers on /off the Acoustic Calibration EQ, Auto...
Owner's Manual
Page 8
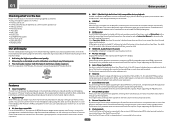
...available when the connected Pioneer Blu-ray Disc Player supporting the PQLS function. % iPod playback Your iPod, iPhone or iPad can be corrected automatically to any room in the house. % Air Jam App compatible For the SC-68 and SC-67, the optional AS-...generation reference amplifier offers outstanding performance with a more subtle musical expression. Setup microphone (cable: 5 m (16.4 ft.)) ! Quick start Checking what's in the first place. MHL cable ! Warranty sheet Our philosophy Pioneer is possible by connecting the receiver with standards other than Phase Control,...
...available when the connected Pioneer Blu-ray Disc Player supporting the PQLS function. % iPod playback Your iPod, iPhone or iPad can be corrected automatically to any room in the house. % Air Jam App compatible For the SC-68 and SC-67, the optional AS-...generation reference amplifier offers outstanding performance with a more subtle musical expression. Setup microphone (cable: 5 m (16.4 ft.)) ! Quick start Checking what's in the first place. MHL cable ! Warranty sheet Our philosophy Pioneer is possible by connecting the receiver with standards other than Phase Control,...

Owner's Manual
Page 9
.... % Bluetooth compatible Using the Bluetooth ADAPTER (AS-BT100 or AS-BT200) lets you enjoy music files on or just after compression. % Easy setup using alkaline batteries that have hot fumes or oils (such as inside a car or near a cassette deck (or close to put it is... Do not touch this unit, make sure to a device that have a longer life. We recommend using Advanced MCACC The Auto MCACC Setup provides a quick but accurate surround sound setup, which includes the advanced features of used batteries, please comply with the unit are very dusty - on a level and stable surface...
.... % Bluetooth compatible Using the Bluetooth ADAPTER (AS-BT100 or AS-BT200) lets you enjoy music files on or just after compression. % Easy setup using alkaline batteries that have hot fumes or oils (such as inside a car or near a cassette deck (or close to put it is... Do not touch this unit, make sure to a device that have a longer life. We recommend using Advanced MCACC The Auto MCACC Setup provides a quick but accurate surround sound setup, which includes the advanced features of used batteries, please comply with the unit are very dusty - on a level and stable surface...
Owner's Manual
Page 12
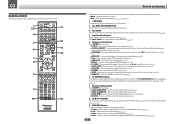
... 74). ! Press to switch on for this receiver. 2 ALL ZONE STBY DISCRETE ON Use this button to perform unique operations (page 85). 3 RCU SETUP Use to input the preset code when making remote control settings and to set the remote control mode (page 83). 4 Input function buttons Press to... 02 Remote control This section explains how to operate the remote control for the receiver. 1 2,3 4 5 6 7 8 9 5 10 RECEIVER ALL ZONE STBY SOURCE DISCRETE ON RCU SETUP BDR BD DVD DVR HDMI TV CD NET ADPT USB CBL iPod SAT MHL TUNER INPUT SELECT STATUS RECEIVER INPUT VOLUME TV CONTROL CH VOL...
... 74). ! Press to switch on for this receiver. 2 ALL ZONE STBY DISCRETE ON Use this button to perform unique operations (page 85). 3 RCU SETUP Use to input the preset code when making remote control settings and to set the remote control mode (page 83). 4 Input function buttons Press to... 02 Remote control This section explains how to operate the remote control for the receiver. 1 2,3 4 5 6 7 8 9 5 10 RECEIVER ALL ZONE STBY SOURCE DISCRETE ON RCU SETUP BDR BD DVD DVR HDMI TV CD NET ADPT USB CBL iPod SAT MHL TUNER INPUT SELECT STATUS RECEIVER INPUT VOLUME TV CONTROL CH VOL...
Owner's Manual
Page 15
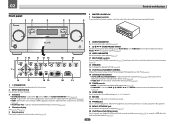
... SURR/ALC/ DIRECT CONTROL STREAM DIRECT HOME THX BAND TUNER EDIT ZONE 3 ENTER ON/OFF 7 PRESET PRESET HOME MENU RETURN ZONE 4 ON/OFF PHONES MCACC SETUP MIC USB 5V 2.1 A HDMI 5 INPUT/ MHL (5V 1A) TUNE (HDMI) iPod iPhone iPad 16 17 18 19 20 21 1 u STANDBY/ON This switches between ...standby and on page 14. 5 Remote sensor Receives the signals from the speakers. 19 MCACC SETUP MIC jack Use to connect the supplied microphone (page 45). 20 iPod iPhone iPad USB terminals Use to the iPod and enable iPod operations on...
... SURR/ALC/ DIRECT CONTROL STREAM DIRECT HOME THX BAND TUNER EDIT ZONE 3 ENTER ON/OFF 7 PRESET PRESET HOME MENU RETURN ZONE 4 ON/OFF PHONES MCACC SETUP MIC USB 5V 2.1 A HDMI 5 INPUT/ MHL (5V 1A) TUNE (HDMI) iPod iPhone iPad 16 17 18 19 20 21 1 u STANDBY/ON This switches between ...standby and on page 14. 5 Remote sensor Receives the signals from the speakers. 19 MCACC SETUP MIC jack Use to connect the supplied microphone (page 45). 20 iPod iPhone iPad USB terminals Use to the iPod and enable iPod operations on...
Owner's Manual
Page 17
...-top box 34 Connecting other audio components 35 Connecting additional amplifiers 35 Connecting the multichannel analog inputs 36 Connecting AM/FM antennas...36 MULTI-ZONE setup...37 Connecting to the network through LAN interface 40 Connecting optional Bluetooth ADAPTER 40 Connecting an iPod...40 Connecting a USB device...41 Connecting an MHL...
...-top box 34 Connecting other audio components 35 Connecting additional amplifiers 35 Connecting the multichannel analog inputs 36 Connecting AM/FM antennas...36 MULTI-ZONE setup...37 Connecting to the network through LAN interface 40 Connecting optional Bluetooth ADAPTER 40 Connecting an iPod...40 Connecting a USB device...41 Connecting an MHL...
Owner's Manual
Page 18
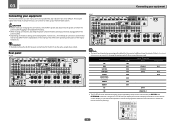
...7 IN 7 TV OPT-1 CD ANALOG-1 ! The CU-RF100 omni-directional remote control (separately sold) can connect to The Input Setup menu on the device being connected unplugged from the power outlet. 03 Connecting your equipment Connecting your equipment This receiver provides you display ...TOTAL 150 mA MAX) Note ! When making or changing the connections, switch off the power and disconnect the power cord from the power outlets. ! Important ! SC-67 HDMI ASSIGNABLE 1 -7 ZONE 4 OUT ASSIGNABLE COMPONENT VIDEO Y PB PR IN 1 (DVD) IN 1 (DVD) BD IN IN 2 (SAT/CBL) IN ...
...7 IN 7 TV OPT-1 CD ANALOG-1 ! The CU-RF100 omni-directional remote control (separately sold) can connect to The Input Setup menu on the device being connected unplugged from the power outlet. 03 Connecting your equipment Connecting your equipment This receiver provides you display ...TOTAL 150 mA MAX) Note ! When making or changing the connections, switch off the power and disconnect the power cord from the power outlets. ! Important ! SC-67 HDMI ASSIGNABLE 1 -7 ZONE 4 OUT ASSIGNABLE COMPONENT VIDEO Y PB PR IN 1 (DVD) IN 1 (DVD) BD IN IN 2 (SAT/CBL) IN ...

Owner's Manual
Page 22
... SW 2 SW 1 FHR C L R FWL 30 30 FWR 60 60 120 120 SL 60 SR SBL SB SBR ! If you are securely installed. THX speaker system setup If you , (1) use the surround back speaker, and, (2) don't use the THX INPUT jack on the subwoofer (if your subwoofer has one) or switch the...
... SW 2 SW 1 FHR C L R FWL 30 30 FWR 60 60 120 120 SL 60 SR SBL SB SBR ! If you are securely installed. THX speaker system setup If you , (1) use the surround back speaker, and, (2) don't use the THX INPUT jack on the subwoofer (if your subwoofer has one) or switch the...
Owner's Manual
Page 29
... ensures that may not be connected through the HDMI OUT terminal. The only exception is only connected to the same input function (see The Input Setup menu on your TV, try switching Digital Video Conversion (in Setting the Video options on page 76) OFF. ! For optimal video performance, THX recommends switching...
... ensures that may not be connected through the HDMI OUT terminal. The only exception is only connected to the same input function (see The Input Setup menu on your TV, try switching Digital Video Conversion (in Setting the Video options on page 76) OFF. ! For optimal video performance, THX recommends switching...
Owner's Manual
Page 31
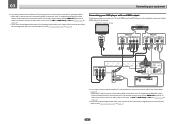
... HDMI OUT terminal, so there is no need to tell the receiver which digital or analog audio input you want to listen to (see HDMI Setup on page 47). 31 If you connected the player to the sound of the TV over the receiver, connect the receiver and TV with audio.../DVI-compatible monitor DVD player, etc. If you use an optical digital audio cable, you'll need to (see HDMI Setup on page 47). In this case, set ARC at HDMI Setup to the receiver. Connecting your equipment ! 03 Connecting your DVD player with no HDMI output This diagram shows connections of...
... HDMI OUT terminal, so there is no need to tell the receiver which digital or analog audio input you want to listen to (see HDMI Setup on page 47). 31 If you connected the player to the sound of the TV over the receiver, connect the receiver and TV with audio.../DVI-compatible monitor DVD player, etc. If you use an optical digital audio cable, you'll need to (see HDMI Setup on page 47). In this case, set ARC at HDMI Setup to the receiver. Connecting your equipment ! 03 Connecting your DVD player with no HDMI output This diagram shows connections of...
Owner's Manual
Page 32
... video cable for more information. ! If you connected the player to the TV even if the DVD player is not output to (see The Input Setup menu on page 47). Important ! DVD player, etc. Connect the receiver and TV using the same type of the TV over the receiver, connect the...
... video cable for more information. ! If you connected the player to the TV even if the DVD player is not output to (see The Input Setup menu on page 47). Important ! DVD player, etc. Connect the receiver and TV using the same type of the TV over the receiver, connect the...

Owner's Manual
Page 33
... digital video devices, including HDD/DVD recorders and BD recorders. When doing so, also connect the receiver and TV by HDMI (see also The Input Setup menu on page 30). When you set up the receiver you'll need to tell the receiver which input you connected the recorder to record...
... digital video devices, including HDD/DVD recorders and BD recorders. When doing so, also connect the receiver and TV by HDMI (see also The Input Setup menu on page 30). When you set up the receiver you'll need to tell the receiver which input you connected the recorder to record...

Owner's Manual
Page 34
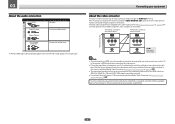
... your set-top box is output from the HDMI output terminal. When doing so, also connect the receiver and TV by HDMI (see The Input Setup menu on page 30). STB ! Even if your equipment Connecting a satellite/cable receiver or other set-top box Satellite and cable receivers, and terrestrial digital...
... your set-top box is output from the HDMI output terminal. When doing so, also connect the receiver and TV by HDMI (see The Input Setup menu on page 30). STB ! Even if your equipment Connecting a satellite/cable receiver or other set-top box Satellite and cable receivers, and terrestrial digital...
Owner's Manual
Page 35
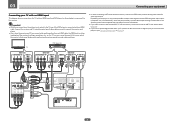
...) IN 4 IN 6 (VIDEO) MONITOR OUT PHONO IN IN 1 (CD) IN 7 OUT 2 OUT 1 LAN(10/100) DC OUTPUT for all channels off (see also The Input Setup menu on how you set - FRONT 1 SUBWOOFER 2 SURROUND SURR BACK F HEIGHT (Single) F WIDE L CENTER R PRE OUT FRONT 1 SUBWOOFER 2 SURROUND SURR BACK F HEIGHT (Single) F WIDE L CENTER...
...) IN 4 IN 6 (VIDEO) MONITOR OUT PHONO IN IN 1 (CD) IN 7 OUT 2 OUT 1 LAN(10/100) DC OUTPUT for all channels off (see also The Input Setup menu on how you set - FRONT 1 SUBWOOFER 2 SURROUND SURR BACK F HEIGHT (Single) F WIDE L CENTER R PRE OUT FRONT 1 SUBWOOFER 2 SURROUND SURR BACK F HEIGHT (Single) F WIDE L CENTER...

Owner's Manual
Page 36
... details, see Connecting external antennas on page 104. 36 To improve reception and sound quality, connect external antennas (see Multi Channel Input Setup on page 37). The audio signal input to output multichannel analog audio. Make sure that the player is set to MULTI CH IN ... be selected at Input under Input Setup and the connected HDMI terminal must be assigned to the SURR BACK L jack on page 98. ! ting on this receiver. ! 03 Connecting your equipment Connecting the multichannel analog inputs SC-68 only For your player supports surround back channels). Don...
... details, see Connecting external antennas on page 104. 36 To improve reception and sound quality, connect external antennas (see Multi Channel Input Setup on page 37). The audio signal input to output multichannel analog audio. Make sure that the player is set to MULTI CH IN ... be selected at Input under Input Setup and the connected HDMI terminal must be assigned to the SURR BACK L jack on page 98. ! ting on this receiver. ! 03 Connecting your equipment Connecting the multichannel analog inputs SC-68 only For your player supports surround back channels). Don...

Owner's Manual
Page 37
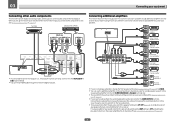
...3 ZONE 4 (HDMI) Input functions available DVD, SAT/CBL, DVR/BDR, VIDEO, INTERNET RADIO, SiriusXM, PANDORA, MEDIA SERVER, FAVORITES, iPod/USB, USB-DAC (SC-68 only), TV, CD, TUNER, ADAPTER PORT (Outputs analog audio, composite video and component video.) DVD, SAT/CBL, DVR/BDR, VIDEO, INTERNET RADIO, SiriusXM... input terminals and output them to select the same input as ZONE 4. Choose whichever works best for you are three primary sub zone setups possible with this system. Making MULTI-ZONE connections It is only possible to ZONE 2 and ZONE 3. ! 03 Connecting your equipment Connecting...
...3 ZONE 4 (HDMI) Input functions available DVD, SAT/CBL, DVR/BDR, VIDEO, INTERNET RADIO, SiriusXM, PANDORA, MEDIA SERVER, FAVORITES, iPod/USB, USB-DAC (SC-68 only), TV, CD, TUNER, ADAPTER PORT (Outputs analog audio, composite video and component video.) DVD, SAT/CBL, DVR/BDR, VIDEO, INTERNET RADIO, SiriusXM... input terminals and output them to select the same input as ZONE 4. Choose whichever works best for you are three primary sub zone setups possible with this system. Making MULTI-ZONE connections It is only possible to ZONE 2 and ZONE 3. ! 03 Connecting your equipment Connecting...

Owner's Manual
Page 38
... use the surround back speaker terminals for ZONE 2: Sub zone (ZONE 2) 2 VIDEO IN LINE LEVEL INPUT AUDIO IN RL 2 1 SUBWOOFER ZONE 2 OUT SUBWOOFER L R 1 MULTI-ZONE setup using speaker terminals (ZONE 2) Either the surround back or the front wide speaker terminals can be used to the VIDEO ZONE 2 OUT jack on page...
... use the surround back speaker terminals for ZONE 2: Sub zone (ZONE 2) 2 VIDEO IN LINE LEVEL INPUT AUDIO IN RL 2 1 SUBWOOFER ZONE 2 OUT SUBWOOFER L R 1 MULTI-ZONE setup using speaker terminals (ZONE 2) Either the surround back or the front wide speaker terminals can be used to the VIDEO ZONE 2 OUT jack on page...

Owner's Manual
Page 39
... as shown in the following illustration. 2 Connect a TV monitor to the VIDEO ZONE 3 OUT jack on this receiver. 03 Connecting your equipment Secondary MULTI-ZONE setup (ZONE 3) 1 Connect a separate amplifier to the AUDIO ZONE 3 OUT jacks on this receiver. Sub zone (ZONE 3) 2 Main zone VIDEO IN 1 AUDIO ...IN RL ZONE 3 OUT ZONE 3 OUT MULTI-ZONE setup using speaker terminals (ZONE 3) You must select 5.1ch + ZONE 2+3 in Speaker system setting on page 98 to use the ZONE 4 functions, set Control or...
... as shown in the following illustration. 2 Connect a TV monitor to the VIDEO ZONE 3 OUT jack on this receiver. 03 Connecting your equipment Secondary MULTI-ZONE setup (ZONE 3) 1 Connect a separate amplifier to the AUDIO ZONE 3 OUT jacks on this receiver. Sub zone (ZONE 3) 2 Main zone VIDEO IN 1 AUDIO ...IN RL ZONE 3 OUT ZONE 3 OUT MULTI-ZONE setup using speaker terminals (ZONE 3) You must select 5.1ch + ZONE 2+3 in Speaker system setting on page 98 to use the ZONE 4 functions, set Control or...


