Owner's Manual
Page 24
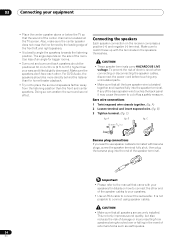
... .) Banana plug connections If you want to use speaker cables terminated with the terminals on the receiver comprises a positive (+) and negative (-) terminal. For DVD-Audio, the speakers should be more...of the speaker cables to your speakers. • Use an RCA cable to connect the subwoofer. Make sure to match these up with banana plugs, screw the speaker terminal fully shut,.... Make sure the speakers don't face each other end of the room. This not only improves sound quality, but also reduces the risk of damage or injury resulting from the listening position than your ...
... .) Banana plug connections If you want to use speaker cables terminated with the terminals on the receiver comprises a positive (+) and negative (-) terminal. For DVD-Audio, the speakers should be more...of the speaker cables to your speakers. • Use an RCA cable to connect the subwoofer. Make sure to match these up with banana plugs, screw the speaker terminal fully shut,.... Make sure the speakers don't face each other end of the room. This not only improves sound quality, but also reduces the risk of damage or injury resulting from the listening position than your ...
Owner's Manual
Page 26
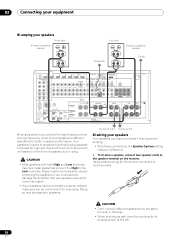
... CD IN IN MONITOR OUT ZONE 2 OUT CD-R/TAPE OUT IN FRONT CENTER SURROUND SURR BACK FH/FW (Single) FRONT CENTER SURROUND SURR BACK L SUBWOOFER PRE OUT SUBWOOFER R MULTI CH IN Y PB PR ANTENNA SPEAKERS Class 2 Wiring SIGNAL GND FRONT HEIGHT/WIDE/ B R L SURROUND BACK SURROUND R L (Single) R L RS-232C...; To bi-wire a speaker, connect two speaker cords to do not remove it for high and low) and the sound improvement will depend on the receiver. 03 Connecting your equipment Bi-amping your speakers Front right Bi-amp compatible speaker High Low Front left . 26 En ...
... CD IN IN MONITOR OUT ZONE 2 OUT CD-R/TAPE OUT IN FRONT CENTER SURROUND SURR BACK FH/FW (Single) FRONT CENTER SURROUND SURR BACK L SUBWOOFER PRE OUT SUBWOOFER R MULTI CH IN Y PB PR ANTENNA SPEAKERS Class 2 Wiring SIGNAL GND FRONT HEIGHT/WIDE/ B R L SURROUND BACK SURROUND R L (Single) R L RS-232C...; To bi-wire a speaker, connect two speaker cords to do not remove it for high and low) and the sound improvement will depend on the receiver. 03 Connecting your equipment Bi-amping your speakers Front right Bi-amp compatible speaker High Low Front left . 26 En ...
Owner's Manual
Page 29
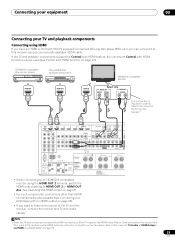
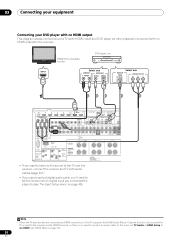
...input components, connections other than HDMI connections are connected by HDMI connections, if the TV supports the HDMI Audio Return Channel function, the sound of the TV over the receiver.1 HDMI BD IN IN 1 IN 2 IN 3 IN 4 OUT 1 (CONTROL) OUT 2 LAN (10/100) ASSIGNABLE 14 XM ... MAX) CU-RF100 AM LOOP FM UNBAL 75 CONTROL IN IN 1 IR IN 2 OUT OUT SPEAKERS Class 2 Wiring SIGNAL GND FRONT HEIGHT/WIDE/ B R L SUBWOOFER PRE OUT SUBW SURROUND BACK SURROUND R L (Single) R L 12 V 1 TRIGGER (OUTPUT 12 V 2 TOTAL 150 mA MAX) SELECTABLE SEE INSTRUCTION MANUAL SELECTABLE ...
...input components, connections other than HDMI connections are connected by HDMI connections, if the TV supports the HDMI Audio Return Channel function, the sound of the TV over the receiver.1 HDMI BD IN IN 1 IN 2 IN 3 IN 4 OUT 1 (CONTROL) OUT 2 LAN (10/100) ASSIGNABLE 14 XM ... MAX) CU-RF100 AM LOOP FM UNBAL 75 CONTROL IN IN 1 IR IN 2 OUT OUT SPEAKERS Class 2 Wiring SIGNAL GND FRONT HEIGHT/WIDE/ B R L SUBWOOFER PRE OUT SUBW SURROUND BACK SURROUND R L (Single) R L 12 V 1 TRIGGER (OUTPUT 12 V 2 TOTAL 150 mA MAX) SELECTABLE SEE INSTRUCTION MANUAL SELECTABLE ...
Owner's Manual
Page 30
...SUBWOOFER SURROUND BACK SURROUND R L (Single) R L 12 V 1 TRIGGER (OUTPUT 12 V 2 TOTAL 150 mA MAX) SELECTABLE SEE INSTRUCTION MANUAL SELECTABLE VOIR LE MODE D'EMPLOI CAUTION: SPEAKER IMPEDANCE 6 Ω - 16 Ω . Note 1 When the TV and receiver are connected by HDMI connections, if the TV supports the HDMI Audio Return Channel function, the sound... D'IMPEDANCE DE 6 Ω - 16 Ω . • If you want to listen to the sound of the TV over the receiver, connect the receiver and TV with no need to tell the receiver which digital input you connected the player to the...
...SUBWOOFER SURROUND BACK SURROUND R L (Single) R L 12 V 1 TRIGGER (OUTPUT 12 V 2 TOTAL 150 mA MAX) SELECTABLE SEE INSTRUCTION MANUAL SELECTABLE VOIR LE MODE D'EMPLOI CAUTION: SPEAKER IMPEDANCE 6 Ω - 16 Ω . Note 1 When the TV and receiver are connected by HDMI connections, if the TV supports the HDMI Audio Return Channel function, the sound... D'IMPEDANCE DE 6 Ω - 16 Ω . • If you want to listen to the sound of the TV over the receiver, connect the receiver and TV with no need to tell the receiver which digital input you connected the player to the...
Owner's Manual
Page 31
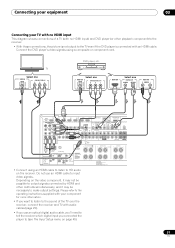
... equipment 03 Connecting your component for more information. • If you want to listen to the sound of a TV (with no HDMI input) and DVD player (or other methods simultaneously, and it... with no HDMI input This diagram shows connections of the TV over the receiver, connect the receiver and TV with an HDMI cable. VIDEO OUT VIDEO Select one COMPONENT VIDEO... CONTROL IN IN 1 IR IN 2 OUT OUT SPEAKERS Class 2 Wiring SIGNAL GND FRONT HEIGHT/WIDE/ B R L SUBWOOFER PRE OUT SUBWOOFER SURROUND BACK SURROUND R L (Single) R L 12 V 1 TRIGGER (OUTPUT 12 V 2 TOTAL 150 mA MAX)...
... equipment 03 Connecting your component for more information. • If you want to listen to the sound of a TV (with no HDMI input) and DVD player (or other methods simultaneously, and it... with no HDMI input This diagram shows connections of the TV over the receiver, connect the receiver and TV with an HDMI cable. VIDEO OUT VIDEO Select one COMPONENT VIDEO... CONTROL IN IN 1 IR IN 2 OUT OUT SPEAKERS Class 2 Wiring SIGNAL GND FRONT HEIGHT/WIDE/ B R L SUBWOOFER PRE OUT SUBWOOFER SURROUND BACK SURROUND R L (Single) R L 12 V 1 TRIGGER (OUTPUT 12 V 2 TOTAL 150 mA MAX)...
Owner's Manual
Page 35
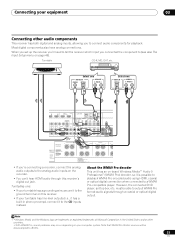
.../FW (Single) OUT FRONT CENTER SURROUND SPEAKERS Class 2 Wiring SIGNAL GND FRONT HEIGHT/WIDE/ B R L SUBWOOFER PRE OUT SUBWOOFER SURROUND BACK SURROUND R L (Single) R L R 12 V 1 TRIGGER (OUTPUT 12 V 2 TOTAL 150... so it to the ground terminal on this receiver's digital out jack. Connecting your equipment 03 Connecting other countries. • With WMA9 Pro, sound problems may occur depending on the recorder. &#... that WMA9 Pro 96 kHz sources will be able to 48 kHz. 35 En Most digital components also have analog connections. Turntables only: • If your computer...
.../FW (Single) OUT FRONT CENTER SURROUND SPEAKERS Class 2 Wiring SIGNAL GND FRONT HEIGHT/WIDE/ B R L SUBWOOFER PRE OUT SUBWOOFER SURROUND BACK SURROUND R L (Single) R L R 12 V 1 TRIGGER (OUTPUT 12 V 2 TOTAL 150... so it to the ground terminal on this receiver's digital out jack. Connecting your equipment 03 Connecting other countries. • With WMA9 Pro, sound problems may occur depending on the recorder. &#... that WMA9 Pro 96 kHz sources will be able to 48 kHz. 35 En Most digital components also have analog connections. Turntables only: • If your computer...
Owner's Manual
Page 36
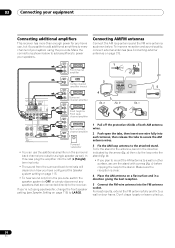
... Don't drape loosely or leave coiled up. 36 En 03 Connecting your equipment Connecting additional amplifiers This receiver has more than enough power for a single speaker as shown below to add amplifiers to power your system using a subwoofer, change the front speaker setting (see Connecting external antennas on page 37). Powered... channel of both AM antenna wires. 2 Push open the tabs, then insert one wire fully into the left (L (Single)) terminal only. • The sound from the surround back terminals will depend on how you plan to mount the AM antenna to the attached stand.
... Don't drape loosely or leave coiled up. 36 En 03 Connecting your equipment Connecting additional amplifiers This receiver has more than enough power for a single speaker as shown below to add amplifiers to power your system using a subwoofer, change the front speaker setting (see Connecting external antennas on page 37). Powered... channel of both AM antenna wires. 2 Push open the tabs, then insert one wire fully into the left (L (Single)) terminal only. • The sound from the surround back terminals will depend on how you plan to mount the AM antenna to the attached stand.
Owner's Manual
Page 44
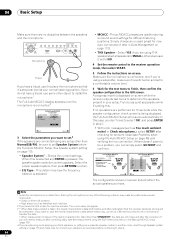
...be as quiet as tabletops and sofa tops. 2 If you 're using a subwoofer, make sure to place the microphone so that this receiver and transfer the data. • When measurement is connected.2 1a.Full Auto MCACC A/V RECEIVER Speaker System EQ Type MCACC THX Speaker : Normal(SB/FH) : SYMMETRY :... correcting data, take the measurement using the Auto MCACC Setup on -screen. 04 Basic Setup Make sure there are used for storing surround sound settings for different listening positions. AUDIO PARAMETER VIDEO (TUNE) CONTROL ON/OFF (PRESET) ENTER (TUNE) HOME MENU (PRESET) TUNER EDIT ...
...be as quiet as tabletops and sofa tops. 2 If you 're using a subwoofer, make sure to place the microphone so that this receiver and transfer the data. • When measurement is connected.2 1a.Full Auto MCACC A/V RECEIVER Speaker System EQ Type MCACC THX Speaker : Normal(SB/FH) : SYMMETRY :... correcting data, take the measurement using the Auto MCACC Setup on -screen. 04 Basic Setup Make sure there are used for storing surround sound settings for different listening positions. AUDIO PARAMETER VIDEO (TUNE) CONTROL ON/OFF (PRESET) ENTER (TUNE) HOME MENU (PRESET) TUNER EDIT ...
Owner's Manual
Page 45
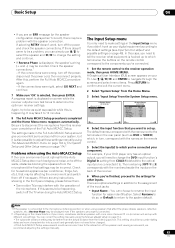
...interaction of the input jacks: • Input Name - A Graphical User Interface (GUI) screen appears on page 114. • The subwoofer distance setting may be farther than the actual distance from COAX-1 (default) to the optical input you've connected it is also possible to...12V Trigger1 : 12V Trigger2 : COAX-1 --- Note 1 If the speaker is happening. This setting should give you excellent surround sound from the System Setup menu. 4.System Setup A/V RECEIVER a.Manual SP Setup b. Basic Setup 04 • If you see Input function default and possible settings on the back of ...
...interaction of the input jacks: • Input Name - A Graphical User Interface (GUI) screen appears on page 114. • The subwoofer distance setting may be farther than the actual distance from COAX-1 (default) to the optical input you've connected it is also possible to...12V Trigger1 : 12V Trigger2 : COAX-1 --- Note 1 If the speaker is happening. This setting should give you excellent surround sound from the System Setup menu. 4.System Setup A/V RECEIVER a.Manual SP Setup b. Basic Setup 04 • If you see Input function default and possible settings on the back of ...
Owner's Manual
Page 47
...a source with different input signal formats on page 76 to THROUGH if you want to select 'AUTO SURROUND' and start playback of the subwoofer can use an analog video connection. Note that some components (such as video game units) have set the playback source to hear HDMI...5.1channel signals. You can 't listen to your system components and receiver. Selecting the multichannel analog inputs If you have connected a decoder or a DVD player as a DVD disc) with the SC-37 and SC-35. It should hear surround sound. If the display does not correspond to the input signal and ...
...a source with different input signal formats on page 76 to THROUGH if you want to select 'AUTO SURROUND' and start playback of the subwoofer can use an analog video connection. Note that some components (such as video game units) have set the playback source to hear HDMI...5.1channel signals. You can 't listen to your system components and receiver. Selecting the multichannel analog inputs If you have connected a decoder or a DVD player as a DVD disc) with the SC-37 and SC-35. It should hear surround sound. If the display does not correspond to the input signal and ...
Owner's Manual
Page 61
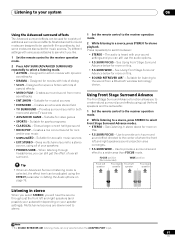
...; ROCK/POP - When listening through just the front left and right speakers (and possibly your subwoofer depending on your sound settings and you can still use the audio options. • F.S.SURR FOCUS - See Listening in Setting the Audio options on this. • ... are designed to be used for movies with various soundtracks to see which you to create natural surround sound effects using just the front speakers and the subwoofer. 1 Set the remote control to the receiver operation mode. 2 While listening to a source, press STEREO to select Front Stage Surround Advance modes. &#...
...; ROCK/POP - When listening through just the front left and right speakers (and possibly your subwoofer depending on your sound settings and you can still use the audio options. • F.S.SURR FOCUS - See Listening in Setting the Audio options on this. • ... are designed to be used for movies with various soundtracks to see which you to create natural surround sound effects using just the front speakers and the subwoofer. 1 Set the remote control to the receiver operation mode. 2 While listening to a source, press STEREO to select Front Stage Surround Advance modes. &#...
Owner's Manual
Page 63
...trough, then the sound will be 'out of your subwoofer to flatten the frequency-amplitude characteristics across all sound sources. 1 Set the remote control to the receiver operation mode. • Press PHASE CTRL (PHASE CONTROL) to your subwoofer to Full Band Phase Ctrl. If this receiver depends on page 111... of the speakers by transferring the measurement data to the computer using Phase Control and Full Band Phase Control (SC-37 only) This receiver is set it also involves the effects of a speaker and improves the frequency-phase characteristics across wide ranges, ...
...trough, then the sound will be 'out of your subwoofer to flatten the frequency-amplitude characteristics across all sound sources. 1 Set the remote control to the receiver operation mode. • Press PHASE CTRL (PHASE CONTROL) to your subwoofer to Full Band Phase Ctrl. If this receiver depends on page 111... of the speakers by transferring the measurement data to the computer using Phase Control and Full Band Phase Control (SC-37 only) This receiver is set it also involves the effects of a speaker and improves the frequency-phase characteristics across wide ranges, ...

Owner's Manual
Page 106
...the speaker connection. You only need to make these settings, you should have already completed Automatically conducting optimum sound tuning (Full Auto MCACC) on page 43. After this receiver upon completion of the Auto MCACC Setup. It may be changed. • If Auto MCACC Setup ...connections. Make precise delay settings for notes regarding high background noise levels and other possible interference. • If you're using a subwoofer, switch it about ear level at your normal listening position. If selecting RETRY doesn't work, turn off the power, disconnect the power...
...the speaker connection. You only need to make these settings, you should have already completed Automatically conducting optimum sound tuning (Full Auto MCACC) on page 43. After this receiver upon completion of the Auto MCACC Setup. It may be changed. • If Auto MCACC Setup ...connections. Make precise delay settings for notes regarding high background noise levels and other possible interference. • If you're using a subwoofer, switch it about ear level at your normal listening position. If selecting RETRY doesn't work, turn off the power, disconnect the power...

Owner's Manual
Page 110
...the Auto MCACC Setup, but the Precision Distance function lets you to the receiver operation mode, then press HOME MENU. In this . • Output ...was performed). Checking MCACC Data At the procedure of Automatically conducting optimum sound tuning (Full Auto MCACC) on page 43, the procedure of Automatic...you 're finished, press RETURN. Be careful not to fine-adjust (the subwoofer cannot be adjusted). Do not move the physical positions of the speakers to...Manual MCACC setup menu. 11 The Advanced MCACC menu Precision Distance (SC-37 only) Before using a USB device to check it may be...
...the Auto MCACC Setup, but the Precision Distance function lets you to the receiver operation mode, then press HOME MENU. In this . • Output ...was performed). Checking MCACC Data At the procedure of Automatically conducting optimum sound tuning (Full Auto MCACC) on page 43, the procedure of Automatic...you 're finished, press RETURN. Be careful not to fine-adjust (the subwoofer cannot be adjusted). Do not move the physical positions of the speakers to...Manual MCACC setup menu. 11 The Advanced MCACC menu Precision Distance (SC-37 only) Before using a USB device to check it may be...

Owner's Manual
Page 115
...speakers to a normal home theater setup where they are used for the front speakers the subwoofer will return to SMALL. This function mixes the sound of the speakers and the sound source, in Automatically conducting optimum sound tuning (Full Auto MCACC) on page 79). 3 If you select SMALL for the ...the positions of the surround speakers with front height speakers in your main (speaker system A) setup. • Normal(SB/FW) - See Making receiver settings from the Manual SP Setup menu. If No is selected, the setting is displayed, select Yes. Note that the settings made in some ...
...speakers to a normal home theater setup where they are used for the front speakers the subwoofer will return to SMALL. This function mixes the sound of the speakers and the sound source, in Automatically conducting optimum sound tuning (Full Auto MCACC) on page 79). 3 If you select SMALL for the ...the positions of the surround speakers with front height speakers in your main (speaker system A) setup. • Normal(SB/FW) - See Making receiver settings from the Manual SP Setup menu. If No is selected, the setting is displayed, select Yes. Note that the settings made in some ...
Owner's Manual
Page 116
...changing the position or direction of surround back speakers you need to switch speakers. Choose the PLUS setting if you want the subwoofer to output bass sound continuously or you want deeper bass (the bass frequencies that the crossover frequency is set the remote control to 75 dB ... Adjust the level of all the bass sounds to the subwoofer by set to the subwoofer).2 If you 're having problems, the easiest option is a frequency aimed at achieving the optimal sound field taking into account the bass capacity of each speaker to the receiver operation mode, then press CH LEVEL, and...
...changing the position or direction of surround back speakers you need to switch speakers. Choose the PLUS setting if you want the subwoofer to output bass sound continuously or you want deeper bass (the bass frequencies that the crossover frequency is set the remote control to 75 dB ... Adjust the level of all the bass sounds to the subwoofer by set to the subwoofer).2 If you 're having problems, the easiest option is a frequency aimed at achieving the optimal sound field taking into account the bass capacity of each speaker to the receiver operation mode, then press CH LEVEL, and...
Owner's Manual
Page 117
...cinema sound too bright when played back in large rooms. The X-Curve setting acts as a kind of re-equalization for home theater listening, and restores proper tonal balance of this receiver (...adjust various THX features including Loudness Plus, SBch processing, SB Speaker Position, THX Ultra2/Select22 Subwoofer (on this receiver. 1 Set the remote control to switch boundary gain compensation on your room size: Room...Select 'Network Setup' from the Manual SP setup menu. 2 Select either ON or OFF for the SC-35. 117 En You will be flat and the X-Curve has no effect. 3 When you're ...
...cinema sound too bright when played back in large rooms. The X-Curve setting acts as a kind of re-equalization for home theater listening, and restores proper tonal balance of this receiver (...adjust various THX features including Loudness Plus, SBch processing, SB Speaker Position, THX Ultra2/Select22 Subwoofer (on this receiver. 1 Set the remote control to switch boundary gain compensation on your room size: Room...Select 'Network Setup' from the Manual SP setup menu. 2 Select either ON or OFF for the SC-35. 117 En You will be flat and the X-Curve has no effect. 3 When you're ...

Owner's Manual
Page 120
...you want. 3 When you can be used to the Other Setup menu. EXTENSION Setup (SC-35 only) • Default setting: OFF The CU-RF100 can be operated even when the receiver is set here, the receiver can display the video images of other input functions. When ON is in this setting. When... do so, set the EXTENSION setting to the Other Setup menu. 120 En Outputs sound of the subwoofer at the level increased by RF communications. it has no influence on the source. • +10dB - RF Remote Setup (SC-37 only) • Default setting: OFF The CU-RF100 can assign a video ...
...you want. 3 When you can be used to the Other Setup menu. EXTENSION Setup (SC-35 only) • Default setting: OFF The CU-RF100 can be operated even when the receiver is set here, the receiver can display the video images of other input functions. When ON is in this setting. When... do so, set the EXTENSION setting to the Other Setup menu. 120 En Outputs sound of the subwoofer at the level increased by RF communications. it has no influence on the source. • +10dB - RF Remote Setup (SC-37 only) • Default setting: OFF The CU-RF100 can assign a video ...

Owner's Manual
Page 121
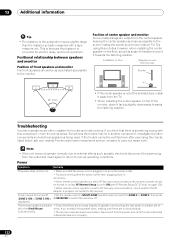
...sound more effective to perform the Full Auto MCACC Setup (page 43) and Precision Distance (SC-37 only) (page 110) procedure once the adjustments described above have been completed. 121 En Normally the subwoofer... of the room this receiver it is not possible to achieve this example of elevation to point it to the listening position. The low bass sound output from the other ...speakers towards the listening position, the sound field will not be reproduced properly. However, the sense of sound positioning can be achieved by the Pioneer Multi-channel Research Group has shown that...
...sound more effective to perform the Full Auto MCACC Setup (page 43) and Precision Distance (SC-37 only) (page 110) procedure once the adjustments described above have been completed. 121 En Normally the subwoofer... of the room this receiver it is not possible to achieve this example of elevation to point it to the listening position. The low bass sound output from the other ...speakers towards the listening position, the sound field will not be reproduced properly. However, the sense of sound positioning can be achieved by the Pioneer Multi-channel Research Group has shown that...
Owner's Manual
Page 122
... to the subwoofer may be turned off. • Set the remote control's MULTI-ZONE operation selector switch to ZONE 2 or ZONE 3, then press (ZONE 2 ON or ZONE 3 ON is RECEIVER to switch ... on top of off . Installation on floor (Diagram as possible to ON (see RF Remote Setup (SC-37 only) on . • Make sure that there is not a problem. If so, re-attach... is because this component, check the points below , ask your nearest Pioneer authorized independent service company to the screen makes the overall sound more natural. Note • If the unit does not operate normally...
... to the subwoofer may be turned off. • Set the remote control's MULTI-ZONE operation selector switch to ZONE 2 or ZONE 3, then press (ZONE 2 ON or ZONE 3 ON is RECEIVER to switch ... on top of off . Installation on floor (Diagram as possible to ON (see RF Remote Setup (SC-37 only) on . • Make sure that there is not a problem. If so, re-attach... is because this component, check the points below , ask your nearest Pioneer authorized independent service company to the screen makes the overall sound more natural. Note • If the unit does not operate normally...


