Owner's Manual
Page 4
... rating system (MPAA 45 Setting the TV ratings 45 4 En Contents Contents Thank you for buying this manual are for the PDP-5072HD/PDP-5071HD/PDP-5070HD unless otherwise specified. 01 Important User Guidance Information 02 Safety Precautions 03 Supplied Accessories Speaker accessories 12 ... of the power plug and power outlet may sometimes differ from Falling Over 25 Attaching/detaching the PIONEER stand 26 PDP-5072HD/PDP-5071HD/ PDP-5070HD 26 PDP-4272HD/PDP-4271HD/ PDP-4270HD 28 Cable connections for watching digital and/or conventional TV channels 29 Connecting VHF/UHF antennas ...
... rating system (MPAA 45 Setting the TV ratings 45 4 En Contents Contents Thank you for buying this manual are for the PDP-5072HD/PDP-5071HD/PDP-5070HD unless otherwise specified. 01 Important User Guidance Information 02 Safety Precautions 03 Supplied Accessories Speaker accessories 12 ... of the power plug and power outlet may sometimes differ from Falling Over 25 Attaching/detaching the PIONEER stand 26 PDP-5072HD/PDP-5071HD/ PDP-5070HD 26 PDP-4272HD/PDP-4271HD/ PDP-4270HD 28 Cable connections for watching digital and/or conventional TV channels 29 Connecting VHF/UHF antennas ...
Owner's Manual
Page 5
... position and clock closed captions 49 adjustments (PC mode only 68 Selecting digital closed captions ........ 50 Manual image position and clock Selecting digital closed caption adjustments (PC mode only 68 parameters 50 Selecting a screen size manually 69 Clock Setting 50 Selecting a screen size automatically ..... 70 10 TV Guide On Screen™ System...
... position and clock closed captions 49 adjustments (PC mode only 68 Selecting digital closed captions ........ 50 Manual image position and clock Selecting digital closed caption adjustments (PC mode only 68 parameters 50 Selecting a screen size manually 69 Clock Setting 50 Selecting a screen size automatically ..... 70 10 TV Guide On Screen™ System...
Owner's Manual
Page 10
... you to the product. The plasma Display used in this manual in a safe place-These safety and operating instructions must be followed. 5. Servicing-Do not attempt to a strong impact, for PDP-6072HD/PDP-5072HD/PDP6071HD/PDP-5071HD/PDP-6070HD/PDP-5070HD only). 23. b. Never expose the screen of power... understood before cleaning the product. The Plasma Display weighs about 51.5 kg (113.6 lbs.) for the PDP-6072HD/PDP-6071HD/PDP-6070HD, about 41.7 kg (92 lbs.) for the PDP-5072HD/PDP-5071HD/PDP-5070HD (including the stand and speaker) and about 31.5 kg (69.5 lbs.) for built-in the...
... you to the product. The plasma Display used in this manual in a safe place-These safety and operating instructions must be followed. 5. Servicing-Do not attempt to a strong impact, for PDP-6072HD/PDP-5072HD/PDP6071HD/PDP-5071HD/PDP-6070HD/PDP-5070HD only). 23. b. Never expose the screen of power... understood before cleaning the product. The Plasma Display weighs about 51.5 kg (113.6 lbs.) for the PDP-6072HD/PDP-6071HD/PDP-6070HD, about 41.7 kg (92 lbs.) for the PDP-5072HD/PDP-5071HD/PDP-5070HD (including the stand and speaker) and about 31.5 kg (69.5 lbs.) for built-in the...
Owner's Manual
Page 11
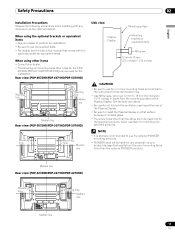
.../PDP-6071HD/PDP-6070HD) can be used only for any items such as the optional bracket. See the side view above. • Be careful not to 11/16 inches) in depth from the use of mounting items other than the optional PIONEER products. When using other items • Consult your... dealer to perform the installation. • Be sure to be liable for the specified products. NOTE • It is strongly recommended to use the supplied bolts. • For details, see the instruction manual that comes with...
.../PDP-6071HD/PDP-6070HD) can be used only for any items such as the optional bracket. See the side view above. • Be careful not to 11/16 inches) in depth from the use of mounting items other than the optional PIONEER products. When using other items • Consult your... dealer to perform the installation. • Be sure to be liable for the specified products. NOTE • It is strongly recommended to use the supplied bolts. • For details, see the instruction manual that comes with...
Owner's Manual
Page 13
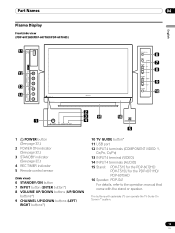
Part Names Part Names Plasma Display Front/side view (PDP-6072HD/PDP-6071HD/PDP-6070HD) 11 12 13 14 POWER ON STANDBY REC TIMER 04 6 7 8 9 10 English 2 3 15 1 4 POWER ON STANDBY REC TIMER 16 5 1 a POWER button (See page 32.) 2 .../PB, CR/PR) 13 INPUT 4 terminal (VIDEO) 14 INPUT 4 terminals (AUDIO) 15 Stand: PDK-TS15 for the PDP-6072HD PDK-TS15U for the PDP-6071HD/ PDP-6070HD 16 Speaker: PDP-S41 For details, refer to the operation manual that came with asterisks (*) can operate the TV Guide On Screen™ system. 13 En The buttons with...
Part Names Part Names Plasma Display Front/side view (PDP-6072HD/PDP-6071HD/PDP-6070HD) 11 12 13 14 POWER ON STANDBY REC TIMER 04 6 7 8 9 10 English 2 3 15 1 4 POWER ON STANDBY REC TIMER 16 5 1 a POWER button (See page 32.) 2 .../PB, CR/PR) 13 INPUT 4 terminal (VIDEO) 14 INPUT 4 terminals (AUDIO) 15 Stand: PDK-TS15 for the PDP-6072HD PDK-TS15U for the PDP-6071HD/ PDP-6070HD 16 Speaker: PDP-S41 For details, refer to the operation manual that came with asterisks (*) can operate the TV Guide On Screen™ system. 13 En The buttons with...
Owner's Manual
Page 16
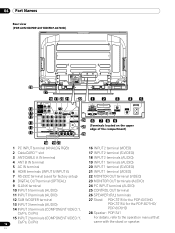
04 Part Names Rear view (PDP-6072HD/PDP-6071HD/PDP-6070HD) 28 27 16 17 20 21 22 1 2 3 45 10 11 12 13 24 6 7 8 9 14 25 (Terminals located on the upper edge of the compartment) ... terminal (VIDEO) 23 MONITOR OUT terminals (AUDIO) 24 PC INPUT terminal (AUDIO) 25 CONTROL OUT terminal 26 SPEAKER (R/L) terminals 27 Stand: PDK-TS15 for the PDP-6072HD PDK-TS15U for the PDP-6071HD/ PDP-6070HD 28 Speaker: PDP-S41 For details, refer to the operation manual that came with the stand or speaker.
04 Part Names Rear view (PDP-6072HD/PDP-6071HD/PDP-6070HD) 28 27 16 17 20 21 22 1 2 3 45 10 11 12 13 24 6 7 8 9 14 25 (Terminals located on the upper edge of the compartment) ... terminal (VIDEO) 23 MONITOR OUT terminals (AUDIO) 24 PC INPUT terminal (AUDIO) 25 CONTROL OUT terminal 26 SPEAKER (R/L) terminals 27 Stand: PDK-TS15 for the PDP-6072HD PDK-TS15U for the PDP-6071HD/ PDP-6070HD 28 Speaker: PDP-S41 For details, refer to the operation manual that came with the stand or speaker.

Owner's Manual
Page 20
.../PDP-6071HD/PDP-6070HD) Stand: PDK-TS15 for the PDP-6072HD PDK-TS15U for the PDP-6071HD/PDP6070HD Speaker: PDP-S41 For details, refer to ensure adequate ventilation of the rear of the unit. NOTE • Allow enough space around the upper and back parts when installing to the operation manual that came with the stand or speaker...
.../PDP-6071HD/PDP-6070HD) Stand: PDK-TS15 for the PDP-6072HD PDK-TS15U for the PDP-6071HD/PDP6070HD Speaker: PDP-S41 For details, refer to ensure adequate ventilation of the rear of the unit. NOTE • Allow enough space around the upper and back parts when installing to the operation manual that came with the stand or speaker...

Owner's Manual
Page 24
.... En * Speaker mounting screw (M5 x 10 mm) The screw hole at the bottom of the Plasma Display. 2. Connect the supplied speaker cables to the instruction manual supplied with an asterisk) is not used when the Plasma Display is installed on wall unit. 3.
.... En * Speaker mounting screw (M5 x 10 mm) The screw hole at the bottom of the Plasma Display. 2. Connect the supplied speaker cables to the instruction manual supplied with an asterisk) is not used when the Plasma Display is installed on wall unit. 3.

Owner's Manual
Page 35
... to 6 or PC does not change the type of the MTS/SAP modes selected, the display changes depend on broadcast signals being received. In this manual designate TV channels that are received through the conventional VHF/ UHF frequencies or conventional cable TV channels. • When stereo sound is difficult to hear...
... to 6 or PC does not change the type of the MTS/SAP modes selected, the display changes depend on broadcast signals being received. In this manual designate TV channels that are received through the conventional VHF/ UHF frequencies or conventional cable TV channels. • When stereo sound is difficult to hear...

Owner's Manual
Page 38
..." returns you to watching TV. • "Don't remind me again"). As content providers move to begin setup. • The Welcome Screen lists features in this manual. Setup may take up to one of the procedure gives you the opportunity to display Screen 2. 38 En Reminder Screen If you previously skipped Guide...
..." returns you to watching TV. • "Don't remind me again"). As content providers move to begin setup. • The Welcome Screen lists features in this manual. Setup may take up to one of the procedure gives you the opportunity to display Screen 2. 38 En Reminder Screen If you previously skipped Guide...

Owner's Manual
Page 42
... 66 Balance 66 Reset 66 FOCUS 66 Front Surround 66 Power Control Energy Save 67 Power Management 67 Sleep Timer 63 Option Auto Setup 68 Manual Setup 68 Home Gallery 78 - 80 Menu operations The following describes the typical procedure for setting up the menus. For the actual procedures, see the...
... 66 Balance 66 Reset 66 FOCUS 66 Front Surround 66 Power Control Energy Save 67 Power Management 67 Sleep Timer 63 Option Auto Setup 68 Manual Setup 68 Home Gallery 78 - 80 Menu operations The following describes the typical procedure for setting up the menus. For the actual procedures, see the...
Owner's Manual
Page 43
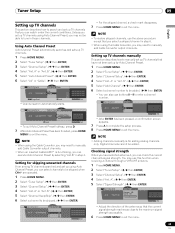
..."Add Channel". ( / then ENTER) 6 Select a channel number to be added. ( / then ENTER) • You can check the current channel's signal strength. You may need to manually add Cable Converter output channels. A" or "Ant. B". ( / then ENTER) 5 Select "Channel Keep/Skip". ( / then ENTER) 6 Select a channel to be added. A Ant... that you may not be able to tune in those channels. Preset Cable Air Ant. Setting up TV channels manually This section describes how to manually set up TV channels using the Cable Converter, you can select channels to exit the menu. Unless you set ...
..."Add Channel". ( / then ENTER) 6 Select a channel number to be added. ( / then ENTER) • You can check the current channel's signal strength. You may need to manually add Cable Converter output channels. A" or "Ant. B". ( / then ENTER) 5 Select "Channel Keep/Skip". ( / then ENTER) 6 Select a channel to be added. A Ant... that you may not be able to tune in those channels. Preset Cable Air Ant. Setting up TV channels manually This section describes how to manually set up TV channels using the Cable Converter, you can select channels to exit the menu. Unless you set ...

Owner's Manual
Page 50
... Apply Current Time: 9:56 pm EDT Monday 05/17/04 xxxxxxxxxxxxxxxxxxxxx xxxxxxxxxxxxxxxxxxxxx xxxxxxxxxxxxxxxxxxxxx Home Menu Exit 8 Select "Auto/Manual Set". ( , / , then ENTER) 9 Select "Auto Set" or "Manual Set". ( / then ENTER) 50 En You can also manually set time is employed in your area. ( / then ENTER) Clock Time Zone Time Zone Atlantic Eastern Central...
... Apply Current Time: 9:56 pm EDT Monday 05/17/04 xxxxxxxxxxxxxxxxxxxxx xxxxxxxxxxxxxxxxxxxxx xxxxxxxxxxxxxxxxxxxxx Home Menu Exit 8 Select "Auto/Manual Set". ( , / , then ENTER) 9 Select "Auto Set" or "Manual Set". ( / then ENTER) 50 En You can also manually set time is employed in your area. ( / then ENTER) Clock Time Zone Time Zone Atlantic Eastern Central...

Owner's Manual
Page 51
... ENTER. If you select a parameter for the Clock menu and press ENTER, the menu screen disappears and a dialog box appears instead; Clock Auto/Manual Set Auto/Manual Set •Manual Set Date and Time 3 4 3 /17/04 11:58pm 5 6 Current Time: 11:58 pm PDT Monday 05/17/04 xxxxxxxxxxxxxxxxxxxxx xxxxxxxxxxxxxxxxxxxxx xxxxxxxxxxxxxxxxxxxxx Home ...; system, the Plasma Display System acquires clock information through the TV Guide On Screen™ system; press A to exit the menu. If you select "Manual Set", manually set up the clock using data from the selected channel. Clock Auto...
... ENTER. If you select a parameter for the Clock menu and press ENTER, the menu screen disappears and a dialog box appears instead; Clock Auto/Manual Set Auto/Manual Set •Manual Set Date and Time 3 4 3 /17/04 11:58pm 5 6 Current Time: 11:58 pm PDT Monday 05/17/04 xxxxxxxxxxxxxxxxxxxxx xxxxxxxxxxxxxxxxxxxxx xxxxxxxxxxxxxxxxxxxxx Home ...; system, the Plasma Display System acquires clock information through the TV Guide On Screen™ system; press A to exit the menu. If you select "Manual Set", manually set up the clock using data from the selected channel. Clock Auto...
Owner's Manual
Page 52
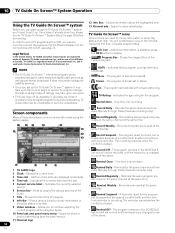
...time/day. • Remind Suspend - Shows the title of the Guide. 7 Title - Reminds for the same channel and time every Monday through Friday (manual recording only). • Record Regularly - In Canada, TV GUIDE is a high-definition broadcast. • New - Indicates that a program is a ... advertising (and the panel menu). 11 Channel logo • Remind Once - Records the same channel and time every Monday through Friday (manual reminder only). • Remind Regularly - Additional information is cleared. • Record Off - Indicates the age rating for cable-ready and...
...time/day. • Remind Suspend - Shows the title of the Guide. 7 Title - Reminds for the same channel and time every Monday through Friday (manual recording only). • Record Regularly - In Canada, TV GUIDE is a high-definition broadcast. • New - Indicates that a program is a ... advertising (and the panel menu). 11 Channel logo • Remind Once - Records the same channel and time every Monday through Friday (manual reminder only). • Remind Regularly - Additional information is cleared. • Record Off - Indicates the age rating for cable-ready and...
Owner's Manual
Page 60
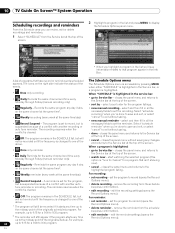
...9:30 program. set the program to record, but is highlighted. A reminder is highlighted: • go to exit without saving. • new manual reminder - A list of a conflict with another recording or auto tune reminder. The icons on the same channel at the top of the events. ... because of programs that program appear in the service bar: • Daily Records the same channel and time every Monday through Friday (manual reminder only) • Regularly - 10 TV Guide On Screen™ System Operation Scheduling recordings and reminders From the Schedule area you ...
...9:30 program. set the program to record, but is highlighted. A reminder is highlighted: • go to exit without saving. • new manual reminder - A list of a conflict with another recording or auto tune reminder. The icons on the same channel at the top of the events. ... because of programs that program appear in the service bar: • Daily Records the same channel and time every Monday through Friday (manual reminder only) • Regularly - 10 TV Guide On Screen™ System Operation Scheduling recordings and reminders From the Schedule area you ...

Owner's Manual
Page 63
... factory default is automatically selected for each input source. DYNAMIC MOVIE GAME USER For a very sharp image with maximum contrast This mode does not allow manual image quality adjustment. This selection is shared by the external input and TV input sources. However, when you resume the Home Gallery after having quit...
... factory default is automatically selected for each input source. DYNAMIC MOVIE GAME USER For a very sharp image with maximum contrast This mode does not allow manual image quality adjustment. This selection is shared by the external input and TV input sources. However, when you resume the Home Gallery after having quit...

Owner's Manual
Page 68
...the positions and clock of images when necessary. 1 Press HOME MENU. 2 Select "Option". ( / then ENTER) 3 Select "Manual Setup". ( / then ENTER) 4 Select an item to be adjusted. ( / then ENTER) Manual Setup H/V Position Adjust Clock 0 Phase 0 Reset 5 Perform adjustment. ( / or / ) • With "Clock" or...computer. 1 Press HOME MENU. 2 Select "Option". ( / then ENTER) 3 Select "Auto Setup". ( / then ENTER) Option Auto Setup Manual Setup Manual image position and clock adjustments (PC mode only) Usually you can easily adjust the positions and clock of images using / . 6 Press HOME ...
...the positions and clock of images when necessary. 1 Press HOME MENU. 2 Select "Option". ( / then ENTER) 3 Select "Manual Setup". ( / then ENTER) 4 Select an item to be adjusted. ( / then ENTER) Manual Setup H/V Position Adjust Clock 0 Phase 0 Reset 5 Perform adjustment. ( / or / ) • With "Clock" or...computer. 1 Press HOME MENU. 2 Select "Option". ( / then ENTER) 3 Select "Auto Setup". ( / then ENTER) Option Auto Setup Manual Setup Manual image position and clock adjustments (PC mode only) Usually you can easily adjust the positions and clock of images using / . 6 Press HOME ...
Owner's Manual
Page 69
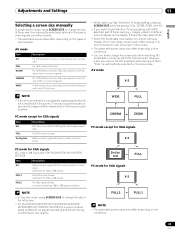
... HD broadcasts or enjoying other HD input sources. PC mode except for XGA signals (Ex. 1024 × 768 input with PDP-5072HD/PDP-5071HD/PDP5070HD) Item 4:3 Description Matches input signal with WIDE selected, part of the screen (e.g., images, graphic interface) may differ... letterbox pictures. Adjustments and Settings 11 English Selecting a screen size manually In single-screen mode, press SCREEN SIZE to change the size of the left screen. • For the PDP-6072HD/PDP-6071HD/PDP-6070HD/PDP4272HD/PDP-4271HD/PDP-4270HD the number of panel pixels is different, so signal processing...
... HD broadcasts or enjoying other HD input sources. PC mode except for XGA signals (Ex. 1024 × 768 input with PDP-5072HD/PDP-5071HD/PDP5070HD) Item 4:3 Description Matches input signal with WIDE selected, part of the screen (e.g., images, graphic interface) may differ... letterbox pictures. Adjustments and Settings 11 English Selecting a screen size manually In single-screen mode, press SCREEN SIZE to change the size of the left screen. • For the PDP-6072HD/PDP-6071HD/PDP-6070HD/PDP4272HD/PDP-4271HD/PDP-4270HD the number of panel pixels is different, so signal processing...

Owner's Manual
Page 70
... ENTER) Item Description Fixed Always sets the same brightness for on-screen display such as menus from a connected HDMI equipment (see page 72). NOTE • Manually select an appropriate screen size if an image does not automatically switch to exit the menu. Activates the Auto Size function. 5 Press HOME MENU to...
... ENTER) Item Description Fixed Always sets the same brightness for on-screen display such as menus from a connected HDMI equipment (see page 72). NOTE • Manually select an appropriate screen size if an image does not automatically switch to exit the menu. Activates the Auto Size function. 5 Press HOME MENU to...


