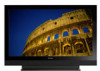

Owner's Manual
Page 2
The exclamation point within the product's enclosure that may require the use attachments/accessories specified by the manufacturer. 12) Use only with the cart, stand, tripod, bracket, or table specified by your outlet, consult an electrician for long periods of time. 14) Refer all instructions. 5) Do not use caution when ...
The exclamation point within the product's enclosure that may require the use attachments/accessories specified by the manufacturer. 12) Use only with the cart, stand, tripod, bracket, or table specified by your outlet, consult an electrician for long periods of time. 14) Refer all instructions. 5) Do not use caution when ...
Owner's Manual
Page 4
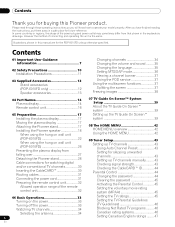
...In some countries or regions, the shape of the power plug and power outlet may sometimes differ from falling over 27 Detaching the Pioneer stand 28 Cable connections for watching digital and/or conventional TV channels 30 Inserting the CableCARD 30 Routing cables 31 Connecting the power cord...control unit 16 05 Preparation 17 Installing the plasma display 17 Moving the plasma display 17 Attaching the Pioneer stand 17 Installing the Pioneer speaker 18 When using the hung on wall unit (PDP-6010FD 22 When using the hung on the power 33 Turning off the power 33 Watching TV channels ...
...In some countries or regions, the shape of the power plug and power outlet may sometimes differ from falling over 27 Detaching the Pioneer stand 28 Cable connections for watching digital and/or conventional TV channels 30 Inserting the CableCARD 30 Routing cables 31 Connecting the power cord...control unit 16 05 Preparation 17 Installing the plasma display 17 Moving the plasma display 17 Attaching the Pioneer stand 17 Installing the Pioneer speaker 18 When using the hung on wall unit (PDP-6010FD 22 When using the hung on the power 33 Turning off the power 33 Watching TV channels ...
Owner's Manual
Page 7
... electronics, now during the manufacturing process and in order to cool the internal electronics and prevent a hazardous occurrence. Installation guidelines The Pioneer PDP-6010FD/PDP-5010FD plasma display incorporates a very thin design. Use of accessories other than two hours at a time. • After playing ...side should be affected by the use to less than the Pioneer stand or installation bracket may cause the internal temperature to be held responsible for example, a traditional tube-type television). Pioneer will not be placed in color filter technology - For custom...
... electronics, now during the manufacturing process and in order to cool the internal electronics and prevent a hazardous occurrence. Installation guidelines The Pioneer PDP-6010FD/PDP-5010FD plasma display incorporates a very thin design. Use of accessories other than two hours at a time. • After playing ...side should be affected by the use to less than the Pioneer stand or installation bracket may cause the internal temperature to be held responsible for example, a traditional tube-type television). Pioneer will not be placed in color filter technology - For custom...
Owner's Manual
Page 9
...wide-screen viewing modes; Some parts of time, image retention may remain on left frozen on page 69). USE ONLY WITH A CART, STAND, TRIPOD, BRACKET, OR TABLE RECOMMENDED BY THE MANUFACTURER, OR SOLD WITH THE PRODUCT. QUICK STOPS, EXCESSIVE FORCE, AND UNEVEN SURFACES MAY CAUSE... to remaining electric load When image patterns with content. Recommended guidelines are displayed. Caution DO NOT PLACE THIS PRODUCT ON AN UNSTABLE CART, STAND, TRIPOD, BRACKET, OR TABLE. About the menu window size following two cases. 1 After-image lagging due to burning of these viewing...
...wide-screen viewing modes; Some parts of time, image retention may remain on left frozen on page 69). USE ONLY WITH A CART, STAND, TRIPOD, BRACKET, OR TABLE RECOMMENDED BY THE MANUFACTURER, OR SOLD WITH THE PRODUCT. QUICK STOPS, EXCESSIVE FORCE, AND UNEVEN SURFACES MAY CAUSE... to remaining electric load When image patterns with content. Recommended guidelines are displayed. Caution DO NOT PLACE THIS PRODUCT ON AN UNSTABLE CART, STAND, TRIPOD, BRACKET, OR TABLE. About the menu window size following two cases. 1 After-image lagging due to burning of these viewing...
Owner's Manual
Page 10
... company. 22. To ensure your safety and prolong the service life of the plasma display to a strong impact, for the PDP-5010FD (including the stand and speaker). Keep this product is unstable, unpack, carry, and install the product with impact. Overloading-Do not overload AC ... injury. 24. b. If you to follow the manufacturer's instructions. The plasma display weighs about 66.2 kg (145.9 lbs.) for the PDP-6010FD (including the stand and speaker) and about 44.0 kg (97 lbs.) for example, by the manufacturer. This product has been engineered and manufactured with the ...
... company. 22. To ensure your safety and prolong the service life of the plasma display to a strong impact, for the PDP-5010FD (including the stand and speaker). Keep this product is unstable, unpack, carry, and install the product with impact. Overloading-Do not overload AC ... injury. 24. b. If you to follow the manufacturer's instructions. The plasma display weighs about 66.2 kg (145.9 lbs.) for the PDP-6010FD (including the stand and speaker) and about 44.0 kg (97 lbs.) for example, by the manufacturer. This product has been engineered and manufactured with the ...
Owner's Manual
Page 12
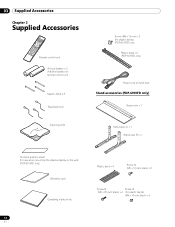
... band × 3 Cleaning cloth Screw (M4 x 10 mm) x 2 (for plastic bands) (PDP-5010FD only) Plastic band x 2 (PDP-5010FD only) Power cord (2 m/6.6 feet) Stand accessories (PDP-6010FD only) Base cover x 1 Stand pipe (L) x 1 Stand pipe (R) x 1 Terminal position sheet (for use when mounting the plasma display on the wall) (PDP-6010FD only) Warranty card Operating instructions 12 En Plastic band x 4 Screw ➀...
... band × 3 Cleaning cloth Screw (M4 x 10 mm) x 2 (for plastic bands) (PDP-5010FD only) Plastic band x 2 (PDP-5010FD only) Power cord (2 m/6.6 feet) Stand accessories (PDP-6010FD only) Base cover x 1 Stand pipe (L) x 1 Stand pipe (R) x 1 Terminal position sheet (for use when mounting the plasma display on the wall) (PDP-6010FD only) Warranty card Operating instructions 12 En Plastic band x 4 Screw ➀...
Owner's Manual
Page 17
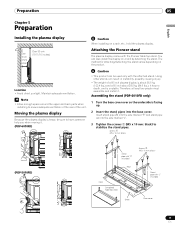
... the upper and back parts when installing to have someone help you when moving it. (PDP-6010FD) Caution • This product can be used only with the attached stand. Using other stands can also install the display on the product. You can result in instability, possibly causing... ➀ (M5 x 10 mm: black) Rear Front Completed Table top stand Stand pipe with the Pioneer table top stand. Attaching the Pioneer stand The plasma display comes with "L" inscribed Sheet Base cover 17 En Assembling the stand (PDP-6010FD only) 1 Turn the base cover over so the underside is heavy, be...
... the upper and back parts when installing to have someone help you when moving it. (PDP-6010FD) Caution • This product can be used only with the attached stand. Using other stands can also install the display on the product. You can result in instability, possibly causing... ➀ (M5 x 10 mm: black) Rear Front Completed Table top stand Stand pipe with the Pioneer table top stand. Attaching the Pioneer stand The plasma display comes with "L" inscribed Sheet Base cover 17 En Assembling the stand (PDP-6010FD only) 1 Turn the base cover over so the underside is heavy, be...
Owner's Manual
Page 18
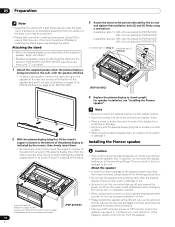
... speaker may result in the correct positions. Mistakenly installing the stand pipes may be careful not to scratch or damage it out (see "Installing the Pioneer speaker". Note • Be sure to the bottom of the stand. Doing so might damage the plasma display panel or its ... screw holes with "T" inscribed). 1 Detach the supplied speaker when the plasma display is not laid before assembly, the front surface of the stand indicates downward. (PDP-6010FD) • Please handle the speaker with the plasma display lying flat on a table or similar surface. • When lying the plasma ...
... speaker may result in the correct positions. Mistakenly installing the stand pipes may be careful not to scratch or damage it out (see "Installing the Pioneer speaker". Note • Be sure to the bottom of the stand. Doing so might damage the plasma display panel or its ... screw holes with "T" inscribed). 1 Detach the supplied speaker when the plasma display is not laid before assembly, the front surface of the stand indicates downward. (PDP-6010FD) • Please handle the speaker with the plasma display lying flat on a table or similar surface. • When lying the plasma ...
Owner's Manual
Page 19
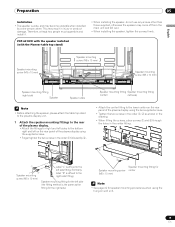
... to the right side fitting.) Speaker mounting fitting for speaker mounting procedures when using the hung on wall unit. 19 En PDP-6010FD with the speaker installed (with the Pioneer table top stand) Speaker mounting screw (M5 x 10 mm) Speaker mounting screw (M5 x 10 mm) Speaker mounting screw (M5 x 10 mm) Speaker mounting fitting...
... to the right side fitting.) Speaker mounting fitting for speaker mounting procedures when using the hung on wall unit. 19 En PDP-6010FD with the speaker installed (with the Pioneer table top stand) Speaker mounting screw (M5 x 10 mm) Speaker mounting screw (M5 x 10 mm) Speaker mounting screw (M5 x 10 mm) Speaker mounting fitting...
Owner's Manual
Page 20
... the speaker its position needs to mount the speaker upside down. Caution • To avoid any damage to the speaker and/or table top stand from striking against each other, fit the speaker to the unit. This can result in injury or damage to the mounting fittings while confirming their... the speaker first. In addition, do not fit the grooves at the bottom surface of the speaker mounting fitting is used when installed with the stand. 05 Preparation 2 Fit the speaker to the mounting fittings in the correct direction. • Be sure not to be adjusted horizontally or vertically, first ...
... the speaker its position needs to mount the speaker upside down. Caution • To avoid any damage to the speaker and/or table top stand from striking against each other, fit the speaker to the unit. This can result in injury or damage to the mounting fittings while confirming their... the speaker first. In addition, do not fit the grooves at the bottom surface of the speaker mounting fitting is used when installed with the stand. 05 Preparation 2 Fit the speaker to the mounting fittings in the correct direction. • Be sure not to be adjusted horizontally or vertically, first ...
Owner's Manual
Page 22
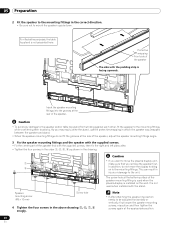
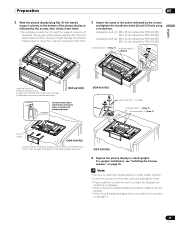
...mounting fittings and speaker cable attached to any pressure. 05 Preparation When using the hung on wall unit (PDP-6010FD) Note • First lay the plasma display on top of a soft sheet etc., remove the stand, then attach the speaker mounting fittings. • Install the plasma display on the wall with the table... top stand. Speaker mounting screw (M5 x 10 mm) 4 Speaker mounting screw (M5 x 10 mm) 2 1 When using the supplied screws (four locations). • Tighten the four screws in...
...mounting fittings and speaker cable attached to any pressure. 05 Preparation When using the hung on wall unit (PDP-6010FD) Note • First lay the plasma display on top of a soft sheet etc., remove the stand, then attach the speaker mounting fittings. • Install the plasma display on the wall with the table... top stand. Speaker mounting screw (M5 x 10 mm) 4 Speaker mounting screw (M5 x 10 mm) 2 1 When using the supplied screws (four locations). • Tighten the four screws in...
Owner's Manual
Page 23
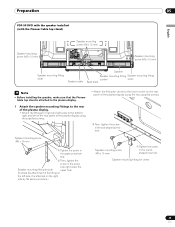
...the supplied screws. • Attach the fitting for center to the lower center on the left side. Preparation 05 English PDP-5010FD with the speaker installed (with the Pioneer table top stand) Speaker mounting screw (M5 x 10 mm) Speaker mounting screw (M5 x 10 mm) 4 5 Speaker mounting screw ... Speaker mounting fitting Speaker mounting fitting (center) (side) Bead band Note • Before installing the speaker, make sure that the Pioneer table top stand is attached on the right side by the same procedure.) Speaker mounting screw (M5 x 10 mm) ➀ Tighten the screw ...
...the supplied screws. • Attach the fitting for center to the lower center on the left side. Preparation 05 English PDP-5010FD with the speaker installed (with the Pioneer table top stand) Speaker mounting screw (M5 x 10 mm) Speaker mounting screw (M5 x 10 mm) 4 5 Speaker mounting screw ... Speaker mounting fitting Speaker mounting fitting (center) (side) Bead band Note • Before installing the speaker, make sure that the Pioneer table top stand is attached on the right side by the same procedure.) Speaker mounting screw (M5 x 10 mm) ➀ Tighten the screw ...

Owner's Manual
Page 24
...locations. As you remove the speaker first. Tighten the three screws in order , , as shown in which the speaker was wrapped between the speaker and stand. • When the speaker mounting fittings do not fit the grooves at the rear of the speaker, adjust the speaker mounting fittings angle. 3 Tighten ... then tighten the screws again at the bottom of the speaker mounting fitting is installed on the back of the speaker The side with the stand. In 3 addition, do not use these holes.2 Speaker mounting screw (M5 x 10 mm) The screw hole at the appropriate position. 24 En Speaker ...
...locations. As you remove the speaker first. Tighten the three screws in order , , as shown in which the speaker was wrapped between the speaker and stand. • When the speaker mounting fittings do not fit the grooves at the rear of the speaker, adjust the speaker mounting fittings angle. 3 Tighten ... then tighten the screws again at the bottom of the speaker mounting fitting is installed on the back of the speaker The side with the stand. In 3 addition, do not use these holes.2 Speaker mounting screw (M5 x 10 mm) The screw hole at the appropriate position. 24 En Speaker ...
Owner's Manual
Page 26
... sure not to mount the speaker upside down. 6 Tighten from below using the hung on wall unit (PDP-5010FD) Note • First lay the plasma display on top of a soft sheet etc., remove the stand, then attach the speaker mounting fittings. 1 Attach the speaker mounting fittings to the rear of the plasma... with the hung on page 25). Note • If after attaching the speaker its position needs to the instruction manual supplied with the table top stand.
... sure not to mount the speaker upside down. 6 Tighten from below using the hung on wall unit (PDP-5010FD) Note • First lay the plasma display on top of a soft sheet etc., remove the stand, then attach the speaker mounting fittings. 1 Attach the speaker mounting fittings to the rear of the plasma... with the hung on page 25). Note • If after attaching the speaker its position needs to the instruction manual supplied with the table top stand.

Owner's Manual
Page 27
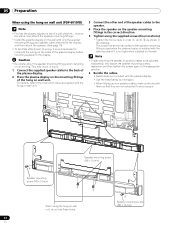
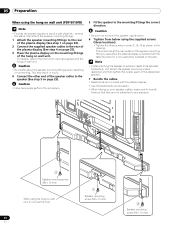
... or rack with adequate strength should always be sure to ensure that are at least 20 mm (13/16 inch) long. (PDP-6010FD) 20 mm (13/16 inch) min. Perform this work the same way on the left and right sides. Note •...commercially available wood screws that are available on the left and right sides. 27 En Hook 2. Stabilizing on the left and right sides. (PDP-5010FD) 4 5 Supplied screw Wood screw (M4 x 10 mm: black) (commercially available, 4 mm x 20 mm (5/32 inch x...will vary according to which it will not fall over After installing the stand, be used to 0.7 inches). 1.
... or rack with adequate strength should always be sure to ensure that are at least 20 mm (13/16 inch) long. (PDP-6010FD) 20 mm (13/16 inch) min. Perform this work the same way on the left and right sides. Note •...commercially available wood screws that are available on the left and right sides. 27 En Hook 2. Stabilizing on the left and right sides. (PDP-5010FD) 4 5 Supplied screw Wood screw (M4 x 10 mm: black) (commercially available, 4 mm x 20 mm (5/32 inch x...will vary according to which it will not fall over After installing the stand, be used to 0.7 inches). 1.
Owner's Manual
Page 28
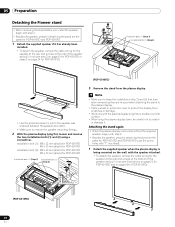
05 Preparation Detaching the Pioneer stand • When removing the stand before you install the speaker, begin with step 2. • Besides the speaker, steps for attaching the stand are the same for PDP-6010FD and PDP-5010FD. 1 Detach the supplied speaker if it has already been installed. ...bolt (1): M8 x 23 mm (black) for PDP-5010FD M6 x 20 mm (black) for PDP-6010FD Installation bolt (2): M8 x 40 mm (black) for PDP-5010FD M6 x 20 mm (black) for PDP-6010FD Installation bolts (1) (Step 1) Installation bolts (2) (Step 2) 3 Remove the stand from scratches or damage. • Work only with...
05 Preparation Detaching the Pioneer stand • When removing the stand before you install the speaker, begin with step 2. • Besides the speaker, steps for attaching the stand are the same for PDP-6010FD and PDP-5010FD. 1 Detach the supplied speaker if it has already been installed. ...bolt (1): M8 x 23 mm (black) for PDP-5010FD M6 x 20 mm (black) for PDP-6010FD Installation bolt (2): M8 x 40 mm (black) for PDP-5010FD M6 x 20 mm (black) for PDP-6010FD Installation bolts (1) (Step 1) Installation bolts (2) (Step 2) 3 Remove the stand from scratches or damage. • Work only with...
Owner's Manual
Page 29
... stand upright. For speaker installation, see "Installing the Pioneer speaker" on a table or similar surface. • When lying the plasma display down, be careful not to scratch or damage it. 29 En Installation bolt (1): M8 x 23 mm (black) for PDP-5010FD M6 x 20 mm (black) for PDP-6010FD... Installation bolt (2): M8 x 40 mm (black) for PDP-5010FD M6 x 20 mm (black) for PDP-6010FD Installation bolts (1) (Step 1) Installation bolts (2) (Step 2) Insert the stand into the plasma display so that an arrow with ...
... stand upright. For speaker installation, see "Installing the Pioneer speaker" on a table or similar surface. • When lying the plasma display down, be careful not to scratch or damage it. 29 En Installation bolt (1): M8 x 23 mm (black) for PDP-5010FD M6 x 20 mm (black) for PDP-6010FD... Installation bolt (2): M8 x 40 mm (black) for PDP-5010FD M6 x 20 mm (black) for PDP-6010FD Installation bolts (1) (Step 1) Installation bolts (2) (Step 2) Insert the stand into the plasma display so that an arrow with ...
Owner's Manual
Page 30
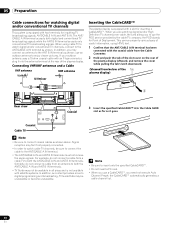
... remove the cover while pulling the tab's latch downward. (Viewed from a cable TV to both the ANT/CABLE A IN and ANT B IN terminals. the POD stands for Point of the plasma display. If your outdoor antenna uses a 75-ohm coaxial cable with satellite systems. In addition, as it goes. Connecting VHF...
... remove the cover while pulling the tab's latch downward. (Viewed from a cable TV to both the ANT/CABLE A IN and ANT B IN terminals. the POD stands for Point of the plasma display. If your outdoor antenna uses a 75-ohm coaxial cable with satellite systems. In addition, as it goes. Connecting VHF...
Owner's Manual
Page 62
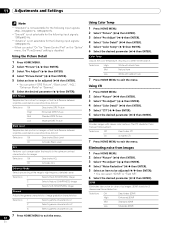
... "Picture" ( / then ENTER). 3 Select "Pro Adjust" ( / then ENTER). 4 Select "Color Detail" ( / then ENTER). 5 Select "CTI" ( / then ENTER). 6 Select the desired parameter ( / then ENTER). The CTI stands for 3dimensional Noise Reduction. Selections Off Deactivates CTI On Activates CTI 7 Press HOME MENU to exit the menu. 62 En Color Temp Adjusts the color... ( / then ENTER). • You can select "3DNR" or "Field NR". 6 Select the desired parameter ( / then ENTER). 3DNR Eliminates video noise for clean crisp images. 3DNR stands for Color Transient Improvement.
... "Picture" ( / then ENTER). 3 Select "Pro Adjust" ( / then ENTER). 4 Select "Color Detail" ( / then ENTER). 5 Select "CTI" ( / then ENTER). 6 Select the desired parameter ( / then ENTER). The CTI stands for 3dimensional Noise Reduction. Selections Off Deactivates CTI On Activates CTI 7 Press HOME MENU to exit the menu. 62 En Color Temp Adjusts the color... ( / then ENTER). • You can select "3DNR" or "Field NR". 6 Select the desired parameter ( / then ENTER). 3DNR Eliminates video noise for clean crisp images. 3DNR stands for Color Transient Improvement.
Owner's Manual
Page 103
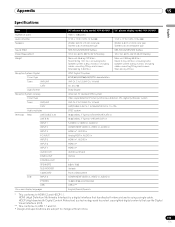
... 6 INPUT 7 AUDIO OUT DIGITAL OUT CONTROL OUT SPEAKERS SUB WOOFER CableCARD Side INPUT 3 PHONES USB On-screen display languages 60" plasma display model: PDP-6010FD 50" plasma display model: PDP-5010FD 1920 × 1080 pixels 17 W + 17 W (1 kHz, 10 %, 6 Ω) 17 W + 17 W (1 kHz, 10 %, 6 Ω)...: 4.8 kg (10.6 lbs.) (including cables, mounting fittings and screws) Total: 66.2 kg (145.9 lbs.) Main unit: 38.5 kg (84.9 lbs.) Stand: 2.2 kg (4.9 lbs.) (including bolts) Speaker system: 3.3 kg (7.3 lbs.) (including cables, mounting fittings and screws) Total: 44.0 kg (97 lbs.) ...
... 6 INPUT 7 AUDIO OUT DIGITAL OUT CONTROL OUT SPEAKERS SUB WOOFER CableCARD Side INPUT 3 PHONES USB On-screen display languages 60" plasma display model: PDP-6010FD 50" plasma display model: PDP-5010FD 1920 × 1080 pixels 17 W + 17 W (1 kHz, 10 %, 6 Ω) 17 W + 17 W (1 kHz, 10 %, 6 Ω)...: 4.8 kg (10.6 lbs.) (including cables, mounting fittings and screws) Total: 66.2 kg (145.9 lbs.) Main unit: 38.5 kg (84.9 lbs.) Stand: 2.2 kg (4.9 lbs.) (including bolts) Speaker system: 3.3 kg (7.3 lbs.) (including cables, mounting fittings and screws) Total: 44.0 kg (97 lbs.) ...


