
Owner's Manual
Page 4
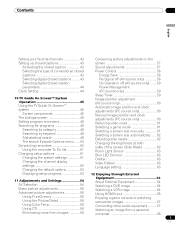
... this manual are for buying this Pioneer product. Contents 01 Important User Guidance Information 7 02 Safety Precautions 10 Installation Precautions 11 03 Supplied Accessories 12 04 Part Names 13 Plasma display 13 Remote control unit 15 05 Preparation 16 Installing the plasma display 16 Moving the plasma display 16 Installing the Pioneer speaker (PDP-5080HD.......... 41 Setting Canadian French ratings ........ 41 Setting new ratings 41 Deleting new ratings 42 Temporarily deactivating the Parental Control 42 Contents Thank you for the PDP-5080HD unless otherwise specified.
... this manual are for buying this Pioneer product. Contents 01 Important User Guidance Information 7 02 Safety Precautions 10 Installation Precautions 11 03 Supplied Accessories 12 04 Part Names 13 Plasma display 13 Remote control unit 15 05 Preparation 16 Installing the plasma display 16 Moving the plasma display 16 Installing the Pioneer speaker (PDP-5080HD.......... 41 Setting Canadian French ratings ........ 41 Setting new ratings 41 Deleting new ratings 42 Temporarily deactivating the Parental Control 42 Contents Thank you for the PDP-5080HD unless otherwise specified.
Owner's Manual
Page 5
... Changing the default options 53 Sleep Timer 59 Image position adjustment (AV source only 60 Automatic image position and clock adjustments (PC source only 60 Manual image position and clock adjustments (PC source only 60 Reducing video noise 61 Selecting a game mode 61 Selecting a screen size... manually 61 Selecting a screen size automatically ..... 62 Detecting side masks 62 Changing the brightness at both sides of the screen (Side Mask 62 Room Light Sensor ...
... Changing the default options 53 Sleep Timer 59 Image position adjustment (AV source only 60 Automatic image position and clock adjustments (PC source only 60 Manual image position and clock adjustments (PC source only 60 Reducing video noise 61 Selecting a game mode 61 Selecting a screen size... manually 61 Selecting a screen size automatically ..... 62 Detecting side masks 62 Changing the brightness at both sides of the screen (Side Mask 62 Room Light Sensor ...
Owner's Manual
Page 10
... sure of the type of unauthorized parts can result in serious personal injuries as well as a bookcase or rack, unless proper ventilation is in this manual in a safe place for example, by hitting it must be followed. 5. When the power cord or plug is made of time. generating products (... the product or when objects have fallen into the product through vents or openings. The plasma display weighs about 40.3 kg (88.8 lbs.) for the PDP-5080HD (including the stand and speaker) and about 31.6 kg (69.7 lbs.) for a long period of glass. If you to fall , resulting in electric ...
... sure of the type of unauthorized parts can result in serious personal injuries as well as a bookcase or rack, unless proper ventilation is in this manual in a safe place for example, by hitting it must be followed. 5. When the power cord or plug is made of time. generating products (... the product or when objects have fallen into the product through vents or openings. The plasma display weighs about 40.3 kg (88.8 lbs.) for the PDP-5080HD (including the stand and speaker) and about 31.6 kg (69.7 lbs.) for a long period of glass. If you to fall , resulting in electric ...
Owner's Manual
Page 11
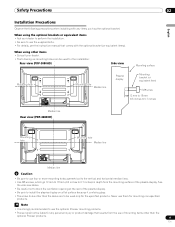
...manual that results from the mounting surface of the plasma display. • Be sure to install the plasma display on a flat surface because it contains glass. • The screw holes other items • Consult your dealer to perform the installation. • Be sure to be used for the installation: Rear view (PDP-5080HD...and horizontal median lines. • Use M8 screws, which go 12 mm to 18 mm (0.5 inches to use the optional Pioneer mounting products. • Pioneer shall not be used only for the specified products. Never use of mounting items other than the above . • Be ...
...manual that results from the mounting surface of the plasma display. • Be sure to install the plasma display on a flat surface because it contains glass. • The screw holes other items • Consult your dealer to perform the installation. • Be sure to be used for the installation: Rear view (PDP-5080HD...and horizontal median lines. • Use M8 screws, which go 12 mm to 18 mm (0.5 inches to use the optional Pioneer mounting products. • Pioneer shall not be used only for the specified products. Never use of mounting items other than the above . • Be ...
Owner's Manual
Page 20
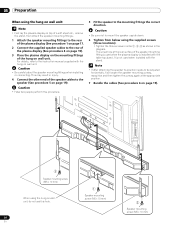
... cables (See procedure 6 on page 19). 3 Speaker mounting screw (M5 x 10 mm) When using the hung on wall unit. For details, refer to the instruction manual supplied with the stand.
... cables (See procedure 6 on page 19). 3 Speaker mounting screw (M5 x 10 mm) When using the hung on wall unit. For details, refer to the instruction manual supplied with the stand.

Owner's Manual
Page 30
06 Basic Operations Setting MTS/SAP mode When watching conventional TV programs, you may manually switch to the MONO mode to INPUT 7 or PC does not change the type of the MTS/SAP modes selected, the display changes depend on ... button is disabled while the TV Guide On Screen™ system is mono sound.) Note • Conventional TV channels in mono or stereo). In this manual designate TV channels that are received through the conventional VHF/UHF frequencies or conventional cable TV channels. • When stereo sound is difficult to hear...
06 Basic Operations Setting MTS/SAP mode When watching conventional TV programs, you may manually switch to the MONO mode to INPUT 7 or PC does not change the type of the MTS/SAP modes selected, the display changes depend on ... button is disabled while the TV Guide On Screen™ system is mono sound.) Note • Conventional TV channels in mono or stereo). In this manual designate TV channels that are received through the conventional VHF/UHF frequencies or conventional cable TV channels. • When stereo sound is difficult to hear...
Owner's Manual
Page 33
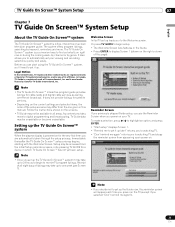
..., Inc. Legal Notices In the United States, TV Guide and other related marks are automatically taken through the setup process. and/or one of this manual. and is a convenient way to one given in all eight days of listings may be accessed from the initial Setup reminder screens, or by genre...
..., Inc. Legal Notices In the United States, TV Guide and other related marks are automatically taken through the setup process. and/or one of this manual. and is a convenient way to one given in all eight days of listings may be accessed from the initial Setup reminder screens, or by genre...

Owner's Manual
Page 36
... Option Home Gallery HDMI Control Item AV Selection Contrast Brightness Red Green Blue Reset Same as the AV source Energy Save Power Management Auto Setup Manual Setup HDMI Input HDMI Control Setting Page 54 55 55 55 55 55 55 57 58 59 59 60 60 65 76 70 - 73 74...
... Option Home Gallery HDMI Control Item AV Selection Contrast Brightness Red Green Blue Reset Same as the AV source Energy Save Power Management Auto Setup Manual Setup HDMI Input HDMI Control Setting Page 54 55 55 55 55 55 55 57 58 59 59 60 60 65 76 70 - 73 74...

Owner's Manual
Page 37
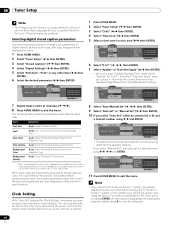
...Channel Setup Ant. Checking signal strength When you have not been set up using the Cable Converter, you may need to manually add Cable Converter output channels. • When an inserted CableCARD™ is for skipping unwanted channels From among TV channels ...ENTER). 3 Select "Channel Setup" ( / then ENTER). 4 Select "Ant. Preset Cable Ant. A Channel Keep/Skip Ant. Setting up TV channels manually This section describes how to manually set up TV channels using the Cable Converter, you may need to enter a channel number. A" ( / then ENTER). 37 En A Add Channel...
...Channel Setup Ant. Checking signal strength When you have not been set up using the Cable Converter, you may need to manually add Cable Converter output channels. • When an inserted CableCARD™ is for skipping unwanted channels From among TV channels ...ENTER). 3 Select "Channel Setup" ( / then ENTER). 4 Select "Ant. Preset Cable Ant. A Channel Keep/Skip Ant. Setting up TV channels manually This section describes how to manually set up TV channels using the Cable Converter, you may need to enter a channel number. A" ( / then ENTER). 37 En A Add Channel...
Owner's Manual
Page 44
...xxxxxxxxxxxxxxxxxxxxx xxxxxxxxxxxxxxxxxxxxx xxxxxxxxxxxxxxxxxxxxx Home Menu Exit • The date and time will not be automatically corrected using / and ENTER. Clock Auto/Manual Set Auto/Manual Set •Manual Set Date and Time 3 4 3 /17/04 11:58pm 5 6 Current Time: 11:58 pm PDT Monday 05/17/... necessary ( , / ). 8 Press HOME MENU to exit the menu. If you cannot set the date and time using the menu. Clock Auto/Manual Set Auto/Manual Set •Auto Set Clock Set Channel Ant. Item Font Size Selection Auto/ Large/ Standard/ Small Font1 Auto/ Font 1/ Font 2/ Font 3/...
...xxxxxxxxxxxxxxxxxxxxx xxxxxxxxxxxxxxxxxxxxx xxxxxxxxxxxxxxxxxxxxx Home Menu Exit • The date and time will not be automatically corrected using / and ENTER. Clock Auto/Manual Set Auto/Manual Set •Manual Set Date and Time 3 4 3 /17/04 11:58pm 5 6 Current Time: 11:58 pm PDT Monday 05/17/... necessary ( , / ). 8 Press HOME MENU to exit the menu. If you cannot set the date and time using the menu. Clock Auto/Manual Set Auto/Manual Set •Auto Set Clock Set Channel Ant. Item Font Size Selection Auto/ Large/ Standard/ Small Font1 Auto/ Font 1/ Font 2/ Font 3/...
Owner's Manual
Page 45
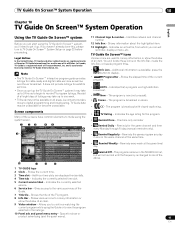
... take up . Note • The TV Guide On Screen™ interactive program guide provides listings for the same channel and time every Monday through Friday (manual reminder only). • Remind Regularly - Indicates an active file, from which you can start using the TV Guide On Screen™ system, you'll need...
... take up . Note • The TV Guide On Screen™ interactive program guide provides listings for the same channel and time every Monday through Friday (manual reminder only). • Remind Regularly - Indicates an active file, from which you can start using the TV Guide On Screen™ system, you'll need...

Owner's Manual
Page 50
... to close the menu. Use the number buttons to input information. • If a highlighted field has arrows on either side, press / to cycle through Friday (manual reminder only) • Regularly - For example, up to start watching it immediately. The search Episode Options menu From the Episode Options menu you can review...
... to close the menu. Use the number buttons to input information. • If a highlighted field has arrows on either side, press / to cycle through Friday (manual reminder only) • Regularly - For example, up to start watching it immediately. The search Episode Options menu From the Episode Options menu you can review...
Owner's Manual
Page 51
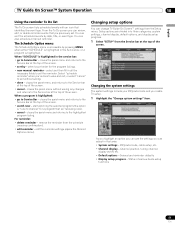
...done to save and exit, or select "cancel" to Service Bar - closes the panel menu and returns to channel" for the program listings. • new manual reminder - closes the panel menu without saving. • done - closes the panel menu and returns to Service Bar - For reminder: • delete reminder ... the reminder from the Service bar at the top of the screen. • watch now - Changing setup options You can also schedule a manual reminder. closes the panel menu and returns to the Service bar at the top of various Guide setup functions 51 En When "SCHEDULE" is highlighted...
...done to save and exit, or select "cancel" to Service Bar - closes the panel menu and returns to channel" for the program listings. • new manual reminder - closes the panel menu without saving. • done - closes the panel menu and returns to Service Bar - For reminder: • delete reminder ... the reminder from the Service bar at the top of the screen. • watch now - Changing setup options You can also schedule a manual reminder. closes the panel menu and returns to the Service bar at the top of various Guide setup functions 51 En When "SCHEDULE" is highlighted...

Owner's Manual
Page 54
... of the viewing area. For PC source Item STANDARD USER Description For a highly defined image in accordance with maximum contrast This mode does not allow manual image quality adjustment. This selection is automatically selected for easier viewing. You can also press AV SELECTION on the remote control unit to the optimum...
... of the viewing area. For PC source Item STANDARD USER Description For a highly defined image in accordance with maximum contrast This mode does not allow manual image quality adjustment. This selection is automatically selected for easier viewing. You can also press AV SELECTION on the remote control unit to the optimum...

Owner's Manual
Page 60
...a PC image composed of images using / . 6 Press HOME MENU to select "Reset" in step 4, and then press ENTER. Manual image position and clock adjustments (PC source only) Usually you can easily adjust the positions and clock of similar patterns or monochrome. Note ... and clock of images coming from a personal computer. 1 Press HOME MENU. 2 Select "Option" ( / then ENTER). 3 Select "Auto Setup" ( / then ENTER). Manual Setup H/V Position Adjust Clock 0 Phase 0 Reset 5 Perform adjustment ( / or / ). • With "Clock" or "Phase" selected, you can change even after adjustment...
...a PC image composed of images using / . 6 Press HOME MENU to select "Reset" in step 4, and then press ENTER. Manual image position and clock adjustments (PC source only) Usually you can easily adjust the positions and clock of similar patterns or monochrome. Note ... and clock of images coming from a personal computer. 1 Press HOME MENU. 2 Select "Option" ( / then ENTER). 3 Select "Auto Setup" ( / then ENTER). Manual Setup H/V Position Adjust Clock 0 Phase 0 Reset 5 Perform adjustment ( / or / ). • With "Clock" or "Phase" selected, you can change even after adjustment...

Owner's Manual
Page 61
... Full 16:9 screen display • The "Channel Keep/Skip" menu is connected to the HDMI terminal. 4 Select "On" or "Off" ( / then ENTER). Selecting a screen size manually In single-screen mode, press SCREEN SIZE to change the size of the screen from among FULL, ZOOM, WIDE, and 4:3. • If you watch High...
... Full 16:9 screen display • The "Channel Keep/Skip" menu is connected to the HDMI terminal. 4 Select "On" or "Off" ( / then ENTER). Selecting a screen size manually In single-screen mode, press SCREEN SIZE to change the size of the screen from among FULL, ZOOM, WIDE, and 4:3. • If you watch High...

Owner's Manual
Page 62
...the 4:3 aspect ratio portion in SD (standard definition) broadcasts. • "AUTO" will not work even with side masks. Note • Manually select an appropriate screen size if an image does not automatically switch to exit the menu. Item Description Fixed (default) Always sets the same brightness... signals are received from a connected HDMI device (see page 65). If that appear at both sides of image retention. For the PDP-4280HD, the number of images 62 En The High Definition 16:9 aspect ratio images containing side masks will be detected automatically and side...
...the 4:3 aspect ratio portion in SD (standard definition) broadcasts. • "AUTO" will not work even with side masks. Note • Manually select an appropriate screen size if an image does not automatically switch to exit the menu. Item Description Fixed (default) Always sets the same brightness... signals are received from a connected HDMI device (see page 65). If that appear at both sides of image retention. For the PDP-4280HD, the number of images 62 En The High Definition 16:9 aspect ratio images containing side masks will be detected automatically and side...

Owner's Manual
Page 64
... control unit or press INPUT on the plasma display to be used . Note • Refer to the relevant instruction manual (DVD player, personal computer, etc.) carefully before connecting to your DVD player instruction manual for viewing. • Connect external equipment only to terminals that are connected in the following order; 1) Component Video...
... control unit or press INPUT on the plasma display to be used . Note • Refer to the relevant instruction manual (DVD player, personal computer, etc.) carefully before connecting to your DVD player instruction manual for viewing. • Connect external equipment only to terminals that are connected in the following order; 1) Component Video...

Owner's Manual
Page 65
... use the HDMI compliant PC or video card. • When connecting a PC to the plasma display. For the types of these signals, see the operation manual that describes the number of the plasma display Audio cable (commercially available) Make this connection when inputting analog audio signals. By connecting devices that is...
... use the HDMI compliant PC or video card. • When connecting a PC to the plasma display. For the types of these signals, see the operation manual that describes the number of the plasma display Audio cable (commercially available) Make this connection when inputting analog audio signals. By connecting devices that is...

Owner's Manual
Page 66
Note • If you select "Auto", an attempt will be specified, check the operation manual that came with the connected equipment. Note • In the "Video" mode, the image is "over-scanned" (enlarged), and the mode is automatically switched to "... select "PC" when a PC is output, specify another digital video signal type. • For the digital video signal types to be specified, check the operation manual that results in full size for the desired input source, then perform the following procedure to specify the type of audio signals. 1 Press HOME MENU...
Note • If you select "Auto", an attempt will be specified, check the operation manual that came with the connected equipment. Note • In the "Video" mode, the image is "over-scanned" (enlarged), and the mode is automatically switched to "... select "PC" when a PC is output, specify another digital video signal type. • For the digital video signal types to be specified, check the operation manual that results in full size for the desired input source, then perform the following procedure to specify the type of audio signals. 1 Press HOME MENU...


