User Manual
Page 4
... ...........21 Use the multiscreen functions 22 Splitting the screen 22 Confirming current status 22 AV Selection 22 Selecting a screen size manually ...........23 09 Basic Adjustment Settings Language setting 25 Basic picture adjustments 25 Advanced picture adjustments 25 Using PureCinema 25 Using Color ... menus 24 PC mode menus 24 Menu operations 24 4 En Please read through these operating instructions so you for buying this Pioneer product. Contents Contents Thank you will know how to route cables 19 Preparing the remote control unit ..........20 Inserting batteries 20...
... ...........21 Use the multiscreen functions 22 Splitting the screen 22 Confirming current status 22 AV Selection 22 Selecting a screen size manually ...........23 09 Basic Adjustment Settings Language setting 25 Basic picture adjustments 25 Advanced picture adjustments 25 Using PureCinema 25 Using Color ... menus 24 PC mode menus 24 Menu operations 24 4 En Please read through these operating instructions so you for buying this Pioneer product. Contents Contents Thank you will know how to route cables 19 Preparing the remote control unit ..........20 Inserting batteries 20...
User Manual
Page 9
... or aerosol cleaners. 6. Sudden stops, excessive force and uneven floor surface can result in electric shock and/or fire. The Plasma Display used in this manual in a safe place - Overloading - Never insert an object into the product. a. When the product has been exposed to perform servicing. 17. Do not touch the...
... or aerosol cleaners. 6. Sudden stops, excessive force and uneven floor surface can result in electric shock and/or fire. The Plasma Display used in this manual in a safe place - Overloading - Never insert an object into the product. a. When the product has been exposed to perform servicing. 17. Do not touch the...
User Manual
Page 10
...by the use the bolts provided with the stand or installation bracket. • For details concerning installation, please refer to the instruction manual provided with the stand or installation bracket. CAUTION This unit incorporates a thin design. Refer to the side view diagram in 4 ... specialist or the dealer where purchased. • When installing, be sure to use of parts and accessories manufactured by other than the PIONEER stand or installation bracket (sold separately) • When possible, please install using accessories other companies. • For custom installation, please...
...by the use the bolts provided with the stand or installation bracket. • For details concerning installation, please refer to the instruction manual provided with the stand or installation bracket. CAUTION This unit incorporates a thin design. Refer to the side view diagram in 4 ... specialist or the dealer where purchased. • When installing, be sure to use of parts and accessories manufactured by other than the PIONEER stand or installation bracket (sold separately) • When possible, please install using accessories other companies. • For custom installation, please...
User Manual
Page 16
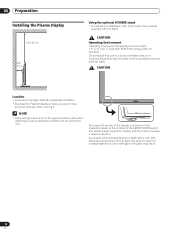
... exposed to have someone help you when moving it. 06 Preparation Preparation Installing the Plasma Display Over 50 cm Over 10 cm Using the optional PIONEER stand • For details on installation, refer to +40 ˚C; CAUTION Operating Environment Operating environment temperature and humidity: +0 ˚C to the instruction...
... exposed to have someone help you when moving it. 06 Preparation Preparation Installing the Plasma Display Over 50 cm Over 10 cm Using the optional PIONEER stand • For details on installation, refer to +40 ˚C; CAUTION Operating Environment Operating environment temperature and humidity: +0 ˚C to the instruction...
User Manual
Page 22
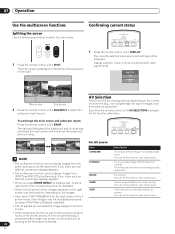
.... For a movie You can set the mode for each input source. Display example: Under normal conditions (with the maximum contrast This mode does not allow manual image quality adjustment. The right and left and the subscreen on the right. DYNAMIC • The multiscreen function cannot display images from the same input...
.... For a movie You can set the mode for each input source. Display example: Under normal conditions (with the maximum contrast This mode does not allow manual image quality adjustment. The right and left and the subscreen on the right. DYNAMIC • The multiscreen function cannot display images from the same input...
User Manual
Page 23
Selecting a screen size manually Press SCREEN SIZE to switch among the screen size options selectable for the type of video signals currently received. • Each time you press SCREEN ...
Selecting a screen size manually Press SCREEN SIZE to switch among the screen size options selectable for the type of video signals currently received. • Each time you press SCREEN ...
User Manual
Page 24
... 25 25 25 25 24 En Sound Power Control Option Setup Treble Bass Balance Front Surround FOCUS Reset Energy Save No Signal Off Power Management Manual Setup Language SR+ INPUT1 INPUT2 INPUT3 INPUT4 INPUT5 INPUT6 28 28 28 28 28 28 29 29 29 30 25 37 31, 35 33, 34...
... 25 25 25 25 24 En Sound Power Control Option Setup Treble Bass Balance Front Surround FOCUS Reset Energy Save No Signal Off Power Management Manual Setup Language SR+ INPUT1 INPUT2 INPUT3 INPUT4 INPUT5 INPUT6 28 28 28 28 28 28 29 29 29 30 25 37 31, 35 33, 34...
User Manual
Page 26
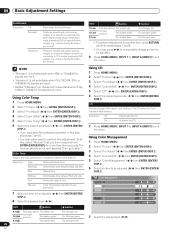
...blue button For stronger red For stronger green For stronger blue • To perform adjustment for more than three seconds. The manual adjustment screen appears. 09 Basic Adjustment Settings PureCinema Selections Off Standard Advanced Deactivates the PureCinema. Produces smooth and quality moving images... (film specific) by converting to perform fine adjustment. Color Temp Adjusts the color temperature, resulting in this , select "Manual" first and then press and hold ENTER (ENTER/DISP.) for another item, press RETURN, and then repeat steps 7 and 8. •...
...blue button For stronger red For stronger green For stronger blue • To perform adjustment for more than three seconds. The manual adjustment screen appears. 09 Basic Adjustment Settings PureCinema Selections Off Standard Advanced Deactivates the PureCinema. Produces smooth and quality moving images... (film specific) by converting to perform fine adjustment. Color Temp Adjusts the color temperature, resulting in this , select "Manual" first and then press and hold ENTER (ENTER/DISP.) for another item, press RETURN, and then repeat steps 7 and 8. •...
User Manual
Page 30
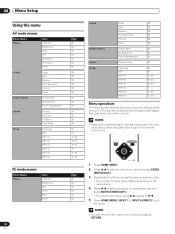
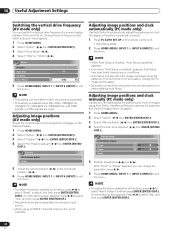
... To restore the factory defaults for all the items, press / to automatically adjust the positions and clock of similar patterns or monochrome. Manual Setup H/V Position Adjust Clock 0 Phase 0 Reset 5 Perform adjustment ( / and / ). 10 Useful Adjustment Settings Useful Adjustment Settings Switching...the horizontal and vertical positions of images when necessary. 1 Press HOME MENU. 2 Select "Option" ( / then ENTER (ENTER/DISP.)). 3 Select "Manual Setup" ( / then ENTER (ENTER/DISP.)). 4 Select the item to input source. • When using Auto Setup. A confirmation screen appears....
... To restore the factory defaults for all the items, press / to automatically adjust the positions and clock of similar patterns or monochrome. Manual Setup H/V Position Adjust Clock 0 Phase 0 Reset 5 Perform adjustment ( / and / ). 10 Useful Adjustment Settings Useful Adjustment Settings Switching...the horizontal and vertical positions of images when necessary. 1 Press HOME MENU. 2 Select "Option" ( / then ENTER (ENTER/DISP.)). 3 Select "Manual Setup" ( / then ENTER (ENTER/DISP.)). 4 Select the item to input source. • When using Auto Setup. A confirmation screen appears....
User Manual
Page 31
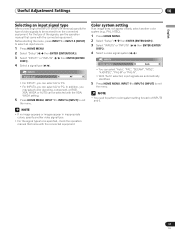
... received from the connected equipment. NOTE • You need to exit the menu. For the type of the signals, see the operation manual that came with the connected equipment. Color system setting If an image does not appear clearly, select another video signal type. • For... to INPUT 6 (INPUT) to exit the menu. Before starting the menu, press INPUT 1 or INPUT 4 (INPUT) to be specified, check the operation manual that came with the connected equipment. NOTE • If no image appears or images appear in inappropriate colors, specify another color system (e.g., PAL, NTSC). 1...
... received from the connected equipment. NOTE • You need to exit the menu. For the type of the signals, see the operation manual that came with the connected equipment. Color system setting If an image does not appear clearly, select another video signal type. • For... to INPUT 6 (INPUT) to exit the menu. Before starting the menu, press INPUT 1 or INPUT 4 (INPUT) to be specified, check the operation manual that came with the connected equipment. NOTE • If no image appears or images appear in inappropriate colors, specify another color system (e.g., PAL, NTSC). 1...
User Manual
Page 32
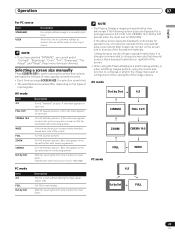
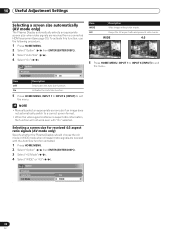
... the menu. WIDE 4:3 5 Press HOME MENU, INPUT 1 to INPUT 6 (INPUT) to exit the menu. Option Position Auto Size 4:3 Mode . On WIDE 32 En NOTE • Manually select an appropriate screen size if an image does not automatically switch to a correct screen format. • When the video signal contains no aspect ratio...
... the menu. WIDE 4:3 5 Press HOME MENU, INPUT 1 to INPUT 6 (INPUT) to exit the menu. Option Position Auto Size 4:3 Mode . On WIDE 32 En NOTE • Manually select an appropriate screen size if an image does not automatically switch to a correct screen format. • When the video signal contains no aspect ratio...
User Manual
Page 33
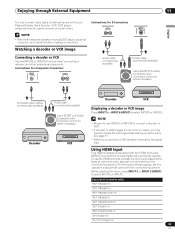
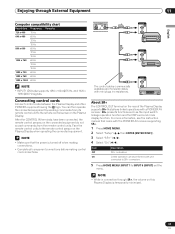
... a decoder or VCR. • If decoder or VCR images do not come in clearly, you may need to the relevant operation manual (DVD player, personal computer, etc.) carefully before making connections. Input signal correlation table 1920*1080p@24 Hz 1920*1080p@50 Hz 1920... (commercially available) Use a SCART to S-Video/ Composite video conversion connector where necessary. For the types of these signals, see the operation manual that came with two HDMI terminals (INPUT2 and 3) which accept digital video and audio signals. Enjoying through External Equipment 11 Enjoying through External ...
... a decoder or VCR. • If decoder or VCR images do not come in clearly, you may need to the relevant operation manual (DVD player, personal computer, etc.) carefully before making connections. Input signal correlation table 1920*1080p@24 Hz 1920*1080p@50 Hz 1920... (commercially available) Use a SCART to S-Video/ Composite video conversion connector where necessary. For the types of these signals, see the operation manual that came with two HDMI terminals (INPUT2 and 3) which accept digital video and audio signals. Enjoying through External Equipment 11 Enjoying through External ...
User Manual
Page 34
... do not come in clearly, specify another audio signal type. • For the audio signal types to be specified, check the operation manual that came with the connected equipment. NOTE • If no sound is output, specify another digital video signal type. • For the..."Video" ( / ). 3 Select the type of digital video signals ( / ). • If you select "Auto", an attempt will be specified, check the operation manual that came with the connected equipment. • Depending on the equipment to be connected, you use the INPUT2 or INPUT3 HDMI terminal, use the following...
... do not come in clearly, specify another audio signal type. • For the audio signal types to be specified, check the operation manual that came with the connected equipment. NOTE • If no sound is output, specify another digital video signal type. • For the..."Video" ( / ). 3 Select the type of digital video signals ( / ). • If you select "Auto", an attempt will be specified, check the operation manual that came with the connected equipment. • Depending on the equipment to be connected, you use the INPUT2 or INPUT3 HDMI terminal, use the following...
User Manual
Page 35
... images do not come in crearly, specify another digital video signal type. • For the digital video signal types to be specified, check the operation manual that came with a DVI terminal (INPUT1) which accept digital video. Item RGB (16 - 235) RGB (0 - 255) Description Didital RGB signals (16 to 235) locked Didital...
... images do not come in crearly, specify another digital video signal type. • For the digital video signal types to be specified, check the operation manual that came with a DVI terminal (INPUT1) which accept digital video. Item RGB (16 - 235) RGB (0 - 255) Description Didital RGB signals (16 to 235) locked Didital...
User Manual
Page 36
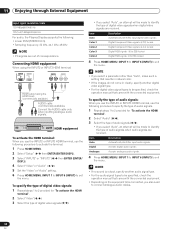
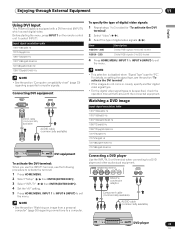
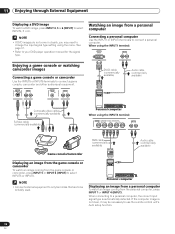
Watching an image from a personal computer Connecting a personal computer Use the INPUT1 or INPUT4 terminals to your DVD player operation manual for the signal type. See page 31. • Refer to connect a personal computer. INPUT5 S-VIDEO INPUT5 R L INPUT6 VIDEO INPUT6 R L DVI-D cable (commercially available) Audio cable (...
Watching an image from a personal computer Connecting a personal computer Use the INPUT1 or INPUT4 terminals to your DVD player operation manual for the signal type. See page 31. • Refer to connect a personal computer. INPUT5 S-VIDEO INPUT5 R L INPUT6 VIDEO INPUT6 R L DVI-D cable (commercially available) Audio cable (...
User Manual
Page 37
... disabled. CONTROL IN OUT About SR+ The CONTROL OUT terminal on the rear of the Plasma Display supports SR+ that allows linked operations with the PIONEER AV receiver supporting SR+. 1 Press HOME MENU. 2 Select "Setup" ( / then ENTER (ENTER/DISP.)). 3 Select "SR+" ( / ). 4 Select "On" ( /... unit to the remote control sensor on the Plasma Display when operating the connected equipment. For more information, see the instruction manual that the power is turned off when making connections. • Complete all component connections before making control cord connections. NOTE ...
... disabled. CONTROL IN OUT About SR+ The CONTROL OUT terminal on the rear of the Plasma Display supports SR+ that allows linked operations with the PIONEER AV receiver supporting SR+. 1 Press HOME MENU. 2 Select "Setup" ( / then ENTER (ENTER/DISP.)). 3 Select "SR+" ( / ). 4 Select "On" ( /... unit to the remote control sensor on the Plasma Display when operating the connected equipment. For more information, see the instruction manual that the power is turned off when making connections. • Complete all component connections before making control cord connections. NOTE ...
Brochure
Page 2
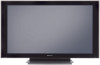
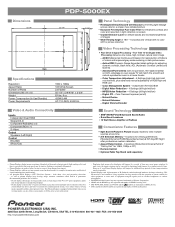
...Amplifier w/TruBass Convenience Features • Split Screen/Picture in dark picture areas - PDP-5000EX 108D0Pim-HeDnsions 25-1/4" 25-1/4" 3-3/8" 14-13/16" 12-1/4" 14-3/4" 12-3/8" ...Television Systems - Color Temperature Adjustment - 5 Settings (high/mid-high/mid/ mid-low/low), plus advanced manual adjustability of Pixels Dimensions (W x H x D) Weight Power Consumption (In Use/Standby) Power Requirements 1920 ... as cordless headphones or cordless microphones). • PIONEER and the Pioneer logo are registered trademarks of Pioneer Corporation. • HDMI and the HDMI logo are...
...Amplifier w/TruBass Convenience Features • Split Screen/Picture in dark picture areas - PDP-5000EX 108D0Pim-HeDnsions 25-1/4" 25-1/4" 3-3/8" 14-13/16" 12-1/4" 14-3/4" 12-3/8" ...Television Systems - Color Temperature Adjustment - 5 Settings (high/mid-high/mid/ mid-low/low), plus advanced manual adjustability of Pixels Dimensions (W x H x D) Weight Power Consumption (In Use/Standby) Power Requirements 1920 ... as cordless headphones or cordless microphones). • PIONEER and the Pioneer logo are registered trademarks of Pioneer Corporation. • HDMI and the HDMI logo are...


