Owner's Manual
Page 4
... Safety Precautions 03 Supplied Accessories Identifying the main units 12 Plasma Display 12 Media Receiver 12 04 Part Names Plasma Display 13 Media Receiver 14 Remote control unit 16 Setting MTS/SAP mode 28 Viewing a channel banner 29 Using the POD service 29 Using the multiscreen functions 29 Splitting the screen 29... Setup Menu Configuration 37 AV mode menus 37 PC mode menus 37 Menu operations 37 Connecting the system cable 19 Cable connections for buying this Pioneer product.
... Safety Precautions 03 Supplied Accessories Identifying the main units 12 Plasma Display 12 Media Receiver 12 04 Part Names Plasma Display 13 Media Receiver 14 Remote control unit 16 Setting MTS/SAP mode 28 Viewing a channel banner 29 Using the POD service 29 Using the multiscreen functions 29 Splitting the screen 29... Setup Menu Configuration 37 AV mode menus 37 PC mode menus 37 Menu operations 37 Connecting the system cable 19 Cable connections for buying this Pioneer product.
Owner's Manual
Page 6
... About SR 77 13 Useful Remote Control Features Learning function of the remote control unit 78 Using the learning function 78 Presetting manufacturer codes ...........78 Manufacture codes 79 Using the remote control unit to control other devices 80 Receiver control buttons 80 Cable control buttons 81 SAT control buttons 82 VCR control buttons 83 DVD/DVR control buttons 84 14 Appendix Troubleshooting...
... About SR 77 13 Useful Remote Control Features Learning function of the remote control unit 78 Using the learning function 78 Presetting manufacturer codes ...........78 Manufacture codes 79 Using the remote control unit to control other devices 80 Receiver control buttons 80 Cable control buttons 81 SAT control buttons 82 VCR control buttons 83 DVD/DVR control buttons 84 14 Appendix Troubleshooting...
Owner's Manual
Page 8
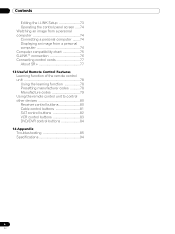
... sound of the fan motor at a location where its cabinet. Plasma Display protection function When still images (such as use, the remote controls of nearby equipment may be adversely affected. This effect is common to clean the Infrared rays The Plasma Display releases infrared rays because ...of a 50 inch display, over . Cleaning the cabinet • When cleaning the cabinet of plastic. 01 Important User Guidance Information CAUTION PIONEER bears no responsibility for any damage arising from incorrect use of the product by you or other people, malfunctions when in use, other similar...
... sound of the fan motor at a location where its cabinet. Plasma Display protection function When still images (such as use, the remote controls of nearby equipment may be adversely affected. This effect is common to clean the Infrared rays The Plasma Display releases infrared rays because ...of a 50 inch display, over . Cleaning the cabinet • When cleaning the cabinet of plastic. 01 Important User Guidance Information CAUTION PIONEER bears no responsibility for any damage arising from incorrect use of the product by you or other people, malfunctions when in use, other similar...
Owner's Manual
Page 12
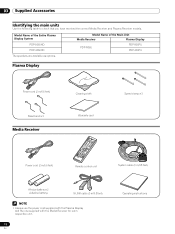
... the Entire Plasma Display System PDP-5060HD PDP-4360HD The speakers are available as options. Model Name of the Main Unit Media Receiver Plasma Display PDP-R06U PDP-506PU PDP-436PU Plasma Display Power cord (2 m/6.6 feet) Bead band × 3 Media Receiver Cleaning cloth Warranty card Speed clamp × 3 Power cord (2 m/6.6 feet) Remote control unit System cable (3 m/9.8 feet) AA...
... the Entire Plasma Display System PDP-5060HD PDP-4360HD The speakers are available as options. Model Name of the Main Unit Media Receiver Plasma Display PDP-R06U PDP-506PU PDP-436PU Plasma Display Power cord (2 m/6.6 feet) Bead band × 3 Media Receiver Cleaning cloth Warranty card Speed clamp × 3 Power cord (2 m/6.6 feet) Remote control unit System cable (3 m/9.8 feet) AA...
Owner's Manual
Page 13
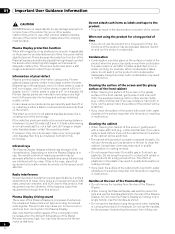
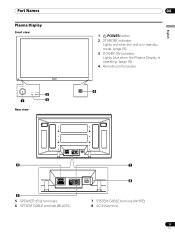
Part Names Part Names Plasma Display Front view 2 1 3 Rear view 04 1 a POWER button 2 STANDBY indicator Lights red when the unit is in standby mode. (page 25) 3 POWER ON indicator Lights blue when the Plasma Display is operating. (page 25) 4 Remote control sensor 4 English 5 SYSTEM CABLE WHITE BLACK SYSTEM CABLE WHITE BLACK 6 5 SPEAKER (R/L) terminals 6 SYSTEM CABLE terminal (BLACK) 7 8 7 SYSTEM CABLE terminal (WHITE) 8 AC IN terminal 13 En
Part Names Part Names Plasma Display Front view 2 1 3 Rear view 04 1 a POWER button 2 STANDBY indicator Lights red when the unit is in standby mode. (page 25) 3 POWER ON indicator Lights blue when the Plasma Display is operating. (page 25) 4 Remote control sensor 4 English 5 SYSTEM CABLE WHITE BLACK SYSTEM CABLE WHITE BLACK 6 5 SPEAKER (R/L) terminals 6 SYSTEM CABLE terminal (BLACK) 7 8 7 SYSTEM CABLE terminal (WHITE) 8 AC IN terminal 13 En
Owner's Manual
Page 16
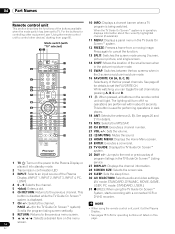
...4 0 - 9: Selects the channel. See page 43 for operating buttons not listed on this 9 / / / : Selects a desired item on the remote control 8 22 unit will turn off if no 23 operations are performed within about the currently highlighted channel (if available). 11 MENU: Displays a panel menu in... a frame from page 80. When the TV Guide On Screen™ system is displayed. 31 (REC): When using the remote control unit, point it into standby mode. 27 DISPLAY: Displays the channel information. 2 Transmission confirmation LED 28 SCREEN SIZE: Selects the screen size...
...4 0 - 9: Selects the channel. See page 43 for operating buttons not listed on this 9 / / / : Selects a desired item on the remote control 8 22 unit will turn off if no 23 operations are performed within about the currently highlighted channel (if available). 11 MENU: Displays a panel menu in... a frame from page 80. When the TV Guide On Screen™ system is displayed. 31 (REC): When using the remote control unit, point it into standby mode. 27 DISPLAY: Displays the channel information. 2 Transmission confirmation LED 28 SCREEN SIZE: Selects the screen size...

Owner's Manual
Page 21
...; Be sure to use a CableCARD™, you need not execute Auto Channel Preset; See page 20. 2 Hold the tab of the slot cover on the remote control unit. • While watching a broadcast, press ANT to view the image received from the Cable Converter. the POD stands for inserting a CableCARD™. This service...
...; Be sure to use a CableCARD™, you need not execute Auto Channel Preset; See page 20. 2 Hold the tab of the slot cover on the remote control unit. • While watching a broadcast, press ANT to view the image received from the Cable Converter. the POD stands for inserting a CableCARD™. This service...
Owner's Manual
Page 22
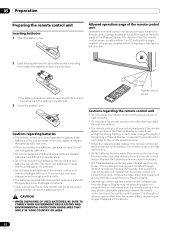
...expectancy due to properly receive commands from its screen. Different types of different types. The strength of the remote control unit Operate the remote control unit while pointing it . Allowed operation range of infrared rays emitted from the screen differs, depending on ...not receive commands from the remote control unit or may shorten allowable distances between the remote control unit and the remote control sensor, the remote control unit may not work properly if the remote sensor window of time, remove the batteries from its remote control unit properly or entirely. ...
...expectancy due to properly receive commands from its screen. Different types of different types. The strength of the remote control unit Operate the remote control unit while pointing it . Allowed operation range of infrared rays emitted from the screen differs, depending on ...not receive commands from the remote control unit or may shorten allowable distances between the remote control unit and the remote control sensor, the remote control unit may not work properly if the remote sensor window of time, remove the batteries from its remote control unit properly or entirely. ...
Owner's Manual
Page 25
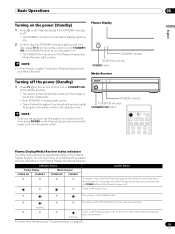
... The STANDBY indicator on the Plasma Display lights up red. 2 Confirm that the STANDBY indicators light up red, and then press TV a on the remote control unit or STANDBY/ ON on the Media Receiver to turn the system on. • The POWER ON indicators on the Plasma Display and Media Receiver.... Plasma Display STANDBY indicator POWER ON indicator POWER button Media Receiver Turning off the power (Standby) 1 Press TV a on the remote control unit or STANDBY/ON on the Media Receiver. • The system enters the standby mode and the image on the Plasma Display and remove both...
... The STANDBY indicator on the Plasma Display lights up red. 2 Confirm that the STANDBY indicators light up red, and then press TV a on the remote control unit or STANDBY/ ON on the Media Receiver to turn the system on. • The POWER ON indicators on the Plasma Display and Media Receiver.... Plasma Display STANDBY indicator POWER ON indicator POWER button Media Receiver Turning off the power (Standby) 1 Press TV a on the remote control unit or STANDBY/ON on the Media Receiver. • The system enters the standby mode and the image on the Plasma Display and remove both...
Owner's Manual
Page 26
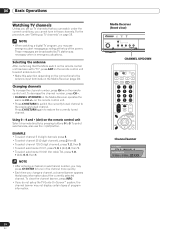
...UP/DOWN on the Media Receiver operates the same as necessary when in emergency situations. Using 0 - 9 and • (dot) on the remote control unit Select channels directly by TV stations as CH +/- Media Receiver (front view) STANDBY/ON REC ON STANDBY TIMER TV GUIDE ENTER DOWN UP..., press 1, 0, • (dot), 0, then 1. • To select subchannel 10.001 (for cable TV), press 1, 0, • (dot), 0, 0, then 1. on the remote control unit. To clear the channel banner, press INFO. • If you cannot tune in the channel more quickly. • Each time you may not display...
...UP/DOWN on the Media Receiver operates the same as necessary when in emergency situations. Using 0 - 9 and • (dot) on the remote control unit Select channels directly by TV stations as CH +/- Media Receiver (front view) STANDBY/ON REC ON STANDBY TIMER TV GUIDE ENTER DOWN UP..., press 1, 0, • (dot), 0, then 1. • To select subchannel 10.001 (for cable TV), press 1, 0, • (dot), 0, 0, then 1. on the remote control unit. To clear the channel banner, press INFO. • If you cannot tune in the channel more quickly. • Each time you may not display...
Owner's Manual
Page 27
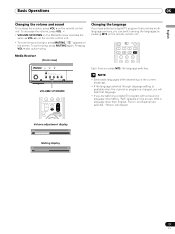
Basic Operations 06 English Changing the volume and sound To increase the volume, press VOL + on the screen. " " appears on the remote control unit. Pressing VOL + also quits muting. NOTE • Switchable languages differ depending on the current broadcast. • If the language selected..., you can switch among the languages by pressing MTS on the screen. To decrease the volume, press VOL -. • VOLUME UP/DOWN on the remote control unit. • To mute the sound output, press MUTING. With a language other than English, French, and Spanish are watching a digital TV program...
Basic Operations 06 English Changing the volume and sound To increase the volume, press VOL + on the screen. " " appears on the remote control unit. Pressing VOL + also quits muting. NOTE • Switchable languages differ depending on the current broadcast. • If the language selected..., you can switch among the languages by pressing MTS on the screen. To decrease the volume, press VOL -. • VOLUME UP/DOWN on the remote control unit. • To mute the sound output, press MUTING. With a language other than English, French, and Spanish are watching a digital TV program...
Owner's Manual
Page 40
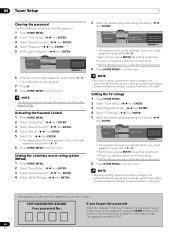
...shipment. 6 Press HOME MENU to exit the menu. PDP-5060HD/PDP-4360HD Your password No.: If you forget the password When the message "Enter your 4-digit password using buttons 0 - 9. 6 Press HOME MENU to exit the menu. Activating the Parental Control 1 Press HOME MENU. 2 Select "Tuner Setup". (...; Each time you press ENTER, the setting is displayed in step 6 under "Clearing the password", press the ENTER button on the remote control unit and hold it . Likewise, unblocking a rating causes less severe ratings to be automatically unblocked. NOTE • The above procedure will...
...shipment. 6 Press HOME MENU to exit the menu. PDP-5060HD/PDP-4360HD Your password No.: If you forget the password When the message "Enter your 4-digit password using buttons 0 - 9. 6 Press HOME MENU to exit the menu. Activating the Parental Control 1 Press HOME MENU. 2 Select "Tuner Setup". (...; Each time you press ENTER, the setting is displayed in step 6 under "Clearing the password", press the ENTER button on the remote control unit and hold it . Likewise, unblocking a rating causes less severe ratings to be automatically unblocked. NOTE • The above procedure will...
Owner's Manual
Page 43
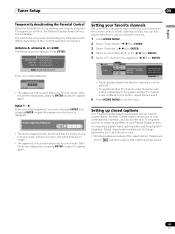
..., narration, and sound effects in total). Antenna A, antenna B, or i.LINK: The following screen appears. Press ENTER. Parental Control EnxtexrxyxoxuxrxPxaxsxswxxoxrdxxxxxxxx xxxxxxxxxxxxxxxxxxxxx A Clear Entry D Cancel • The password entry screen stays only for one minute. pressing ENTER causes the ...of the four color buttons on the currently selected input source. Please look for temporarily deactivating the Parental Control differs, depending on the remote control unit (40 channels in TV programs and home videos as fonts and colors. • Not all programs...
..., narration, and sound effects in total). Antenna A, antenna B, or i.LINK: The following screen appears. Press ENTER. Parental Control EnxtexrxyxoxuxrxPxaxsxswxxoxrdxxxxxxxx xxxxxxxxxxxxxxxxxxxxx A Clear Entry D Cancel • The password entry screen stays only for one minute. pressing ENTER causes the ...of the four color buttons on the currently selected input source. Please look for temporarily deactivating the Parental Control differs, depending on the remote control unit (40 channels in TV programs and home videos as fonts and colors. • Not all programs...
Owner's Manual
Page 47
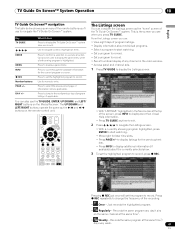
...the available information for numeric entry. PAGE +/- The Listings screen You can consider the Listings screen as the / and / buttons on the remote control unit. to select the previous/next page of program listings (if applicable). Just records the highlighted program. • Regularly - Press to display... TV Guide On Screen™ System Operation 10 English TV Guide On Screen™ navigation The table below shows a summary of the remote buttons you press TV GUIDE. Can also be used to display the panel menu when a forthcoming program is the screen you see when...
...the available information for numeric entry. PAGE +/- The Listings screen You can consider the Listings screen as the / and / buttons on the remote control unit. to select the previous/next page of program listings (if applicable). Just records the highlighted program. • Regularly - Press to display... TV Guide On Screen™ System Operation 10 English TV Guide On Screen™ navigation The table below shows a summary of the remote buttons you press TV GUIDE. Can also be used to display the panel menu when a forthcoming program is the screen you see when...

Owner's Manual
Page 58
.... For movies This selection is shared by the external input and TV input sources. AV Selection Select from the five viewing options, depending on the remote control unit to customize settings as below: 30 60 90 (cancel) Off 120 (minutes) • The factory default is "Off". This selection is switched in a normally...
.... For movies This selection is shared by the external input and TV input sources. AV Selection Select from the five viewing options, depending on the remote control unit to customize settings as below: 30 60 90 (cancel) Off 120 (minutes) • The factory default is "Off". This selection is switched in a normally...
Owner's Manual
Page 63
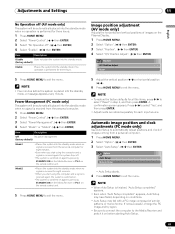
... again, the system is switched on. • The system is switched on again by pressing STANDBY/ON on the Media Receiver or TV on the remote control unit. 5 Press HOME MENU to exit the menu. 5 Adjust the vertical position ( / ) or horizontal position ( / ). 6 Press HOME MENU to exit the menu. Adjustments...; Auto Setup starts. 4 Press HOME MENU to exit the menu. appears, Auto Setup may fail with a PC image composed of images on the remote control unit. Mode2 • Places the system into the standby mode when no signal is received for three hours. 1 Press HOME MENU. 2 Select "Power...
... again, the system is switched on. • The system is switched on again by pressing STANDBY/ON on the Media Receiver or TV on the remote control unit. 5 Press HOME MENU to exit the menu. 5 Adjust the vertical position ( / ) or horizontal position ( / ). 6 Press HOME MENU to exit the menu. Adjustments...; Auto Setup starts. 4 Press HOME MENU to exit the menu. appears, Auto Setup may fail with a PC image composed of images on the remote control unit. Mode2 • Places the system into the standby mode when no signal is received for three hours. 1 Press HOME MENU. 2 Select "Power...
Owner's Manual
Page 67
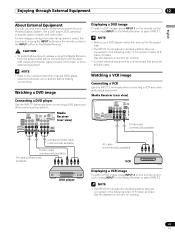
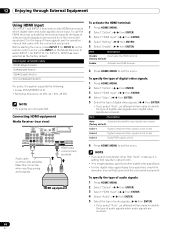
... INPUT 1 Y CB / PB COMPONENT VIDEO CR / PR INPUT 1 HD Displaying a DVD image To watch a VCR image, press INPUT 2 on the remote control unit or press INPUT on the Media Receiver to select INPUT1. Media Receiver (rear view) MONITOR OUT ANT/ CABLE A IN INPUT 2 G-LINK INPUT 3 I ...(commercially available) AV cable (commercially available) VCR DVD player Displaying a VCR image To watch a DVD image, press INPUT 1 on the remote control unit or press INPUT on the Media Receiver. Use the desired connection for viewing. • Connect external equipment to only terminals that are ...
... INPUT 1 Y CB / PB COMPONENT VIDEO CR / PR INPUT 1 HD Displaying a DVD image To watch a VCR image, press INPUT 2 on the remote control unit or press INPUT on the Media Receiver to select INPUT1. Media Receiver (rear view) MONITOR OUT ANT/ CABLE A IN INPUT 2 G-LINK INPUT 3 I ...(commercially available) AV cable (commercially available) VCR DVD player Displaying a VCR image To watch a DVD image, press INPUT 1 on the remote control unit or press INPUT on the Media Receiver. Use the desired connection for viewing. • Connect external equipment to only terminals that are ...
Owner's Manual
Page 68
... cable (commercially available) Audio cable (commercially available) Make this connection when inputting analog audio signals. Before starting the menu, press INPUT 1 (or INPUT 3) on the remote control unit or press INPUT on the Media Receiver to exit the menu. NOTE • If you select a parameter other than "Auto", make such a setting that...
... cable (commercially available) Audio cable (commercially available) Make this connection when inputting analog audio signals. Before starting the menu, press INPUT 1 (or INPUT 3) on the remote control unit or press INPUT on the Media Receiver to exit the menu. NOTE • If you select a parameter other than "Auto", make such a setting that...
Owner's Manual
Page 69
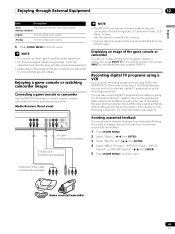
...input audio signals. (factory default) Digital Accepts digital audio signals. You can prevent unwanted feedback from the game console or camcorder, press INPUT 4 on the remote control unit or press INPUT on the equipment to be inhibited. 1 Press HOME MENU. 2 Select "Option". ( / then ENTER) 3 Select "Monitor Out".... 4 terminals are checked whether they are to be specified, check the operation manual that its light emitting section faces the remote control sensor on the rear of images. Displaying an image of the game console or camcorder To watch an image coming from adversely...
...input audio signals. (factory default) Digital Accepts digital audio signals. You can prevent unwanted feedback from the game console or camcorder, press INPUT 4 on the remote control unit or press INPUT on the equipment to be inhibited. 1 Press HOME MENU. 2 Select "Option". ( / then ENTER) 3 Select "Monitor Out".... 4 terminals are checked whether they are to be specified, check the operation manual that its light emitting section faces the remote control sensor on the rear of images. Displaying an image of the game console or camcorder To watch an image coming from adversely...
Owner's Manual
Page 72
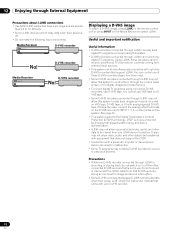
... may not allow this system. See page 67. • This system supports the Digital Transmission Content Protection (DTCP) technology. You can control one D-VHS recorder connected through i.LINK is not in use VHS tape nor SVHS tape. • Some D-VHS recorders connected though i.LINK... STANDBY/ON REC ON STANDBY TIMER PULL OPEN D-VHS recorder Displaying a D-VHS image To watch a D-VHS image, press i.LINK on the remote control unit or press INPUT on the Media Receiver to select i.LINK. DTCP is a copy protection technology that presents data coding and device authentication. ...
... may not allow this system. See page 67. • This system supports the Digital Transmission Content Protection (DTCP) technology. You can control one D-VHS recorder connected through i.LINK is not in use VHS tape nor SVHS tape. • Some D-VHS recorders connected though i.LINK... STANDBY/ON REC ON STANDBY TIMER PULL OPEN D-VHS recorder Displaying a D-VHS image To watch a D-VHS image, press i.LINK on the remote control unit or press INPUT on the Media Receiver to select i.LINK. DTCP is a copy protection technology that presents data coding and device authentication. ...


