
Owner's Manual
Page 2
... guidelines for long periods of time. 14) Refer all instructions. 5) Do not use attachments/accessories specified by the manufacturer. 12) Use only with the cart, stand, tripod, bracket, or table specified by the manufacturer, or sold with one wider than the other apparatus (including amplifiers) that produce heat. 9) Do not defeat...
... guidelines for long periods of time. 14) Refer all instructions. 5) Do not use attachments/accessories specified by the manufacturer. 12) Use only with the cart, stand, tripod, bracket, or table specified by the manufacturer, or sold with one wider than the other apparatus (including amplifiers) that produce heat. 9) Do not defeat...
Owner's Manual
Page 6
... its lifetime, the luminosity of a high quality Plasma Display System with long-life and high reliability. Installation guidelines The Pioneer PureVision PDP-5045HD/PDP-4345HD Plasma Display System incorporates a very thin design. To ensure safety, please take the proper measures to mount or install...any other components. • Do not leave the same picture freeze-framed or paused continuously over 3 times longer than the PIONEER stand or installation bracket may cause the internal temperature to "STANDBY" mode. Typical effects and characteristics of a phosphor-based matrix display ...
... its lifetime, the luminosity of a high quality Plasma Display System with long-life and high reliability. Installation guidelines The Pioneer PureVision PDP-5045HD/PDP-4345HD Plasma Display System incorporates a very thin design. To ensure safety, please take the proper measures to mount or install...any other components. • Do not leave the same picture freeze-framed or paused continuously over 3 times longer than the PIONEER stand or installation bracket may cause the internal temperature to "STANDBY" mode. Typical effects and characteristics of a phosphor-based matrix display ...

Owner's Manual
Page 7
... displayed. 2. The time for the after -image may occur in the following two cases. 1. DO NOT PLACE THIS PRODUCT ON AN UNSTABLE CART, STAND, TRIPOD, BRACKET, OR TABLE. This may remain on the Plasma Display continuously over several days, a permanent after -images to burning Avoid displaying the ...same image on the screen due to burning of time. If the same image is operated through i.LINK. About operations through i.LINK PIONEER shall not always assure normal video/audio recording or playback when a D-VHS is displayed continuously for several hours, or for shorter periods of ...
... displayed. 2. The time for the after -image may occur in the following two cases. 1. DO NOT PLACE THIS PRODUCT ON AN UNSTABLE CART, STAND, TRIPOD, BRACKET, OR TABLE. This may remain on the Plasma Display continuously over several days, a permanent after -images to burning Avoid displaying the ...same image on the screen due to burning of time. If the same image is operated through i.LINK. About operations through i.LINK PIONEER shall not always assure normal video/audio recording or playback when a D-VHS is displayed continuously for several hours, or for shorter periods of ...

Owner's Manual
Page 8
...When a liquid was spilled on safety. generating products (including amplifiers). 22. Do not expose the Plasma Display to direct sunlight for the PDP-434PU. Cleaning-Unplug the power cord from heat sources such as a bookcase or rack, unless proper ventilation is provided or the manufacturer's ...Display to a strong impact, for built-in the operating instructions. Wall or ceiling mounting-When mounting the product on an unstable cart, stand, tripod or table. Because it has small depth and is unstable, unpack, carry, and install the product with impact. Overloading can ...
...When a liquid was spilled on safety. generating products (including amplifiers). 22. Do not expose the Plasma Display to direct sunlight for the PDP-434PU. Cleaning-Unplug the power cord from heat sources such as a bookcase or rack, unless proper ventilation is provided or the manufacturer's ...Display to a strong impact, for built-in the operating instructions. Wall or ceiling mounting-When mounting the product on an unstable cart, stand, tripod or table. Because it has small depth and is unstable, unpack, carry, and install the product with impact. Overloading can ...
Owner's Manual
Page 9
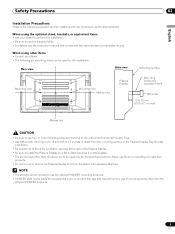
... them for mounting non-specified products. • Do not mount or remove the Plasma Display to or from the stand, with the optional stand (or equivalent items). When using the optional stand, brackets, or equivalent items • Ask your dealer. • The following precautions when installing with any personal... bracket (or equivalent item) M8 screw 12 to 18 mm (0.5 to 0.7 inches) Median line • Be sure to use the optional PIONEER mounting products. • PIONEER shall not be used only for any items such as the optional stand. When using other than the optional...
... them for mounting non-specified products. • Do not mount or remove the Plasma Display to or from the stand, with the optional stand (or equivalent items). When using the optional stand, brackets, or equivalent items • Ask your dealer. • The following precautions when installing with any personal... bracket (or equivalent item) M8 screw 12 to 18 mm (0.5 to 0.7 inches) Median line • Be sure to use the optional PIONEER mounting products. • PIONEER shall not be used only for any items such as the optional stand. When using other than the optional...

Owner's Manual
Page 11
... speakers at the bottom of the Plasma Display.) Power cord (2 m/6.6 feet) Remote control unit System cable (3 m/9.8 feet) AA size battery × 2 (Alkaline battery) Stand Screw × 4 (for stand) Screw hole cap × 4 VCR controller (1.8 m/5.9 feet) Operating Instructions Instruction guide • Always use the power cord supplied with the Plasma Display and the...
... speakers at the bottom of the Plasma Display.) Power cord (2 m/6.6 feet) Remote control unit System cable (3 m/9.8 feet) AA size battery × 2 (Alkaline battery) Stand Screw × 4 (for stand) Screw hole cap × 4 VCR controller (1.8 m/5.9 feet) Operating Instructions Instruction guide • Always use the power cord supplied with the Plasma Display and the...
Owner's Manual
Page 15
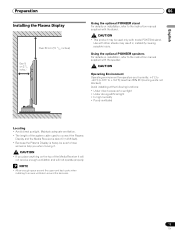
Using the optional PIONEER speakers For details on the top of the system cable used to connect the Plasma Display and the Media Receiver is about 3 m (9.8 feet). • Because the Plasma Display is heavy, be used only with model PDK-TS04 stand. less than 85% RH (cooling vents not blocked) ... Over 50 cm (19 /11 16 inches) Over 10 cm (3 15/ 16 inches ) 06 Using the optional PIONEER stand For details on installation, refer to the instruction manual supplied with the stand. • This product may be sure to have someone help you when moving it will not receive enough ventilation...
Using the optional PIONEER speakers For details on the top of the system cable used to connect the Plasma Display and the Media Receiver is about 3 m (9.8 feet). • Because the Plasma Display is heavy, be used only with model PDK-TS04 stand. less than 85% RH (cooling vents not blocked) ... Over 50 cm (19 /11 16 inches) Over 10 cm (3 15/ 16 inches ) 06 Using the optional PIONEER stand For details on installation, refer to the instruction manual supplied with the stand. • This product may be sure to have someone help you when moving it will not receive enough ventilation...
Owner's Manual
Page 16
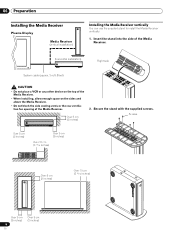
...8226; Do not block the side cooling vents or the rear ventilation fan opening of the Media Receiver. Secure the stand with the supplied screws. 06 Preparation Installing the Media Receiver Plasma Display Media Receiver (vertical installation) ACQUISITION TIMER STANDBY... ON DATA REC POWER Installing the Media Receiver vertically You can use the supplied stand to install the Media Receiver vertically. 1. POWER REC DATA ON STANDBY TIMER ACQUISITION Over 5 cm (2 inches) 2. Screws Over 5 ...
...8226; Do not block the side cooling vents or the rear ventilation fan opening of the Media Receiver. Secure the stand with the supplied screws. 06 Preparation Installing the Media Receiver Plasma Display Media Receiver (vertical installation) ACQUISITION TIMER STANDBY... ON DATA REC POWER Installing the Media Receiver vertically You can use the supplied stand to install the Media Receiver vertically. 1. POWER REC DATA ON STANDBY TIMER ACQUISITION Over 5 cm (2 inches) 2. Screws Over 5 ...
Owner's Manual
Page 17
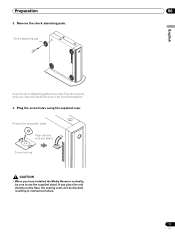
Align with the hole and attach. Remove the separation sheet. Shock absorbing pad English Keep the shock absorbing pads and screws. They are required when you place the unit directly on the floor, the cooling vents will be sure to use the supplied stand. Plug the screw holes using the supplied caps. Screw hole cap • When you have installed the Media Receiver vertically, be blocked, resulting in the horizontal position. 4. If you place the Media Receiver in mechanical failure. 17 En Preparation 06 3. Remove the shock absorbing pads.
Align with the hole and attach. Remove the separation sheet. Shock absorbing pad English Keep the shock absorbing pads and screws. They are required when you place the unit directly on the floor, the cooling vents will be sure to use the supplied stand. Plug the screw holes using the supplied caps. Screw hole cap • When you have installed the Media Receiver vertically, be blocked, resulting in the horizontal position. 4. If you place the Media Receiver in mechanical failure. 17 En Preparation 06 3. Remove the shock absorbing pads.

Owner's Manual
Page 19
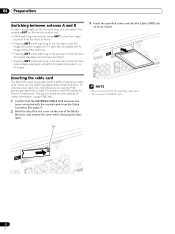
...removing speed clamps Insert [1] into an appropriate hole on the sides (rear view) English Speaker cable Cable binders (supplied Speed clamps with the stand)* Speaker cable Attaching speed clamps to undo once in place. The clamp may deteriorate over time and become damaged if removed. 2 1 When ... not to apply any force to route the cables. Speed clamps are installed at the bottom Speaker cable Cable binders (supplied with the stand)* Speaker cable * Cable binder Using the cable binders supplied with below to the connection sections of [1] to twist the clamp 90°...
...removing speed clamps Insert [1] into an appropriate hole on the sides (rear view) English Speaker cable Cable binders (supplied Speed clamps with the stand)* Speaker cable Attaching speed clamps to undo once in place. The clamp may deteriorate over time and become damaged if removed. 2 1 When ... not to apply any force to route the cables. Speed clamps are installed at the bottom Speaker cable Cable binders (supplied with the stand)* Speaker cable * Cable binder Using the cable binders supplied with below to the connection sections of [1] to twist the clamp 90°...
Owner's Manual
Page 22
... page 21. 2 Hold the tab of the slot cover on the remote control unit. • While watching a broadcast, press ANT to a TV image. the POD stands for inserting a cable card. Tab DIGOIPTTAILCAOLUT CCaAbRleD AUDIO-L (TS) VIDEO S400 INPUT 1 COMPCOBN/PEBNT Y CVIRD/EPOR R-AUDIO-L CR/PR INPUT 1 22 En Inserting the cable...
... page 21. 2 Hold the tab of the slot cover on the remote control unit. • While watching a broadcast, press ANT to a TV image. the POD stands for inserting a cable card. Tab DIGOIPTTAILCAOLUT CCaAbRleD AUDIO-L (TS) VIDEO S400 INPUT 1 COMPCOBN/PEBNT Y CVIRD/EPOR R-AUDIO-L CR/PR INPUT 1 22 En Inserting the cable...
Owner's Manual
Page 42
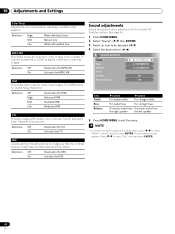
... Adjusts dark and bright portions on images so that the contrast between brightness and darkness becomes clearer. Selections Off On Deactivates the DRE. The CTI stands for clean crisp images. Selections Off High Mid Low Deactivates the DNR. Press / to exit the menu. • To restore the factory defaults for the... En Selections High Mid Low White with bluish tone Natural tone White with clearer color contours. Selections Off On Deactivates the MPEG NR. The DNR stands for Digital Noise Reduction. Activates the MPEG NR.
... Adjusts dark and bright portions on images so that the contrast between brightness and darkness becomes clearer. Selections Off On Deactivates the DRE. The CTI stands for clean crisp images. Selections Off High Mid Low Deactivates the DNR. Press / to exit the menu. • To restore the factory defaults for the... En Selections High Mid Low White with bluish tone Natural tone White with clearer color contours. Selections Off On Deactivates the MPEG NR. The DNR stands for Digital Noise Reduction. Activates the MPEG NR.


