
Owner's Manual
Page 9
...on a wall or ceiling, be broken, resulting in proper operating condition. 20. Unplug the power cord from the AC outlet before installing the speakers. 23. Do not expose the Plasma Display to the method recommended by hitting it has small depth and is in fire or personal injury. ... as radiators, heaters, stoves and other danger. 19. The screen may be sure to install the product according to direct sunlight for the PDP-434PU. The optical characteristics of unauthorized parts can result in discoloration or warp. 25. Use of the front protection panel changes, resulting in fire...
...on a wall or ceiling, be broken, resulting in proper operating condition. 20. Unplug the power cord from the AC outlet before installing the speakers. 23. Do not expose the Plasma Display to the method recommended by hitting it has small depth and is in fire or personal injury. ... as radiators, heaters, stoves and other danger. 19. The screen may be sure to install the product according to direct sunlight for the PDP-434PU. The optical characteristics of unauthorized parts can result in discoloration or warp. 25. Use of the front protection panel changes, resulting in fire...

Owner's Manual
Page 12
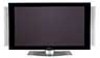
05 Supplied Accessories Plasma Display Power cord (2 m/6.6 feet) Cleaning cloth Speed clamp x 3 Bead band x 3 Media Receiver Warranty card Speaker cushion x 3 (Use when installing the optional speakers at the bottom of the Plasma Display.) Power cord (2 m/6.6 feet) Remote control unit System cable (3 m/9.8 feet) AA size battery x 2 (Alkaline battery) Stand Screw x 4 (for stand) ...
05 Supplied Accessories Plasma Display Power cord (2 m/6.6 feet) Cleaning cloth Speed clamp x 3 Bead band x 3 Media Receiver Warranty card Speaker cushion x 3 (Use when installing the optional speakers at the bottom of the Plasma Display.) Power cord (2 m/6.6 feet) Remote control unit System cable (3 m/9.8 feet) AA size battery x 2 (Alkaline battery) Stand Screw x 4 (for stand) ...

Owner's Manual
Page 13
buttons 8 CHANNEL +/- buttons Rear view 9 - 0 = 9 SYSTEM CABLE terminal (BLACK) 0 SYSTEM CABLE terminal (WHITE) The terminals have faced downward. - SPEAKER (right/left) terminals = AC INLET terminal PDP5040HD-Eng (13-16) 13 13 En 7/24/03, 1:57 PM Part Names Plasma Display Front view 06 (right view) 5 6 7 8 English 2 1 3 1 POWER button 2 STANDBY indicator 3 POWER ON indicator 4 Remote control sensor 4 5 STANDBY/ON button 6 INPUT button 7 VOLUME +/-
buttons 8 CHANNEL +/- buttons Rear view 9 - 0 = 9 SYSTEM CABLE terminal (BLACK) 0 SYSTEM CABLE terminal (WHITE) The terminals have faced downward. - SPEAKER (right/left) terminals = AC INLET terminal PDP5040HD-Eng (13-16) 13 13 En 7/24/03, 1:57 PM Part Names Plasma Display Front view 06 (right view) 5 6 7 8 English 2 1 3 1 POWER button 2 STANDBY indicator 3 POWER ON indicator 4 Remote control sensor 4 5 STANDBY/ON button 6 INPUT button 7 VOLUME +/-
Owner's Manual
Page 17
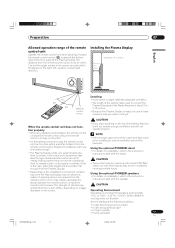
...operate properly. • Allow enough space around the upper and back parts when installing to ensure ventilation around the backside. Using the optional PIONEER stand • For details on installation, refer to the sensor must be within 7 m and the angle relative to the instruction manual ...light • In high humidity • Poorly ventilated 17 En PDP5040HD-Eng (17-27) 17 7/24/03, 1:58 PM Using the optional PIONEER speakers • For details on installation, refer to the instruction manual provided with new ones early enough. • The Plasma Display emits very weak...
...operate properly. • Allow enough space around the upper and back parts when installing to ensure ventilation around the backside. Using the optional PIONEER stand • For details on installation, refer to the sensor must be within 7 m and the angle relative to the instruction manual ...light • In high humidity • Poorly ventilated 17 En PDP5040HD-Eng (17-27) 17 7/24/03, 1:58 PM Using the optional PIONEER speakers • For details on installation, refer to the instruction manual provided with new ones early enough. • The Plasma Display emits very weak...
Owner's Manual
Page 20
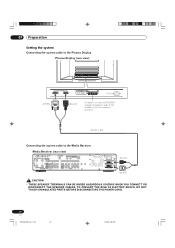
..., 6:06 PM 07 Preparation Setting the system Connecting the system cable to the Plasma Display Plasma Display (rear view) (WHITE) (BLACK) For details on optional PIONEER speaker installation, refer to the Media Receiver Media Receiver (rear view) SERVICE ONLY IN OUT CONTROL VCR CONTROL IN OUT IN OUT S-VIDEO DIGITAL OUT OPTICAL.../PR A ANTENNA/CABLE B MONITOR OUT S-VIDEO VIDEO R-AUDIO-L S-VIDEO R-AUDIO-L INPUT 3 Y CB/PB CR/PR AC INLET BLACK WHITE SYSTEM CABLE (BLACK) (WHITE) • THESE SPEAKER TERMINALS CAN BE UNDER HAZARDOUS VOLTAGE WHEN YOU CONNECT OR DISCONNECT THE...
..., 6:06 PM 07 Preparation Setting the system Connecting the system cable to the Plasma Display Plasma Display (rear view) (WHITE) (BLACK) For details on optional PIONEER speaker installation, refer to the Media Receiver Media Receiver (rear view) SERVICE ONLY IN OUT CONTROL VCR CONTROL IN OUT IN OUT S-VIDEO DIGITAL OUT OPTICAL.../PR A ANTENNA/CABLE B MONITOR OUT S-VIDEO VIDEO R-AUDIO-L S-VIDEO R-AUDIO-L INPUT 3 Y CB/PB CR/PR AC INLET BLACK WHITE SYSTEM CABLE (BLACK) (WHITE) • THESE SPEAKER TERMINALS CAN BE UNDER HAZARDOUS VOLTAGE WHEN YOU CONNECT OR DISCONNECT THE...

Owner's Manual
Page 21
...attach them carefully. The clamp may deteriorate over time and become damaged if removed. 2 1 When the speakers are installed at the bottom PDP5040HD-Eng (17-27) Speaker cable Cable binders (supplied with the stand)* Speaker cable * Cable binder Using the cable binders supplied with the stand, put the...twist the clamp 90°, pulling outward. Speed clamps are installed on the sides (rear view) English Speaker cable Cable binders (supplied Speed clamps with the stand)* Speaker cable Attaching speed clamps to the main unit Attach the speed clamps using the 4 holes marked with ...
...attach them carefully. The clamp may deteriorate over time and become damaged if removed. 2 1 When the speakers are installed at the bottom PDP5040HD-Eng (17-27) Speaker cable Cable binders (supplied with the stand)* Speaker cable * Cable binder Using the cable binders supplied with the stand, put the...twist the clamp 90°, pulling outward. Speed clamps are installed on the sides (rear view) English Speaker cable Cable binders (supplied Speed clamps with the stand)* Speaker cable Attaching speed clamps to the main unit Attach the speed clamps using the 4 holes marked with ...
Owner's Manual
Page 38
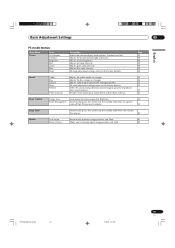
... Adjust Reset Sound Treble Bass Balance Reset FOCUS Front Surround Description Select from changing especially Parental Control settings. Adjusts the picture between left and right speakers. 52 All audio adjustment settings return to the factory defaults.
... Adjust Reset Sound Treble Bass Balance Reset FOCUS Front Surround Description Select from changing especially Parental Control settings. Adjusts the picture between left and right speakers. 52 All audio adjustment settings return to the factory defaults.
Owner's Manual
Page 39
... Adjusts the bass weaker or stronger. 52 Adjusts audio output between light and shade. Adjusts blue color intensity. Adjusts the picture between left and right speakers. 52 All audio adjustment settings return to the factory defaults. 52 Shifts the sound coming direction (sound images) upward and produces clear sound contours. 53...
... Adjusts the bass weaker or stronger. 52 Adjusts audio output between light and shade. Adjusts blue color intensity. Adjusts the picture between left and right speakers. 52 All audio adjustment settings return to the factory defaults. 52 Shifts the sound coming direction (sound images) upward and produces clear sound contours. 53...

Owner's Manual
Page 52
... Treble Bass Balance button For weaker treble button For stronger treble For weaker bass For stronger bass Decreases audio from Decreases audio from the right speaker the left speaker 4 Press HOME MENU to exit the menu. • To restore the factory defaults for the chosen AV Selection option.
... Treble Bass Balance button For weaker treble button For stronger treble For weaker bass For stronger bass Decreases audio from Decreases audio from the right speaker the left speaker 4 Press HOME MENU to exit the menu. • To restore the factory defaults for the chosen AV Selection option.
Owner's Manual
Page 106
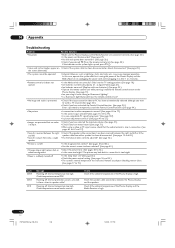
... or • Adjust the picture tone. (See pages 48 to 67 and 77.) • Sound is reversed between the right • Check if the speaker cable connections have muted sound. (See page 31.) • When using a video or PC input source, check that is too bright. • Power ... Powering off . • Is the sleep timer set correctly? The picture may cause improper operation. Internal protection circuits activated. Check temperature around PDP. Slide it to 52.) • Images are presented but no audio is high. Powering off. Internal temperature too high. Check if the ...
... or • Adjust the picture tone. (See pages 48 to 67 and 77.) • Sound is reversed between the right • Check if the speaker cable connections have muted sound. (See page 31.) • When using a video or PC input source, check that is too bright. • Power ... Powering off . • Is the sleep timer set correctly? The picture may cause improper operation. Internal protection circuits activated. Check temperature around PDP. Slide it to 52.) • Images are presented but no audio is high. Powering off. Internal temperature too high. Check if the ...


