
Owner's Manual
Page 3
... the receiver is no guarantee that to which can radiate radio frequency energy and, if not installed and used to connect the unit to Part 15 of California and other equipment. These limits are used in a residential installation. Consult the dealer or an experienced radio/TV technician for connections. WARNING: Handling the cord on this serial number on , the user is located on...
... the receiver is no guarantee that to which can radiate radio frequency energy and, if not installed and used to connect the unit to Part 15 of California and other equipment. These limits are used in a residential installation. Consult the dealer or an experienced radio/TV technician for connections. WARNING: Handling the cord on this serial number on , the user is located on...
Owner's Manual
Page 4
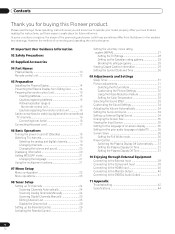
... Sound Settings 34 Adjusting the Volume Automatically 34 Setting the Surround Sound 34 Setting up External Digital Sound 34 Changing the Screen Size 35 Viewing the Input Source 35 Setting for the language of digital TV 36 Screen Saver 36 Setting the Full White mode 36 Power Control 37 Switching the Plasma Display Off Automatically ...... 37 Setting the Plasma Display On Time 37 Setting the Plasma Display Off Time 37 10 Enjoying through these operating instructions so you will know how to the DIGITAL Audio Output 41 11 Appendix Troubleshooting...
... Sound Settings 34 Adjusting the Volume Automatically 34 Setting the Surround Sound 34 Setting up External Digital Sound 34 Changing the Screen Size 35 Viewing the Input Source 35 Setting for the language of digital TV 36 Screen Saver 36 Setting the Full White mode 36 Power Control 37 Switching the Plasma Display Off Automatically ...... 37 Setting the Plasma Display On Time 37 Setting the Plasma Display Off Time 37 10 Enjoying through these operating instructions so you will know how to the DIGITAL Audio Output 41 11 Appendix Troubleshooting...
Owner's Manual
Page 5
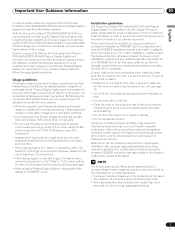
... to mount or install the Plasma Display, in order to prevent the unit from tipping over a long period of accessories other equipment, walls, etc. Use of time, when using a vacuum cleaner set to its lowest suction setting. • Do not place the product on the screen can be displayed for extended periods, from a DVD player, VCR, and all phosphor-based screens (for over 3 times longer than the PIONEER installation bracket...
... to mount or install the Plasma Display, in order to prevent the unit from tipping over a long period of accessories other equipment, walls, etc. Use of time, when using a vacuum cleaner set to its lowest suction setting. • Do not place the product on the screen can be displayed for extended periods, from a DVD player, VCR, and all phosphor-based screens (for over 3 times longer than the PIONEER installation bracket...
Owner's Manual
Page 6
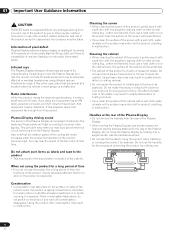
... and use of plastic. 01 Important User Guidance Information PIONEER bears no responsibility for example. Plasma Display driving sound The screen of the Plasma Display is a possibility of time. Using the product with a soft dry cloth; Do not use a hard cloth or rub the cabinet hard, the surface of the fan motor at a location where its characteristics. Information of pixel defect Plasma Display systems display images consisting...
... and use of plastic. 01 Important User Guidance Information PIONEER bears no responsibility for example. Plasma Display driving sound The screen of the Plasma Display is a possibility of time. Using the product with a soft dry cloth; Do not use a hard cloth or rub the cabinet hard, the surface of the fan motor at a location where its characteristics. Information of pixel defect Plasma Display systems display images consisting...
Owner's Manual
Page 8
... when the product is not designed for the PDP-42A3HD/PDP-4214HD. The plasma Display used to fall , resulting in serious personal injuries as well as the original parts. d. Improper adjustment of the front protection panel changes, resulting in fire or personal injury. 24. When mounting the product on an unstable cart, stand, tripod or table. generating products (including amplifiers). 22. This product...
... when the product is not designed for the PDP-42A3HD/PDP-4214HD. The plasma Display used to fall , resulting in serious personal injuries as well as the original parts. d. Improper adjustment of the front protection panel changes, resulting in fire or personal injury. 24. When mounting the product on an unstable cart, stand, tripod or table. generating products (including amplifiers). 22. This product...

Owner's Manual
Page 11
Part Names Rear view INPUT VIDEO 3 L R AUDIO S-VIDEO 3 1 English 04 2 3 45 6 7 8 9 10 DTVANTENNA IN ANTENNA / CABLE IN VIDEO 2 L-AUDIO-R L R VIDEO AUDIO MONITOR OUT OPTICAL DIGITAL OUT VIDEO 1 L-AUDIO-R S-VIDEO 2 L-AUDIO-R S-VIDEO 1 L-AUDIO-R Y Y INPUT CB/PB CR/PR COMPONENT 2 CB/PB COMPONENT 1 CR/PR L HDMI HDMI R AUDIO SERVICE ONLY AC IN The terminals have faced downward. 1 VIDEO 3 terminals (AUDIO/VIDEO/S-VIDEO) 2 DTV-ANTENNA IN terminal 3 ANTENNA/CABLE IN terminal 4 MONITOR OUT terminals (AUDIO/VIDEO) 5 DIGITAL OUT terminal (OPTICAL) 6 VIDEO 1/VIDEO 2 terminals ...
Part Names Rear view INPUT VIDEO 3 L R AUDIO S-VIDEO 3 1 English 04 2 3 45 6 7 8 9 10 DTVANTENNA IN ANTENNA / CABLE IN VIDEO 2 L-AUDIO-R L R VIDEO AUDIO MONITOR OUT OPTICAL DIGITAL OUT VIDEO 1 L-AUDIO-R S-VIDEO 2 L-AUDIO-R S-VIDEO 1 L-AUDIO-R Y Y INPUT CB/PB CR/PR COMPONENT 2 CB/PB COMPONENT 1 CR/PR L HDMI HDMI R AUDIO SERVICE ONLY AC IN The terminals have faced downward. 1 VIDEO 3 terminals (AUDIO/VIDEO/S-VIDEO) 2 DTV-ANTENNA IN terminal 3 ANTENNA/CABLE IN terminal 4 MONITOR OUT terminals (AUDIO/VIDEO) 5 DIGITAL OUT terminal (OPTICAL) 6 VIDEO 1/VIDEO 2 terminals ...

Owner's Manual
Page 12
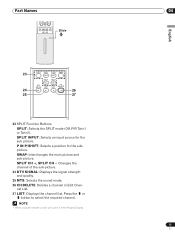
... BACK 20 11 21 12 13 CH MUTING VOL 22 SPLIT SPLIT INPUT P IN P SHIFT SWAP DTV SIGNAL SPLIT CH+ MTS SPLIT CH- To turn the sound back on - buttons. 14 TV : Switches between operation and standby mode. 15 SCREEN SIZE: Changes the aspect ratio of DTV. 7 C.C.: Display captions while in the closed- caption source. 8 FAVORITE CH: Selects the favorite channel. 9 c/d/[/\: Controls the cursor in DTV mode. 2 INPUT: Displays all available input sources.
... BACK 20 11 21 12 13 CH MUTING VOL 22 SPLIT SPLIT INPUT P IN P SHIFT SWAP DTV SIGNAL SPLIT CH+ MTS SPLIT CH- To turn the sound back on - buttons. 14 TV : Switches between operation and standby mode. 15 SCREEN SIZE: Changes the aspect ratio of DTV. 7 C.C.: Display captions while in the closed- caption source. 8 FAVORITE CH: Selects the favorite channel. 9 c/d/[/\: Controls the cursor in DTV mode. 2 INPUT: Displays all available input sources.
Owner's Manual
Page 13
... the required channel. • When using the remote control unit, point it at the Plasma Display. 13 En nel List. 27 LIST: Displays the channel list. SPLIT INPUT: Selects an input source for the subpicture. SWAP: Interchanges the main picture and sub-picture. SPLIT CH +, SPLIT CH -: Changes the channel of the sub-picture. 24 DTV SIGNAL: Displays the signal strength and quality. 25 MTS: Selects the sound mode. 26 CH DELETE: Deletes a channel in...
... the required channel. • When using the remote control unit, point it at the Plasma Display. 13 En nel List. 27 LIST: Displays the channel list. SPLIT INPUT: Selects an input source for the subpicture. SWAP: Interchanges the main picture and sub-picture. SPLIT CH +, SPLIT CH -: Changes the channel of the sub-picture. 24 DTV SIGNAL: Displays the signal strength and quality. 25 MTS: Selects the sound mode. 26 CH DELETE: Deletes a channel in...
Owner's Manual
Page 16
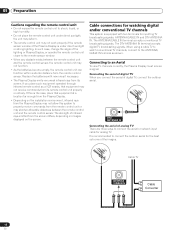
... strong lighting. When using a cable TV to watch conventional TV channels, connect to an Aerial To view TV channels correctly, the Plasma Display must receive a signal. The strength of the Plasma Display is the case, place that equipment may shorten allowable distances between the remote control unit and the remote control sensor, the remote control unit may not allow this is under direct sunlight; The DTV-ANTENNA IN terminal accepts digital...
... strong lighting. When using a cable TV to watch conventional TV channels, connect to an Aerial To view TV channels correctly, the Plasma Display must receive a signal. The strength of the Plasma Display is the case, place that equipment may shorten allowable distances between the remote control unit and the remote control sensor, the remote control unit may not allow this is under direct sunlight; The DTV-ANTENNA IN terminal accepts digital...

Owner's Manual
Page 18
POWER POWER button S TA N D B Y DTV TV VCR DVD HDMI STANDBY indicator STANDBY /ON STANDBY/ON button S TA N D B Y DTV TV VCR DVD HDMI Current input source indicator 18 En The STANDBY indicator lights off and the current input source indicator lights up. 3 To switch the Plasma Display off, press the TV button on the remote control or the STANDBY/ ON button on the bottom of the Plasma Display for 1 second. • The Plasma Display enters to standby mode and the STANDBY indicator lights up . 2 Press the...
POWER POWER button S TA N D B Y DTV TV VCR DVD HDMI STANDBY indicator STANDBY /ON STANDBY/ON button S TA N D B Y DTV TV VCR DVD HDMI Current input source indicator 18 En The STANDBY indicator lights off and the current input source indicator lights up. 3 To switch the Plasma Display off, press the TV button on the remote control or the STANDBY/ ON button on the bottom of the Plasma Display for 1 second. • The Plasma Display enters to standby mode and the STANDBY indicator lights up . 2 Press the...

Owner's Manual
Page 21
... mono or stereo). Basic Operations 06 English Setting MTS/SAP mode When watching conventional TV programs, you may enjoy stereo sound and/or Secondary Audio Programs (SAP), using the MTS button, the display changes depending on broadcasting signals being received. STEREO mode STEREO SAP mode SSAAPP MONO mode MMOONNOO Main input Sub-picture Twin 1 (2-screen) Main input Twin 2 (2-screen) Sub-picture • In each of digital TV" in page 36. SPLIT SPLIT...
... mono or stereo). Basic Operations 06 English Setting MTS/SAP mode When watching conventional TV programs, you may enjoy stereo sound and/or Secondary Audio Programs (SAP), using the MTS button, the display changes depending on broadcasting signals being received. STEREO mode STEREO SAP mode SSAAPP MONO mode MMOONNOO Main input Sub-picture Twin 1 (2-screen) Main input Twin 2 (2-screen) Sub-picture • In each of digital TV" in page 36. SPLIT SPLIT...
Owner's Manual
Page 22
... the sub-picture, then press the [ or BACK button. 9 Press the EXIT button. • You can turn off the sub-picture by simply pressing the SPLIT INPUT button on the remote control. • Multi screen function is available with the following steps are not available. 6 Press the c or d button to move to switch the position of picture in picture display. ANALOG CH DIGITAL CH/ANALOG CH - S-VIDEO 2 - PIP -
... the sub-picture, then press the [ or BACK button. 9 Press the EXIT button. • You can turn off the sub-picture by simply pressing the SPLIT INPUT button on the remote control. • Multi screen function is available with the following steps are not available. 6 Press the c or d button to move to switch the position of picture in picture display. ANALOG CH DIGITAL CH/ANALOG CH - S-VIDEO 2 - PIP -

Owner's Manual
Page 23
... can return to the upper menu levels by pressing the BACK button. 23 En Menu Setup 07 English Menu configuration Home Menu Tuner Setup Item Scan Channels Scan Analog Channel Scan Digital Channel Edit Channel List Picture AV Selection Brightness Contrast Sharpness Color Tint Noise Reduction Color Temp Sound Effect Bass Treble Balance Auto Volume Level SRS TruSurround XT Digital Audio Out Screen Screen Size Main Input PIP/TWIN Screen Saver System Menu Language Audio Language Clock Setting Parental Control Closed Caption Display Analog CC DTV CC Page...
... can return to the upper menu levels by pressing the BACK button. 23 En Menu Setup 07 English Menu configuration Home Menu Tuner Setup Item Scan Channels Scan Analog Channel Scan Digital Channel Edit Channel List Picture AV Selection Brightness Contrast Sharpness Color Tint Noise Reduction Color Temp Sound Effect Bass Treble Balance Auto Volume Level SRS TruSurround XT Digital Audio Out Screen Screen Size Main Input PIP/TWIN Screen Saver System Menu Language Audio Language Clock Setting Parental Control Closed Caption Display Analog CC DTV CC Page...

Owner's Manual
Page 25
... digital channels manually. Scan Digital Channel Channel 6 Store Level 30% Quality 30% Move Enter Return 7 When finished scanning, press to start the search. The channel is stored with " FAV " displayed. If the broadcasting station is set to Edit Channel List, then press the \ or OK button. Editing Channel List 1 Press the MENU button. 2 Press the c or d button to move to Tuner Setup, then press the \ or OK button. 3 Press the c or d button to move to Store...
... digital channels manually. Scan Digital Channel Channel 6 Store Level 30% Quality 30% Move Enter Return 7 When finished scanning, press to start the search. The channel is stored with " FAV " displayed. If the broadcasting station is set to Edit Channel List, then press the \ or OK button. Editing Channel List 1 Press the MENU button. 2 Press the c or d button to move to Tuner Setup, then press the \ or OK button. 3 Press the c or d button to move to Store...
Owner's Manual
Page 29
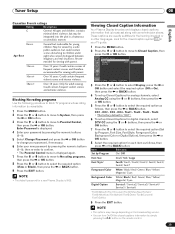
... factory default is "CC1". 6 To set up Closed Captions for digital channels, select DTV CC using the c or d buttons, then press the \ or OK button. 5 Press the c or d button to select the required option as follows, then press [ or the BACK button: Item Selection Set by Program On/ Off Font Size Small/ Mid/ Large Font Style1 Font0/ Font1/ Font2/ Font3/ Font4/ Font5/ Font6/ Font7 Foreground Color White/ Black/ Red/ Green/ Blue...
... factory default is "CC1". 6 To set up Closed Captions for digital channels, select DTV CC using the c or d buttons, then press the \ or OK button. 5 Press the c or d button to select the required option as follows, then press [ or the BACK button: Item Selection Set by Program On/ Off Font Size Small/ Mid/ Large Font Style1 Font0/ Font1/ Font2/ Font3/ Font4/ Font5/ Font6/ Font7 Foreground Color White/ Black/ Red/ Green/ Blue...

Owner's Manual
Page 34
... output in the PCM format regardless of the types of signals. Sound Effect Bass Treble Balance Auto Volume Level SRS TruSurround XT Digital Audio Out Flat On 50 Off 50 R 1 Off On PCM Move Enter Return • The factory default is "Off". 5 Press the EXIT button. 34 En is effective only for the signal of digital TV when you switch the "SRS TruSurrond XT" setting, the sound...
... output in the PCM format regardless of the types of signals. Sound Effect Bass Treble Balance Auto Volume Level SRS TruSurround XT Digital Audio Out Flat On 50 Off 50 R 1 Off On PCM Move Enter Return • The factory default is "Off". 5 Press the EXIT button. 34 En is effective only for the signal of digital TV when you switch the "SRS TruSurrond XT" setting, the sound...

Owner's Manual
Page 35
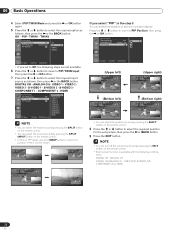
... or French). VIDEO 2 VIDEO 3 - Wide In this mode pictures are registered trademarks of the screen to correspond to your audio and video systems, you cannot select the screen mode. (The Screen Size setting is "English". 5 Press the EXIT button. 35 En HDMI Screen Screen Size Main Input PIP/TWIN Screen Saver Move Enter Zoom DIGITAL CH Return DIGITAL CH ANALOG CH VIDEO 1 VIDEO 2 VIDEO 3 S-VIDEO 1 S-VIDEO 2 S-VIDEO 3 COMPONENT 1 COMOPNENT 2 HDMI • The Plasma Display switches to selected source. 5 Press the EXIT button. • You...
... or French). VIDEO 2 VIDEO 3 - Wide In this mode pictures are registered trademarks of the screen to correspond to your audio and video systems, you cannot select the screen mode. (The Screen Size setting is "English". 5 Press the EXIT button. 35 En HDMI Screen Screen Size Main Input PIP/TWIN Screen Saver Move Enter Zoom DIGITAL CH Return DIGITAL CH ANALOG CH VIDEO 1 VIDEO 2 VIDEO 3 S-VIDEO 1 S-VIDEO 2 S-VIDEO 3 COMPONENT 1 COMOPNENT 2 HDMI • The Plasma Display switches to selected source. 5 Press the EXIT button. • You...

Owner's Manual
Page 40
... Enjoying through External Equipment Connecting to the HDMI Input HDMI Cable (commercially available) L HDMI HDMI R AUDIO Audio Cable (commercially available) HDMI equipment DVD Player The digital video and audio signals can be received from the connected equipment. Connecting to the Monitor Output Your Plasma Display can also record from the HDMI terminal (INPUT 3) • When watching images played back on a VCR or DVD recorder connected to the MONITOR OUT terminals, select an input source (e.g., TV channel reception) on , then press the INPUT button to select HDMI. • PC...
... Enjoying through External Equipment Connecting to the HDMI Input HDMI Cable (commercially available) L HDMI HDMI R AUDIO Audio Cable (commercially available) HDMI equipment DVD Player The digital video and audio signals can be received from the connected equipment. Connecting to the Monitor Output Your Plasma Display can also record from the HDMI terminal (INPUT 3) • When watching images played back on a VCR or DVD recorder connected to the MONITOR OUT terminals, select an input source (e.g., TV channel reception) on , then press the INPUT button to select HDMI. • PC...

Owner's Manual
Page 42
... wall outlet. • Blurred or snowy picture, distorted • Check the direction, location and connections of the Plasma Display. • Select an input source responding to avoid glare. 42 En Such interference often occurs due to sound the use of an indoor aerial. • Remote control malfunctions • Press the INPUT button to select the Plasma Display or an external device. • Replace the batteries in the remote control. • Install...
... wall outlet. • Blurred or snowy picture, distorted • Check the direction, location and connections of the Plasma Display. • Select an input source responding to avoid glare. 42 En Such interference often occurs due to sound the use of an indoor aerial. • Remote control malfunctions • Press the INPUT button to select the Plasma Display or an external device. • Replace the batteries in the remote control. • Install...

Owner's Manual
Page 44
11 Appendix Specifications Item Number of Pixels Audio Amplifier Surround System Power Requirement Dimensions (with stand) Weight (with stand) Reception System (Digital) Circuit type Tuner Audio format Reception System (Analog) Tuning System Tuner VHF/UHF CATV Audio multiplex Terminals Rear DTV-ANTENNA IN ANTENNA/CABLE IN VIDEO 1 VIDEO 2 COMPONENT 1 COMPONENT 2 HDMI MONITOR OUT DIGITAL OUT RS-232C Side VIDEO 3 OSD 42" Plasma Display, Model: PDP-42A3HD/PDP-4214HD 1 024 × 768 pixels 10 W + 10 W (1 kHz, 1 %, 4 Ω) SRS TruSurround XT 120 V AC...
11 Appendix Specifications Item Number of Pixels Audio Amplifier Surround System Power Requirement Dimensions (with stand) Weight (with stand) Reception System (Digital) Circuit type Tuner Audio format Reception System (Analog) Tuning System Tuner VHF/UHF CATV Audio multiplex Terminals Rear DTV-ANTENNA IN ANTENNA/CABLE IN VIDEO 1 VIDEO 2 COMPONENT 1 COMPONENT 2 HDMI MONITOR OUT DIGITAL OUT RS-232C Side VIDEO 3 OSD 42" Plasma Display, Model: PDP-42A3HD/PDP-4214HD 1 024 × 768 pixels 10 W + 10 W (1 kHz, 1 %, 4 Ω) SRS TruSurround XT 120 V AC...


