
User Manual
Page 1
... anglais. For customers in Japan, please use and refer to the instructions written in either English or French. Plasma Display Écran à plasma PDP-607CMX PDP-507CMX PDP-427CMX Operating Instructions Mode d'emploi Contents related to system specifications, power requirements, accessories, and other information differ with respect to the instructions written in Japanese...
... anglais. For customers in Japan, please use and refer to the instructions written in either English or French. Plasma Display Écran à plasma PDP-607CMX PDP-507CMX PDP-427CMX Operating Instructions Mode d'emploi Contents related to system specifications, power requirements, accessories, and other information differ with respect to the instructions written in Japanese...
User Manual
Page 6
... service in Canada. For warranty information please see the Limited Warranty sheet included with Video Card Model Number: PDP-607CMX/PDP-507CMX/PDP-427CMX (Plasma Display) PDA-5003/PDA-5004 (Video Card) Product Category: Class B Personal Computers & Peripherals Responsible Party Name: PIONEER ELECTRONICS SERVICE, INC. Customer Support Division P.O. and you wish to locate the nearest...
... service in Canada. For warranty information please see the Limited Warranty sheet included with Video Card Model Number: PDP-607CMX/PDP-507CMX/PDP-427CMX (Plasma Display) PDA-5003/PDA-5004 (Video Card) Product Category: Class B Personal Computers & Peripherals Responsible Party Name: PIONEER ELECTRONICS SERVICE, INC. Customer Support Division P.O. and you wish to locate the nearest...
User Manual
Page 7
... 2 Before Proceeding 3 How to use this manual 3 Checking supplied accessories 5 Part Names and Functions 6 Main unit 6 Remote control unit 7 Connection panel (PDP-607CMX 9 Connection panel (PDP-507CMX 10 Connection panel (PDP-427CMX 11 Installation and Connections 12 Installation of the unit 12 Connection to a personal computer 14 Audio connections 15 Power cord connection 16...
... 2 Before Proceeding 3 How to use this manual 3 Checking supplied accessories 5 Part Names and Functions 6 Main unit 6 Remote control unit 7 Connection panel (PDP-607CMX 9 Connection panel (PDP-507CMX 10 Connection panel (PDP-427CMX 11 Installation and Connections 12 Installation of the unit 12 Connection to a personal computer 14 Audio connections 15 Power cord connection 16...
User Manual
Page 8
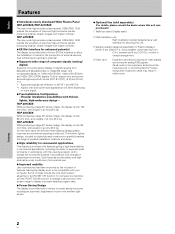
.... Such features provide safety and highendurance under conditions of commercial use. ¶ Improved usability User convenience has been improved by Pioneer. Broader installation possibilities with your computer. The thinner, lighter design, coupled to high-endurance construction greatly broadens the range of ...and 8 cm (3-3/16 in.) woofer in vertical arrangement. 4 Video card: Expansion card allows viewing of video signals and computer analog RGB signals. PDP-427CMX: While producing a large 42" screen image, the display is only 122 mm thick, and weighs in at only 62.0 kg. Cards used ...
.... Such features provide safety and highendurance under conditions of commercial use. ¶ Improved usability User convenience has been improved by Pioneer. Broader installation possibilities with your computer. The thinner, lighter design, coupled to high-endurance construction greatly broadens the range of ...and 8 cm (3-3/16 in.) woofer in vertical arrangement. 4 Video card: Expansion card allows viewing of video signals and computer analog RGB signals. PDP-427CMX: While producing a large 42" screen image, the display is only 122 mm thick, and weighs in at only 62.0 kg. Cards used ...
User Manual
Page 11
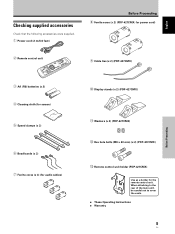
... Checking supplied accessories Check that the following accessories were supplied. 1 Power cord (2 m/6.6 feet) 2 Remote control unit Before Proceeding 8 Ferrite cores (x 2) (PDP-427CMX: for power cord) 9 Cable ties (x 2) (PDP-427CMX) Before Proceeding 3 AA (R6) batteries (x 2) 4 Cleaning cloth (for screen) 5 Speed clamps (x 3) 6 Bead bands (x 3) 7 Ferrite cores (x 3) (for the remote control unit. When attaching to the rear...
... Checking supplied accessories Check that the following accessories were supplied. 1 Power cord (2 m/6.6 feet) 2 Remote control unit Before Proceeding 8 Ferrite cores (x 2) (PDP-427CMX: for power cord) 9 Cable ties (x 2) (PDP-427CMX) Before Proceeding 3 AA (R6) batteries (x 2) 4 Cleaning cloth (for screen) 5 Speed clamps (x 3) 6 Bead bands (x 3) 7 Ferrite cores (x 3) (for the remote control unit. When attaching to the rear...
User Manual
Page 12
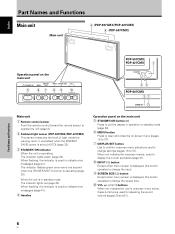
... in standby mode: The indicator lights red (page 20). When flashing, the indicator is operating (page 25). VOL + 89 0 PDP-507CMX PDP-427CMX 1 STANDBY ON 23 PDP-607CMX 31 Main unit 1 Remote control sensor Point the remote control toward the remote sensor to operate the unit (page 8). 2 Ambient...when the [POWER MGT.] function is used to indicate error messages (page 41). English Part Names and Functions Main unit Main unit 4 (PDP-507CMX/PDP-427CMX) 4 (PDP-607CMX) Operation panel on -screen menu (pages 18 to 37). 7 DISPLAY/SET button Use to confirm onscreen menu selections, and to ...
... in standby mode: The indicator lights red (page 20). When flashing, the indicator is operating (page 25). VOL + 89 0 PDP-507CMX PDP-427CMX 1 STANDBY ON 23 PDP-607CMX 31 Main unit 1 Remote control sensor Point the remote control toward the remote sensor to operate the unit (page 8). 2 Ambient...when the [POWER MGT.] function is used to indicate error messages (page 41). English Part Names and Functions Main unit Main unit 4 (PDP-507CMX/PDP-427CMX) 4 (PDP-607CMX) Operation panel on -screen menu (pages 18 to 37). 7 DISPLAY/SET button Use to confirm onscreen menu selections, and to ...
User Manual
Page 15
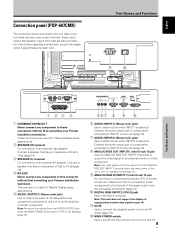
...connection of 6 Ω to 16 Ω (page 15). 4 RS-232C Never connect any component to this connector without first consulting your Pioneer installation technician. AC IN Use to connect the supplied power cord to an AC outlet (page 16). = MAIN POWER switch Use to switch the...main power of components connected to INPUT2 to these connectors without first consulting your Pioneer installation technician. Connect a speaker that has an impedance of an external left speaker. English Connection panel (PDP-607CMX) The connection panel is selected. Connect the audio output jack of the...
...connection of 6 Ω to 16 Ω (page 15). 4 RS-232C Never connect any component to this connector without first consulting your Pioneer installation technician. AC IN Use to connect the supplied power cord to an AC outlet (page 16). = MAIN POWER switch Use to switch the...main power of components connected to INPUT2 to these connectors without first consulting your Pioneer installation technician. Connect a speaker that has an impedance of an external left speaker. English Connection panel (PDP-607CMX) The connection panel is selected. Connect the audio output jack of the...

User Manual
Page 16
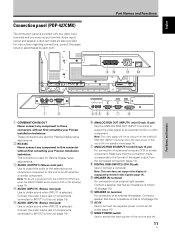
... is used for Plasma Display setup adjustments. 5 AUDIO (OUTPUT) (Stereo mini jack) Use to these connectors without first consulting your Pioneer installation technician. English Part Names and Functions Connection panel (PDP-507CMX) The connection panel is selected. Audio input/ output and speaker output terminals are used for Plasma Display setup adjustments. 4 RS... and one video output terminal. Note: This unit does not support the display of components connected to INPUT2 to this connector without first consulting your Pioneer installation technician.
... is used for Plasma Display setup adjustments. 5 AUDIO (OUTPUT) (Stereo mini jack) Use to these connectors without first consulting your Pioneer installation technician. English Part Names and Functions Connection panel (PDP-507CMX) The connection panel is selected. Audio input/ output and speaker output terminals are used for Plasma Display setup adjustments. 4 RS... and one video output terminal. Note: This unit does not support the display of components connected to INPUT2 to this connector without first consulting your Pioneer installation technician.
User Manual
Page 17
...this unit to obtain sound when INPUT1 is provided with two video input terminals and one video output terminal. English Connection panel (PDP-427CMX) The connection panel is selected. Note: No sound is selected. Note: The video signal will not be output from the AUDIO... of copyguard-protected video signals (page 14). 9 SPEAKER (R) terminal For connection of 6 Ω to these connectors without first consulting your Pioneer installation technician. Part Names and Functions 90 -= Part Names and Functions IN OUT COMBINATION RS-232C 1 2 1 COMBINATION IN/OUT Never connect...
...this unit to obtain sound when INPUT1 is provided with two video input terminals and one video output terminal. English Connection panel (PDP-427CMX) The connection panel is selected. Note: No sound is selected. Note: The video signal will not be output from the AUDIO... of copyguard-protected video signals (page 14). 9 SPEAKER (R) terminal For connection of 6 Ω to these connectors without first consulting your Pioneer installation technician. Part Names and Functions 90 -= Part Names and Functions IN OUT COMBINATION RS-232C 1 2 1 COMBINATION IN/OUT Never connect...
User Manual
Page 18
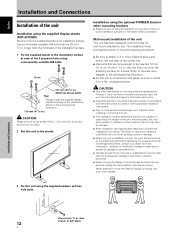
... by two persons holding only one of this unit using the supplied washers and hex hole bolts. Installation using the supplied display stands (PDP-427CMX) Be sure to fix the supplied stands to the side view diagram in .) longer than the professional installation technician or service personnel..... Wall-mount installation of this unit in 4 or more locations above and below, left and right of the unit Installation using the optional PIONEER stand or other mounting brackets ÷ Please be a stable, flat, and even surface. If other applicable installation instructions. ÷ Two or...
... by two persons holding only one of this unit using the supplied washers and hex hole bolts. Installation using the supplied display stands (PDP-427CMX) Be sure to fix the supplied stands to the side view diagram in .) longer than the professional installation technician or service personnel..... Wall-mount installation of this unit in 4 or more locations above and below, left and right of the unit Installation using the optional PIONEER stand or other mounting brackets ÷ Please be a stable, flat, and even surface. If other applicable installation instructions. ÷ Two or...
User Manual
Page 19
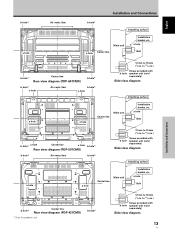
...Attaching surface a hole a hole Main unit Center line Installation bracket, etc. a hole Bolt b hole* a hole Center line a hole b hole* Rear view diagram (PDP-507CMX) b hole* Air vents (fan) b hole* 12 mm to 11/16 in . a hole Bolt Français Installation and Connections b hole* Center line ...b hole* a hole Air vents (fan) b hole* a hole 12 mm to 18 mm (1/2 in . a hole Bolt Center line b hole* Rear view diagram (PDP-427CMX) * Only for speaker unit b hole* 12 mm to 18 mm (1/2 in . to 11/16 in .) Screw provided with b hole speaker unit (sold separately) Side...
...Attaching surface a hole a hole Main unit Center line Installation bracket, etc. a hole Bolt b hole* a hole Center line a hole b hole* Rear view diagram (PDP-507CMX) b hole* Air vents (fan) b hole* 12 mm to 11/16 in . a hole Bolt Français Installation and Connections b hole* Center line ...b hole* a hole Air vents (fan) b hole* a hole 12 mm to 18 mm (1/2 in . a hole Bolt Center line b hole* Rear view diagram (PDP-427CMX) * Only for speaker unit b hole* 12 mm to 18 mm (1/2 in . to 11/16 in .) Screw provided with b hole speaker unit (sold separately) Side...
User Manual
Page 22
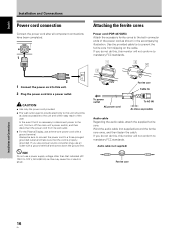
... core. Do not use a three-core power cord with a ground terminal and screw down the ground line. AC IN 1 Attaching the ferrite cores Power cord (PDP-427CMX) Attach the accessory ferrite cores to the both connector ends of the power cord as possible to this may cause fire or electric shock. CAUTION...
... core. Do not use a three-core power cord with a ground terminal and screw down the ground line. AC IN 1 Attaching the ferrite cores Power cord (PDP-427CMX) Attach the accessory ferrite cores to the both connector ends of the power cord as possible to this may cause fire or electric shock. CAUTION...
User Manual
Page 23
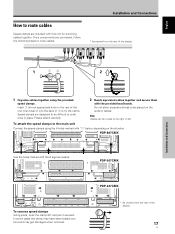
... once in place. To attach the speed clamps to the main unit Connect the speed clamps using the provided speed clamps. PDP-427CMX * As viewed from the rear of cables. PDP-607CMX Use the holes marked with the provided bead bands. Speed clamps are designed to be placed on the ends of the... on the rear of the unit, then snap 2 into the back of the display. 17 En Note Cables can be routed to fix the clamp. PDP-507CMX To remove speed clamps Using pliers, twist the clamp 90° and pull it outward. In some cases the clamp may have deteriorated over...
... once in place. To attach the speed clamps to the main unit Connect the speed clamps using the provided speed clamps. PDP-427CMX * As viewed from the rear of cables. PDP-607CMX Use the holes marked with the provided bead bands. Speed clamps are designed to be placed on the ends of the... on the rear of the unit, then snap 2 into the back of the display. 17 En Note Cables can be routed to fix the clamp. PDP-507CMX To remove speed clamps Using pliers, twist the clamp 90° and pull it outward. In some cases the clamp may have deteriorated over...
User Manual
Page 28
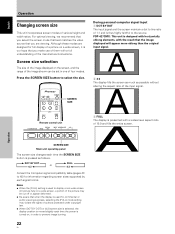
... signal. A 3 FULL The display is pressed as possible without altering the aspect ratio of 16:9 and fills the entire screen. Although these modes are viewing. PDP-427CMX: This unit is our hope that you make use of them with the result that when the display is used to display a non-wide screen...
... signal. A 3 FULL The display is pressed as possible without altering the aspect ratio of 16:9 and fills the entire screen. Although these modes are viewing. PDP-427CMX: This unit is our hope that you make use of them with the result that when the display is used to display a non-wide screen...
User Manual
Page 38
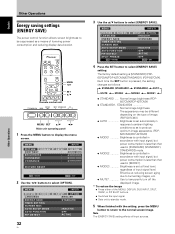
... MODE2 2 MODE1 2 ÷ STANDARD ...... MENU PICTURE SCREEN LANGUAGE ENERGY SAVE TIMER SETTING S C R E E N M G T. Normal image brightness (PDP607CMX/PDP-427CMX) ÷ STANDARD1, STANDARD2 Normal image brightness. Effective at fixed level, regardless of the MENU, DISPLAY, SUB INPUT, SPLIT, SWAP, or PIP SHIFT buttons. ÷...input signal, but power consumption is less than that used in [MODE1]. ÷ MODE3 Brightness is [STANDARD] (PDP607CMX/PDP-427CMX)/[STANDARD1] (PDP-507CMX). VOL + MENU SET 5/∞ 2/3 Main unit operating panel 1 Press the MENU button to the normal screen...
... MODE2 2 MODE1 2 ÷ STANDARD ...... MENU PICTURE SCREEN LANGUAGE ENERGY SAVE TIMER SETTING S C R E E N M G T. Normal image brightness (PDP607CMX/PDP-427CMX) ÷ STANDARD1, STANDARD2 Normal image brightness. Effective at fixed level, regardless of the MENU, DISPLAY, SUB INPUT, SPLIT, SWAP, or PIP SHIFT buttons. ÷...input signal, but power consumption is less than that used in [MODE1]. ÷ MODE3 Brightness is [STANDARD] (PDP607CMX/PDP-427CMX)/[STANDARD1] (PDP-507CMX). VOL + MENU SET 5/∞ 2/3 Main unit operating panel 1 Press the MENU button to the normal screen...
User Manual
Page 44
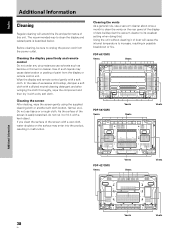
... the power cord from the display or remote control unit. Wipe the display and remote control gently with a dry soft cloth. PDP-607CMX Vents Vents PDP-507CMX Vents Vents Vents Vents PDP-427CMX Vents Vents Vents Vents Additional Information Vents Vents 38 En Before cleaning, be sure to clean the display and related parts...
... the power cord from the display or remote control unit. Wipe the display and remote control gently with a dry soft cloth. PDP-607CMX Vents Vents PDP-507CMX Vents Vents Vents Vents PDP-427CMX Vents Vents Vents Vents Additional Information Vents Vents 38 En Before cleaning, be sure to clean the display and related parts...
User Manual
Page 48
... 3-29/32 in. (D: Not including handles) Weight 35.5 kg (78.3 lbs.) Operating temperature range 0 °C to 40 °C General (PDP-427CMX) Light emission panel 42V type AC Plasma Panel 92.16 cm (W) x 51.53 cm (H) x 105.59 cm (diagonal) Number of pixels 1024... mVrms/more than 10 kΩ Output AUDIO INPUT (for power cord 2 Cable ties (PDP-427CMX 2 Display stands (PDP-427CMX 2 Washers (PDP-427CMX 2 Hex hole bolts (M8 x 40 mm) (PDP-427CMX 2 Remote control unit holder (PDP-427CMX 1 Operating Instructions 1 Warranty 1 ÷ Due to improvements, specifications and design are subject...
... 3-29/32 in. (D: Not including handles) Weight 35.5 kg (78.3 lbs.) Operating temperature range 0 °C to 40 °C General (PDP-427CMX) Light emission panel 42V type AC Plasma Panel 92.16 cm (W) x 51.53 cm (H) x 105.59 cm (diagonal) Number of pixels 1024... mVrms/more than 10 kΩ Output AUDIO INPUT (for power cord 2 Cable ties (PDP-427CMX 2 Display stands (PDP-427CMX 2 Washers (PDP-427CMX 2 Hex hole bolts (M8 x 40 mm) (PDP-427CMX 2 Remote control unit holder (PDP-427CMX 1 Operating Instructions 1 Warranty 1 ÷ Due to improvements, specifications and design are subject...
User Manual
Page 50
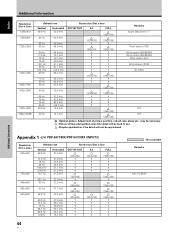
Additional Information Appendix 1 -2/4: PDP-607CMX/PDP-507CMX (INPUT2) Resolution (Dot x Line) 640x480 720x400 848x480 852x480 800x600 Refresh rate Vertical 59.9 Hz Horizontal 31.5 kHz 72.8 Hz 75 Hz 85 Hz 100.4 ...
Additional Information Appendix 1 -2/4: PDP-607CMX/PDP-507CMX (INPUT2) Resolution (Dot x Line) 640x480 720x400 848x480 852x480 800x600 Refresh rate Vertical 59.9 Hz Horizontal 31.5 kHz 72.8 Hz 75 Hz 85 Hz 100.4 ...
User Manual
Page 53
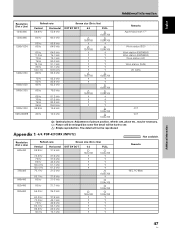
... position, refresh rate, phase etc., may be necessary. : Picture will be enlarged but some fine detail will not be hard to see. : Simple reproduction. Appendix 1 -4/4: PDP-427CMX (INPUT2) Resolution (Dot x Line) 640x480 720x400 848x480 852x480 800x600 Refresh rate Vertical 59.9 Hz Horizontal 31.5 kHz 72.8 Hz 75 Hz 85 Hz 100.4 Hz...
... position, refresh rate, phase etc., may be necessary. : Picture will be enlarged but some fine detail will not be hard to see. : Simple reproduction. Appendix 1 -4/4: PDP-427CMX (INPUT2) Resolution (Dot x Line) 640x480 720x400 848x480 852x480 800x600 Refresh rate Vertical 59.9 Hz Horizontal 31.5 kHz 72.8 Hz 75 Hz 85 Hz 100.4 Hz...
Brochure
Page 2
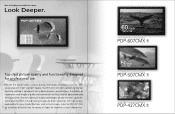
... Plasma Display PDP-607CMX inch 1365x768 - 50-Inch WXGA Professional Plasma Display PDP-507CMX 1, 42-Inch XGA Professional Plasma Display PDP-427CMX PDP-427CMX it convenient for in plasma display technology, introduces a new 42" PDP to convey all displays are bright and crisp. Pioneer's advanced imaging... high quality, combined with many handy functions such as Dual Screen, make the PDP-427CMX an extremely effective way to complement its 60" and 50" models. Look Deeper. Pioneer, the world leader in -house business presentations, the display of important visual information...
... Plasma Display PDP-607CMX inch 1365x768 - 50-Inch WXGA Professional Plasma Display PDP-507CMX 1, 42-Inch XGA Professional Plasma Display PDP-427CMX PDP-427CMX it convenient for in plasma display technology, introduces a new 42" PDP to convey all displays are bright and crisp. Pioneer's advanced imaging... high quality, combined with many handy functions such as Dual Screen, make the PDP-427CMX an extremely effective way to complement its 60" and 50" models. Look Deeper. Pioneer, the world leader in -house business presentations, the display of important visual information...


