
Owner's Manual
Page 8
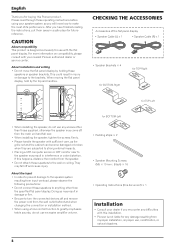
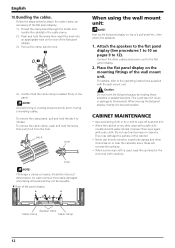
... the wall outlet beforehand when changing the connection or installation method. • When using your nearest Pioneer authorized dealer or service center. CAUTION About compatibility This product is not liable for future reference. for BOTTOM-Left • Padding strips × 2 • Speaker Mounting Screws (M5 × 10 mm : Black) × 16 • Operating Instructions (this installation. • Pioneer is designed exclusively for use excessive amplifier volume. This...
... the wall outlet beforehand when changing the connection or installation method. • When using your nearest Pioneer authorized dealer or service center. CAUTION About compatibility This product is not liable for future reference. for BOTTOM-Left • Padding strips × 2 • Speaker Mounting Screws (M5 × 10 mm : Black) × 16 • Operating Instructions (this installation. • Pioneer is designed exclusively for use excessive amplifier volume. This...
Owner's Manual
Page 9
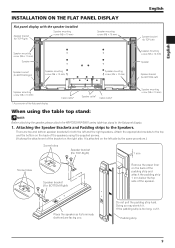
... (bottom) are top and bottom speaker brackets for BOTTOM-Left) Speaker mounting screw (M5 × 10 mm) *: Accessories of the flat panel display Cable clamp* Speaker cable* Cable clamp* Speaker mounting screw (M5 × 10 mm) When using the table top stand: NOTE: Before attaching the speaker, please attach the KRP-TS02/KRP-SW01 series table top stand to the top and the bottom on the back of the speakers using the supplied screws. (It shows the attachment...
... (bottom) are top and bottom speaker brackets for BOTTOM-Left) Speaker mounting screw (M5 × 10 mm) *: Accessories of the flat panel display Cable clamp* Speaker cable* Cable clamp* Speaker mounting screw (M5 × 10 mm) When using the table top stand: NOTE: Before attaching the speaker, please attach the KRP-TS02/KRP-SW01 series table top stand to the top and the bottom on the back of the speakers using the supplied screws. (It shows the attachment...
Owner's Manual
Page 10
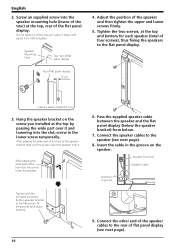
... wide part of the hole of flat panel display 5 mm 4. Tighten with about 5 mm 3. Connect the speaker cables to the flat panel display. Hang the speaker bracket on the speaker. Pass the supplied speaker cable between the speaker and the flat panel display (below the speaker bracket) from below. 7. screw in groove 9. English 2. Speaker Mounting Hole Top, rear of flat panel display Top of the speaker bracket (top) over the screw, lower the speaker. Adjust the position of about 5 mm left to the flat screen TV...
... wide part of the hole of flat panel display 5 mm 4. Tighten with about 5 mm 3. Connect the speaker cables to the flat panel display. Hang the speaker bracket on the speaker. Pass the supplied speaker cable between the speaker and the flat panel display (below the speaker bracket) from below. 7. screw in groove 9. English 2. Speaker Mounting Hole Top, rear of flat panel display Top of the speaker bracket (top) over the screw, lower the speaker. Adjust the position of about 5 mm left to the flat screen TV...
Owner's Manual
Page 11
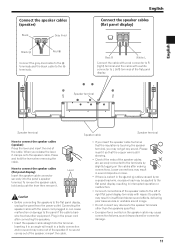
... speaker. English Connect the speaker cables (speaker) Black Gray lined Black Red Connect the gray-lined cable to the terminals and the black cable to the flat panel display, unplug the panel from the power outlet. English Connect the speaker cables (flat panel display) Red: R White: L Connect the cable with a red connector to R (right) terminal and the cable with the power cord plugged in can cause malfunction or damage to the flat panel display, resulting in the power cord after making connections. How to L (left or right flat panel display...
... speaker. English Connect the speaker cables (speaker) Black Gray lined Black Red Connect the gray-lined cable to the terminals and the black cable to the flat panel display, unplug the panel from the power outlet. English Connect the speaker cables (flat panel display) Red: R White: L Connect the cable with a red connector to R (right) terminal and the cable with the power cord plugged in can cause malfunction or damage to the flat panel display, resulting in the power cord after making connections. How to L (left or right flat panel display...
Owner's Manual
Page 12
... remove the clamp band, pull and hold the levers then insert the hook into an appropriate hole on top of deterioration. For details, refer to 12). Place the flat panel display on pages 9 to the operating instructions supplied with a dry cloth. Speaker cable Cable clamp Cable clamp 12 Attach the speakers to the flat panel display (See procedures 1 to 10 on the mounting fittings of the wall mount...
... remove the clamp band, pull and hold the levers then insert the hook into an appropriate hole on top of deterioration. For details, refer to 12). Place the flat panel display on pages 9 to the operating instructions supplied with a dry cloth. Speaker cable Cable clamp Cable clamp 12 Attach the speakers to the flat panel display (See procedures 1 to 10 on the mounting fittings of the wall mount...
Owner's Manual
Page 13
... prevent potential negative effects on the environment and human health. input 18 W Rated input 6 W Crossover frequency 3 kHz External Dimensions 82 (W) mm × 723 (H) mm × 64 (D) mm English Weight : Speaker (one ). There is a separate collection system for the...2008 Pioneer Corporation. English SPECIFICATIONS Cabinet Bass-reflex type Used speaker (two-way system): Woofer (for low tones 4.8 cm × 13 cm cone type Tweeter (for two speakers Speaker Brackets TOP-Left × 1 BOTTOM-Left × 1 TOP-Right × 1 BOTTOM-Right × 1 Speaker Mounting Screws (M5...
... prevent potential negative effects on the environment and human health. input 18 W Rated input 6 W Crossover frequency 3 kHz External Dimensions 82 (W) mm × 723 (H) mm × 64 (D) mm English Weight : Speaker (one ). There is a separate collection system for the...2008 Pioneer Corporation. English SPECIFICATIONS Cabinet Bass-reflex type Used speaker (two-way system): Woofer (for low tones 4.8 cm × 13 cm cone type Tweeter (for two speakers Speaker Brackets TOP-Left × 1 BOTTOM-Left × 1 TOP-Right × 1 BOTTOM-Right × 1 Speaker Mounting Screws (M5...


