Owner's Manual
Page 2
... openings. If you will not completely shut off all instructions. 5) Do not use attachments/accessories specified by the manufacturer. 12) Use only with the cart, stand, tripod, bracket, or table specified by the manufacturer, or sold with the product will expose you to chemicals listed on this apparatus during lightning storms...
... openings. If you will not completely shut off all instructions. 5) Do not use attachments/accessories specified by the manufacturer. 12) Use only with the cart, stand, tripod, bracket, or table specified by the manufacturer, or sold with the product will expose you to chemicals listed on this apparatus during lightning storms...
Owner's Manual
Page 3
... English TABLE OF CONTENTS Congratulations on the Remote Control ...11 2 Install Your Flat Panel Display ...13 2.1 Use the Optional Table Top Stand (Stand) or Equivalent Items 13 2.2 Use the Optional Brackets or Equivalent Items ...14 2.3 Check the Location for Suitability...15 2.4 Lift and/.... It's a world without boundaries. We hope you enjoy the experience of the best entertainment experiences possible. KURO is the future of a Pioneer KURO monitor. TABLE OF CONTENTS 1 Introduction to the Flat Panel Displays 6 1.1 Flat Panel Display Shipment Checklist ...6 1.2 Control Options: Get ...
... English TABLE OF CONTENTS Congratulations on the Remote Control ...11 2 Install Your Flat Panel Display ...13 2.1 Use the Optional Table Top Stand (Stand) or Equivalent Items 13 2.2 Use the Optional Brackets or Equivalent Items ...14 2.3 Check the Location for Suitability...15 2.4 Lift and/.... It's a world without boundaries. We hope you enjoy the experience of the best entertainment experiences possible. KURO is the future of a Pioneer KURO monitor. TABLE OF CONTENTS 1 Introduction to the Flat Panel Displays 6 1.1 Flat Panel Display Shipment Checklist ...6 1.2 Control Options: Get ...
Owner's Manual
Page 6
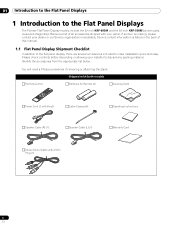
... below. You will need a Philips screwdriver if removing or attaching the stand. If an item is missing, please contact your installer to the Flat Panel Displays The Pioneer Flat Panel Display models include the 60-inch KRP-600M and the 50-inch KRP-500M (screen sizes measured diagonally). 01 Introduction to the Flat Panel Displays...
... below. You will need a Philips screwdriver if removing or attaching the stand. If an item is missing, please contact your installer to the Flat Panel Displays The Pioneer Flat Panel Display models include the 60-inch KRP-600M and the 50-inch KRP-500M (screen sizes measured diagonally). 01 Introduction to the Flat Panel Displays...
Owner's Manual
Page 13
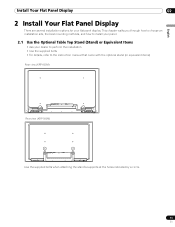
...; Use the supplied bolts • For details, refer to the instruction manual that came with the optional stand (or equivalent items) Rear view (KRP-600M) Rear view (KRP-500M) Use the supplied bolts when attaching the stand's supports at the holes indicated by a circle. 13 En This chapter walks you through how to choose an...
...; Use the supplied bolts • For details, refer to the instruction manual that came with the optional stand (or equivalent items) Rear view (KRP-600M) Rear view (KRP-500M) Use the supplied bolts when attaching the stand's supports at the holes indicated by a circle. 13 En This chapter walks you through how to choose an...
Owner's Manual
Page 15
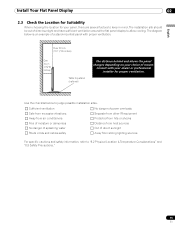
... of mount. English Over 50 cm (19 11/16 inches) Over 10 cm (3 15/16 inches) Table top stand (optional) The distance behind and above the panel changes depending on your choice of a stand-mounted panel with your dealer or professional installer for your panel, there are several factors to "8.2 Physical Location...
... of mount. English Over 50 cm (19 11/16 inches) Over 10 cm (3 15/16 inches) Table top stand (optional) The distance behind and above the panel changes depending on your choice of a stand-mounted panel with your dealer or professional installer for your panel, there are several factors to "8.2 Physical Location...
Owner's Manual
Page 16
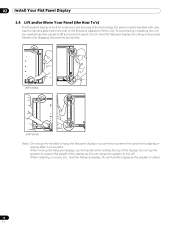
... slipping or tipping after it is built for endurance but because of the display. When installing on a rack, etc., hold the display by its handles. (KRP-600M) (KRP-500M) Notes: Do not use the handle while holding only a single handle or by dragging the panel by the speaker or...
... slipping or tipping after it is built for endurance but because of the display. When installing on a rack, etc., hold the display by its handles. (KRP-600M) (KRP-500M) Notes: Do not use the handle while holding only a single handle or by dragging the panel by the speaker or...

Owner's Manual
Page 17
...as commercially available wood screws. Do not use bare wires for the different mounting and anchoring options. Anchor the Panel When Using a Stand When using the stand, follow the steps below. The hardware size and strength depends on the back of the wire is introduced into the wall or ... mm, length 12 mm to 18 mm (0.5 inches to 0.7 inches) To anchor the panel when using a stand, stabilize the panel to anchor the metal fittings when mounting on the back of the panel. (KRP-600M) 2 ) Sink the fittings into the ventilation port on the composition and thickness of 4 mm (5/32 inch) ...
...as commercially available wood screws. Do not use bare wires for the different mounting and anchoring options. Anchor the Panel When Using a Stand When using the stand, follow the steps below. The hardware size and strength depends on the back of the wire is introduced into the wall or ... mm, length 12 mm to 18 mm (0.5 inches to 0.7 inches) To anchor the panel when using a stand, stabilize the panel to anchor the metal fittings when mounting on the back of the panel. (KRP-600M) 2 ) Sink the fittings into the ventilation port on the composition and thickness of 4 mm (5/32 inch) ...
Owner's Manual
Page 18
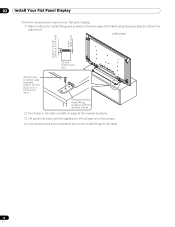
... steps below to secure your flat panel display. 1 ) Mark locations for metal fittings and screws on the back edge of the table using the panel stand to the table. 18 En Wood screw (commercially available, 4 mm x 20 mm (5/32 inch × 13/16 inch) min.) Falling prevention metal fitting... (supplied with the optional stand) 2 ) Drill holes in the table or platform edge at the marked locations. 3 ) Lift panel into place with the assistance with at least one other person. 4 ) Use wood screws (not included) to secure the metal fittings to determine placement. (KRP-600M) 20 mm (13/16 inch...
... steps below to secure your flat panel display. 1 ) Mark locations for metal fittings and screws on the back edge of the table using the panel stand to the table. 18 En Wood screw (commercially available, 4 mm x 20 mm (5/32 inch × 13/16 inch) min.) Falling prevention metal fitting... (supplied with the optional stand) 2 ) Drill holes in the table or platform edge at the marked locations. 3 ) Lift panel into place with the assistance with at least one other person. 4 ) Use wood screws (not included) to secure the metal fittings to determine placement. (KRP-600M) 20 mm (13/16 inch...
Owner's Manual
Page 84
...rug or blanket. 8.2 Physical Location & Temperature Considerations Condensation may form on the surface or inside of accessories other than the Pioneer stand or installation brackets may cause the internal temperature to rise, resulting in instability and cause injury. Note: If you maintain ...or just after a heater or air conditioner is switched on. Using the unit without proper ventilation may result in a possible malfunction. Pioneer is condensation may damage the panel or cause a malfunction. 8.3 Usage Guidelines For maximum enjoyment of factors. For more installation information,...
...rug or blanket. 8.2 Physical Location & Temperature Considerations Condensation may form on the surface or inside of accessories other than the Pioneer stand or installation brackets may cause the internal temperature to rise, resulting in instability and cause injury. Note: If you maintain ...or just after a heater or air conditioner is switched on. Using the unit without proper ventilation may result in a possible malfunction. Pioneer is condensation may damage the panel or cause a malfunction. 8.3 Usage Guidelines For maximum enjoyment of factors. For more installation information,...
Owner's Manual
Page 87
...radiation. Turn OFF the panel before connecting any naked flame sources (such as inside a car or near a heater. Use with KRP-TS01 (Pioneer Corporation.) stand. To avoid danger please follow the instructions below when installing, operating, and cleaning your flat panel display. • Water &...liquid. WARNING: Do not use can result in electric shock and/or fire. D3-4-2-3-3_En CAUTION: This KRP-600M for use only with other stands is capable of resulting in instability causing possible injury. 8.9.2 Radio Interference Information to User Alteration or modifications ...
...radiation. Turn OFF the panel before connecting any naked flame sources (such as inside a car or near a heater. Use with KRP-TS01 (Pioneer Corporation.) stand. To avoid danger please follow the instructions below when installing, operating, and cleaning your flat panel display. • Water &...liquid. WARNING: Do not use can result in electric shock and/or fire. D3-4-2-3-3_En CAUTION: This KRP-600M for use only with other stands is capable of resulting in instability causing possible injury. 8.9.2 Radio Interference Information to User Alteration or modifications ...


