Owner's Manual
Page 3
...: Get to Know Your Flat Panel Display 7 1.2.1 Control Buttons and More on the Flat Panel Display 7 1.2.2 Operating the Remote Control ...9 1.2.3 Buttons on your purchase of a Pioneer KURO monitor. KURO is the future of Pioneer flat panel displays. We are felt and sounds can be tasted. An experience that set the KURO apart. We...
...: Get to Know Your Flat Panel Display 7 1.2.1 Control Buttons and More on the Flat Panel Display 7 1.2.2 Operating the Remote Control ...9 1.2.3 Buttons on your purchase of a Pioneer KURO monitor. KURO is the future of Pioneer flat panel displays. We are felt and sounds can be tasted. An experience that set the KURO apart. We...
Owner's Manual
Page 4
... 50 6.1.1 Use the Learning Function ...50 6.1.2 Assign a Manufacturing Code to the Remote Control 51 6.1.3 Issue a Library Search for a Manufacturer Code 51 6.1.4 Clear Added Manufacturer Codes from the Remote Control 52 6.1.5 Control a Pioneer Receiver ...52 6.1.6 Control a Cable (CBL) or Satellite (SAT) System 53 ...Input Name...58 6.3.2 Specify the HDMI Input Type ...59 6.3.3 Specify a Digital HDMI Signal Type ...59 6.4 Control Equipment with the Panel's Remote Through HDMI 60 6.4.1 Control an AV System...62 6.4.2 Control a Recorder ...63 6.4.3 Control a Player...63 6.4.4 Add an AV Amp ...
... 50 6.1.1 Use the Learning Function ...50 6.1.2 Assign a Manufacturing Code to the Remote Control 51 6.1.3 Issue a Library Search for a Manufacturer Code 51 6.1.4 Clear Added Manufacturer Codes from the Remote Control 52 6.1.5 Control a Pioneer Receiver ...52 6.1.6 Control a Cable (CBL) or Satellite (SAT) System 53 ...Input Name...58 6.3.2 Specify the HDMI Input Type ...59 6.3.3 Specify a Digital HDMI Signal Type ...59 6.4 Control Equipment with the Panel's Remote Through HDMI 60 6.4.1 Control an AV System...62 6.4.2 Control a Recorder ...63 6.4.3 Control a Player...63 6.4.4 Add an AV Amp ...
Owner's Manual
Page 5
...-Image Lag 85 8.7 Prevent Burning ...86 8.8 Safety Precautions...87 8.9 Legal Notices...87 8.9.1 Safety...87 8.9.2 Radio Interference...87 9 Appendix ...89 9.1 Manufacturer Codes to Program into the Remote Control 89 9.1.1 Cable...89 9.1.2 Satellite...90 9.1.3 VCR ...92 9.1.4 BDP (Blu-ray) ...95 9.1.5 DVD-R ...96 9.1.6 DVD...97 9.1.7 LD...99 9.2 Video/PC Signals (HDMI/DVI/Component/min...
...-Image Lag 85 8.7 Prevent Burning ...86 8.8 Safety Precautions...87 8.9 Legal Notices...87 8.9.1 Safety...87 8.9.2 Radio Interference...87 9 Appendix ...89 9.1 Manufacturer Codes to Program into the Remote Control 89 9.1.1 Cable...89 9.1.2 Satellite...90 9.1.3 VCR ...92 9.1.4 BDP (Blu-ray) ...95 9.1.5 DVD-R ...96 9.1.6 DVD...97 9.1.7 LD...99 9.2 Video/PC Signals (HDMI/DVI/Component/min...
Owner's Manual
Page 6
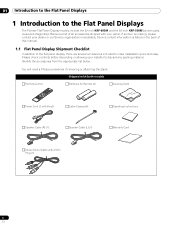
Shipped with both models Remote Control Batteries for Remote (2) Cleaning Cloth Power Cord (2 m/6.6 feet) Cable Clamps (4) Speaker Cable (R) (1) Speaker Cable (L) (1) Operating Instructions Warranty Card Stereo Sound Cable with your panel. If an item is... Checklist In addition to the flat panel display, there are several accessories included to the Flat Panel Displays The Pioneer Flat Panel Display models include the 60-inch KRP-600M and the 50-inch KRP-500M (screen sizes measured diagonally). You will need a Philips screwdriver if removing or attaching the stand. Please check ...
Shipped with both models Remote Control Batteries for Remote (2) Cleaning Cloth Power Cord (2 m/6.6 feet) Cable Clamps (4) Speaker Cable (R) (1) Speaker Cable (L) (1) Operating Instructions Warranty Card Stereo Sound Cable with your panel. If an item is... Checklist In addition to the flat panel display, there are several accessories included to the Flat Panel Displays The Pioneer Flat Panel Display models include the 60-inch KRP-600M and the 50-inch KRP-500M (screen sizes measured diagonally). You will need a Philips screwdriver if removing or attaching the stand. Please check ...
Owner's Manual
Page 7
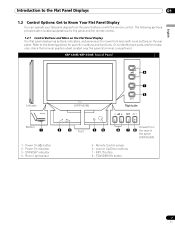
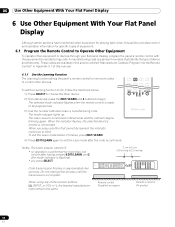
...on the Flat Panel Display Your flat panel display has buttons, indicators, and sensors on the rear panel. Power On indicator 3 - Remote Control sensor 6 - The following sections provide button locations/operations for specific locations and functions. Volume Up/Down buttons 7 - Refer to...Room Light sensor 3 Front 45 Viewed from the panel buttons or with more buttons on the lower front bezel with the remote control. KRP-600M/KRP-500M: Face of the panel (KRP-500M) 5 - INPUT button 8 - STANDBY/ON button 7 En Introduction to the Flat Panel Displays 01 English 1.2 ...
...on the Flat Panel Display Your flat panel display has buttons, indicators, and sensors on the rear panel. Power On indicator 3 - Remote Control sensor 6 - The following sections provide button locations/operations for specific locations and functions. Volume Up/Down buttons 7 - Refer to...Room Light sensor 3 Front 45 Viewed from the panel buttons or with more buttons on the lower front bezel with the remote control. KRP-600M/KRP-500M: Face of the panel (KRP-500M) 5 - INPUT button 8 - STANDBY/ON button 7 En Introduction to the Flat Panel Displays 01 English 1.2 ...

Owner's Manual
Page 9
...chemical leaks in old batteries. Also, mixing different types or brands of time, remove the batteries. Note: If the flat panel display's remote control is not needed for the flat panel display is a powerful tool. Caution: When changing batteries, use only conventional non-rechargeable alkaline ...or manganese batteries(2). Dispose of the arrows. Load the supplied two AA size batteries by an incorrect type. If the remote control seems to your country/area. This section provides a brief introduction to be failing or is replaced by the negative polarity (-) ends...
...chemical leaks in old batteries. Also, mixing different types or brands of time, remove the batteries. Note: If the flat panel display's remote control is not needed for the flat panel display is a powerful tool. Caution: When changing batteries, use only conventional non-rechargeable alkaline ...or manganese batteries(2). Dispose of the arrows. Load the supplied two AA size batteries by an incorrect type. If the remote control seems to your country/area. This section provides a brief introduction to be failing or is replaced by the negative polarity (-) ends...

Owner's Manual
Page 10
... of issues that can affect your viewing room is naturally bright, change the batteries. Weak batteries in the area around the panel. If your remote control but the most common is weak batteries. Also consider other IR signals can cause communication to the panel's sensor. For easy operation, keep... deform. 10 En If the panel responds, change the position of less than 30 degrees. 7 m 30º (23 feet) 30º Sensor The remote control may not work properly if the sensor is left sitting in direct sunlight or very bright lighting. Objects and other equipment with your...
... of issues that can affect your viewing room is naturally bright, change the batteries. Weak batteries in the area around the panel. If your remote control but the most common is weak batteries. Also consider other IR signals can cause communication to the panel's sensor. For easy operation, keep... deform. 10 En If the panel responds, change the position of less than 30 degrees. 7 m 30º (23 feet) 30º Sensor The remote control may not work properly if the sensor is left sitting in direct sunlight or very bright lighting. Objects and other equipment with your...
Owner's Manual
Page 11
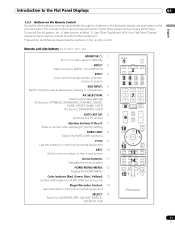
... Except for a few options, commands available through the buttons on the flat panel display are duplicated on the remote control. This section identifies and describes the buttons on the remote control. Remote: Left side buttons (top to bottom, left to right) MONITOR : 1 Turn On or place panel in Standby INPUT:...DVD/HDD RECEIVER VOL INPUT SELECT BDP EDIT/LEARN 15MONITOR STB LD VCR CBL DVD SAT DVR 11 En A later section entitled "6. The remote control can be programmed to the normal screen Arrow buttons: 11 Navigate the menu screens HOME MENU/MENU: 12 Display the HOME MENU ...
... Except for a few options, commands available through the buttons on the flat panel display are duplicated on the remote control. This section identifies and describes the buttons on the remote control. Remote: Left side buttons (top to bottom, left to right) MONITOR : 1 Turn On or place panel in Standby INPUT:...DVD/HDD RECEIVER VOL INPUT SELECT BDP EDIT/LEARN 15MONITOR STB LD VCR CBL DVD SAT DVR 11 En A later section entitled "6. The remote control can be programmed to the normal screen Arrow buttons: 11 Navigate the menu screens HOME MENU/MENU: 12 Display the HOME MENU ...
Owner's Manual
Page 12
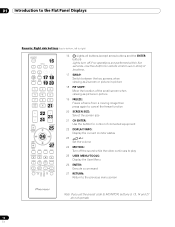
Use this button for remote control use in dimly lit locations. 17 SWAP: Switch between the two screens when viewing as 2-screen or picture-in-picture 18 PIP SHIFT: Move ... from a moving image then press again to MONITOR, buttons 9, 13, 14 and 21 do not operate. 12 En 01 Introduction to the Flat Panel Displays Remote: Right side buttons (top to bottom, left to right) MONITOR INPUT 1 2 3 16 4 5 6 7 8 SUB PIP 17 18 SPLIT INPUT SWAP SHIFT AV AUTO SCREEN 19 20...
Use this button for remote control use in dimly lit locations. 17 SWAP: Switch between the two screens when viewing as 2-screen or picture-in-picture 18 PIP SHIFT: Move ... from a moving image then press again to MONITOR, buttons 9, 13, 14 and 21 do not operate. 12 En 01 Introduction to the Flat Panel Displays Remote: Right side buttons (top to bottom, left to right) MONITOR INPUT 1 2 3 16 4 5 6 7 8 SUB PIP 17 18 SPLIT INPUT SWAP SHIFT AV AUTO SCREEN 19 20...
Owner's Manual
Page 24
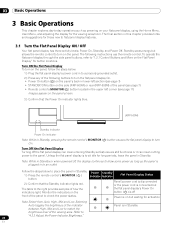
...button (a) on the panel's back in lower-left section (see page 7) • STANDBY/ON button on the side (KRP-600M) or rear (KRP-500M) of the panel (see page 7) • Remote control's MONITOR (a) button located in the upper left corner (see page 11) Images appear on the panel. Selecting Auto ... is on the panel, follow the steps below to place the panel in Standby. 1 ) Press the remote control's MONITOR ( a ) button. 2 ) Confirm that the Power On indicator lights blue. (KRP-500M) Standby indicator Power On indicator Note: While in Standby En The final section in this chapter provides ...
...button (a) on the panel's back in lower-left section (see page 7) • STANDBY/ON button on the side (KRP-600M) or rear (KRP-500M) of the panel (see page 7) • Remote control's MONITOR (a) button located in the upper left corner (see page 11) Images appear on the panel. Selecting Auto ... is on the panel, follow the steps below to place the panel in Standby. 1 ) Press the remote control's MONITOR ( a ) button. 2 ) Confirm that the Power On indicator lights blue. (KRP-500M) Standby indicator Power On indicator Note: While in Standby En The final section in this chapter provides ...
Owner's Manual
Page 25
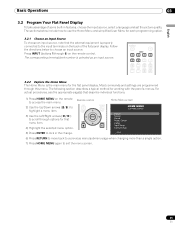
...the main menu for working with the panel's menus. For actual procedures, see the appropriate page(s) that describe individual functions. 1) Press HOME MENU on the remote to access the main menu. 2) Use the Up/Down arrows (/ ) to highlight a menu item. 3) Use the Left/Right arrows (... features, choose the input source, select a language and set the picture quality. The sections below to the input terminals on the remote control. Follow the directions below include how to use the Home Menu and simplified User Menu for that the external equipment is selected ...
...the main menu for working with the panel's menus. For actual procedures, see the appropriate page(s) that describe individual functions. 1) Press HOME MENU on the remote to access the main menu. 2) Use the Up/Down arrows (/ ) to highlight a menu item. 3) Use the Left/Right arrows (... features, choose the input source, select a language and set the picture quality. The sections below to the input terminals on the remote control. Follow the directions below include how to use the Home Menu and simplified User Menu for that the external equipment is selected ...
Owner's Manual
Page 26
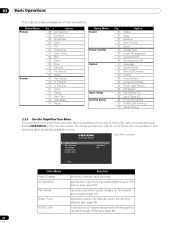
...-based sources (see page 42) places the panel into Standby when the set time elapses (see page 34) controls the connected equipment with the panel's remote through HDMI (see page 60) 26 En For actual procedures, refer to frequently used menus/submenus. Home Menu Picture Screen Pg 35 39 39 39... User Menu Input Change AV Selection Film Mode Sleep Timer KURO LINK Function switches external input sources selects from eight viewing modes depending on the remote control.
...-based sources (see page 42) places the panel into Standby when the set time elapses (see page 34) controls the connected equipment with the panel's remote through HDMI (see page 60) 26 En For actual procedures, refer to frequently used menus/submenus. Home Menu Picture Screen Pg 35 39 39 39... User Menu Input Change AV Selection Film Mode Sleep Timer KURO LINK Function switches external input sources selects from eight viewing modes depending on the remote control.

Owner's Manual
Page 33
Orbiter slightly changes the position of one hour after -image ghosts or burnin. Also, when the Orbiter function is on, only the remote's MONITOR (a) button and the panel's STANDBY/ON button are available. Note: The Video Pattern timer has priority over Sleep Timer, No Signal... steps below . 1 ) Access Orbiter through the Power Control menu. 2 ) Select an option from the submenu. To cancel the Video Pattern screen, press the remote's MONITOR (a) or press the panel's STANDBY/ON button. The Video Pattern screen appears. 3 ) Leave the panel alone for all available screen modes • PC...
Orbiter slightly changes the position of one hour after -image ghosts or burnin. Also, when the Orbiter function is on, only the remote's MONITOR (a) button and the panel's STANDBY/ON button are available. Note: The Video Pattern timer has priority over Sleep Timer, No Signal... steps below . 1 ) Access Orbiter through the Power Control menu. 2 ) Select an option from the submenu. To cancel the Video Pattern screen, press the remote's MONITOR (a) or press the panel's STANDBY/ON button. The Video Pattern screen appears. 3 ) Leave the panel alone for all available screen modes • PC...

Owner's Manual
Page 35
..., browse this chapter for the room light sensor, the AV Option or Selection depends upon the brightness of the environment and the movie on the remote control. Choose from among the seven AV Selections for an external AV Source. 1 ) Press AV SELECTION on screen. If the AV source is... a Game Control, select GAME and refer to "5.1.4 Set the Panel to Recognize a Game Console" for more information. 5.1.1 AV Source through the Remote Control Follow the directions below to set the mode for each input source) 3 ) Allow the AV Selection screen to the purpose for features and functions...
..., browse this chapter for the room light sensor, the AV Option or Selection depends upon the brightness of the environment and the movie on the remote control. Choose from among the seven AV Selections for an external AV Source. 1 ) Press AV SELECTION on screen. If the AV source is... a Game Control, select GAME and refer to "5.1.4 Set the Panel to Recognize a Game Console" for more information. 5.1.1 AV Source through the Remote Control Follow the directions below to set the mode for each input source) 3 ) Allow the AV Selection screen to the purpose for features and functions...
Owner's Manual
Page 38
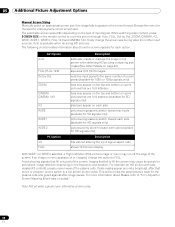
... may appear on the top and bottom on some pictures that are 16:9 letterbox bars may cause temporary or permanent image retention depending on the remote control to cycle the picture through Auto, FULL, Dot by Dot ZOOM CINEMA CINEMA 14:9 4:3 WIDE WIDE 1 WIDE 2 PC Option 4:3 FULL Description adds side masks...
... may appear on the top and bottom on some pictures that are 16:9 letterbox bars may cause temporary or permanent image retention depending on the remote control to cycle the picture through Auto, FULL, Dot by Dot ZOOM CINEMA CINEMA 14:9 4:3 WIDE WIDE 1 WIDE 2 PC Option 4:3 FULL Description adds side masks...

Owner's Manual
Page 47
... Picture-In-Picture (P-in -picture, and single-screen views. The pictures may be reversed (in 2-screen and P-in-P) or moved to various locations on the remote control. Additional Picture Adjustment Options 05 5.4 View in -P) English 5.4.1 Split / Swap / Shift the Screen To split the screen so that two input sources appear, press...
... Picture-In-Picture (P-in -picture, and single-screen views. The pictures may be reversed (in 2-screen and P-in-P) or moved to various locations on the remote control. Additional Picture Adjustment Options 05 5.4 View in -P) English 5.4.1 Split / Swap / Shift the Screen To split the screen so that two input sources appear, press...

Owner's Manual
Page 49
... the signal fails. In an earlier section entitled "4.2 Smart Starts for eight seconds, using the PC has no effect on the panel Notes: Pressing the remote's MONITOR (a) button or the panel's STANDBY/ON button reactivates the flat panel display. No Signal To save power and to Standby. Power Management When receiving...
... the signal fails. In an earlier section entitled "4.2 Smart Starts for eight seconds, using the PC has no effect on the panel Notes: Pressing the remote's MONITOR (a) button or the panel's STANDBY/ON button reactivates the flat panel display. No Signal To save power and to Standby. Power Management When receiving...
Owner's Manual
Page 50
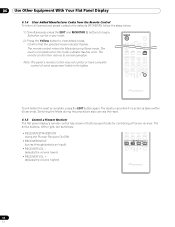
...sections have mentioned other equipment for playing back video, this manual. 6.1.1 Use the Learning Function The Learning function allows the panel's remote control to memorize codes to 2.0 inches) Code transmission finishes in approximately two seconds. When you press SELECT 2 cm to 5 ... a series of numbers that cannot be programmed. 3 ) Use the number buttons to blink. The Learn session is complete. Remote control (Supplied accessory) Remote control of the receiver buttons (a, INPUT, or VOL+/-), the learned manufacturer code remains the same. To exit the Learn mode...
...sections have mentioned other equipment for playing back video, this manual. 6.1.1 Use the Learning Function The Learning function allows the panel's remote control to memorize codes to 2.0 inches) Code transmission finishes in approximately two seconds. When you press SELECT 2 cm to 5 ... a series of numbers that cannot be programmed. 3 ) Use the number buttons to blink. The Learn session is complete. Remote control (Supplied accessory) Remote control of the receiver buttons (a, INPUT, or VOL+/-), the learned manufacturer code remains the same. To exit the Learn mode...

Owner's Manual
Page 51
...SELECT BDP EDIT/LEARN MONITOR STB LD VCR CBL DVD SAT DVR Factory default manufacture codes: STB (Set-top Box): Pioneer (0329) BDP/LD/DVD/DVR: Pioneer (2052) VCR (VTR): Pioneer (0058) 6.1.3 Issue a Library Search for a Manufacturer Code If the code for a particular device is ready to be... programmed. 2 ) Press and hold MONITOR a for at least two seconds. Another option is ready to control the device. The remote control then returns...
...SELECT BDP EDIT/LEARN MONITOR STB LD VCR CBL DVD SAT DVR Factory default manufacture codes: STB (Set-top Box): Pioneer (0329) BDP/LD/DVD/DVR: Pioneer (2052) VCR (VTR): Pioneer (0058) 6.1.3 Issue a Library Search for a Manufacturer Code If the code for a particular device is ready to be... programmed. 2 ) Press and hold MONITOR a for at least two seconds. Another option is ready to control the device. The remote control then returns...
Owner's Manual
Page 52
...is complete when the mode indicator flashes once. Switching the Mode during this procedure also cancels the reset. 6.1.5 Control a Pioneer Receiver The flat panel display's remote control has a bank of some equipment listed in any mode. 2 ) Press the Yellow button to normal operation. ...left to begin. Confirm that the selected mode indicator flashes. Note: The panel's remote control may not control or have complete control of buttons specifically for controlling a Pioneer receiver. The remote control then returns to clear added codes. The reset is cancelled if no action ...
...is complete when the mode indicator flashes once. Switching the Mode during this procedure also cancels the reset. 6.1.5 Control a Pioneer Receiver The flat panel display's remote control has a bank of some equipment listed in any mode. 2 ) Press the Yellow button to normal operation. ...left to begin. Confirm that the selected mode indicator flashes. Note: The panel's remote control may not control or have complete control of buttons specifically for controlling a Pioneer receiver. The remote control then returns to clear added codes. The reset is cancelled if no action ...


