Owner's Manual
Page 5
...Pioneer product. English Deutsch Français Italiano Nederlands Español Thank you for future reference. Contents 01 Controls and displays Front panel 7 Remote control 8 Display 10 02 Getting started Home theater sound setup 11 Using the Auto MCACC setup for optimal surround sound...sources 15 03 Listening to your system Auto listening mode 16 Listening in surround sound 16 Dolby Pro Logic II Music settings. . . . . . 16 Using Front Stage Surround Advance . . . 17 Using Advanced Surround 17 Listening in stereo 17 Listening with headphones 17 Listening with the Navigator ...
...Pioneer product. English Deutsch Français Italiano Nederlands Español Thank you for future reference. Contents 01 Controls and displays Front panel 7 Remote control 8 Display 10 02 Getting started Home theater sound setup 11 Using the Auto MCACC setup for optimal surround sound...sources 15 03 Listening to your system Auto listening mode 16 Listening in surround sound 16 Dolby Pro Logic II Music settings. . . . . . 16 Using Front Stage Surround Advance . . . 17 Using Advanced Surround 17 Listening in stereo 17 Listening with headphones 17 Listening with the Navigator ...
Owner's Manual
Page 6
06 Surround sound settings Using the Setup menu 28 07 Video Adjust menu Video Adjust menu 29 08 Initial Settings menu Using the Initial Settings menu 30 Video ... using HDMI 35 Switching the HDMI audio setting. . . . . .36 Resetting the HDMI connection 36 About HDMI 36 Using this unit with a Pioneer Flat Panel TV 36 SR+ Setup for Pioneer Flat Panel TVs 37 Switching on the SR+ mode 37 10 Additional information Optional system settings 38 Setting the sleep timer 38...
06 Surround sound settings Using the Setup menu 28 07 Video Adjust menu Video Adjust menu 29 08 Initial Settings menu Using the Initial Settings menu 30 Video ... using HDMI 35 Switching the HDMI audio setting. . . . . .36 Resetting the HDMI connection 36 About HDMI 36 Using this unit with a Pioneer Flat Panel TV 36 SR+ Setup for Pioneer Flat Panel TVs 37 Switching on the SR+ mode 37 10 Additional information Optional system settings 38 Setting the sleep timer 38...
Owner's Manual
Page 8
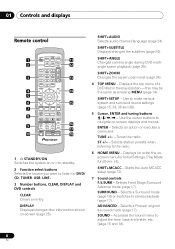
... setup (page 12). 7 Sound controls F.S.SURR - Selects Front Stage Surround Advance mode (page 17). SHIFT+SUBTITLE Displays/changes the subtitles (page 24). Selects a Pioneer original surround mode (page 17). SOUND - SHIFT+ANGLE Changes camera ...angle during DVD multiangle scene playback (page 25). Selects a Surround mode (page 16) or switches to navigate on-screen displays and menus. TUNE +/- - SHIFT+ZOOM Changes the screen zoom level (page 24). 4 TOP MENU - Use to make various system and surround sound...
... setup (page 12). 7 Sound controls F.S.SURR - Selects Front Stage Surround Advance mode (page 17). SHIFT+SUBTITLE Displays/changes the subtitles (page 24). Selects a Pioneer original surround mode (page 17). SOUND - SHIFT+ANGLE Changes camera ...angle during DVD multiangle scene playback (page 25). Selects a Surround mode (page 16) or switches to navigate on-screen displays and menus. TUNE +/- - SHIFT+ZOOM Changes the screen zoom level (page 24). 4 TOP MENU - Use to make various system and surround sound...
Owner's Manual
Page 10
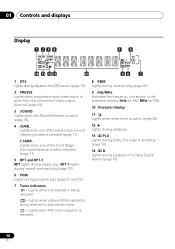
... signal is given from the component video output terminal (page 35). 3 SOUND Lights when the Sound Retriever is selected (page 17). 5 RPT and RPT-1 RPT lights during repeat play. Lights when one of the Front Stage Surround Advance mode is active (page 18). 4 SURR. Lights when FM mono...Lights during random play (page 21 and 23). 7 Tuner indicators - Lights when one -track play (page 22). 6 PGM Lights during playback of the Advanced surround listening modes is active (page 38). 12 Lights during playback. 13 2 PL II Lights during Dolby Pro Logic II decoding (page 16). 14 2...
... signal is given from the component video output terminal (page 35). 3 SOUND Lights when the Sound Retriever is selected (page 17). 5 RPT and RPT-1 RPT lights during repeat play. Lights when one of the Front Stage Surround Advance mode is active (page 18). 4 SURR. Lights when FM mono...Lights during random play (page 21 and 23). 7 Tuner indicators - Lights when one -track play (page 22). 6 PGM Lights during playback of the Advanced surround listening modes is active (page 38). 12 Lights during playback. 13 2 PL II Lights during Dolby Pro Logic II decoding (page 16). 14 2...
Owner's Manual
Page 11
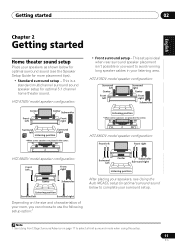
... more placement tips). • Standard surround setup - SL SR FL C FR HTZ-580DV model speaker configuration: Front left Front right Surround left Surround right Depending on page 17 to select a front surround mode when using this setup. 11 En HTZ-575DV model speaker configuration: • Front surround setup - This setup is a standard multichannel surround sound speaker setup for optimal 5.1 channel...
... more placement tips). • Standard surround setup - SL SR FL C FR HTZ-580DV model speaker configuration: Front left Front right Surround left Surround right Depending on page 17 to select a front surround mode when using this setup. 11 En HTZ-575DV model speaker configuration: • Front surround setup - This setup is a standard multichannel surround sound speaker setup for optimal 5.1 channel...
Owner's Manual
Page 12
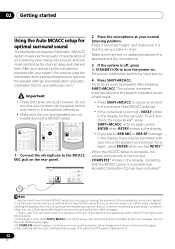
... (too much ambient noise, echo off Acoustic Calibration EQ. 12 En 02 Getting started Using the Auto MCACC setup for optimal surround sound The Multichannel Acoustic Calibration (MCACC) system measures the acoustic characteristics of your listening area, taking into account ambient noise and testing ...ZOOM 7 8 93 CLEAR TOP MENU DISPLAY 0 TUNE MENU SETUP ST HOME MENU ENTER SR ST RETURN MCACC TUNE TEST TONE F.S.SURR SURROUND ADVANCED SOUND TV CONTROL SLEEP INPUT CHANNEL VOLUME MUTE SHIFT VOLUME 1 Connect the microphone to turn the power on the rear panel. The volume increases...
... (too much ambient noise, echo off Acoustic Calibration EQ. 12 En 02 Getting started Using the Auto MCACC setup for optimal surround sound The Multichannel Acoustic Calibration (MCACC) system measures the acoustic characteristics of your listening area, taking into account ambient noise and testing ...ZOOM 7 8 93 CLEAR TOP MENU DISPLAY 0 TUNE MENU SETUP ST HOME MENU ENTER SR ST RETURN MCACC TUNE TEST TONE F.S.SURR SURROUND ADVANCED SOUND TV CONTROL SLEEP INPUT CHANNEL VOLUME MUTE SHIFT VOLUME 1 Connect the microphone to turn the power on the rear panel. The volume increases...
Owner's Manual
Page 16
...corresponding indicator lights in the front panel display. 2 Note that 's playing. • AUTO - Pro Logic II 5.1 channel surround sound, especially suited to include the surround speakers for a 'wraparound' effect. Extends the front stereo image to movie sources (use with any two-channel source) •...; STEREO - Auto listening mode (see above) • DOLBY PL (Dolby Pro Logic) - 4.1 channel surround sound (use with any source as it sound wider (higher settings) or narrower (lower settings). • DIMEN. (Dimension) - See Listening in stereo below Dolby Pro ...
...corresponding indicator lights in the front panel display. 2 Note that 's playing. • AUTO - Pro Logic II 5.1 channel surround sound, especially suited to include the surround speakers for a 'wraparound' effect. Extends the front stereo image to movie sources (use with any two-channel source) •...; STEREO - Auto listening mode (see above) • DOLBY PL (Dolby Pro Logic) - 4.1 channel surround sound (use with any source as it sound wider (higher settings) or narrower (lower settings). • DIMEN. (Dimension) - See Listening in stereo below Dolby Pro ...
Owner's Manual
Page 17
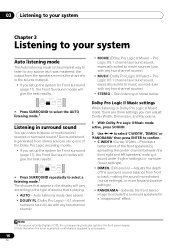
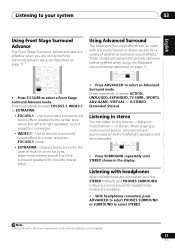
....1 0 TOP MENU TUNE MENU SETUP ST HOME MENU ENTER SR ST RETURN MCACC TUNE TEST TONE F.S.SURR SURROUND ADVANCED SOUND • Press F.S.SURR to select a Front Stage Surround Advance mode. in the display. Use to provide a rich surround sound effect directed to the center area where the left /right speakers and the subwoofer. Using Advanced...
....1 0 TOP MENU TUNE MENU SETUP ST HOME MENU ENTER SR ST RETURN MCACC TUNE TEST TONE F.S.SURR SURROUND ADVANCED SOUND • Press F.S.SURR to select a Front Stage Surround Advance mode. in the display. Use to provide a rich surround sound effect directed to the center area where the left /right speakers and the subwoofer. Using Advanced...
Owner's Manual
Page 18
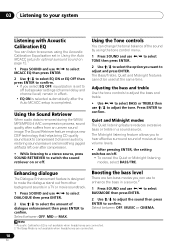
... you to confirm. Enhancing dialogue The Dialogue Enhancement feature is set in Using the Auto MCACC setup for optimal surround sound on /off but speaker settings (channel delay and channel level) remain in a sound source. Using the Tone controls You can use to enhance the bass in a TV or movie soundtrack. 1... press ENTER to confirm. • If you can change the tonal balance of movies at the same time. Press ENTER to hear effective surround sound of the sound by restoring sound pressure and smoothing jagged artifacts left over after the Auto MCACC setup is completed.
... you to confirm. Enhancing dialogue The Dialogue Enhancement feature is set in Using the Auto MCACC setup for optimal surround sound on /off but speaker settings (channel delay and channel level) remain in a sound source. Using the Tone controls You can use to enhance the bass in a TV or movie soundtrack. 1... press ENTER to confirm. • If you can change the tonal balance of movies at the same time. Press ENTER to hear effective surround sound of the sound by restoring sound pressure and smoothing jagged artifacts left over after the Auto MCACC setup is completed.
Owner's Manual
Page 28
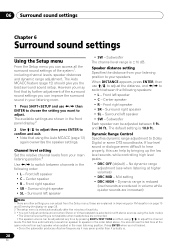
... speakers: • L - The test tone automatically moves from each speaker when seated in the order listed above. Press ENTER when you the best surround sound setup. Subwoofer The channel level range is 10.0 ft.. Center speaker • R - You should give you 're finished. • Since the...produces ultra-low frequencies it may find that using / to hear properly, this can help by further adjustment of the surround sound settings you can be adjusted at the same volume from speaker to Dolby Digital or some DTS soundtracks. Channel level setting Set the...
... speakers: • L - The test tone automatically moves from each speaker when seated in the order listed above. Press ENTER when you the best surround sound setup. Subwoofer The channel level range is 10.0 ft.. Center speaker • R - You should give you 're finished. • Since the...produces ultra-low frequencies it may find that using / to hear properly, this can help by further adjustment of the surround sound settings you can be adjusted at the same volume from speaker to Dolby Digital or some DTS soundtracks. Channel level setting Set the...
Owner's Manual
Page 36
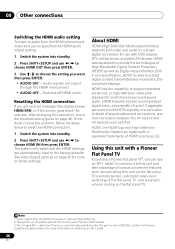
... below to reset the HDMI connection. 1 Switch the system into standby. 2 Press SHIFT+SETUP and use / to multichannel surround-sound audio. About HDMI HDMI (High Definition Multimedia Interface) supports both video and audio on a single digital connection for more information on obtaining... linear PCM only. 2 This system is compatible with HDTV signals), one specification. HDMI was developed to 2.2 gigabytes per second (with all Pioneer flat panel TVs from 2003 onward. 3 The 3-ringed SR+ cable from the HDMI interconnect, make sure you've specified the HDMI audio ...
... below to reset the HDMI connection. 1 Switch the system into standby. 2 Press SHIFT+SETUP and use / to multichannel surround-sound audio. About HDMI HDMI (High Definition Multimedia Interface) supports both video and audio on a single digital connection for more information on obtaining... linear PCM only. 2 This system is compatible with HDTV signals), one specification. HDMI was developed to 2.2 gigabytes per second (with all Pioneer flat panel TVs from 2003 onward. 3 The 3-ringed SR+ cable from the HDMI interconnect, make sure you've specified the HDMI audio ...
Owner's Manual
Page 44
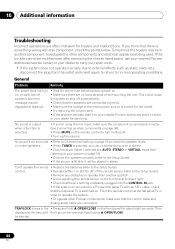
...remote sensor (refer to the Setup Guide). • Remove any obstacles or operate from the outlet and insert again to return to your nearest Pioneer authorized service center or your dealer for about eight seconds. Can't operate the remote • Replace the batteries (refer to shut off . ...work. • If the system does not operate normally due to a Pioneer flat panel TV with this component, check the points below. This could cause suddenly (an error the system to the Setup Guide). No sound from surround • Refer to Channel level setting on page 16). • ...
...remote sensor (refer to the Setup Guide). • Remove any obstacles or operate from the outlet and insert again to return to your nearest Pioneer authorized service center or your dealer for about eight seconds. Can't operate the remote • Replace the batteries (refer to shut off . ...work. • If the system does not operate normally due to a Pioneer flat panel TV with this component, check the points below. This could cause suddenly (an error the system to the Setup Guide). No sound from surround • Refer to Channel level setting on page 16). • ...


