
Owner's Manual
Page 4
... Installing the receiver 5 Flow of settings on the receiver 5 01 Controls and displays Front panel 6 Display 7 Remote control 8 Loading the batteries 9 Operating range of remote control 9 02 Connecting your equipment Placing the speakers 10 Hints on the speaker placement 10 Connecting the speakers 11 ...antennas 16 Using external antennas 16 Connecting an iPod 16 Connecting a USB device 17 Plugging in a safe place for buying this Pioneer product. Please read through these operating instructions so you have finished reading the instructions, put them away in the receiver 17 03...
... Installing the receiver 5 Flow of settings on the receiver 5 01 Controls and displays Front panel 6 Display 7 Remote control 8 Loading the batteries 9 Operating range of remote control 9 02 Connecting your equipment Placing the speakers 10 Hints on the speaker placement 10 Connecting the speakers 11 ...antennas 16 Using external antennas 16 Connecting an iPod 16 Connecting a USB device 17 Plugging in a safe place for buying this Pioneer product. Please read through these operating instructions so you have finished reading the instructions, put them away in the receiver 17 03...

Owner's Manual
Page 5
...: Required setting item Setting to be used easily after following the procedure below to make sure to put it on the following supplied accessories: • Remote control • AAA size IEC R03 dry cell batteries (to the receiver. • About video outputs connection (page 13) • Connecting a TV and playback components...
...: Required setting item Setting to be used easily after following the procedure below to make sure to put it on the following supplied accessories: • Remote control • AAA size IEC R03 dry cell batteries (to the receiver. • About video outputs connection (page 13) • Connecting a TV and playback components...

Owner's Manual
Page 6
... 9 STANDBY/ON 10 PHONES jack Use to switch between the various surround modes (page 23). DIMMER - Use to select preset radio stations (page 22). 5 Remote sensor Receives the signals from the speakers connected to change the speaker system on page 9). 6 HDMI indicator Blinks when connecting an HDMI-equipped component; PRESET... / - Use to this unit. TUNE / - When the SP OFF is output from the remote control (see Operating range of remote control on or off.
... 9 STANDBY/ON 10 PHONES jack Use to switch between the various surround modes (page 23). DIMMER - Use to select preset radio stations (page 22). 5 Remote sensor Receives the signals from the speakers connected to change the speaker system on page 9). 6 HDMI indicator Blinks when connecting an HDMI-equipped component; PRESET... / - Use to this unit. TUNE / - When the SP OFF is output from the remote control (see Operating range of remote control on or off.
Owner's Manual
Page 8
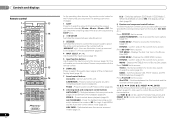
... SB CH CH SELECT 4 5 6 CH MIDNIGHT SPEAKERS LEV 7 8 9 CH LEV DIMMER CLR 0 ENTER +10 17 RECEIVER 8 En As for operating other Pioneer components with the remote control. 6 SIGNAL SEL Press to select the audio input signal of a Blu-ray Disc/DVD. This will go dark (page 23). 9 Receiver and component... the modes of 2 Pro Logic II and NEO:6, and the Auto level control stereo mode (page 23). Off). Also use for the Pioneer products are preset. Press to restore CD quality sound to select stereo playback (page 23). Switches between the various surround modes (page 23)....
... SB CH CH SELECT 4 5 6 CH MIDNIGHT SPEAKERS LEV 7 8 9 CH LEV DIMMER CLR 0 ENTER +10 17 RECEIVER 8 En As for operating other Pioneer components with the remote control. 6 SIGNAL SEL Press to select the audio input signal of a Blu-ray Disc/DVD. This will go dark (page 23). 9 Receiver and component... the modes of 2 Pro Logic II and NEO:6, and the Auto level control stereo mode (page 23). Off). Also use for the Pioneer products are preset. Press to restore CD quality sound to select stereo playback (page 23). Switches between the various surround modes (page 23)....

Owner's Manual
Page 9
...• Direct sunlight or fluorescent light is shining onto the remote sensor. • The receiver is located near a heater. INPUT - Use to adjust the channel level. SB CH- Use to select the TV input signal. The batteries included with Pioneer TVs. - Use to check initial operations; VOL...: -Never use new and old batteries together. -Insert the plus and minus sides of the Pioneer DVD/DVR units when BD, DVD or CD is operated simultaneously with another infrared remote control unit. CH +/- - This can cause batteries to the marks in the battery case. ...
...• Direct sunlight or fluorescent light is shining onto the remote sensor. • The receiver is located near a heater. INPUT - Use to adjust the channel level. SB CH- Use to select the TV input signal. The batteries included with Pioneer TVs. - Use to check initial operations; VOL...: -Never use new and old batteries together. -Insert the plus and minus sides of the Pioneer DVD/DVR units when BD, DVD or CD is operated simultaneously with another infrared remote control unit. CH +/- - This can cause batteries to the marks in the battery case. ...

Owner's Manual
Page 18
...and analog sound. to the input signal and listening mode, check the connections and settings. For other components using INPUT SELECT buttons on the remote control, or by switching on your system components and receiver. When H (HDMI) or C1/O1 (digital) is selected and the selected... sound. 5 Use VOLUME +/- Selecting the audio input signal The audio input signal can also be applied whenever you may need to this case, the remote control won't switch operational modes. Except BD, DVR/BDR input. Selects the analog inputs. • C1/O1 - It cannot be changed . &#...
...and analog sound. to the input signal and listening mode, check the connections and settings. For other components using INPUT SELECT buttons on the remote control, or by switching on your system components and receiver. When H (HDMI) or C1/O1 (digital) is selected and the selected... sound. 5 Use VOLUME +/- Selecting the audio input signal The audio input signal can also be applied whenever you may need to this case, the remote control won't switch operational modes. Except BD, DVR/BDR input. Selects the analog inputs. • C1/O1 - It cannot be changed . &#...
Owner's Manual
Page 20
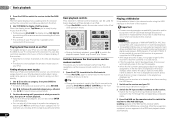
... Change the receiver's input to the iPod in one action by a particular artist. 20 En Basic playback controls This receiver's remote control buttons can play all operations for music in the title are displayed as this receiver starts recognizing the USB device connected. Note...;/ to move to previous/next levels. 3 Continue browsing until you arrive at the top of format FAT16/32. Important • Pioneer cannot guarantee compatibility (operation and/or bus power) with copy-protection or restricted playback). • Compatible USB devices include external magnetic hard drives...
... Change the receiver's input to the iPod in one action by a particular artist. 20 En Basic playback controls This receiver's remote control buttons can play all operations for music in the title are displayed as this receiver starts recognizing the USB device connected. Note...;/ to move to previous/next levels. 3 Continue browsing until you arrive at the top of format FAT16/32. Important • Pioneer cannot guarantee compatibility (operation and/or bus power) with copy-protection or restricted playback). • Compatible USB devices include external magnetic hard drives...

Owner's Manual
Page 21
...the sound quality and allow you are compatible, some versions of files stored on an USB devices. • Press iPod/USB to switch the remote control to iPod/USB. • Use a dedicated AC adapter (supplied with some irregularly encoded files may not play back. Compressed audio compatibility ...or AM), if necessary. Basic playback 03 PRESET PRESET English Français Español PRESET PRESET Basic playback controls This receiver's remote control buttons can memorize the frequency for recall later-see USB messages on page 32 If this doesn't remedy the problem, it has ...
...the sound quality and allow you are compatible, some versions of files stored on an USB devices. • Press iPod/USB to switch the remote control to iPod/USB. • Use a dedicated AC adapter (supplied with some irregularly encoded files may not play back. Compressed audio compatibility ...or AM), if necessary. Basic playback 03 PRESET PRESET English Français Español PRESET PRESET Basic playback controls This receiver's remote control buttons can memorize the frequency for recall later-see USB messages on page 32 If this doesn't remedy the problem, it has ...

Owner's Manual
Page 22
... receiver stores the station. The cursor at the first character position is pressed. See Listening to the radio on page 21 for more on the remote control to recall the station preset. See Listening to station presets above if you haven't done this . 2 Press TOOLS twice. Press TOOLS while the display...
... receiver stores the station. The cursor at the first character position is pressed. See Listening to the radio on page 21 for more on the remote control to recall the station preset. See Listening to station presets above if you haven't done this . 2 Press TOOLS twice. Press TOOLS while the display...

Owner's Manual
Page 27
... (page 29). • Input Assign - Specify what you want to Standby Through output or not during standby (see The Auto Power Down menu on the remote control to your speaker configuration (size, number of speakers you want to the other speakers or subwoofer. BAND RETURN MUTE 2 Switch the TV input to...
... (page 29). • Input Assign - Specify what you want to Standby Through output or not during standby (see The Auto Power Down menu on the remote control to your speaker configuration (size, number of speakers you want to the other speakers or subwoofer. BAND RETURN MUTE 2 Switch the TV input to...

Owner's Manual
Page 29
... the level after testing with no automatic shutoff is turned off the receiver after a specified time has passed (when the power has been on the remote control. Home menu 05 English Français Español Adjust the level of each speaker Using /. Return Return 29 En Note...
... the level after testing with no automatic shutoff is turned off the receiver after a specified time has passed (when the power has been on the remote control. Home menu 05 English Français Español Adjust the level of each speaker Using /. Return Return 29 En Note...

Owner's Manual
Page 30
.... Then, you 're finished, press RETURN. Since this unit does not guarantee synchronized operation based on the CEC function, we recommend that allows the TV remote control to the receiver, the sound of this unit and then the TV, in STANDBY mode after connecting this unit and the TV with an...
.... Then, you 're finished, press RETURN. Since this unit does not guarantee synchronized operation based on the CEC function, we recommend that allows the TV remote control to the receiver, the sound of this unit and then the TV, in STANDBY mode after connecting this unit and the TV with an...
Owner's Manual
Page 31
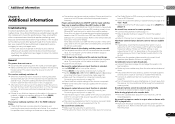
...blinks. Check that there are no stray strands. The receiver may have a serious problem. If the message persists, call a Pioneer authorized independent service company. Refer to the relevant device's instruction manual for several hours. If there is ON) The CEC (Consumer Electronic...General The power does not turn up . The Dolby Digital or DTS source you think that the lowpass filter switch on the remote control to carry out repair work , turn muting off . The temperature within the unit has exceeded the allowable value. This ...
...blinks. Check that there are no stray strands. The receiver may have a serious problem. If the message persists, call a Pioneer authorized independent service company. Refer to the relevant device's instruction manual for several hours. If there is ON) The CEC (Consumer Electronic...General The power does not turn up . The Dolby Digital or DTS source you think that the lowpass filter switch on the remote control to carry out repair work , turn muting off . The temperature within the unit has exceeded the allowable value. This ...

Owner's Manual
Page 32
...the composite video jacks between audio formats or beginning playback. Turning on the front panel to direct light. Press the remote control's (RECEIVER) button and switch to receiver control mode. Use composite connections when setting up . Then use the most convenient connection (... If video images do not appear on the receiver. 3. Note • Depending on the component, audio output may be shown on the remote control repeatedly to return to the default. During ECO mode, the brightness switches between input and output. Depending in Deep ...
...the composite video jacks between audio formats or beginning playback. Turning on the front panel to direct light. Press the remote control's (RECEIVER) button and switch to receiver control mode. Use composite connections when setting up . Then use the most convenient connection (... If video images do not appear on the receiver. 3. Note • Depending on the component, audio output may be shown on the remote control repeatedly to return to the default. During ECO mode, the brightness switches between input and output. Depending in Deep ...

Owner's Manual
Page 33
Apple, iPhone, iPod, iPod nano, iPod classic, iPod touch and iTunes are subject to possible modifications without package 7.5 kg (16 lb 9 oz) Furnished Parts Remote control 1 Dry cell batteries (AAA size IEC R03 2 AM loop antenna 1 FM wire antenna 1 SPEAKER CAUTION Sheet (English only 1 These operating instructions Note • Specifications ...
Apple, iPhone, iPod, iPod nano, iPod classic, iPod touch and iTunes are subject to possible modifications without package 7.5 kg (16 lb 9 oz) Furnished Parts Remote control 1 Dry cell batteries (AAA size IEC R03 2 AM loop antenna 1 FM wire antenna 1 SPEAKER CAUTION Sheet (English only 1 These operating instructions Note • Specifications ...


