
Owner's Manual
Page 4
... comfortably and clearly, and without distortion. After all, we want you 've just purchased is only the start of your new sound equipment will provide a lifetime of fun and enjoyment. This manufacturer and the Electronic Industries Association's Consumer Electronics Group want you can ...Vacuum cleaner, hair dryer, noisy restaurant 80 Average city traffic, garbage disposals, alarm clock at a low setting. ÷ Slowly increase the sound until it at a safe level BEFORE your hearing. THE FOLLOWING NOISES CAN BE DANGEROUS UNDER CONSTANT EXPOSURE 90 Subway, motorcycle, truck traffic, lawn...
... comfortably and clearly, and without distortion. After all, we want you 've just purchased is only the start of your new sound equipment will provide a lifetime of fun and enjoyment. This manufacturer and the Electronic Industries Association's Consumer Electronics Group want you can ...Vacuum cleaner, hair dryer, noisy restaurant 80 Average city traffic, garbage disposals, alarm clock at a low setting. ÷ Slowly increase the sound until it at a safe level BEFORE your hearing. THE FOLLOWING NOISES CAN BE DANGEROUS UNDER CONSTANT EXPOSURE 90 Subway, motorcycle, truck traffic, lawn...
Owner's Manual
Page 5
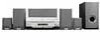
...14 Front panel 15 Display 15 4 Setting Up Switching on and setting the clock 16 Setting up for surround sound 16 Setting the speaker distances 16 Balancing the surround sound 17 Using the Setup Navigator 18 5 Getting Started Playing DVDs, CDs and Video CDs 19 Basic playback controls... up timer 31 Activating/deactivating the wake up timer 31 Checking the timer settings 32 Using the sleep timer 32 9 Advanced Sound Setup Advanced sound settings 33 LFE attenuator 33 Dynamic Range Control 33 Dual-mono setting 34 Adjusting channel volume levels 34 10 DVD Setup Menu ...
...14 Front panel 15 Display 15 4 Setting Up Switching on and setting the clock 16 Setting up for surround sound 16 Setting the speaker distances 16 Balancing the surround sound 17 Using the Setup Navigator 18 5 Getting Started Playing DVDs, CDs and Video CDs 19 Basic playback controls... up timer 31 Activating/deactivating the wake up timer 31 Checking the timer settings 32 Using the sleep timer 32 9 Advanced Sound Setup Advanced sound settings 33 LFE attenuator 33 Dynamic Range Control 33 Dual-mono setting 34 Adjusting channel volume levels 34 10 DVD Setup Menu ...
Owner's Manual
Page 6
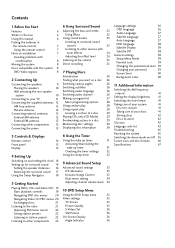
... product incorporates copyright protection technology that appear on-screen and the Setup Navigator makes the necessary video and language settings for surround sound and other limited viewing uses only unless otherwise authorized by Macrovision Corporation. It is prohibited. * Manufactured under license from Dolby...1 Before You Start Features • Superlative audio performance with Dolby Digital* and DTS** software The XV-HTD510 delivers breathtaking sound quality with Dolby Digital and DTS discs. • Graphical Setup Navigator Setting up your home theater is intended for the XV-HTD510...
... product incorporates copyright protection technology that appear on-screen and the Setup Navigator makes the necessary video and language settings for surround sound and other limited viewing uses only unless otherwise authorized by Macrovision Corporation. It is prohibited. * Manufactured under license from Dolby...1 Before You Start Features • Superlative audio performance with Dolby Digital* and DTS** software The XV-HTD510 delivers breathtaking sound quality with Dolby Digital and DTS discs. • Graphical Setup Navigator Setting up your home theater is intended for the XV-HTD510...

Owner's Manual
Page 9
... terminals. 4 Use the speaker cable with the colored sleeve into the black terminal. 3 Release the speaker terminal tabs to secure the speaker cable. For proper sound, it's important to the speaker in the same way. Connecting Up 2 Before making or changing any rear panel connections, make sure that all the components...
... terminals. 4 Use the speaker cable with the colored sleeve into the black terminal. 3 Release the speaker terminal tabs to secure the speaker cable. For proper sound, it's important to the speaker in the same way. Connecting Up 2 Before making or changing any rear panel connections, make sure that all the components...
Owner's Manual
Page 10
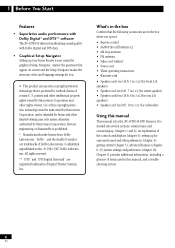
...the floor. 2 Connecting Up Do not connect any of the supplied speakers to any accidents or damage that you to get the best sound from the TV due to external shocks such as earthquakes, endangering 10 those nearby or damaging the speaker. The rear speakers and subwoofer are...to them very high on a wall is sturdy enough to support the weight of the sound. The mounting screws are unsure of the qualities and strength of the walls, consult a professional for advice. • PIONEER is extremely dangerous. Please find the correct screws for any other speakers with this system...
...the floor. 2 Connecting Up Do not connect any of the supplied speakers to any accidents or damage that you to get the best sound from the TV due to external shocks such as earthquakes, endangering 10 those nearby or damaging the speaker. The rear speakers and subwoofer are...to them very high on a wall is sturdy enough to support the weight of the sound. The mounting screws are unsure of the qualities and strength of the walls, consult a professional for advice. • PIONEER is extremely dangerous. Please find the correct screws for any other speakers with this system...

Owner's Manual
Page 11
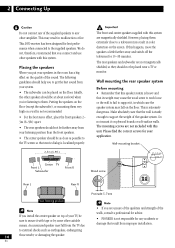
... on your TV. Placing the main unit too close to the TV/VCR IN jacks. This will enable you to hear the TV (or VCR) sound through this system. • If you notice interference, move the unit away from the TV. 11 En
... on your TV. Placing the main unit too close to the TV/VCR IN jacks. This will enable you to hear the TV (or VCR) sound through this system. • If you notice interference, move the unit away from the TV. 11 En

Owner's Manual
Page 12
... and fix to reduce noise that the reception is connected. If you find that reception quality is poor, an outdoor antenna should give you better sound The signal earth (H) is designed to a wall or door frame.
... and fix to reduce noise that the reception is connected. If you find that reception quality is poor, an outdoor antenna should give you better sound The signal earth (H) is designed to a wall or door frame.

Owner's Manual
Page 14
... menus and on-screen displays. 17 MENU Page 20 TOP MENU Page 20 18 Cursor down Use for navigating menus and on-screen displays. 19 SOUND Page 24 20 7 Page 19 21 3/8 Page 19 22 RETURN Page 20 23 4 / -PREV Pages 19-20 24 1 / STEP/SLOW e Pages 19-20 25 &#... DISC 4 Page 20 49 DISC 5 Page 20 50 OPEN/CLOSE 0 Pages 19, 21 14 En VOLUME + DVD SETUP SYSTEM SETUP 5 2 ENTER 3 TOP MENU MENU ∞ SOUND RETURN 7 6 - PREV e STEP/SLOW E 41 ¡ NEXT + ¢ CONDITION LAST MEMO SEARCH 1 2 3 DVD DISP CLEAR ANGLE 4 MONO 5 SLEEP 6 FL DIMMER >10 PROGRAM 7 RANDOM 8 REPEAT 9 REP...
... menus and on-screen displays. 17 MENU Page 20 TOP MENU Page 20 18 Cursor down Use for navigating menus and on-screen displays. 19 SOUND Page 24 20 7 Page 19 21 3/8 Page 19 22 RETURN Page 20 23 4 / -PREV Pages 19-20 24 1 / STEP/SLOW e Pages 19-20 25 &#... DISC 4 Page 20 49 DISC 5 Page 20 50 OPEN/CLOSE 0 Pages 19, 21 14 En VOLUME + DVD SETUP SYSTEM SETUP 5 2 ENTER 3 TOP MENU MENU ∞ SOUND RETURN 7 6 - PREV e STEP/SLOW E 41 ¡ NEXT + ¢ CONDITION LAST MEMO SEARCH 1 2 3 DVD DISP CLEAR ANGLE 4 MONO 5 SLEEP 6 FL DIMMER >10 PROGRAM 7 RANDOM 8 REPEAT 9 REP...

Owner's Manual
Page 16
... be able to use this system to your main listening position to the front speakers. Unless you change the layout of the box for surround sound with the hour blinking. 7 Use the 5 and ∞ buttons to set the hour, then press ENTER. 8 Use the 5 and ∞ buttons to switch on. ... you see the clock when the system is 3m. Ideally, your speakers or main listening position, you see FRT. However, for really great surround sound, we recommend that you see CLOCK ADJ in steps of these settings once. STANDBY /ON SYSTEM SETUP 5 2 ENTER 3 ∞ Setting up for surround...
... be able to use this system to your main listening position to the front speakers. Unless you change the layout of the box for surround sound with the hour blinking. 7 Use the 5 and ∞ buttons to set the hour, then press ENTER. 8 Use the 5 and ∞ buttons to switch on. ... you see the clock when the system is 3m. Ideally, your speakers or main listening position, you see FRT. However, for really great surround sound, we recommend that you see CLOCK ADJ in steps of these settings once. STANDBY /ON SYSTEM SETUP 5 2 ENTER 3 ∞ Setting up for surround...

Owner's Manual
Page 17
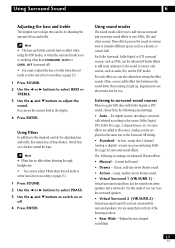
...anything except SURROUND OFF or AUTO (No test tone is set to adjust the level of +/-10dB. 5 When you can further improve surround sound performance by balancing the levels from the subwoofer, center and surround speakers relative to turn (make from the System Setup menu to the center ... on to the CENTER speaker setting. 5 Use the 5 and ∞ buttons to set the distance from your main listening position to further tailor your surround sound. You can set levels independently for more on . Setting Up 4 4 Press 3 to move on to the SURROUND speakers setting. 7 Use the 5 and &#...
...anything except SURROUND OFF or AUTO (No test tone is set to adjust the level of +/-10dB. 5 When you can further improve surround sound performance by balancing the levels from the subwoofer, center and surround speakers relative to turn (make from the System Setup menu to the center ... on to the CENTER speaker setting. 5 Use the 5 and ∞ buttons to set the distance from your main listening position to further tailor your surround sound. You can set levels independently for more on . Setting Up 4 4 Press 3 to move on to the SURROUND speakers setting. 7 Use the 5 and &#...
Owner's Manual
Page 22
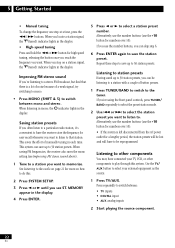
...station, it's convenient to have connected your external equipment as the source. 2 Press SYSTEM SETUP. 3 Press 2 or 3 until you see Improving FM stereo sound above). 1 Tune to a station you stop on how to do this system. MEMORY appear in the display. • High-speed tuning Press and hold the.... 1 Press TUNER/BAND to switch to play through this . 5 Press 2 or 3 to 30 station presets. Press repeatedly to . Improving FM stereo sound If you can save the station preset. If you use the >10 button for a lengthy period, the station presets will have to memorize. Use the...
...station, it's convenient to have connected your external equipment as the source. 2 Press SYSTEM SETUP. 3 Press 2 or 3 until you see Improving FM stereo sound above). 1 Tune to a station you stop on how to do this system. MEMORY appear in the display. • High-speed tuning Press and hold the.... 1 Press TUNER/BAND to switch to play through this . 5 Press 2 or 3 to 30 station presets. Press repeatedly to . Improving FM stereo sound If you can save the station preset. If you use the >10 button for a lengthy period, the station presets will have to memorize. Use the...
Owner's Manual
Page 23
...only sources, such as the Surround Off setting. • Standard - Classic, mid-size movie theater sound. • Action - Use this system has a P.Bass feature. Virtual surround sound if you have no effect when listening through headphones. • You cannot adjust P.Bass when Record...Dolby Surround, Dolby Digital or DTS surround sources, such as a theater, or concert hall. Using Surround Sound 6 Adjusting the bass and treble The simplest way to shape the sound is by adjusting the amount of the listening position. • Rear Wide - Listening to simulate different spaces...
...only sources, such as the Surround Off setting. • Standard - Classic, mid-size movie theater sound. • Action - Use this system has a P.Bass feature. Virtual surround sound if you have no effect when listening through headphones. • You cannot adjust P.Bass when Record...Dolby Surround, Dolby Digital or DTS surround sources, such as a theater, or concert hall. Using Surround Sound 6 Adjusting the bass and treble The simplest way to shape the sound is by adjusting the amount of the listening position. • Rear Wide - Listening to simulate different spaces...
Owner's Manual
Page 24
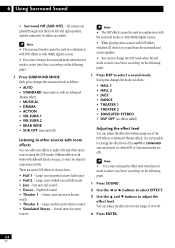
... sources with 96kHz digital sources. • You cannot change the surround mode when Record mode is active (see Direct recording on the following page). 1 Press SOUND. 2 Use the 2 or 3 buttons to select EFFECT. 3 Use the 5 and ∞ buttons to choose from the surround and center speakers. •... level of music, so don't be used in combination with DSP effects or with DSP effects switched off, there is no sound from : • Hall 1 - 6 Using Surround Sound • Surround Off (SUR.OFF) - No effects are played through only the front left and right speakers, and the subwoofer...
... sources with 96kHz digital sources. • You cannot change the surround mode when Record mode is active (see Direct recording on the following page). 1 Press SOUND. 2 Use the 2 or 3 buttons to select EFFECT. 3 Use the 5 and ∞ buttons to choose from the surround and center speakers. •... level of music, so don't be used in combination with DSP effects or with DSP effects switched off, there is no sound from : • Hall 1 - 6 Using Surround Sound • Surround Off (SUR.OFF) - No effects are played through only the front left and right speakers, and the subwoofer...

Owner's Manual
Page 25
...or the Midnight setting. • Once the power is switched off the Record Mode, repeat the same proceedure. The Record Mode is not recorded. 1 Press SOUND. 2 Use the 2 or 3 buttons to select RECORD MODE. 3 Press ENTER. The display shows RECMODE ON. 4 Press ENTER again. Turn the Midnight... • To switch off or the function is changed, the Record mode automatically reverts to an external recorder, without worrying about the various sound settings. Direct recording This feature let's you cannot change the Midnight mode when Record mode is active (see Direct recording right). In step 3...
...or the Midnight setting. • Once the power is switched off the Record Mode, repeat the same proceedure. The Record Mode is not recorded. 1 Press SOUND. 2 Use the 2 or 3 buttons to select RECORD MODE. 3 Press ENTER. The display shows RECMODE ON. 4 Press ENTER again. Turn the Midnight... • To switch off or the function is changed, the Record mode automatically reverts to an external recorder, without worrying about the various sound settings. Direct recording This feature let's you cannot change the Midnight mode when Record mode is active (see Direct recording right). In step 3...

Owner's Manual
Page 31
.... • If you make a mistake, press SYSTEM SETUP and start again from step 3. 10 Check the settings you have set the wake up to the sound of a disc loaded or the radio. Activating/deactivating the wake up timer To activate the wake up to . If you just made. The display should...
.... • If you make a mistake, press SYSTEM SETUP and start again from step 3. 10 Check the settings you have set the wake up to the sound of a disc loaded or the radio. Activating/deactivating the wake up timer To activate the wake up to . If you just made. The display should...

Owner's Manual
Page 33
... small amount. • D.R.C. Dynamic Range Control The dynamic range of signal reduction. the dynamic range is the difference between the quietest and the loudest sounds. the LFE channel is reduced by a large amount (good for listening at night, for the sub-woofer. • You can be useful late... (no signal reduction) • LFE ATT 10 - Use the LFE attenuator setting to reduce the signal fed to further optimize the sound of Dolby Digital soundtracks can 't change this setting if the Record mode is reduced to select a dynamic range setting. • D.R.C. Advanced...
... small amount. • D.R.C. Dynamic Range Control The dynamic range of signal reduction. the dynamic range is the difference between the quietest and the loudest sounds. the LFE channel is reduced by a large amount (good for listening at night, for the sub-woofer. • You can be useful late... (no signal reduction) • LFE ATT 10 - Use the LFE attenuator setting to reduce the signal fed to further optimize the sound of Dolby Digital soundtracks can 't change this setting if the Record mode is reduced to select a dynamic range setting. • D.R.C. Advanced...

Owner's Manual
Page 34
...speaker (or through the right) • CH1 - Ch1 is muted. • CH2 - Adjustments to the channel volume levels will affect only the current sound mode. 2 Use the 2 and 3 buttons to select a channel to Standard and all channels are completely independent and don't affect any other . You can...); just the backing, or everything together (through both left and right speakers if Surround Off is selected). 4 Press ENTER. 9 Advanced Sound Setup Dual-mono setting The dual-mono setting applies only to Dolby Digital discs that may want to adjust the relative volumes of one channel...
...speaker (or through the right) • CH1 - Ch1 is muted. • CH2 - Adjustments to the channel volume levels will affect only the current sound mode. 2 Use the 2 and 3 buttons to select a channel to Standard and all channels are completely independent and don't affect any other . You can...); just the backing, or everything together (through both left and right speakers if Surround Off is selected). 4 Press ENTER. 9 Advanced Sound Setup Dual-mono setting The dual-mono setting applies only to Dolby Digital discs that may want to adjust the relative volumes of one channel...

Owner's Manual
Page 42
...is high). Avoid leaving discs in other sharptipped writing instrument. Use of shaped discs is designed for use of shaped CDs and DVDs. Pioneer disclaims all liability arising in connection with more durable than one region (or all at high speed during playback. Conventional TVs are 16:9 ...of digital audio (front left and right, surround left and right, center and low-frequency channels). See also DTS. 42 En DTS A surround sound system developed by Dolby Laboratories containing up damaging the system. PBC (PlayBack Control) (Video CD only) A system of navigating a Video CD ...
...is high). Avoid leaving discs in other sharptipped writing instrument. Use of shaped discs is designed for use of shaped CDs and DVDs. Pioneer disclaims all liability arising in connection with more durable than one region (or all at high speed during playback. Conventional TVs are 16:9 ...of digital audio (front left and right, surround left and right, center and low-frequency channels). See also DTS. 42 En DTS A surround sound system developed by Dolby Laboratories containing up damaging the system. PBC (PlayBack Control) (Video CD only) A system of navigating a Video CD ...
Owner's Manual
Page 45
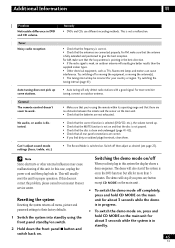
..., press and 1 Switch the system into standby using the remote within its operating range and that the antenna is switched on . 45 En Can't adjust sound mode settings (bass, treble, etc.) • The Record Mode is fully extended and positioned to give better results than 5 minutes. This will only detect radio... direction. • If the radio signal is weak, an outdoor antenna will also start if the system is on the main unit for your nearest Pioneer When you press any button except CD MODE on and that the disc is not paused. • Check that the disc is clean and undamaged...
..., press and 1 Switch the system into standby using the remote within its operating range and that the antenna is switched on . 45 En Can't adjust sound mode settings (bass, treble, etc.) • The Record Mode is fully extended and positioned to give better results than 5 minutes. This will only detect radio... direction. • If the radio signal is weak, an outdoor antenna will also start if the system is on the main unit for your nearest Pioneer When you press any button except CD MODE on and that the disc is not paused. • Check that the disc is clean and undamaged...


