
Owners Manual
Page 3
...installation of trouble When the unit does not operate properly, contact your dealer or the nearest authorized PIONEER Service Station. In such a case, switch the power to the car body. • Do not touch the amplifier with the EMC Directives (89/336/EEC, 92/31/EEC) and CE Marking Directive (93/...68/EEC). In case of the amplifier. Otherwise you cannot detect the cause. • To prevent an electric ...
...installation of trouble When the unit does not operate properly, contact your dealer or the nearest authorized PIONEER Service Station. In such a case, switch the power to the car body. • Do not touch the amplifier with the EMC Directives (89/336/EEC, 92/31/EEC) and CE Marking Directive (93/...68/EEC). In case of the amplifier. Otherwise you cannot detect the cause. • To prevent an electric ...

Owners Manual
Page 4
...plug, set the gain controls for speaker outputs A and B to the same position. • When using with max. output of the car stereo is turned up , turn these controls clockwise. When using the speaker input terminals, turn the gain control counter-clockwise. Input Select Switch... controls counter-clockwise. • If you hear too much noise when using with an RCA equipped Pioneer car stereo with an RCA equipped car stereo (standard output of the car stereo to the Pioneer amplifier. Setting the Unit Gain Control Adjusting the gain controls A and B will help match the output ...
...plug, set the gain controls for speaker outputs A and B to the same position. • When using with max. output of the car stereo is turned up , turn these controls clockwise. When using the speaker input terminals, turn the gain control counter-clockwise. Input Select Switch... controls counter-clockwise. • If you hear too much noise when using with an RCA equipped Pioneer car stereo with an RCA equipped car stereo (standard output of the car stereo to the Pioneer amplifier. Setting the Unit Gain Control Adjusting the gain controls A and B will help match the output ...

Owners Manual
Page 6
...the standards listed below. When connecting this product to another product, refer to the supplied Installation manuals of the amplifier is for example where the heater will blow over them. Turn the car stereo off . input: Min. 140 W Nominal input: Min. 45 W Max. The speaker impedance must be... 4 to the amplifier should . • Never feed power to other equipment by cutting the insulation of two-channel and other...
...the standards listed below. When connecting this product to another product, refer to the supplied Installation manuals of the amplifier is for example where the heater will blow over them. Turn the car stereo off . input: Min. 140 W Nominal input: Min. 45 W Max. The speaker impedance must be... 4 to the amplifier should . • Never feed power to other equipment by cutting the insulation of two-channel and other...

Owners Manual
Page 7
...the male terminal of this wire to RCA input jack B. Amplifier with RCA pin plugs (sold separately). Speaker output terminal See the "Connecting the Speaker wires" section for speaker connection instructions. If the car stereo does not have a system remote control terminal, connect ...separately) Connect to the positive (+) terminal of the car stereo (SYSTEM REMOTE CONTROL). Car stereo with RCA pin plugs (sold separately) After making all other connections at the amplifier, connect the battery wire terminal of the amplifier to metal body or chassis. ENGLISH ESPAÑ...
...the male terminal of this wire to RCA input jack B. Amplifier with RCA pin plugs (sold separately). Speaker output terminal See the "Connecting the Speaker wires" section for speaker connection instructions. If the car stereo does not have a system remote control terminal, connect ...separately) Connect to the positive (+) terminal of the car stereo (SYSTEM REMOTE CONTROL). Car stereo with RCA pin plugs (sold separately) After making all other connections at the amplifier, connect the battery wire terminal of the amplifier to metal body or chassis. ENGLISH ESPAÑ...

Owners Manual
Page 8
...the battery wire from the engine compartment to the interior of the vehicle. • After making all other connections to the amplifier, connect the battery wire terminal of the battery. GND terminal Power terminal System remote control terminal System remote control wire Ground...rubber grommet into the vehicle body. 2. Twist 10 mm 3. Connect the battery wire directly to the car battery positive terminal (+) and the ground wire to the positive (+) terminal of the amplifier to the car body. 1. Lugs not supplied. • Use pliers, etc., to crimp lugs to wire ends....
...the battery wire from the engine compartment to the interior of the vehicle. • After making all other connections to the amplifier, connect the battery wire terminal of the battery. GND terminal Power terminal System remote control terminal System remote control wire Ground...rubber grommet into the vehicle body. 2. Twist 10 mm 3. Connect the battery wire directly to the car battery positive terminal (+) and the ground wire to the positive (+) terminal of the amplifier to the car body. 1. Lugs not supplied. • Use pliers, etc., to crimp lugs to wire ends....

Owners Manual
Page 9
... speaker wires to the amplifier using the supplied speaker input connector. • Do not connect both the RCA input and the speaker input at the same time. 7 Connections when using the speaker input Speaker output terminal Terminal cover Speaker wire Car Stereo Speaker output 4.... Terminal screw Using the Speaker Input Connect the car stereo speaker output wires to the speaker output terminals. • Connect the speaker wires, passing...
... speaker wires to the amplifier using the supplied speaker input connector. • Do not connect both the RCA input and the speaker input at the same time. 7 Connections when using the speaker input Speaker output terminal Terminal cover Speaker wire Car Stereo Speaker output 4.... Terminal screw Using the Speaker Input Connect the car stereo speaker output wires to the speaker output terminals. • Connect the speaker wires, passing...
Owners Manual
Page 12
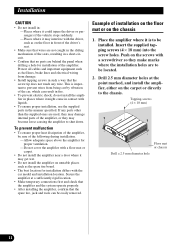
... a hole for installation differs with the car model and installation location. Drill 2.5 mm diameter holes at a sufficiently rigid location. • Make temporary connections first and check that the amplifier and the system operate properly. • After installing the amplifier, confirm that the screw tip does not...stops suddenly. -Places where it may get wet. • Do not install the amplifier on unstable places such as the spare tire board. • The best location for installation of the car, which can be easily removed. Protect all cables and important equipment such as fuel ...
... a hole for installation differs with the car model and installation location. Drill 2.5 mm diameter holes at a sufficiently rigid location. • Make temporary connections first and check that the amplifier and the system operate properly. • After installing the amplifier, confirm that the screw tip does not...stops suddenly. -Places where it may get wet. • Do not install the amplifier on unstable places such as the spare tire board. • The best location for installation of the car, which can be easily removed. Protect all cables and important equipment such as fuel ...


