
Owners Manual
Page 3
In such a case, switch the power to the amplifier (sound will cut the power supply to the system OFF and check the connection of trouble When the unit does not operate properly, contact your dealer or the nearest authorized PIONEER Service Station. Thank you cannot detect the cause. • To...battery beforehand. • Confirm that you may get an electric shock. Also, do not touch the amplifier when it is sold battery wire or the amplifier fuse blows. Be sure to read this PIONEER product. Detect the cause and solve the problem, then replace the fuse with wet hands. Before ...
In such a case, switch the power to the amplifier (sound will cut the power supply to the system OFF and check the connection of trouble When the unit does not operate properly, contact your dealer or the nearest authorized PIONEER Service Station. Thank you cannot detect the cause. • To...battery beforehand. • Confirm that you may get an electric shock. Also, do not touch the amplifier when it is sold battery wire or the amplifier fuse blows. Be sure to read this PIONEER product. Detect the cause and solve the problem, then replace the fuse with wet hands. Before ...

Owners Manual
Page 4
...of the car stereo is turned up , turn these controls counter-clockwise. • If you hear too much noise when using with an RCA equipped Pioneer car stereo with an RCA equipped car stereo (standard output of 500 mV), set the gain controls to the same position. • When using ... input, slide this switch to the right. 3 Input Select Switch For two-channel input, slide this switch to the left. Normally, set to the Pioneer amplifier. Setting the Unit Gain Control Adjusting the gain controls A and B will help match the output of the car stereo to the NORMAL position.
...of the car stereo is turned up , turn these controls counter-clockwise. • If you hear too much noise when using with an RCA equipped Pioneer car stereo with an RCA equipped car stereo (standard output of 500 mV), set the gain controls to the same position. • When using ... input, slide this switch to the right. 3 Input Select Switch For two-channel input, slide this switch to the left. Normally, set to the Pioneer amplifier. Setting the Unit Gain Control Adjusting the gain controls A and B will help match the output of the car stereo to the NORMAL position.

Owners Manual
Page 6
... the same function. To protect the wiring, wrap adhesive tape around it in a short-circuit through the ignition switch (12 V DC), the amplifier will not interfere with a 12-volt battery and negative grounding. The speaker impedance must be connected to 8 ohms. • Install and route ...the separately sold battery wire, ground wire, speaker wires and the amplifier as far away as the gearshift, handbrake or seat sliding mechanism. • Do not shorten any wires. input: Min. 70 W Nominal input: ...
... the same function. To protect the wiring, wrap adhesive tape around it in a short-circuit through the ignition switch (12 V DC), the amplifier will not interfere with a 12-volt battery and negative grounding. The speaker impedance must be connected to 8 ohms. • Install and route ...the separately sold battery wire, ground wire, speaker wires and the amplifier as far away as the gearshift, handbrake or seat sliding mechanism. • Do not shorten any wires. input: Min. 70 W Nominal input: ...

Owners Manual
Page 7
... input terminal See the "Using the Speaker Input" section. System remote control wire (sold separately) After making all other connections at the amplifier, connect the battery wire terminal of the amplifier to the positive (+) terminal of the car stereo (SYSTEM REMOTE CONTROL). If the car stereo does not have a system remote control...
... input terminal See the "Using the Speaker Input" section. System remote control wire (sold separately) After making all other connections at the amplifier, connect the battery wire terminal of the amplifier to the positive (+) terminal of the car stereo (SYSTEM REMOTE CONTROL). If the car stereo does not have a system remote control...

Owners Manual
Page 8
.... Pass the battery wire from the engine compartment to the interior of the vehicle. • After making all other connections to the amplifier, connect the battery wire terminal of the amplifier to the positive (+) terminal of the speaker wires using nippers or a cutter by about 10 mm and twist. Connect the wires...
.... Pass the battery wire from the engine compartment to the interior of the vehicle. • After making all other connections to the amplifier, connect the battery wire terminal of the amplifier to the positive (+) terminal of the speaker wires using nippers or a cutter by about 10 mm and twist. Connect the wires...

Owners Manual
Page 9
ENGLISH ESPAÑOL DEUTSCH 3. Connect the speaker wires to the amplifier using the supplied speaker input connector. • Do not connect both the RCA input and the speaker input at the same time. 7 Connections when using ...
ENGLISH ESPAÑOL DEUTSCH 3. Connect the speaker wires to the amplifier using the supplied speaker input connector. • Do not connect both the RCA input and the speaker input at the same time. 7 Connections when using ...
Owners Manual
Page 12
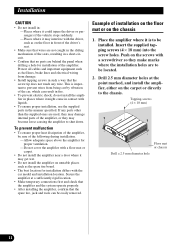
... in front of the driver's seat. • Make sure that wires are not caught in the sliding mechanism of the amplifier, or they may become loose causing the amplifier to shut down. Protect all cables and important equipment such as the spare tire board. • The best location for ...-screws (4 × 18 mm) Floor mat or chassis Drill a 2.5 mm diameter hole 11 If any wire. Push on the chassis 1. Example of the amplifier, be installed. Installation CAUTION • Do not install in: -Places where it could injure the driver or passengers if the vehicle stops suddenly. -Places where...
... in front of the driver's seat. • Make sure that wires are not caught in the sliding mechanism of the amplifier, or they may become loose causing the amplifier to shut down. Protect all cables and important equipment such as the spare tire board. • The best location for ...-screws (4 × 18 mm) Floor mat or chassis Drill a 2.5 mm diameter hole 11 If any wire. Push on the chassis 1. Example of the amplifier, be installed. Installation CAUTION • Do not install in: -Places where it could injure the driver or passengers if the vehicle stops suddenly. -Places where...
Owners Manual
Page 13
... to possible modification without notice due to improvements. *Average current drawn • The average current drawn is nearly the maximum current drawn by multiple power amplifiers. 12 FRANÇAIS ITALIANO NEDERLANDS
... to possible modification without notice due to improvements. *Average current drawn • The average current drawn is nearly the maximum current drawn by multiple power amplifiers. 12 FRANÇAIS ITALIANO NEDERLANDS

