Owner's Manual
Page 2
Contents Before you start Information to User 3 After-sales service for Pioneer products 3 Visit our website 3 About This Product 3 Before connecting/installing the amplifier 4 Setting the Unit What's what 5 Setting gain properly 5 Connecting the units Connection diagram 7 Before connecting the amplifier 7... the speakers 8 Connections when using the speaker input wire 8 Connecting the power terminal 9 Connecting the speaker output terminals 10 Installation Before installing the amplifier 11 Example of installation on the floor mat or chassis 11 Additional information Specifications 12 2 En
Contents Before you start Information to User 3 After-sales service for Pioneer products 3 Visit our website 3 About This Product 3 Before connecting/installing the amplifier 4 Setting the Unit What's what 5 Setting gain properly 5 Connecting the units Connection diagram 7 Before connecting the amplifier 7... the speakers 8 Connections when using the speaker input wire 8 Connecting the power terminal 9 Connecting the speaker output terminals 10 Installation Before installing the amplifier 11 Example of installation on the floor mat or chassis 11 Additional information Specifications 12 2 En
Owner's Manual
Page 3
...R (right) channels are connected to the RCA input of Canada, Inc. En 3 PIONEER SUGGESTS USING A PROFESSIONAL INSTALLER DUE TO THE COMPLEXITY OF THIS PRODUCT. After-sales service for Pioneer products Please contact the dealer or distributor from where you refer to the companies at the ...following site: http://www.pioneerelectronics.com 1 Register your nearest Pioneer authorized dealer or installation specialist. CUSTOMER SATISFACTION DEPARTMENT 300 Allstate Parkway Markham, Ontario L3R 0P2 1-877-283-5901 905-479-4411 For ...
...R (right) channels are connected to the RCA input of Canada, Inc. En 3 PIONEER SUGGESTS USING A PROFESSIONAL INSTALLER DUE TO THE COMPLEXITY OF THIS PRODUCT. After-sales service for Pioneer products Please contact the dealer or distributor from where you refer to the companies at the ...following site: http://www.pioneerelectronics.com 1 Register your nearest Pioneer authorized dealer or installation specialist. CUSTOMER SATISFACTION DEPARTMENT 300 Allstate Parkway Markham, Ontario L3R 0P2 1-877-283-5901 905-479-4411 For ...
Owner's Manual
Page 4
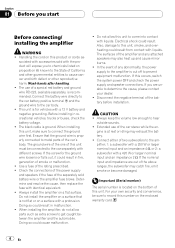
...If you are out of this occurs, switch the system power OFF and check the power supply and speaker connections. CAUTION ! Before installing in malfunction. ! Disconnect the negative terminal of the rating prescribed. ! Connect either of the amplifier and any abnormality, the power ...with a 250 W or larger nominal input and an impedance 4 W, or 2: a subwoofer with the product will expose you start Before connecting/ installing the amplifier WARNING ! The ground wire of the one of the car stereo while the en- The use of this unit, smoke, and overheating ...
...If you are out of this occurs, switch the system power OFF and check the power supply and speaker connections. CAUTION ! Before installing in malfunction. ! Disconnect the negative terminal of the rating prescribed. ! Connect either of the amplifier and any abnormality, the power ...with a 250 W or larger nominal input and an impedance 4 W, or 2: a subwoofer with the product will expose you start Before connecting/ installing the amplifier WARNING ! The ground wire of the one of the car stereo while the en- The use of this unit, smoke, and overheating ...
Owner's Manual
Page 8
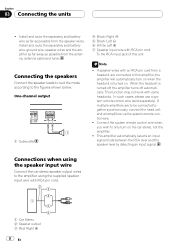
...are to be connected together synchronously, connect the head unit and all amplifiers via the system remote control wire. ! Section 03 Connecting the units ! Install and route the separately sold separately). When the headunit is turned on the car stereo, not the amplifier. ! Connecting the speakers Connect the speaker ... wires with some headunits. Connections when using the speaker input wire Connect the car stereo speaker output wires to the figures shown below. Install and route the separately sold battery wire as far as possible from the antenna, antenna cable and tuner.
...are to be connected together synchronously, connect the head unit and all amplifiers via the system remote control wire. ! Section 03 Connecting the units ! Install and route the separately sold separately). When the headunit is turned on the car stereo, not the amplifier. ! Connecting the speakers Connect the speaker ... wires with some headunits. Connections when using the speaker input wire Connect the car stereo speaker output wires to the figures shown below. Install and route the separately sold battery wire as far as possible from the antenna, antenna cable and tuner.
Owner's Manual
Page 11
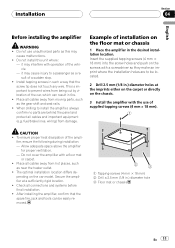
...cut by vibration of the ampli- Place all cables away from hot places, such as the gear shift and seat rails. ! Installation Section 04 English Before installing the amplifier WARNING ! CAUTION ! Secure the amplifier at the imprints either on the carpet or directly on the screws with the ...use unauthorized parts as a result of installation on the car model. Install tapping screws in such a way that the spare tire, jack and tools can result in .) diameter hole 3 Floor mat or...
...cut by vibration of the ampli- Place all cables away from hot places, such as the gear shift and seat rails. ! Installation Section 04 English Before installing the amplifier WARNING ! CAUTION ! Secure the amplifier at the imprints either on the carpet or directly on the screws with the ...use unauthorized parts as a result of installation on the car model. Install tapping screws in such a way that the spare tire, jack and tools can result in .) diameter hole 3 Floor mat or...
