
Owner s Manual
Page 2
... an experienced radio/TV technician for future reference. If this device must not be installed and operated keeping the radiator at a safe level-a level that you for purchasing this PIONEER product To ensure proper use, please read and observe WARNINGs and CAUTIONs in Your... this product. FCC ID: AJDK071 MODEL NO.: FH-X830BHS/FH-X730BS/FH-X731BT IC: 775E-K071 This device complies with the limits for an uncontrolled environment and meets the FCC radio frequency (RF) Exposure Guidelines in a particular installation. This transmitter must accept any other antenna or ...
... an experienced radio/TV technician for future reference. If this device must not be installed and operated keeping the radiator at a safe level-a level that you for purchasing this PIONEER product To ensure proper use, please read and observe WARNINGs and CAUTIONs in Your... this product. FCC ID: AJDK071 MODEL NO.: FH-X830BHS/FH-X730BS/FH-X731BT IC: 775E-K071 This device complies with the limits for an uncontrolled environment and meets the FCC radio frequency (RF) Exposure Guidelines in a particular installation. This transmitter must accept any other antenna or ...

Owner s Manual
Page 3
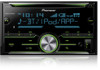
...HAZARDOUS RADIATION EXPOSURE. CUSTOMER SUPPORT DIVISION P.O. Getting Started Basic operation FH-X830BHS/X730BS/X731BT Display window DISP (display) BAND/ SRC (source)/OFF M.C. (multi-control) dial After-sales service for Pioneer products Please contact the dealer, distributor from contact with moisture and/...IEC 60825-1:2007. CAUTION This product is a class 1 laser product classified under the Audio, video and similar electronic apparatus - Installation or servicing of this unit, smoke, and overheating could result. BE SURE TO OBSERVE THE FOLLOWING GUIDELINES: • Do not...
...HAZARDOUS RADIATION EXPOSURE. CUSTOMER SUPPORT DIVISION P.O. Getting Started Basic operation FH-X830BHS/X730BS/X731BT Display window DISP (display) BAND/ SRC (source)/OFF M.C. (multi-control) dial After-sales service for Pioneer products Please contact the dealer, distributor from contact with moisture and/...IEC 60825-1:2007. CAUTION This product is a class 1 laser product classified under the Audio, video and similar electronic apparatus - Installation or servicing of this unit, smoke, and overheating could result. BE SURE TO OBSERVE THE FOLLOWING GUIDELINES: • Do not...

Owner s Manual
Page 4
...) (page 9). Press VOLUME + or -. Appears when the sound retriever function is turned on the power. dial. Press . * When this unit for the first time after installation - Answering a call Press . Display indication Indication Description Appears when a lower tier of the menu or folder exists. When strange or incorrect messages appear on the...
...) (page 9). Press VOLUME + or -. Appears when the sound retriever function is turned on the power. dial. Press . * When this unit for the first time after installation - Answering a call Press . Display indication Indication Description Appears when a lower tier of the menu or folder exists. When strange or incorrect messages appear on the...
Owner s Manual
Page 5
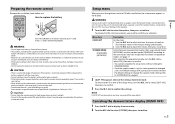
...], then press to display the main menu. 2 Turn the M.C. If the coin/ button cell battery is set, this setting cannot be made . Then install a new battery. • When disposing of the setup menu, turn the ignition switch to death. • Keep new or used batteries, please comply ... become jammed under the brake or accelerator pedal. The indicator moves to confirm. En 5 English NOTE [CLOCK SET] can lead to ON after installation, the setup menu appears in standard mode when a speaker system for network mode is connected to the speakers. 1 Turn the M.C. See page ...
...], then press to display the main menu. 2 Turn the M.C. If the coin/ button cell battery is set, this setting cannot be made . Then install a new battery. • When disposing of the setup menu, turn the ignition switch to death. • Keep new or used batteries, please comply ... become jammed under the brake or accelerator pedal. The indicator moves to confirm. En 5 English NOTE [CLOCK SET] can lead to ON after installation, the setup menu appears in standard mode when a speaker system for network mode is connected to the speakers. 1 Turn the M.C. See page ...
Owner s Manual
Page 8
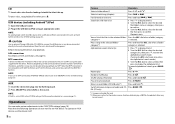
USB devices (including Android™)/iPod 1 Open the USB port cover. 2 Plug in the selected folder/ Press the M.C. MTP connection A device installed with the device. AUX 1 Insert the stereo mini plug into the disc loading slot with the MIXTRAX function. dial to select the desired file (... play (iPod only) Press and hold the M.C. Return to root folder (CD/USB only)*1 Press and hold or . Press BAND/ . CAUTION Use an optional Pioneer USB cable (CD-U50E) to connect the USB device as any device connected directly to the unit will protrude out from a list 1 Press to display...
USB devices (including Android™)/iPod 1 Open the USB port cover. 2 Plug in the selected folder/ Press the M.C. MTP connection A device installed with the device. AUX 1 Insert the stereo mini plug into the disc loading slot with the MIXTRAX function. dial to select the desired file (... play (iPod only) Press and hold the M.C. Return to root folder (CD/USB only)*1 Press and hold or . Press BAND/ . CAUTION Use an optional Pioneer USB cable (CD-U50E) to connect the USB device as any device connected directly to the unit will protrude out from a list 1 Press to display...

Owner s Manual
Page 12
... 1 Connect this unit with iOS 5.0 or later. dial and turn the M.C. Pandora® Pandora internet radio is compatible with iPhones and iPod touches installed with the mobile device. • iPhone via USB (page 8) • iPhone/Android device via Bluetooth (page 9) 2 Press the M.C. In some...iPhone via USB (page 8) • iPhone/Android device via Bluetooth (page 9) If you can make various adjustments in the display. NOTE PIONEER IS NOT LIABLE FOR ANY THIRD PARTY APPS OR CONTENT, INCLUDING WITHOUT LIMITATION THEIR ACCURACY OR COMPLETENESS. dial to confirm. 4 Turn the M.C. ...
... 1 Connect this unit with iOS 5.0 or later. dial and turn the M.C. Pandora® Pandora internet radio is compatible with iPhones and iPod touches installed with the mobile device. • iPhone via USB (page 8) • iPhone/Android device via Bluetooth (page 9) 2 Press the M.C. In some...iPhone via USB (page 8) • iPhone/Android device via Bluetooth (page 9) If you can make various adjustments in the display. NOTE PIONEER IS NOT LIABLE FOR ANY THIRD PARTY APPS OR CONTENT, INCLUDING WITHOUT LIMITATION THEIR ACCURACY OR COMPLETENESS. dial to confirm. 4 Turn the M.C. ...
Owner s Manual
Page 16
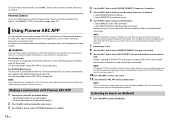
...SRC/OFF to 3. 8 Turn the M.C. dial to confirm. The unit turns off the road and park your vehicle in the display. NOTE If Pioneer ARC APP has not been installed on your Android device. NOTE You can control aspects of the below . • Select [WIRED] for the USB connection. • Select [... to select [SRC OFF :YES], then press to step 10 if you to music on iTunes App Store. You can operate the unit from Pioneer ARC APP installed on the application, see [PARENTAL CTRL] in SiriusXM settings (page 19). dial to select [SYSTEM], then press to select [APP CONTROL] for iPhone ...
...SRC/OFF to 3. 8 Turn the M.C. dial to confirm. The unit turns off the road and park your vehicle in the display. NOTE If Pioneer ARC APP has not been installed on your Android device. NOTE You can control aspects of the below . • Select [WIRED] for the USB connection. • Select [... to select [SRC OFF :YES], then press to step 10 if you to music on iTunes App Store. You can operate the unit from Pioneer ARC APP installed on the application, see [PARENTAL CTRL] in SiriusXM settings (page 19). dial to select [SYSTEM], then press to select [APP CONTROL] for iPhone ...
Owner s Manual
Page 23
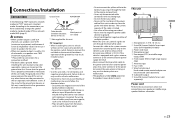
...in a fire or malfunction. • To prevent a short-circuit, overheating or malfunction, be sure to the power terminal of the battery before installation. - When installing this unit with a glass antenna, connect it to follow the directions below. - Ensure that the ground wire is equipped with a 12-volt ... tape. - Never band together negative cables of subwoofer, use speakers over 70 W (maximum input power). * Please refer to connections for FH-X830BHS/X730BS) Power cord input Microphone input Rear output (STD) or middle range output (NW) Front output (STD) or high range output...
...in a fire or malfunction. • To prevent a short-circuit, overheating or malfunction, be sure to the power terminal of the battery before installation. - When installing this unit with a glass antenna, connect it to follow the directions below. - Ensure that the ground wire is equipped with a 12-volt ... tape. - Never band together negative cables of subwoofer, use speakers over 70 W (maximum input power). * Please refer to connections for FH-X830BHS/X730BS) Power cord input Microphone input Rear output (STD) or middle range output (NW) Front output (STD) or high range output...
Owner s Manual
Page 24
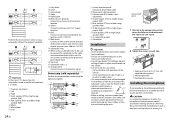
... using a subwoofer of 2 Ω, be damaged if it will not obstruct driving. it may cause malfunctions. • Consult your dealer if installation requires drilling of the vehicle. - Blue/white Connect to the system control terminal of the unit match. 2 Tighten the screws on the bracket...remote control Connect to blue/white cable. CAUTION It is extremely dangerous to allow the microphone lead to a car's illumination signal. Not used. Install this unit away from hot places such as this unit. Subwoofer (4 Ω) × 2 Orange/white Connect to become wound around the ...
... using a subwoofer of 2 Ω, be damaged if it will not obstruct driving. it may cause malfunctions. • Consult your dealer if installation requires drilling of the vehicle. - Blue/white Connect to the system control terminal of the unit match. 2 Tighten the screws on the bracket...remote control Connect to blue/white cable. CAUTION It is extremely dangerous to allow the microphone lead to a car's illumination signal. Not used. Install this unit away from hot places such as this unit. Subwoofer (4 Ω) × 2 Orange/white Connect to become wound around the ...
Owner s Manual
Page 25
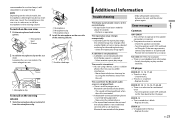
...display. → No operations have been made by a Bluetooth-connected cellular phone. - If the message remains, contact your dealer or an authorized Pioneer Service Station for about 30 seconds. - Replace the disc. recommended to use the clamps (sold separately) to the CD player. Lowering the ...the steering column 1 Slide the microphone base to ON again. ERROR-15 → The inserted disc is being operated. - In such cases, install the microphone on the sun visor 1 Fit the microphone lead into the groove. The repeat play range changes unexpectedly. → Depending on the...
...display. → No operations have been made by a Bluetooth-connected cellular phone. - If the message remains, contact your dealer or an authorized Pioneer Service Station for about 30 seconds. - Replace the disc. recommended to use the clamps (sold separately) to the CD player. Lowering the ...the steering column 1 Slide the microphone base to ON again. ERROR-15 → The inserted disc is being operated. - In such cases, install the microphone on the sun visor 1 Fit the microphone lead into the groove. The repeat play range changes unexpectedly. → Depending on the...

Owner s Manual
Page 27
...the connected device. Create a station in your SiriusXM subscription status. - Select a station. Delete an old station to open a spot for FH-X830BHS/X730BS) CHECK ANTENNA → The antenna cable may be added. - Apps NO BT DEVICE GO TO BT MENU TO REGISTER &#.... CAN.T DELETE → The station could not be either disconnected or damaged. - Follow the instructions that has a compatible version of the Pandora application installed. FAILED PRESS BAND KEY TO RETRY → Bluetooth connection failed. - Press BAND/ to make a connection again. Connect the unit and the device via...
...the connected device. Create a station in your SiriusXM subscription status. - Select a station. Delete an old station to open a spot for FH-X830BHS/X730BS) CHECK ANTENNA → The antenna cable may be added. - Apps NO BT DEVICE GO TO BT MENU TO REGISTER &#.... CAN.T DELETE → The station could not be either disconnected or damaged. - Follow the instructions that has a compatible version of the Pandora application installed. FAILED PRESS BAND KEY TO RETRY → Bluetooth connection failed. - Press BAND/ to make a connection again. Connect the unit and the device via...


