Owner s Manual
Page 11
... on Bluetooth settings, see page 9. *1 The contacts on availability and functionality. 1 Make a Bluetooth connection with your phone. Press or . dial and then talk into the microphone to confirm. Press 4/PAUSE. 1 Press to confirm. 3 Turn the M.C. NOTE For details on the connected phone, this function does not work . Phone menu Menu Item...
... on Bluetooth settings, see page 9. *1 The contacts on availability and functionality. 1 Make a Bluetooth connection with your phone. Press or . dial and then talk into the microphone to confirm. Press 4/PAUSE. 1 Press to confirm. 3 Turn the M.C. NOTE For details on the connected phone, this function does not work . Phone menu Menu Item...
Owner s Manual
Page 23
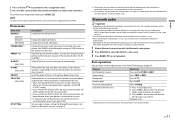
.... 10-1/8 in battery drain. Ensure that the ground wire is equipped with different screws. If the screw for FH-X830BHS/X730BS) Power cord input Microphone input Rear output (STD) or middle range output (NW) Front output (STD) or high range output (NW) Antenna input Fuse (10 A) Wired remote input Hard-...
.... 10-1/8 in battery drain. Ensure that the ground wire is equipped with different screws. If the screw for FH-X830BHS/X730BS) Power cord input Microphone input Rear output (STD) or middle range output (NW) Front output (STD) or high range output (NW) Antenna input Fuse (10 A) Wired remote input Hard-...
Owner s Manual
Page 24
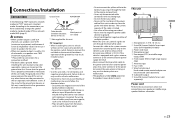
... without the optional amplifier. Tapping screw (5 mm × 9 mm, not supplied with product) Mounting bracket Dashboard or console Installing the microphone The microphone should be placed directly in front of the driver at an angle of this unit where: - CAUTION It is extremely dangerous to allow ...when the unit is it overheats. Be sure to a car's illumination signal. Subwoofer (4 Ω) × 2 Orange/white Connect to install the microphone in parallel will be sure to connect the subwoofer to a passenger as a result of the unit match. 2 Tighten the screws on each side. ...
... without the optional amplifier. Tapping screw (5 mm × 9 mm, not supplied with product) Mounting bracket Dashboard or console Installing the microphone The microphone should be placed directly in front of the driver at an angle of this unit where: - CAUTION It is extremely dangerous to allow ...when the unit is it overheats. Be sure to a car's illumination signal. Subwoofer (4 Ω) × 2 Orange/white Connect to install the microphone in parallel will be sure to connect the subwoofer to a passenger as a result of the unit match. 2 Tighten the screws on each side. ...
Owner s Manual
Page 25
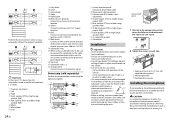
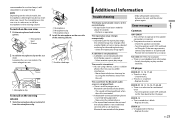
...→ The connection between the unit and the cellular phone again. If the message remains, contact your dealer or an authorized Pioneer Service Station for example) → There is dirty. - Switch the display or play another repeat play range. Replace the...the steering column. NO XXXX (NO TITLE, for assistance. Microphone lead Groove Microphone Microphone clip Microphone base 2 Install the microphone on the rear side of the steering column. 2 Install the microphone clip on the vehicle model, the microphone cable length may cause audible interference. - The repeat play ...
...→ The connection between the unit and the cellular phone again. If the message remains, contact your dealer or an authorized Pioneer Service Station for example) → There is dirty. - Switch the display or play another repeat play range. Replace the...the steering column. NO XXXX (NO TITLE, for assistance. Microphone lead Groove Microphone Microphone clip Microphone base 2 Install the microphone on the rear side of the steering column. 2 Install the microphone clip on the vehicle model, the microphone cable length may cause audible interference. - The repeat play ...


