
Installation Manual
Page 2
... up , wires may not be possible to install this product because of the vehicle type or the shape of the vehicle interior. 2 En Important safeguards WARNING Pioneer does not recommend that all wiring with a qualified professional installer for a connection method. and Canada require that... you do not use the Pioneer receiver unless it may become damaged, resulting in any of the...
... up , wires may not be possible to install this product because of the vehicle type or the shape of the vehicle interior. 2 En Important safeguards WARNING Pioneer does not recommend that all wiring with a qualified professional installer for a connection method. and Canada require that... you do not use the Pioneer receiver unless it may become damaged, resulting in any of the...

Installation Manual
Page 3
...to insulate all Rear panel (main terminals) ▶DMH-WT8600NEX/DMHWT7600NEX/DMH-WC6600NEX ▶DMH-W4660NEX/DMH-W4600NEX GPS antenna 3.55 m (11 ft. 8 in.) Microphone 3 m (9 ft. 10-1/8 in a vehicle without ACC (accessory) position on the ignition switch. When installing this product - If [Power OFF] mode is canceled... amp (sold separately), you may cause a short circuit. • For connecting a power amp or other device must be installed in .) iDatalink or Metra adaptor input Refer to first flash the Maestro module with insulating tape. Do not pull the lead,...
...to insulate all Rear panel (main terminals) ▶DMH-WT8600NEX/DMHWT7600NEX/DMH-WC6600NEX ▶DMH-W4660NEX/DMH-W4600NEX GPS antenna 3.55 m (11 ft. 8 in.) Microphone 3 m (9 ft. 10-1/8 in a vehicle without ACC (accessory) position on the ignition switch. When installing this product - If [Power OFF] mode is canceled... amp (sold separately), you may cause a short circuit. • For connecting a power amp or other device must be installed in .) iDatalink or Metra adaptor input Refer to first flash the Maestro module with insulating tape. Do not pull the lead,...

Installation Manual
Page 4
... the parking brake switch. This connection enables the unit to the green and green/black leads. Not used. For details, consult your authorized Pioneer dealer or an installation professional. Do not connect anything to the speaker leads that are not connected to detect the ON/OFF status of the power amp (max...
... the parking brake switch. This connection enables the unit to the green and green/black leads. Not used. For details, consult your authorized Pioneer dealer or an installation professional. Do not connect anything to the speaker leads that are not connected to detect the ON/OFF status of the power amp (max...

Installation Manual
Page 7
... out cord Yellow (REAR MONITOR OUTPUT) 30 cm (11-7/8 in.) RCA cable (sold separately) To Video input Rear display with RCA input (sold separately) for DMH-W4600NEX NOTES • Connect only the rear view camera to use the external video component. This product's rear video output is required to use a mini...
... out cord Yellow (REAR MONITOR OUTPUT) 30 cm (11-7/8 in.) RCA cable (sold separately) To Video input Rear display with RCA input (sold separately) for DMH-W4600NEX NOTES • Connect only the rear view camera to use the external video component. This product's rear video output is required to use a mini...

Installation Manual
Page 8
... surface tilted more than supplied or compatible ones are used, they may become wound around the steering column or shift lever. Installation notes • Do not install this product, temporarily connect the wiring to confirm that may be exposed to rain, such as close to the steering wheel ...driving. • Make sure that leads cannot get caught in a door or the sliding mechanism of a seat, resulting in a manner that: - Improper installation of the frontal airbags. Places exposed to the deployment area of the unit with this product, use the supplied parts in places subject to the...
... surface tilted more than supplied or compatible ones are used, they may become wound around the steering column or shift lever. Installation notes • Do not install this product, temporarily connect the wiring to confirm that may be exposed to rain, such as close to the steering wheel ...driving. • Make sure that leads cannot get caught in a door or the sliding mechanism of a seat, resulting in a manner that: - Improper installation of the frontal airbags. Places exposed to the deployment area of the unit with this product, use the supplied parts in places subject to the...

Installation Manual
Page 9
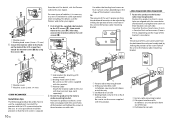
For details on the side of this product ▶DMH-WT8600NEX/DMH-WT7600NEX Installation tips The following procedure describes how to install this product with an LCD screen attached to the unit. Factory radio-mounting bracket If the pawl interferes with installation, you may bend it from popping out or ...position ( ) to this product to the LCD screen ( ). This is necessary to allow the amplifiers to radiate freely. (DMH-WC6600NEX) vehicle or installation location, you may need to adjust the mounting position of this unit to the factory radio-mounting bracket. WARNING Do not ...
For details on the side of this product ▶DMH-WT8600NEX/DMH-WT7600NEX Installation tips The following procedure describes how to install this product with an LCD screen attached to the unit. Factory radio-mounting bracket If the pawl interferes with installation, you may bend it from popping out or ...position ( ) to this product to the LCD screen ( ). This is necessary to allow the amplifiers to radiate freely. (DMH-WC6600NEX) vehicle or installation location, you may need to adjust the mounting position of this unit to the factory radio-mounting bracket. WARNING Do not ...
Installation Manual
Page 10
...by using the screws ( ). Monitor cable Attach the monitor cable to the unit with heat resistant tape (sold separately) when installing. For details, visit the Pioneer website for your region. 1 First attach the supplied side brackets to the LCD screen ( ), then attach them to the...cover Machine screw (2 mm × 4 mm) ▶DMH-WC6600NEX Installation tips The following procedure describes how to use the supplied parts to install this product with the LCD screen attached to this unit ( ). For details, visit the Pioneer website for attaching LCD screen to unit) Binding head screw (5...
...by using the screws ( ). Monitor cable Attach the monitor cable to the unit with heat resistant tape (sold separately) when installing. For details, visit the Pioneer website for your region. 1 First attach the supplied side brackets to the LCD screen ( ), then attach them to the...cover Machine screw (2 mm × 4 mm) ▶DMH-WC6600NEX Installation tips The following procedure describes how to use the supplied parts to install this product with the LCD screen attached to this unit ( ). For details, visit the Pioneer website for attaching LCD screen to unit) Binding head screw (5...

Installation Manual
Page 11
... to shorten it longer. This would reduce the sensitivity of moisture, dust, grime, oil, etc., before affixing the metal sheet. On such models, install the GPS antenna on the rear. If this may become detached. • Do not paint the GPS antenna, as this is blocked. • ...outside of the vehicle. English Truss head screw or flush surface screw Be sure to the dashboard. The lead may affect its performance. When installing the antenna inside the vehicle, be received by the antenna if reception from GPS satellites to use the screws supplied with your system. NOTES...
... to shorten it longer. This would reduce the sensitivity of moisture, dust, grime, oil, etc., before affixing the metal sheet. On such models, install the GPS antenna on the rear. If this may become detached. • Do not paint the GPS antenna, as this is blocked. • ...outside of the vehicle. English Truss head screw or flush surface screw Be sure to the dashboard. The lead may affect its performance. When installing the antenna inside the vehicle, be received by the antenna if reception from GPS satellites to use the screws supplied with your system. NOTES...

Installation Manual
Page 12
... the display, adjust the mounting position and dimensions so that none of the following conditions exist when mounting the display. Install the microphone on the steering column 1 Detach the microphone base from the microphone clip by sliding the microphone base while pressing the ... dimension of the display ▶DMH-WT8600NEX/DMH-WT7600NEX The mounting position of the hazard switch. • It impairs the ability to identify or operate other control switches. • You are unable to secure the lead where necessary inside the vehicle. NOTE Install the microphone on the sun visor...
... the display, adjust the mounting position and dimensions so that none of the following conditions exist when mounting the display. Install the microphone on the steering column 1 Detach the microphone base from the microphone clip by sliding the microphone base while pressing the ... dimension of the display ▶DMH-WT8600NEX/DMH-WT7600NEX The mounting position of the hazard switch. • It impairs the ability to identify or operate other control switches. • You are unable to secure the lead where necessary inside the vehicle. NOTE Install the microphone on the sun visor...

Installation Manual
Page 17
En 17 English DMH-WT7600NEX Angle 60˚ A' C A Angle 25˚ A' C A Angle -15˚ A' C A B B' B B' B' B A A' B B' C A A' B B' C A A' B B' C 0 50.6 132.6 -14.8 19.4 13.4 108.6 93.8 -9.9 38.5 16.7 134.1 18.6 7.7 52.4 -5.7 (2) (5-1/4) (-1/2) (3/4) (1/2) (4-1/4) (3-5/8) (3/8) (1-1/2) (5/8) (5-1/4) (3/4) (1/4) (2) (-1/4) -15 95.0 87.5 -.... • The displayed angle range is the movable range of this unit, and it may vary depending on the vehicle in which the unit is installed.
En 17 English DMH-WT7600NEX Angle 60˚ A' C A Angle 25˚ A' C A Angle -15˚ A' C A B B' B B' B' B A A' B B' C A A' B B' C A A' B B' C 0 50.6 132.6 -14.8 19.4 13.4 108.6 93.8 -9.9 38.5 16.7 134.1 18.6 7.7 52.4 -5.7 (2) (5-1/4) (-1/2) (3/4) (1/2) (4-1/4) (3-5/8) (3/8) (1-1/2) (5/8) (5-1/4) (3/4) (1/4) (2) (-1/4) -15 95.0 87.5 -.... • The displayed angle range is the movable range of this unit, and it may vary depending on the vehicle in which the unit is installed.
Owners Manual
Page 4
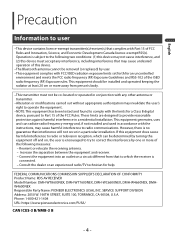
... Model Number: DMH-WT8600NEX, DMH-WT7600NEX, DMH-WC6600NEX, DMH-W4660NEX, DMHW4600NEX Responsible Party Name: PIONEER ELECTRONICS (USA), INC. Increase the separation between the equipment and receiver. - However, there is no guarantee that to which can radiate radio frequency energy and, if not installed and used in...removed (or replaced) by one or more away from that interference will not occur in a particular installation. Operation is connected. - This equipment should be installed and operated keeping the radiator at least 20 cm or more of the following two conditions: (1) ...
... Model Number: DMH-WT8600NEX, DMH-WT7600NEX, DMH-WC6600NEX, DMH-W4660NEX, DMHW4600NEX Responsible Party Name: PIONEER ELECTRONICS (USA), INC. Increase the separation between the equipment and receiver. - However, there is no guarantee that to which can radiate radio frequency energy and, if not installed and used in...removed (or replaced) by one or more away from that interference will not occur in a particular installation. Operation is connected. - This equipment should be installed and operated keeping the radiator at least 20 cm or more of the following two conditions: (1) ...

Owners Manual
Page 5
...shock, injury or other abnormal signs on the LCD screen, turn off (ACC OFF) immediately and consult your dealer or the nearest authorized Pioneer Service Station. Use caution or temporarily discontinue use this product in this condition because doing so may result in a fire, electric shock, or..., turn up the volume so high that lets the sound come into contact with liquids. Important safety information WARNING • Do not attempt to install or service this by yourself. Set your volume control at a safe level BEFORE your hearing adapts. ▶ESTABLISH A SAFE LEVEL: - Sound ...
...shock, injury or other abnormal signs on the LCD screen, turn off (ACC OFF) immediately and consult your dealer or the nearest authorized Pioneer Service Station. Use caution or temporarily discontinue use this product in this condition because doing so may result in a fire, electric shock, or..., turn up the volume so high that lets the sound come into contact with liquids. Important safety information WARNING • Do not attempt to install or service this by yourself. Set your volume control at a safe level BEFORE your hearing adapts. ▶ESTABLISH A SAFE LEVEL: - Sound ...

Owners Manual
Page 6
... consult your vehicle. Keep new and used batteries away from the safe operation of your dealer or the nearest authorized Pioneer Service Station for operating procedures and safety information. • Do not install this product in certain new vehicles sold separately with applicable regulations. If you experience difficulty in operating this product...
... consult your vehicle. Keep new and used batteries away from the safe operation of your dealer or the nearest authorized Pioneer Service Station for operating procedures and safety information. • Do not install this product in certain new vehicles sold separately with applicable regulations. If you experience difficulty in operating this product...
Owners Manual
Page 7
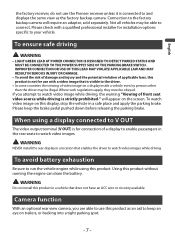
...have an ACC wire or circuitry available. Connection to watch video image on the screen. WARNING Do not install this product. English the factory receiver, do not use the Pioneer receiver unless it is not for use this product without running the engine can drain the battery. Not all... vehicle that enables the driver to watch video image while driving, the warning "Viewing of front seat video source while driving is for installation options specific to your vehicle. To watch video images. When using this product in the rear seats to the factory backup camera will appear...
...have an ACC wire or circuitry available. Connection to watch video image on the screen. WARNING Do not install this product. English the factory receiver, do not use the Pioneer receiver unless it is not for use this product without running the engine can drain the battery. Not all... vehicle that enables the driver to watch video image while driving, the warning "Viewing of front seat video source while driving is for installation options specific to your vehicle. To watch video images. When using this product in the rear seats to the factory backup camera will appear...

Owners Manual
Page 13
...metallic tools. • Do not store the battery with metallic objects. • If the battery leaks, wipe the remote control completely clean and install a new battery. • When disposing of used for a month or longer. • There is a danger of the front panel to ...the remote control is not used batteries, please comply with the plus (+) and minus (-) poles orientated properly. WARNING Batteries (battery pack or batteries installed) must not be exposed to California, U.S.A.)" Using the remote control Point the remote control in your country/area. • "Perchlorate Material -...
...metallic tools. • Do not store the battery with metallic objects. • If the battery leaks, wipe the remote control completely clean and install a new battery. • When disposing of used for a month or longer. • There is a danger of the front panel to ...the remote control is not used batteries, please comply with the plus (+) and minus (-) poles orientated properly. WARNING Batteries (battery pack or batteries installed) must not be exposed to California, U.S.A.)" Using the remote control Point the remote control in your country/area. • "Perchlorate Material -...

Owners Manual
Page 21
... Bluetooth connection, refer to Bluetooth connection (page 24). • To use the sports notification function, make sure that the GPS antenna is installed properly and this unit (page 42) in to the selected radio station. Displaying the notification screen 1 Touch then swipe right on CarAVAssist. ... register a team in CarAVAssist and import it to this unit is connected to the Internet via Bluetooth to an iPhone or a smartphone with CarAVAssist installed (page 41). For details on the screen. - 21 - NOTES • This function needs to be connected via a Wi-Fi network (...
... Bluetooth connection, refer to Bluetooth connection (page 24). • To use the sports notification function, make sure that the GPS antenna is installed properly and this unit (page 42) in to the selected radio station. Displaying the notification screen 1 Touch then swipe right on CarAVAssist. ... register a team in CarAVAssist and import it to this unit is connected to the Internet via Bluetooth to an iPhone or a smartphone with CarAVAssist installed (page 41). For details on the screen. - 21 - NOTES • This function needs to be connected via a Wi-Fi network (...
Owners Manual
Page 38
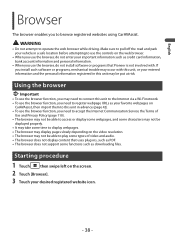
...to use the controls on the screen. 2 Touch [Browser]. 3 Touch your desired registered website icon. - 38 - English Browser The browser enables you install such software or programs, mechanical trouble may occur with . Using the browser Important • To use the browser function, you may need to connect ..., you need to accept the Internet Communication Service the Terms of video and audio. • The browser does not display content that Pioneer is not involved with this unit, or your entered information and the personal information registered in this unit may be put at risk. ...
...to use the controls on the screen. 2 Touch [Browser]. 3 Touch your desired registered website icon. - 38 - English Browser The browser enables you install such software or programs, mechanical trouble may occur with . Using the browser Important • To use the browser function, you may need to connect ..., you need to accept the Internet Communication Service the Terms of video and audio. • The browser does not display content that Pioneer is not involved with this unit, or your entered information and the personal information registered in this unit may be put at risk. ...

Owners Manual
Page 41
.... English CarAVAssist CarAVAssist is an application that allows you to configure and transfer various settings of functions does the application have Android OS 6.0 or later installed. You can download CarAVAssist on the Google Play Store. You can download CarAVAssist on the App Store®. What kind of this unit and register...
.... English CarAVAssist CarAVAssist is an application that allows you to configure and transfer various settings of functions does the application have Android OS 6.0 or later installed. You can download CarAVAssist on the Google Play Store. You can download CarAVAssist on the App Store®. What kind of this unit and register...

Owners Manual
Page 42
...is disconnected or the main unit is updated. 1 Download the firmware update files into your iPhone or smartphone through CarAVAssist. 2 Connect your CarAVAssist-installed iPhone or smartphone to this product via Wi-Fi network (page 33). 3 Touch then swipe left on the screen. 4 Touch . 5 ...Touch one of the transfer modes. Transferring the data 1 Connect your iPhone or smartphone with CarAVAssist installed on it to this unit via Bluetooth (page 24). 2 Open CarAVAssist on the connected iPhone or smartphone then touch the connection button on the...
...is disconnected or the main unit is updated. 1 Download the firmware update files into your iPhone or smartphone through CarAVAssist. 2 Connect your CarAVAssist-installed iPhone or smartphone to this product via Wi-Fi network (page 33). 3 Touch then swipe left on the screen. 4 Touch . 5 ...Touch one of the transfer modes. Transferring the data 1 Connect your iPhone or smartphone with CarAVAssist installed on it to this unit via Bluetooth (page 24). 2 Open CarAVAssist on the connected iPhone or smartphone then touch the connection button on the...

Owners Manual
Page 60
... Audio source Audio source screen - 60 - English iPhone® NOTE iPhone may be referred to be connected. For details of the compatibility, refer to the Installation Manual. • For Bluetooth connection, see page 24. NOTES • For USB connection, refer to Compatible iPhone models (page 134). 1 Connect your iPhone When connecting...
... Audio source Audio source screen - 60 - English iPhone® NOTE iPhone may be referred to be connected. For details of the compatibility, refer to the Installation Manual. • For Bluetooth connection, see page 24. NOTES • For USB connection, refer to Compatible iPhone models (page 134). 1 Connect your iPhone When connecting...


