
Owner's Manual
Page 4
...3 Beat effects The "beat effects" so popular on other features of the high-fidelity technology also used to connect the unit to a Pioneer DJ CD player, thus allowing playback to be linked to operation of the fader ("fader start play with a rotary type control. 4 Some of the ...-COLOR EFFECT 18 USING SOUND-COLOR EFFECTS 18 EFFECT PARAMETERS 19 MIDI SETTINGS 20 SYNCHRONIZING AUDIO SIGNALS TO EXTERNAL SEQUENCER, OR USING DJM-800 INFORMATION TO OPERATE AN EXTERNAL SEQUENCER 20 MIDI MESSAGES 20 PROGRAM CHANGE 21 SNAPSHOT 21 OTHER TROUBLESHOOTING 22 SPECIFICATIONS 23 BLOCK DIAGRAM 24...
...3 Beat effects The "beat effects" so popular on other features of the high-fidelity technology also used to connect the unit to a Pioneer DJ CD player, thus allowing playback to be linked to operation of the fader ("fader start play with a rotary type control. 4 Some of the ...-COLOR EFFECT 18 USING SOUND-COLOR EFFECTS 18 EFFECT PARAMETERS 19 MIDI SETTINGS 20 SYNCHRONIZING AUDIO SIGNALS TO EXTERNAL SEQUENCER, OR USING DJM-800 INFORMATION TO OPERATE AN EXTERNAL SEQUENCER 20 MIDI MESSAGES 20 PROGRAM CHANGE 21 SNAPSHOT 21 OTHER TROUBLESHOOTING 22 SPECIFICATIONS 23 BLOCK DIAGRAM 24...
Owner's Manual
Page 5
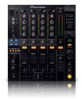
...connectors Ø6.3 mm phone-type input connectors. Use to connect to connect ground wires from microphone 1 and microphone 2 are connected, the DJM-800's fader can be temporarily interrupted when the output signal's sampling frequency is simultaneously input to the [ADD] position, the sounds from these... signal switch (MIC SIGNAL ADD/CUT) When set the sampling frequency of the digital output to attenuate the level of a Pioneer DJ CD player. MASTER 2 output connectors RCA type unbalanced output. 3. DIGITAL/LINE input selector switches Use to an AC power outlet of external...
...connectors Ø6.3 mm phone-type input connectors. Use to connect to connect ground wires from microphone 1 and microphone 2 are connected, the DJM-800's fader can be temporarily interrupted when the output signal's sampling frequency is simultaneously input to the [ADD] position, the sounds from these... signal switch (MIC SIGNAL ADD/CUT) When set the sampling frequency of the digital output to attenuate the level of a Pioneer DJ CD player. MASTER 2 output connectors RCA type unbalanced output. 3. DIGITAL/LINE input selector switches Use to an AC power outlet of external...
Owner's Manual
Page 6
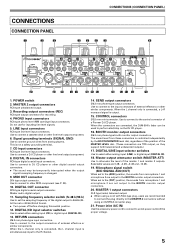
CONNECTING INPUTS Pioneer DJ CD players Connect a DJ CD player's audio output connectors to one of the channel 1 to 2 CD input connectors or the channel 3 to 4 LINE input connectors, and connect the player's control cable to [PHONO]. Alternately, connect the component to the channel 1 LINE input connector, then...disconnect the power plug from its outlet when making digital connections, connect the digital coaxial output terminal of the DJ CD player to one of the DJM-800's SIGNAL GND terminals. ÷ Note that no PHONO input connector is changed. Set the connected channel's DIGITAL/CD ...
CONNECTING INPUTS Pioneer DJ CD players Connect a DJ CD player's audio output connectors to one of the channel 1 to 2 CD input connectors or the channel 3 to 4 LINE input connectors, and connect the player's control cable to [PHONO]. Alternately, connect the component to the channel 1 LINE input connector, then...disconnect the power plug from its outlet when making digital connections, connect the digital coaxial output terminal of the DJ CD player to one of the DJM-800's SIGNAL GND terminals. ÷ Note that no PHONO input connector is changed. Set the connected channel's DIGITAL/CD ...
Owner's Manual
Page 8
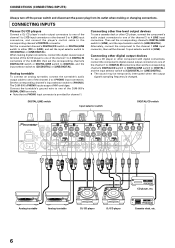
... the [- ∞] side. CONNECTIONS (CONNECTING MICROPHONE AND HEADPHONES/CONNECTING THE POWER CORD) CONNECTING MICROPHONE AND HEADPHONES Microphone The MIC 1 jack on the back of the player, then connect the plug to a standard wall outlet or to the auxiliary power outlet of your amplifier. ÷ Use only the supplied power cord. 8 Headphones...
... the [- ∞] side. CONNECTIONS (CONNECTING MICROPHONE AND HEADPHONES/CONNECTING THE POWER CORD) CONNECTING MICROPHONE AND HEADPHONES Microphone The MIC 1 jack on the back of the player, then connect the plug to a standard wall outlet or to the auxiliary power outlet of your amplifier. ÷ Use only the supplied power cord. 8 Headphones...
Owner's Manual
Page 10
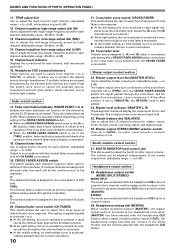
... to adjust the booth monitor output volume. Channel level indicator Displays the current level for each channel. (adjustable range: -26 dB to which a DJ CD player is linked to the operation of the channel fader (and unlinked to the master output, without being passed through the cross fader. Unselected buttons glow...
... to adjust the booth monitor output volume. Channel level indicator Displays the current level for each channel. (adjustable range: -26 dB to which a DJ CD player is linked to the operation of the channel fader (and unlinked to the master output, without being passed through the cross fader. Unselected buttons glow...
Owner's Manual
Page 14
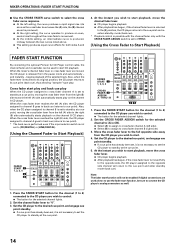
... [THRU]. [Using the Cross Fader to Start Playback] FADER START FUNCTION By connecting the optional Pioneer DJ CD Player control cable, the channel fader and cross fader can be used alone; Set the CD player to the desired cue point, and engage cue point standby. ¶ If a cue point ...cross fader curve response. ¶ At the left setting, the curve produces a rapid signal rise. (As soon as well. 1. Also, when the CD player assigned to channel B is produced, midway between the two curves noted above. ¶ This setting produces equal curve effects for the channel (1 to 4) connected...
... [THRU]. [Using the Cross Fader to Start Playback] FADER START FUNCTION By connecting the optional Pioneer DJ CD Player control cable, the channel fader and cross fader can be used alone; Set the CD player to the desired cue point, and engage cue point standby. ¶ If a cue point ...cross fader curve response. ¶ At the left setting, the curve produces a rapid signal rise. (As soon as well. 1. Also, when the CD player assigned to channel B is produced, midway between the two curves noted above. ¶ This setting produces equal curve effects for the channel (1 to 4) connected...
Owner's Manual
Page 20
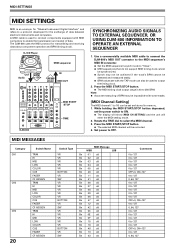
... START/STOP button. ¶ The selected MIDI channel will enter the MIDI setting mode. 2. Use a commercially available MIDI cable to connect the DJM-800's MIDI OUT connector to the MIDI sequencer's MIDI IN connector. ¶ Set the MIDI sequencer's synch mode to "Slave". ¶ MIDI ... receipt of data between electronic instruments and computers. DJ CD Player MIDI sequencer OUT Audio IN BPM =120 BPM =120 IN MIDI OUT DJM-800 MIDI START /STOP TIME SYNCHRONIZING AUDIO SIGNALS TO EXTERNAL SEQUENCER, OR USING DJM-800 INFORMATION TO OPERATE AN EXTERNAL SEQUENCER 1. Press the MIDI START...
... START/STOP button. ¶ The selected MIDI channel will enter the MIDI setting mode. 2. Use a commercially available MIDI cable to connect the DJM-800's MIDI OUT connector to the MIDI sequencer's MIDI IN connector. ¶ Set the MIDI sequencer's synch mode to "Slave". ¶ MIDI ... receipt of data between electronic instruments and computers. DJ CD Player MIDI sequencer OUT Audio IN BPM =120 BPM =120 IN MIDI OUT DJM-800 MIDI START /STOP TIME SYNCHRONIZING AUDIO SIGNALS TO EXTERNAL SEQUENCER, OR USING DJM-800 INFORMATION TO OPERATE AN EXTERNAL SEQUENCER 1. Press the MIDI START...
Owner's Manual
Page 22
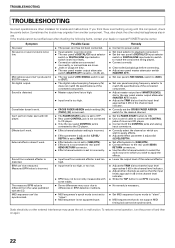
... channel level indicator. ÷ Adjust other external interference may cause the unit to which you think there is something wrong with CD player. Effects don't work . External effector doesn't work. Sound from another component. BPM can 't be rectified even after checking the following... items, contact your dealer or nearest PIONEER service center. To restore normal operation, turn the power off and then on which you wish to apply effects. ÷ Adjust the...
... channel level indicator. ÷ Adjust other external interference may cause the unit to which you think there is something wrong with CD player. Effects don't work . External effector doesn't work. Sound from another component. BPM can 't be rectified even after checking the following... items, contact your dealer or nearest PIONEER service center. To restore normal operation, turn the power off and then on which you wish to apply effects. ÷ Adjust the...
