Owner's Manual
Page 4
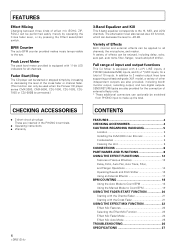
...This function can only be used when the Pioneer CD player series CMX-3000, CMX-5000, CDJ-1000, CDJ-100S, ... 4 CONTENTS FEATURES 4 CHECKING ACCESSORIES 4 CAUTIONS REGARDING HANDLING 5 Location 5 Installing the DJM-3000 in an EIA rack 5 Condensation 5 Cleaning the Unit 5 CONNECTIONS 6 PART NAMES ...Using the Auto Mode to Count BPM 18 Using the Manual Mode to all channels. SEND/RETURN jacks are also... addition to 2 master output lines (one supporting professional-grade XLR mode), a variety of input and output functions This DJ Mixer is connected.) 3-Band Equalizer and Kill This 3-...
...This function can only be used when the Pioneer CD player series CMX-3000, CMX-5000, CDJ-1000, CDJ-100S, ... 4 CONTENTS FEATURES 4 CHECKING ACCESSORIES 4 CAUTIONS REGARDING HANDLING 5 Location 5 Installing the DJM-3000 in an EIA rack 5 Condensation 5 Cleaning the Unit 5 CONNECTIONS 6 PART NAMES ...Using the Auto Mode to Count BPM 18 Using the Manual Mode to all channels. SEND/RETURN jacks are also... addition to 2 master output lines (one supporting professional-grade XLR mode), a variety of input and output functions This DJ Mixer is connected.) 3-Band Equalizer and Kill This 3-...
Owner's Manual
Page 10
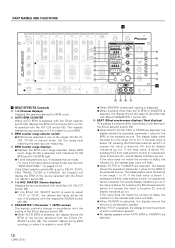
...value is below 1, pressing the Effect beat selector switch (@) causes the value to become 1/2, and all display indicators go out. For more information about manual mode, see the item "BPM COUNTING" "on the setting of the Effect selector switch (⁄). ¶ When DELAY, ECHO, PAN, or TRANS ... selector switch (#) causes the value to become 8/1, and all display indicators go out. The indicator flashes during BPM counting, or when it indicates manual mode. SELECT switch is used to count BPM. ¶ BPM counter range selector switch ¶ BPM can be the one (1-4) selected with ...
...value is below 1, pressing the Effect beat selector switch (@) causes the value to become 1/2, and all display indicators go out. For more information about manual mode, see the item "BPM COUNTING" "on the setting of the Effect selector switch (⁄). ¶ When DELAY, ECHO, PAN, or TRANS ... selector switch (#) causes the value to become 8/1, and all display indicators go out. The indicator flashes during BPM counting, or when it indicates manual mode. SELECT switch is used to count BPM. ¶ BPM counter range selector switch ¶ BPM can be the one (1-4) selected with ...
Owner's Manual
Page 11
.... ⁄ Effect selector switch Use to count the BPM, both BPM counter range displays (70-139 BPM and 91-180 BPM) go out, and the manual mode is enabled (see page 14). fi ON/OFF, TAP (Effect ON/OFF switch, TAP switch) This switch produces different operations depending on the setting... selected, the switch operates to turn the selected effect ON/OFF. by tapping the switch together with the source beat, the BPM can be input manually. FADER: Selects Effect Mix Fader mode.
.... ⁄ Effect selector switch Use to count the BPM, both BPM counter range displays (70-139 BPM and 91-180 BPM) go out, and the manual mode is enabled (see page 14). fi ON/OFF, TAP (Effect ON/OFF switch, TAP switch) This switch produces different operations depending on the setting... selected, the switch operates to turn the selected effect ON/OFF. by tapping the switch together with the source beat, the BPM can be input manually. FADER: Selects Effect Mix Fader mode.
Owner's Manual
Page 12
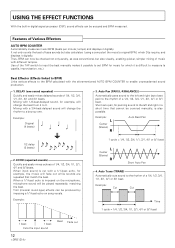
Use of the TAP switch to input the beat manually makes it is also possible. Mixing with a 3/4-beat-delayed sound will change the rhythm to the BPM calculated with different tempos. When a 1/1-beat echo is... BPM COUNTER to the rhythm of 1/4, 1/2, 3/4, 1/1, 2/1, 4/1 and 8/1 beats. Thus, BPM can now be played repeatedly, matching the beat. Mixing with 1/2-beat-delayed sound, for which DJs require, and displays it digitally. Troll (musical round-type) effects can be enjoyed and BPM measured. Example: Cut Cut Time 1 cycle = 1/4, 1/2, 3/4, 1/1, 2/1, 4/1 or 8/1 beat 1 beat 1 ...
Use of the TAP switch to input the beat manually makes it is also possible. Mixing with a 3/4-beat-delayed sound will change the rhythm to the BPM calculated with different tempos. When a 1/1-beat echo is... BPM COUNTER to the rhythm of 1/4, 1/2, 3/4, 1/1, 2/1, 4/1 and 8/1 beats. Thus, BPM can now be played repeatedly, matching the beat. Mixing with 1/2-beat-delayed sound, for which DJs require, and displays it digitally. Troll (musical round-type) effects can be enjoyed and BPM measured. Example: Cut Cut Time 1 cycle = 1/4, 1/2, 3/4, 1/1, 2/1, 4/1 or 8/1 beat 1 beat 1 ...
Owner's Manual
Page 15
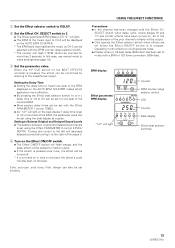
... the reverberation of the BPM displayed on the beat display if delay time is set using the beat display as a guide. Turning this case, use manual mode to 1/2 of one beat of the prior channel's effects will be output. ÷ Only operate the Effect selector switch when effects are off (when...
... the reverberation of the BPM displayed on the beat display if delay time is set using the beat display as a guide. Turning this case, use manual mode to 1/2 of one beat of the prior channel's effects will be output. ÷ Only operate the Effect selector switch when effects are off (when...

Owner's Manual
Page 18
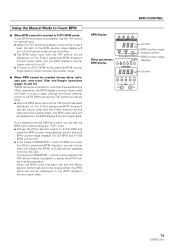
... the BPM counter range selector switch to synchronize two tracks with different speeds (count range 70.0-180.0 BPM). The 70-180 range is set to manual mode to count the BPM (see page 19). 4 Press CH-1 H.P CUE switch. ÷ The BPM display LED "1" will light. ÷ The BPM of the music...
... the BPM counter range selector switch to synchronize two tracks with different speeds (count range 70.0-180.0 BPM). The 70-180 range is set to manual mode to count the BPM (see page 19). 4 Press CH-1 H.P CUE switch. ÷ The BPM display LED "1" will light. ÷ The BPM of the music...
Owner's Manual
Page 19
... to adjust the BPM from the first digit. In such a case, change the Effect selector switch to AUTO BPM and use the TAP switch for manual input. ÷ When the TAP switch is pressed in time to the music's beat, the light in AUTO BPM mode: If auto BPM counting is...), and the BPM display's counter (upper side) will turn off . ÷ If the Effect PARAMETER 1 control (TIME) is not possible, use the TAP switch for manual input. ÷ After the BPM value input via the TAP switch has been displayed on the Effect parameter/BPM display's counter (lower side) and the...
... to adjust the BPM from the first digit. In such a case, change the Effect selector switch to AUTO BPM and use the TAP switch for manual input. ÷ When the TAP switch is pressed in time to the music's beat, the light in AUTO BPM mode: If auto BPM counting is...), and the BPM display's counter (upper side) will turn off . ÷ If the Effect PARAMETER 1 control (TIME) is not possible, use the TAP switch for manual input. ÷ After the BPM value input via the TAP switch has been displayed on the Effect parameter/BPM display's counter (lower side) and the...
Owner's Manual
Page 26
...hasn't been connected. ÷ Turn on CD. ÷ Because of other channels to approach 0 dB. ÷ Press the TAP switch and set BPM manually. Can't use CH-4's PHONO 4 ÷ A microphone has been connected to MIC ÷ Disconnect the microphone from value indicated on the FADER START switch....somewhat different values may cause the unit to which effects should be rectified even after checking the following items, contact your dealer or nearest PIONEER service center. Sound is something wrong with this component, check the points below. There is little or no sound. ÷ The ...
...hasn't been connected. ÷ Turn on CD. ÷ Because of other channels to approach 0 dB. ÷ Press the TAP switch and set BPM manually. Can't use CH-4's PHONO 4 ÷ A microphone has been connected to MIC ÷ Disconnect the microphone from value indicated on the FADER START switch....somewhat different values may cause the unit to which effects should be rectified even after checking the following items, contact your dealer or nearest PIONEER service center. Sound is something wrong with this component, check the points below. There is little or no sound. ÷ The ...
Owner's Manual
Page 28
... OP2, Canada TEL: 905-479-4411 28 L00000> Printed in the U.S.A. and you wish to locate the nearest Pioneer Authorized Independent Service Company, or if you wish to purchase replacement parts, operating instructions, service manuals, or accessories, please call the number shown below. 800 - 872 - 4159 Please do not ship your product...
... OP2, Canada TEL: 905-479-4411 28 L00000> Printed in the U.S.A. and you wish to locate the nearest Pioneer Authorized Independent Service Company, or if you wish to purchase replacement parts, operating instructions, service manuals, or accessories, please call the number shown below. 800 - 872 - 4159 Please do not ship your product...

