Operation Manual
Page 5
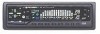
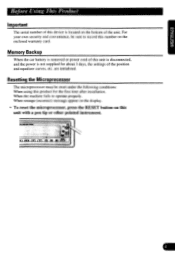
For your own security and convenience, be reset under the following conditions: When using this product for about 3 days, the settings of the position and equalizer curves, etc. are initialized. Resetting the Microprocessor The microprocessor must be sure to operate properly. When the machine fails to record this number on the .... MI WM MYMM Fxa inn 1-1 d55 Before Using This Product Important The serial number of this device is not supplied for the first time after installation.
For your own security and convenience, be reset under the following conditions: When using this product for about 3 days, the settings of the position and equalizer curves, etc. are initialized. Resetting the Microprocessor The microprocessor must be sure to operate properly. When the machine fails to record this number on the .... MI WM MYMM Fxa inn 1-1 d55 Before Using This Product Important The serial number of this device is not supplied for the first time after installation.

Operation Manual
Page 30
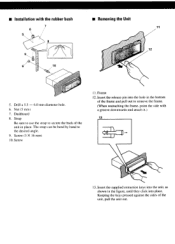
... the dashboard, then select the appropriate tabs according to the following illustrated installation methods. DIN Front-mount ■ Installation with your nearest dealer if installation requires the drilling of holes or other modifications of unit chassis). Screw Dashboard 2. Installation Note: • Before finally installing the unit, connect the wiring temporarily, making sure it does not...
... the dashboard, then select the appropriate tabs according to the following illustrated installation methods. DIN Front-mount ■ Installation with your nearest dealer if installation requires the drilling of holes or other modifications of unit chassis). Screw Dashboard 2. Installation Note: • Before finally installing the unit, connect the wiring temporarily, making sure it does not...
Operation Manual
Page 31
... frame. (When reattaching the frame. Dashboard 8. Screw (5 X 16 mm) 10. point the side with the rubber bush ■ Removing the Unit 7 11 12 0 0 10 5. ■ Installation with a groove downwards and attach it.) 13 13. Frame 12. Nut (5 mm) 7. The strap can be bend by hand to secure the back of the...
... frame. (When reattaching the frame. Dashboard 8. Screw (5 X 16 mm) 10. point the side with the rubber bush ■ Removing the Unit 7 11 12 0 0 10 5. ■ Installation with a groove downwards and attach it.) 13 13. Frame 12. Nut (5 mm) 7. The strap can be bend by hand to secure the back of the...
Operation Manual
Page 32
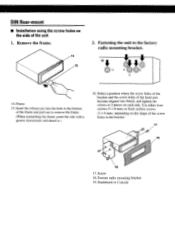
... either truss screws (5 x 8 mm) or flush surface screws (5 x 9 mm), depending on the shape of the unit 1. Remove the frame. 14 15 2. DIN Rear-mount ■ Installation using the screw holes on the side of the screw holes in the bottom of the head unit become aligned (are fitted), and tighten the...
... either truss screws (5 x 8 mm) or flush surface screws (5 x 9 mm), depending on the shape of the unit 1. Remove the frame. 14 15 2. DIN Rear-mount ■ Installation using the screw holes on the side of the screw holes in the bottom of the head unit become aligned (are fitted), and tighten the...

Operation Manual
Page 33
... wiring, wrap adhesive tape around them where they lie against metal parts. • Route and secure all wiring so it cannot touch any leads. Before installing it should. • Never feed power to other units, then make connections correctly. • Secure the wiring with a 12-volt battery and negative grounding. If... for vehicles with cable clamps or adhesive tape. Do not route wiring in the electrical system, be sure to e disconnect the battery cable before beginning installation. • Refer to the battery.
... wiring, wrap adhesive tape around them where they lie against metal parts. • Route and secure all wiring so it cannot touch any leads. Before installing it should. • Never feed power to other units, then make connections correctly. • Secure the wiring with a 12-volt battery and negative grounding. If... for vehicles with cable clamps or adhesive tape. Do not route wiring in the electrical system, be sure to e disconnect the battery cable before beginning installation. • Refer to the battery.

Operation Manual
Page 36
...WHICH MAY VARY FROM STATE TO STATE. OBLIGATIONS OR CONDITIONS. To receive warranty i3ervice you wit need to a nnuracturing detect when installed ano operated accordino ro the owners instructions P.M.:.0Seri me origins. necome necessary to snip Inc unit you will need to your ...the U.S.A. ONLY Should your product ever require service. CALIFORNIA 90801 1-800-421-1404 IN THE U.S.A. please call or write: CUSTOMER SERVICE DEPARTMENT PIONEER ELECTRONICS OF CANADA INC. 7405 THANS.CANADIENNE STE 3:32 VILLE Si 'T PO. H41 . 22 i5141335.6262 300 ALLSTATE PARKWAY ?.1ARKHAM ONT ...
...WHICH MAY VARY FROM STATE TO STATE. OBLIGATIONS OR CONDITIONS. To receive warranty i3ervice you wit need to a nnuracturing detect when installed ano operated accordino ro the owners instructions P.M.:.0Seri me origins. necome necessary to snip Inc unit you will need to your ...the U.S.A. ONLY Should your product ever require service. CALIFORNIA 90801 1-800-421-1404 IN THE U.S.A. please call or write: CUSTOMER SERVICE DEPARTMENT PIONEER ELECTRONICS OF CANADA INC. 7405 THANS.CANADIENNE STE 3:32 VILLE Si 'T PO. H41 . 22 i5141335.6262 300 ALLSTATE PARKWAY ?.1ARKHAM ONT ...
