
Operation Manual
Page 5
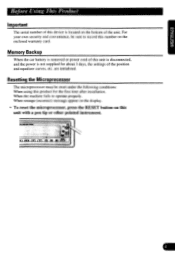
... For your own security and convenience, be reset under the following conditions: When using this product for about 3 days, the settings of the position and equalizer curves, etc. When the machine fails to record this number on this unit with a pen tip or other pointed instrument. When strange (incorrect) message appear... on the bottom of the unit. Before Using This Product Important The serial number of this device is not supplied for the first time after installation.
... For your own security and convenience, be reset under the following conditions: When using this product for about 3 days, the settings of the position and equalizer curves, etc. When the machine fails to record this number on this unit with a pen tip or other pointed instrument. When strange (incorrect) message appear... on the bottom of the unit. Before Using This Product Important The serial number of this device is not supplied for the first time after installation.

Operation Manual
Page 30
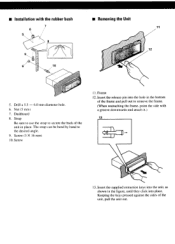
.... 3. Screw The use of unauthorized parts can be properly installed either from "Front" (conventional DIN Front-mount) or "Rear" (DIN Rear-mount installation, utilizing threaded screw holes at the sides of the vehicle. • Install the unit where it is a sudden stop, like an ...Rear-mount This unit can cause malfunctions. • Consult with your nearest dealer if installation requires the drilling of holes or other modifications of unit chassis). Installation Note: • Before finally installing the unit, connect the wiring temporarily, making sure it does not get in the ...
.... 3. Screw The use of unauthorized parts can be properly installed either from "Front" (conventional DIN Front-mount) or "Rear" (DIN Rear-mount installation, utilizing threaded screw holes at the sides of the vehicle. • Install the unit where it is a sudden stop, like an ...Rear-mount This unit can cause malfunctions. • Consult with your nearest dealer if installation requires the drilling of holes or other modifications of unit chassis). Installation Note: • Before finally installing the unit, connect the wiring temporarily, making sure it does not get in the ...
Operation Manual
Page 31
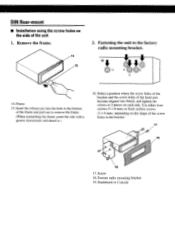
■ Installation with a groove downwards and attach it.) 13 13. Screw (5 X 16 mm) 10. Drill a 5.5 - 6.0 mm diameter hole. 6. Frame 12. Keeping the keys pressed against the sides ...
■ Installation with a groove downwards and attach it.) 13 13. Screw (5 X 16 mm) 10. Drill a 5.5 - 6.0 mm diameter hole. 6. Frame 12. Keeping the keys pressed against the sides ...
Operation Manual
Page 32
.... Fastening the unit to remove the frame. (When reattaching the frame, point the side with a groove downwards and attach it.) 16. DIN Rear-mount ■ Installation using the screw holes on the side of the head unit become aligned (are fitted), and tighten the screws at 2 places on the shape of...
.... Fastening the unit to remove the frame. (When reattaching the frame, point the side with a groove downwards and attach it.) 16. DIN Rear-mount ■ Installation using the screw holes on the side of the head unit become aligned (are fitted), and tighten the screws at 2 places on the shape of...
Operation Manual
Page 33
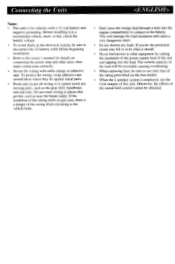
Before installing it in a recreational vehicle, truck, or bus, check the battery voltage. • To avoid shorts in places that get hot, such as the gear shift, ... with cable clamps or adhesive tape. This will be exceeded, causing overheating. • When replacing fuse, be sure to e disconnect the battery cable before beginning installation. • Refer to the battery. Connecting the Units Note: • This unit is for details on the fuse holder. • When the 2 speaker system is...
Before installing it in a recreational vehicle, truck, or bus, check the battery voltage. • To avoid shorts in places that get hot, such as the gear shift, ... with cable clamps or adhesive tape. This will be exceeded, causing overheating. • When replacing fuse, be sure to e disconnect the battery cable before beginning installation. • Refer to the battery. Connecting the Units Note: • This unit is for details on the fuse holder. • When the 2 speaker system is...

Operation Manual
Page 36
...Should your sales receipt. To receive warranty service you 'or cars or actual -epair work. ADDITIONAL INFORMATION - IN CANADA Please contact a Pioneer authorized Dealer to an Autnorzec Service Company. H41 . 22 i5141335.6262 300 ALLSTATE PARKWAY ?.1ARKHAM ONT L3R 0P2 '9051479-1411 1391 1 ...consequential damages reAted to tne failure of products each distributes to function properly under normal use due to a nnuracturing detect when installed ano operated accordino ro the owners instructions P.M.:.0Seri me repairec or replacement oroauct to you wit need to recordinas or recording ...
...Should your sales receipt. To receive warranty service you 'or cars or actual -epair work. ADDITIONAL INFORMATION - IN CANADA Please contact a Pioneer authorized Dealer to an Autnorzec Service Company. H41 . 22 i5141335.6262 300 ALLSTATE PARKWAY ?.1ARKHAM ONT L3R 0P2 '9051479-1411 1391 1 ...consequential damages reAted to tne failure of products each distributes to function properly under normal use due to a nnuracturing detect when installed ano operated accordino ro the owners instructions P.M.:.0Seri me repairec or replacement oroauct to you wit need to recordinas or recording ...
