Operating Instructions
Page 1
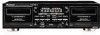
STEREO DOUBLE CASSETTE DECK CT-W208R Operating Instructions
STEREO DOUBLE CASSETTE DECK CT-W208R Operating Instructions
Operating Instructions
Page 4
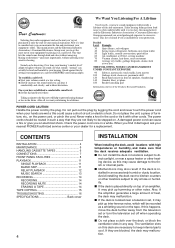
...: ÷ Set the dial and leave it may malfunction. CONTENTS INSTALLATION 4 MAINTENANCE 5 HANDLING CASSETTE TAPES 6 CONNECTIONS 7 FRONT PANEL FACILITIES 8 PLAYBACK 11 SINGLE PLAYBACK 11 BLANK SKIP 11 RELAY ... TAPE 14 TAPE COPYING 15 TROUBLESHOOTlNG 16 SPECIFICATIONS Back cover 4 INSTALLATION When installing the deck, avoid locations with other noise. If this may cause damage to get the most... cords should be routed in the cord or tie it damaged, ask your nearest PIONEER authrized service center or your musical enjoyment. Never make sure that lets the sound ...
...: ÷ Set the dial and leave it may malfunction. CONTENTS INSTALLATION 4 MAINTENANCE 5 HANDLING CASSETTE TAPES 6 CONNECTIONS 7 FRONT PANEL FACILITIES 8 PLAYBACK 11 SINGLE PLAYBACK 11 BLANK SKIP 11 RELAY ... TAPE 14 TAPE COPYING 15 TROUBLESHOOTlNG 16 SPECIFICATIONS Back cover 4 INSTALLATION When installing the deck, avoid locations with other noise. If this may cause damage to get the most... cords should be routed in the cord or tie it damaged, ask your nearest PIONEER authrized service center or your musical enjoyment. Never make sure that lets the sound ...
Operating Instructions
Page 5
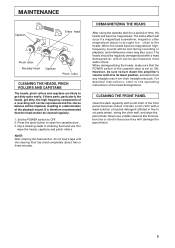
When demagnetizing the heads, make sure that the POWER switch of the cassette deck is set to get dirty, the high frequency components of a recording will not be reproduced and the stereo balance will occur if a magnetized screwdriver, magnet ... water), wring the cloth well, and wipe the panel clean. CLEANING THE FRONT PANEL Clean the deck regularly with a soft cloth. The same effect will be sure to turn down the amplifier's volume control to open the cassette door. 3. Set the POWER switch to the heads. DEMAGNETIZING THE HEADS After using the...
When demagnetizing the heads, make sure that the POWER switch of the cassette deck is set to get dirty, the high frequency components of a recording will not be reproduced and the stereo balance will occur if a magnetized screwdriver, magnet ... water), wring the cloth well, and wipe the panel clean. CLEANING THE FRONT PANEL Clean the deck regularly with a soft cloth. The same effect will be sure to turn down the amplifier's volume control to open the cassette door. 3. Set the POWER switch to the heads. DEMAGNETIZING THE HEADS After using the...
Operating Instructions
Page 6
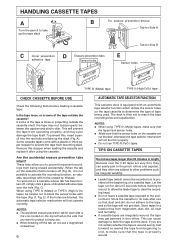
... side is the one located on the top left when the side that the tape is properly wound. The deck is then set to match the tape recording bias and equalization. TIPS ON CASSETTE TAPES Do not use TYPE III (FeCr) tapes. Remove this , insert a pencil into the reel hole and take... function, so valuable recordings will not get jammed in the pinch rollers and capstan, and they can cause damage to both the tape and the deck. Some cassette tapes come with the tape (Fig. These tabs allow the leader tape to clear the recording head. ÷ Do not leave...
... side is the one located on the top left when the side that the tape is properly wound. The deck is then set to match the tape recording bias and equalization. TIPS ON CASSETTE TAPES Do not use TYPE III (FeCr) tapes. Remove this , insert a pencil into the reel hole and take... function, so valuable recordings will not get jammed in the pinch rollers and capstan, and they can cause damage to both the tape and the deck. Some cassette tapes come with the tape (Fig. These tabs allow the leader tape to clear the recording head. ÷ Do not leave...
Operating Instructions
Page 7
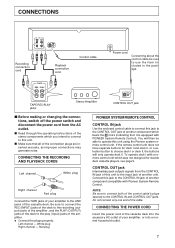
...jack of another component which was not designed for deck I and deck II, or a selection button to choose deck I with a remote control unit which bears the Î mark (indicating that all of another component compatible with PIONEER System Remote Control). Connect this jack to the ...household outlet. 7 CONNECTING THE RECORDING AND PLAYBACK CORDS Left channel White plug Right channel Red plug Connect the TAPE jacks of the cassette deck. White plug Right channel - CONTROL OUT jack Intermediary jack outputs signals from the AC outlet. 7 Read through the operating instructions of...
...jack of another component which was not designed for deck I and deck II, or a selection button to choose deck I with a remote control unit which bears the Î mark (indicating that all of another component compatible with PIONEER System Remote Control). Connect this jack to the ...household outlet. 7 CONNECTING THE RECORDING AND PLAYBACK CORDS Left channel White plug Right channel Red plug Connect the TAPE jacks of the cassette deck. White plug Right channel - CONTROL OUT jack Intermediary jack outputs signals from the AC outlet. 7 Read through the operating instructions of...
Operating Instructions
Page 8
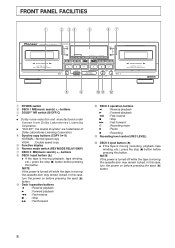
... before pressing this button. NOTE: If the power is turned off while the tape is moving , the cassette door may remain locked. buttons 8 DECK I operation buttons 2 : Reverse playback 3 : Forward playback 1 : Fast reverse 7 : Stop ¡ : Fast forward 0 DECK II operation buttons 2 : Reverse playback 3 : Forward playback 1 : Fast reverse 7 : Stop ¡ : Fast forward • : Recording mute...
... before pressing this button. NOTE: If the power is turned off while the tape is moving , the cassette door may remain locked. buttons 8 DECK I operation buttons 2 : Reverse playback 3 : Forward playback 1 : Fast reverse 7 : Stop ¡ : Fast forward 0 DECK II operation buttons 2 : Reverse playback 3 : Forward playback 1 : Fast reverse 7 : Stop ¡ : Fast forward • : Recording mute...
Operating Instructions
Page 9
... button for playback, both sides of the tape are recorded and then the tape stops, as it stops automatically (auto stop (7) button of DECK I In order to DECK II, press the stop function). Two way mode [ position When the switch is restarted, the repeat mode starts over from the reverse side, ...the tape will be operated using the remote control unit, but DECK II cannot. Repeat mode position When the switch is in reducing noise, as described above procedure from the mid-range on both sides of ...
... button for playback, both sides of the tape are recorded and then the tape stops, as it stops automatically (auto stop (7) button of DECK I In order to DECK II, press the stop function). Two way mode [ position When the switch is restarted, the repeat mode starts over from the reverse side, ...the tape will be operated using the remote control unit, but DECK II cannot. Repeat mode position When the switch is in reducing noise, as described above procedure from the mid-range on both sides of ...
Operating Instructions
Page 10
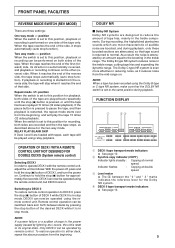
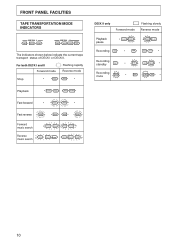
... REC REV PLAY FWD The indicators shown below indicate the current tape transport status of DECK I and II Forward mode Flashing rapidly Reverse mode Stop FWD REV Playback PLAY FWD REV PLAY Fast forward FWD REV Fast reverse REV FWD REV ...FWD Forward music search PLAY FWD REV PLAY Reverse music search REV PLAY FWD REV PLAY FWD DECK II only Forward mode Flashing slowly Reverse mode Playback pause PLAY FWD REV PLAY Recording REC FWD REC REV Recording REC standby Recording REC mute...
... REC REV PLAY FWD The indicators shown below indicate the current tape transport status of DECK I and II Forward mode Flashing rapidly Reverse mode Stop FWD REV Playback PLAY FWD REV PLAY Fast forward FWD REV Fast reverse REV FWD REV ...FWD Forward music search PLAY FWD REV PLAY Reverse music search REV PLAY FWD REV PLAY FWD DECK II only Forward mode Flashing slowly Reverse mode Playback pause PLAY FWD REV PLAY Recording REC FWD REC REV Recording REC standby Recording REC mute...
Operating Instructions
Page 11
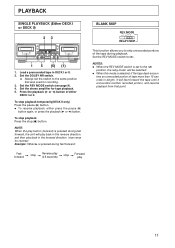
... unrecorded portion of either press the pause (8) button again, or press the playback (3 or 2) button. To stop (7) button. REC LEVEL MAX DECK @II AUTO REVERSE Auto Tape Selector MUSIC SEARCH SYSTEM / PLAYBACK DOLBY B-C NR 1 5 (5) (1) 1. Press the playback (3 or 2) button of... to . OFF _ ON HIGH SPEED COPY SYSYEM MIN DECK @II + MS - PLAYBACK SINGLE PLAYBACK (Either DECK I or DECK II) 23 B STEREO DOUBLE CASSETTE DECK Î DECK I or II. 2. COPY I 3 II NORMAL HIGH DOLBY NR B OFF C DECK II REV MODE RELAY/SKIP DECK @I or II. Set the REV MODE switch (see ...
... unrecorded portion of either press the pause (8) button again, or press the playback (3 or 2) button. To stop (7) button. REC LEVEL MAX DECK @II AUTO REVERSE Auto Tape Selector MUSIC SEARCH SYSTEM / PLAYBACK DOLBY B-C NR 1 5 (5) (1) 1. Press the playback (3 or 2) button of... to . OFF _ ON HIGH SPEED COPY SYSYEM MIN DECK @II + MS - PLAYBACK SINGLE PLAYBACK (Either DECK I or DECK II) 23 B STEREO DOUBLE CASSETTE DECK Î DECK I or II. 2. COPY I 3 II NORMAL HIGH DOLBY NR B OFF C DECK II REV MODE RELAY/SKIP DECK @I or II. Set the REV MODE switch (see ...
Operating Instructions
Page 12
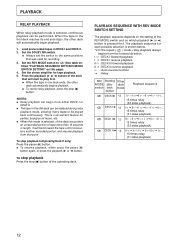
... the tape until it encounters another recorded portion, and resume playback from the forward direction. To stop playback Press the stop (7) button. deck switch back mode button Playback sequence DECK I3 *2 DECK I2 *2 I# ∞I @=II # ∞II @=I # ∞I @... 15 times relay (32 sides playback) I@ = II #∞II @ = I #∞I @ = II #... 15 times relay (31...
... the tape until it encounters another recorded portion, and resume playback from the forward direction. To stop playback Press the stop (7) button. deck switch back mode button Playback sequence DECK I3 *2 DECK I2 *2 I# ∞I @=II # ∞II @=I # ∞I @... 15 times relay (32 sides playback) I@ = II #∞II @ = I #∞I @ = II #... 15 times relay (31...
Operating Instructions
Page 14
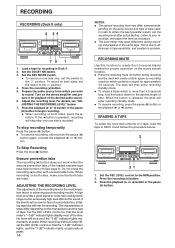
...SYSTEM / PLAYBACK DOLBY B-C NR 31 1. Press the playback (3 or 2) button or the pause (8) button. RECORDING RECORDING (Deck II only) 2 34 B STEREO DOUBLE CASSETTE DECK Î DECK I + AUTO REVERSE Auto Tape Selector MUSIC SEARCH SYSTEM / PLAYBACK MS - If the 2 button is pressed , recording ... for the desired length of the same tape. For details, see "ADJUSTING THE RECORDING LEVEL" below . 2 B STEREO DOUBLE CASSETTE DECK Î DECK I + AUTO REVERSE Auto Tape Selector MUSIC SEARCH SYSTEM / PLAYBACK MS - ADJUSTING THE RECORDING LEVEL The adjustment of the recording...
...SYSTEM / PLAYBACK DOLBY B-C NR 31 1. Press the playback (3 or 2) button or the pause (8) button. RECORDING RECORDING (Deck II only) 2 34 B STEREO DOUBLE CASSETTE DECK Î DECK I + AUTO REVERSE Auto Tape Selector MUSIC SEARCH SYSTEM / PLAYBACK MS - If the 2 button is pressed , recording ... for the desired length of the same tape. For details, see "ADJUSTING THE RECORDING LEVEL" below . 2 B STEREO DOUBLE CASSETTE DECK Î DECK I + AUTO REVERSE Auto Tape Selector MUSIC SEARCH SYSTEM / PLAYBACK MS - ADJUSTING THE RECORDING LEVEL The adjustment of the recording...
Operating Instructions
Page 15
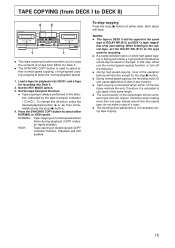
... copying Press the stop (7) button. ÷ During normal speed copying, the recording mute (•) and pause (8)buttons of deck II also function. ÷ Tape copying is advisable to DECK II) 4 2 B STEREO DOUBLE CASSETTE DECK Î DECK I + AUTO REVERSE Auto Tape Selector MUSIC SEARCH SYSTEM / PLAYBACK MS - Therefore it is cancelled when either of the two...
... copying Press the stop (7) button. ÷ During normal speed copying, the recording mute (•) and pause (8)buttons of deck II also function. ÷ Tape copying is advisable to DECK II) 4 2 B STEREO DOUBLE CASSETTE DECK Î DECK I + AUTO REVERSE Auto Tape Selector MUSIC SEARCH SYSTEM / PLAYBACK MS - Therefore it is cancelled when either of the two...
Operating Instructions
Page 16
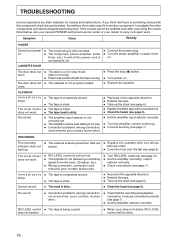
...the trouble cannot be rectified even after exercising the checks listed below . tabs are ÷ Replace the cassette with this component,check the points below , ask your nearest PIONEER authorized service center or your dealer to which the power cord is connected is moving). ÷ Power ...; Cover the hole over the tab (see page 6). The door does not close. ÷ The deck is something wrong with one . ÷ Clean the heads (see page 5). RECORDING The recording ÷ The cassette erasure prevention tabs are intact. light up . ÷ Connect securely (see page 7). stops. ÷...
...the trouble cannot be rectified even after exercising the checks listed below . tabs are ÷ Replace the cassette with this component,check the points below , ask your nearest PIONEER authorized service center or your dealer to which the power cord is connected is moving). ÷ Power ...; Cover the hole over the tab (see page 6). The door does not close. ÷ The deck is something wrong with one . ÷ Clean the heads (see page 5). RECORDING The recording ÷ The cassette erasure prevention tabs are intact. light up . ÷ Connect securely (see page 7). stops. ÷...
Operating Instructions
Page 20
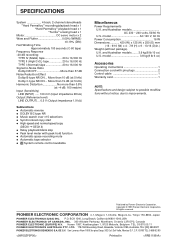
...IV (Metal) tape 20 to 16,500 Hz TYPE II (High/CrO ) tape 20 to 16,000 Hz 2 TYPE I = DECK II) ÷ Relay playback/blank skip ÷ Peak level meter with pin plugs 2 Control cable 1 Warranty card 1 NOTE: Specifications... 9/16 (W) x 4 - 7/8 (H) x 9 - 13/16 (D)in All rights reserved. Published by Pioneer Electronic Corporation. DE C.V. Copyright © 1999 Pioneer Electronic Corporation. Haven 1087, Keetberglaan 1, 9120 Melsele, Belgium TEL: 03/570.05.11 PIONEER ELECTRONICS AUSTRALIA PTY. More than 19 dB (at 5 kHz) Harmonic Distortion No more than 0.8% (at -4...
...IV (Metal) tape 20 to 16,500 Hz TYPE II (High/CrO ) tape 20 to 16,000 Hz 2 TYPE I = DECK II) ÷ Relay playback/blank skip ÷ Peak level meter with pin plugs 2 Control cable 1 Warranty card 1 NOTE: Specifications... 9/16 (W) x 4 - 7/8 (H) x 9 - 13/16 (D)in All rights reserved. Published by Pioneer Electronic Corporation. DE C.V. Copyright © 1999 Pioneer Electronic Corporation. Haven 1087, Keetberglaan 1, 9120 Melsele, Belgium TEL: 03/570.05.11 PIONEER ELECTRONICS AUSTRALIA PTY. More than 19 dB (at 5 kHz) Harmonic Distortion No more than 0.8% (at -4...

