
Owners Manual
Page 4
... the sun visor 38 - Contents Initial Settings Entering PIN code for Bluetooth wireless connection 24 Operating with Velcro fasteners 37 Installing the microphone 37 - Using a cellular phone to initiate a connection 32 Registering connected cellular phone 32 Disconnecting a cellular ... device information of this unit 33 Connecting a Bluetooth audio player 34 Disconnecting a Bluetooth audio player 34 Connections Connecting the units 36 Installation Installing this unit 37 - Mounting with different head units Using as an external unit 25 Function compatibility charts 26 - Head unit group ...
... the sun visor 38 - Contents Initial Settings Entering PIN code for Bluetooth wireless connection 24 Operating with Velcro fasteners 37 Installing the microphone 37 - Using a cellular phone to initiate a connection 32 Registering connected cellular phone 32 Disconnecting a cellular ... device information of this unit 33 Connecting a Bluetooth audio player 34 Disconnecting a Bluetooth audio player 34 Connections Connecting the units 36 Installation Installing this unit 37 - Mounting with different head units Using as an external unit 25 Function compatibility charts 26 - Head unit group ...

Owners Manual
Page 6
...PCs and other than AVH-P7800DVD (Russian model) and AVHP6800DVD (Russian model), refer to operate properly, contact your dealer or nearest authorized Pioneer Service Station. automatic answering ! When this unit lets you read and observe WARNINGs and CAUTIONs in 2.4 GHz frequency range and transmits voice...Ericsson Inc., Intel Corp., Nokia Corp., Toshiba and IBM in 1998, and it is developed as a cable replacement for the first time after installation ! REFUSE ALL CALLS ! ring tone This unit must be problems with the op- eration of the following settings are cleared: ! About ...
...PCs and other than AVH-P7800DVD (Russian model) and AVHP6800DVD (Russian model), refer to operate properly, contact your dealer or nearest authorized Pioneer Service Station. automatic answering ! When this unit lets you read and observe WARNINGs and CAUTIONs in 2.4 GHz frequency range and transmits voice...Ericsson Inc., Intel Corp., Nokia Corp., Toshiba and IBM in 1998, and it is developed as a cable replacement for the first time after installation ! REFUSE ALL CALLS ! ring tone This unit must be problems with the op- eration of the following settings are cleared: ! About ...
Owners Manual
Page 35
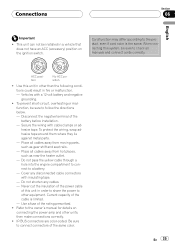
... the rating prescribed. ! OF OF T T ACC position No ACC position ! Be sure to follow the directions below. - Cover any cables. - This unit can not be installed in a vehicle that does not have an ACC (accessory) position on connecting the power amp and other equipment. Current capacity of the battery before...
... the rating prescribed. ! OF OF T T ACC position No ACC position ! Be sure to follow the directions below. - Cover any cables. - This unit can not be installed in a vehicle that does not have an ACC (accessory) position on connecting the power amp and other equipment. Current capacity of the battery before...

Owners Manual
Page 37
...movement. If this unit using the Velcro fasteners (soft). % Mount this unit is a sudden stop, like an emergency stop. ! Be sure to install the unit in the passenger compartment, anchor it securely so it to the car mat directly, you want to become wound around the sliding mechanism...this unit so as to make sure none of the leads are trapped between this unit, be heard during playback of unauthorized parts may install this unit without using the Velcro fasteners. Check all leads and cords carefully around the steering column or gearstick. Depending on its top surface...
...movement. If this unit using the Velcro fasteners (soft). % Mount this unit is a sudden stop, like an emergency stop. ! Be sure to install the unit in the passenger compartment, anchor it securely so it to the car mat directly, you want to become wound around the sliding mechanism...this unit so as to make sure none of the leads are trapped between this unit, be heard during playback of unauthorized parts may install this unit without using the Velcro fasteners. Check all leads and cords carefully around the steering column or gearstick. Depending on its top surface...
Owners Manual
Page 38
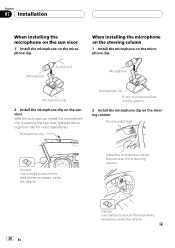
... Microphone clip Fit the microphone lead into the groove. 2 Install the microphone clip on the sun visor. Microphone To this unit. Microphone Microphone clip 2 Install the microphone clip on the steering column. Install the microphone clip on the rear side of the steering column...to secure the lead where necessary inside the vehicle. When installing the microphone on the steering column 1 Install the microphone on the microphone clip. Section 07 Installation When installing the microphone on the sun visor 1 Install the microphone on the microphone clip. Double-sided tape ...
... Microphone clip Fit the microphone lead into the groove. 2 Install the microphone clip on the sun visor. Microphone To this unit. Microphone Microphone clip 2 Install the microphone clip on the steering column. Install the microphone clip on the rear side of the steering column...to secure the lead where necessary inside the vehicle. When installing the microphone on the steering column 1 Install the microphone on the microphone clip. Section 07 Installation When installing the microphone on the sun visor 1 Install the microphone on the microphone clip. Double-sided tape ...
Owners Manual
Page 39
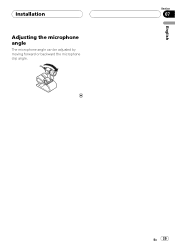
English Section 07 En 39 Installation Adjusting the microphone angle The microphone angle can be adjusted by moving forward or backward the microphone clip angle.
English Section 07 En 39 Installation Adjusting the microphone angle The microphone angle can be adjusted by moving forward or backward the microphone clip angle.