
Leaflet
Page 1
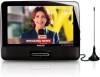
...of -use • USB connection for video, photo and music playback • AC adaptor, car adaptor and AV cable included Philips Portable DVD and digital TV 23cm/ 9" LCD 3hr playtime DTV PD9003 Watch your convenience • Enjoy up Enjoy free-to-air digital TV programs with a built-in battery* • Full ...-air digital TV • Electronic Program Guide (EPG) • Easy installation and automatic channel search Extra touches for your favorite TV programs and DVDs anywhere with easy set-up to 3 hours playback with the built-in digital TV receiver on the PD9003 portable DVD player.
...of -use • USB connection for video, photo and music playback • AC adaptor, car adaptor and AV cable included Philips Portable DVD and digital TV 23cm/ 9" LCD 3hr playtime DTV PD9003 Watch your convenience • Enjoy up Enjoy free-to-air digital TV programs with a built-in battery* • Full ...-air digital TV • Electronic Program Guide (EPG) • Easy installation and automatic channel search Extra touches for your favorite TV programs and DVDs anywhere with easy set-up to 3 hours playback with the built-in digital TV receiver on the PD9003 portable DVD player.

Leaflet
Page 2
...player - it will resume play " followed by "resume" on your DivX Certified® Philips device. If you did not take the disc out of continuous movie, photo and music playback enjoyment can share your digital videos, music or photos directly. Portable DVD and digital TV 23cm/ 9" LCD 3hr playtime DTV Highlights PD9003... large files like movies, trailers and music videos on your Philips portable DVD player and playback your favorite moments with a compact builtin rechargeable battery for long-lasting power. Up to 3 hours of the player, simply press play and it 's that you have taken ...
...player - it will resume play " followed by "resume" on your DivX Certified® Philips device. If you did not take the disc out of continuous movie, photo and music playback enjoyment can share your digital videos, music or photos directly. Portable DVD and digital TV 23cm/ 9" LCD 3hr playtime DTV Highlights PD9003... large files like movies, trailers and music videos on your Philips portable DVD player and playback your favorite moments with a compact builtin rechargeable battery for long-lasting power. Up to 3 hours of the player, simply press play and it 's that you have taken ...

User manual
Page 2
Contents 1 Important 5 Important Safety Instructions 5 Hearing safety 6 Notice 7 2 Your portable DVD player 10 Introduction 10 What's in the box 10 Overview of the main unit 11 Overview of remote control 13 3 Get started 15 Preparation (for in-...car use) 15 Charge the battery 17 Install remote control battery 18 Connect additional equipment 19 4 Use your player 21 Turn on 21 Select OSD language 21 Play discs 21 Play from USB 22 Play options 22 5 Watch TV 23 First time settings 23...
Contents 1 Important 5 Important Safety Instructions 5 Hearing safety 6 Notice 7 2 Your portable DVD player 10 Introduction 10 What's in the box 10 Overview of the main unit 11 Overview of remote control 13 3 Get started 15 Preparation (for in-...car use) 15 Charge the battery 17 Install remote control battery 18 Connect additional equipment 19 4 Use your player 21 Turn on 21 Select OSD language 21 Play discs 21 Play from USB 22 Play options 22 5 Watch TV 23 First time settings 23...

User manual
Page 9
... angle of view (again depending on disc and playback set-up). Besides, you can play of your product at www.philips. Introduction Your portable DVD player plays digital video discs that conform to Philips! You can play movies with JPEG files What's in the box Check and identify the contents of discs that...
... angle of view (again depending on disc and playback set-up). Besides, you can play of your product at www.philips. Introduction Your portable DVD player plays digital video discs that conform to Philips! You can play movies with JPEG files What's in the box Check and identify the contents of discs that...

User manual
Page 11
... to the previous or next title, chapter, or track. q SETUP • Accesses or exits the setup menu. 12 EN m Display panel n DISC MENU • For DVD, accesses or exits disc menu. • For VCD, turns on or off PBC (Playback Control) mode. • For VCD version 2.0 or SVCD with PBC turned... entry or selection. • Starts, pauses or resumes disc play. • Stops disc play. p DISPLAY • Adjusts screen brightness, contrast and color. • Turns off DVD player.
... to the previous or next title, chapter, or track. q SETUP • Accesses or exits the setup menu. 12 EN m Display panel n DISC MENU • For DVD, accesses or exits disc menu. • For VCD, turns on or off PBC (Playback Control) mode. • For VCD version 2.0 or SVCD with PBC turned... entry or selection. • Starts, pauses or resumes disc play. • Stops disc play. p DISPLAY • Adjusts screen brightness, contrast and color. • Turns off DVD player.

User manual
Page 14
...-car use) Warning • Remove the mounting kit and the DVD player from the seat when the DVD player is not in use the player in sequence. Buckle release button D. If you contact Philips, you will be asked for the model and serial number of your player.The model number and serial number are on to the...
...-car use) Warning • Remove the mounting kit and the DVD player from the seat when the DVD player is not in use the player in sequence. Buckle release button D. If you contact Philips, you will be asked for the model and serial number of your player.The model number and serial number are on to the...
User manual
Page 15
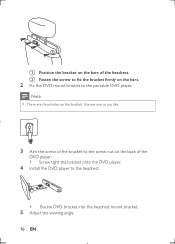
b Fasten the screw to fix the bracket firmly on the back of the DVD player. • Screw tight the bracket onto the DVD player. 4 Install the DVD player to the portable DVD player. Use any one as you like. 3 Aim the screw of the headrest. Note • There are three holes on the bars of the bracket to the screw nut on the bars. 2 Fix the DVD mount bracket to the headrest. • Buckle DVD bracket into the headrest mount bracket. 5 Adjust the viewing angle. 16 EN a Position the bracket on the bracket.
b Fasten the screw to fix the bracket firmly on the back of the DVD player. • Screw tight the bracket onto the DVD player. 4 Install the DVD player to the portable DVD player. Use any one as you like. 3 Aim the screw of the headrest. Note • There are three holes on the bars of the bracket to the screw nut on the bars. 2 Fix the DVD mount bracket to the headrest. • Buckle DVD bracket into the headrest mount bracket. 5 Adjust the viewing angle. 16 EN a Position the bracket on the bracket.

User manual
Page 16
Charge the battery Caution • Risk of the player. • Use only the supplied AC adaptor to the voltage printed on the bottom of product damage! Ensure that the power supply voltage corresponds to ...; The charge indicator turns on the bottom of the player. • You can only charge the player when it is in power-off mode. 1 Slide the POWERON/OFF switch to OFF position. 2 Connect the supplied AC adaptor to the player and to release the DVD player from headrest. English a Release the node. b Adjust the viewing...
Charge the battery Caution • Risk of the player. • Use only the supplied AC adaptor to the voltage printed on the bottom of product damage! Ensure that the power supply voltage corresponds to ...; The charge indicator turns on the bottom of the player. • You can only charge the player when it is in power-off mode. 1 Slide the POWERON/OFF switch to OFF position. 2 Connect the supplied AC adaptor to the player and to release the DVD player from headrest. English a Release the node. b Adjust the viewing...

User manual
Page 18
R L VIDEO IN EN 19 English 1 2 3 Connect additional equipment Connect a TV Caution • Turn off your player before connecting to enjoy DVDs. You can connect the player to a TV or an amplifier to any additional equipment. Note • You cannot output the TV content from the player to TV is not supplied) with the jacks: • the yellow cable is for the yellow video jack • the red/white cable is for the red/white audio jacks. Match the color of the AV cables (the AV cable connected to a TV.
R L VIDEO IN EN 19 English 1 2 3 Connect additional equipment Connect a TV Caution • Turn off your player before connecting to enjoy DVDs. You can connect the player to a TV or an amplifier to any additional equipment. Note • You cannot output the TV content from the player to TV is not supplied) with the jacks: • the yellow cable is for the yellow video jack • the red/white cable is for the red/white audio jacks. Match the color of the AV cables (the AV cable connected to a TV.


