
Leaflet
Page 1
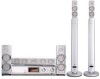
... Entertainment System PC & Internet Entertainment for your home entertainment system and get wireless access to -date • Instant wireless PC link comes with music (MP3) MX6000i/37 anything anywhere anytime W I R E L E S S PC LINK 45 Enjoy wireless PC & Internet media on TV & stereo • Internet connected for quality sound performance • ClearVoice™...
... Entertainment System PC & Internet Entertainment for your home entertainment system and get wireless access to -date • Instant wireless PC link comes with music (MP3) MX6000i/37 anything anywhere anytime W I R E L E S S PC LINK 45 Enjoy wireless PC & Internet media on TV & stereo • Internet connected for quality sound performance • ClearVoice™...
Leaflet
Page 2
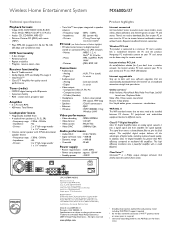
... Loudspeaker boxes • Magnetically shielded front • 4 triple-driver speakers (L, R, SL, SR) - Frequency range : 120Hz - 20 kHz - Frequency range : 30Hz - 120Hz - Wireless Home Entertainment System MX6000i/37 Technical specifications Playback formats • Video: DVD, DVD+R/RW, DVD-R/-RW, VCD, SVCD, MPEG-4, DivX® 3.11/4.x/5.x • Audio: CD, CD-R/RW, MP3-CD...
... Loudspeaker boxes • Magnetically shielded front • 4 triple-driver speakers (L, R, SL, SR) - Frequency range : 120Hz - 20 kHz - Frequency range : 30Hz - 120Hz - Wireless Home Entertainment System MX6000i/37 Technical specifications Playback formats • Video: DVD, DVD+R/RW, DVD-R/-RW, VCD, SVCD, MPEG-4, DivX® 3.11/4.x/5.x • Audio: CD, CD-R/RW, MP3-CD...

User manual
Page 1
Call us on the web at www.philips.com IM E ! Philips representatives are ready to start enjoying your Warranty Registration Card within 10 days E E W HY INSID Wireless Home Entertainment System MX 6000i Need help you with any of the Features. CALL US BEFORE YOU CONSIDER RETURNING THE PRODUCT! 1-800-531-0039 or Visit us ! T S PORTAN Return your new product right away! We want you through Connections, First-time Setup, or any questions about your new product.We can guide you to help ?
Call us on the web at www.philips.com IM E ! Philips representatives are ready to start enjoying your Warranty Registration Card within 10 days E E W HY INSID Wireless Home Entertainment System MX 6000i Need help you with any of the Features. CALL US BEFORE YOU CONSIDER RETURNING THE PRODUCT! 1-800-531-0039 or Visit us ! T S PORTAN Return your new product right away! We want you through Connections, First-time Setup, or any questions about your new product.We can guide you to help ?

User manual
Page 2
... not be sure to complete and return your Product Registration Card at http://www.philips.com Know these safetysymbols Congratulations on file, so no additional paperwork will be required from your PHILIPS purchase, be exposed to rain or moisture, and objects filled with your purchase for...the very most from the manufacturer - directly from your purchase. As a member of the PHILIPS "family," you're entitled to protection by one of plug to your household, please do everything in a PHILIPS product. P.S. ATTENTION: Pour éviter les choc électriques, introduire la lame la ...
... not be sure to complete and return your Product Registration Card at http://www.philips.com Know these safetysymbols Congratulations on file, so no additional paperwork will be required from your PHILIPS purchase, be exposed to rain or moisture, and objects filled with your purchase for...the very most from the manufacturer - directly from your purchase. As a member of the PHILIPS "family," you're entitled to protection by one of plug to your household, please do everything in a PHILIPS product. P.S. ATTENTION: Pour éviter les choc électriques, introduire la lame la ...

User manual
Page 3
Read these material may be exposed to dripping or splashing. 17. Follow all warnings. 4. Do not install near water. 6. If the provided plug does not fit into the apparatus, the apparatus has been exposed to environment considerations. Apparatus shall not be regulated due to rain or moisture, does not operate normally, or has been dropped. 15. Disposal of time. 14.Refer all batteries correctly, + and - Clean only with the apparatus.When a cart is damaged, liquid has been spilled or objects have fallen into your outlet, consult an electrician for replacement ...
Read these material may be exposed to dripping or splashing. 17. Follow all warnings. 4. Do not install near water. 6. If the provided plug does not fit into the apparatus, the apparatus has been exposed to environment considerations. Apparatus shall not be regulated due to rain or moisture, does not operate normally, or has been dropped. 15. Disposal of time. 14.Refer all batteries correctly, + and - Clean only with the apparatus.When a cart is damaged, liquid has been spilled or objects have fallen into your outlet, consult an electrician for replacement ...
User manual
Page 4
Operation is subject to correct the interference by turning the equipment off and on, the user is encouraged to try to the following measures: - Increase the separation between the equipment and the receiver. - Consult the dealer or an experienced radio/TV technician for a Class B digital device, pursuant to Part 15 of Communications. Français: Cet appareil numérique n'émet pas de bruits radioélectriques dépassant les limites applicables aux appareils numériques de Classe B prescrites dans le Règlement sur le Brouillage Radioélectrique é...
Operation is subject to correct the interference by turning the equipment off and on, the user is encouraged to try to the following measures: - Increase the separation between the equipment and the receiver. - Consult the dealer or an experienced radio/TV technician for a Class B digital device, pursuant to Part 15 of Communications. Français: Cet appareil numérique n'émet pas de bruits radioélectriques dépassant les limites applicables aux appareils numériques de Classe B prescrites dans le Règlement sur le Brouillage Radioélectrique é...
User manual
Page 5
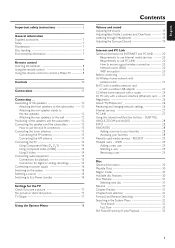
...wireless USB adapter 23 C) Wired home network with a router 24 D) PC only with a network interface (Ethernet) card -- 25 Registration 26 About "My.Philips.com 26 Reviewing and changing network settings 26 Internet services 27 PC LINK 27 Using the colored multifunction buttons - English Important safety instructions 3 General information... 7 Setup 7 Maintenance 7 Disc handling 7 Environmental information 7 Remote control Inserting the batteries 8 Using the remote control 8 Using the remote control to control a Philips TV ------- 8 Controls 10 Connections 11 Connecting ...
...wireless USB adapter 23 C) Wired home network with a router 24 D) PC only with a network interface (Ethernet) card -- 25 Registration 26 About "My.Philips.com 26 Reviewing and changing network settings 26 Internet services 27 PC LINK 27 Using the colored multifunction buttons - English Important safety instructions 3 General information... 7 Setup 7 Maintenance 7 Disc handling 7 Environmental information 7 Remote control Inserting the batteries 8 Using the remote control 8 Using the remote control to control a Philips TV ------- 8 Controls 10 Connections 11 Connecting ...

User manual
Page 6
Audio settings Night Mode 41 Analogue Output 41 Digital Output 41 Speaker layout, speaker distances and volume balance -- 42 System Menu - Additional features Help Line and Status window 43 Sleep timer 43 Adjusting the display brightness 43 Online upgrade 43 Resetting the Streamium System 43 Tuner Tuning to radio stations 44 Automatic Preset Programming 44 Storing favorite radio stations manually 44 Selecting a favorite radio station 44 Deleting a favorite radio station 45 Deleting all favorite radio stations 45 Changing the order of favorite radio stations --------- 45 ...
Audio settings Night Mode 41 Analogue Output 41 Digital Output 41 Speaker layout, speaker distances and volume balance -- 42 System Menu - Additional features Help Line and Status window 43 Sleep timer 43 Adjusting the display brightness 43 Online upgrade 43 Resetting the Streamium System 43 Tuner Tuning to radio stations 44 Automatic Preset Programming 44 Storing favorite radio stations manually 44 Selecting a favorite radio station 44 Deleting a favorite radio station 45 Deleting all favorite radio stations 45 Changing the order of favorite radio stations --------- 45 ...
User manual
Page 7
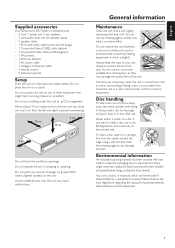
Do not place any cleaning agents as they may have tried to make the packaging easy to separate into the speaker stands - 7 speaker cables - 1 RCA-style audio cable (white and red plugs) - 1 Composite Video (CVBS) cable (yellow) - 1 Component Video cable (red/blue/green) - 1 FM antenna - 1 AM loop antenna - 1 AC power cable - 1 Category 5 Ethernet cable - 1 remote control - 2 batteries type AA Setup Place the unit on a flat least 10 cm clearance from the rear and top of the unit and 5 cm from the center toward the edge using a soft, lint-free cloth. General information ...
Do not place any cleaning agents as they may have tried to make the packaging easy to separate into the speaker stands - 7 speaker cables - 1 RCA-style audio cable (white and red plugs) - 1 Composite Video (CVBS) cable (yellow) - 1 Component Video cable (red/blue/green) - 1 FM antenna - 1 AM loop antenna - 1 AC power cable - 1 Category 5 Ethernet cable - 1 remote control - 2 batteries type AA Setup Place the unit on a flat least 10 cm clearance from the rear and top of the unit and 5 cm from the center toward the edge using a soft, lint-free cloth. General information ...
User manual
Page 8
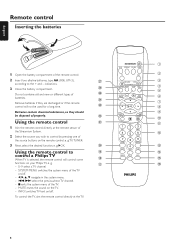
... old and new or different types of the TV on the remote control, e. indications. 3 Close the battery compartment. g. 2OK. ) Using the remote control to ( control a Philips TV When TV is selected, the remote control will not be used for a long time. (UN) MARK VIEW FAVORITES SUBTITLE ANGLE ZOOM AUDIO SYSTEM MENU...
... old and new or different types of the TV on the remote control, e. indications. 3 Close the battery compartment. g. 2OK. ) Using the remote control to ( control a Philips TV When TV is selected, the remote control will not be used for a long time. (UN) MARK VIEW FAVORITES SUBTITLE ANGLE ZOOM AUDIO SYSTEM MENU...
User manual
Page 9
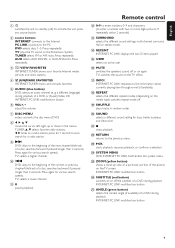
a different language) during playback of a disc; Press again for various search speeds. searches backward if pressed longer than 2 seconds. Press again for various search speeds. pauses playback Remote control @ 0-9 to enter numbers 0-9 and characters (to the PC DVD selects discs 1-5. TUNER selects FM or AM radio. Press repeatedly. 3 VIEW FAVORITES INTERNET,TUNER: shows your favorite Internet media services and radio stations 4 (UN)MARK FAVORITES INTERNET,TUNER: marks and unmarks favorites 5 AUDIO (blue button) DVD: selects an audio channel (e. searches forward if pressed longer ...
a different language) during playback of a disc; Press again for various search speeds. searches backward if pressed longer than 2 seconds. Press again for various search speeds. pauses playback Remote control @ 0-9 to enter numbers 0-9 and characters (to the PC DVD selects discs 1-5. TUNER selects FM or AM radio. Press repeatedly. 3 VIEW FAVORITES INTERNET,TUNER: shows your favorite Internet media services and radio stations 4 (UN)MARK FAVORITES INTERNET,TUNER: marks and unmarks favorites 5 AUDIO (blue button) DVD: selects an audio channel (e. searches forward if pressed longer ...

User manual
Page 10
English Controls ^ %$ #@ ! 09 12 3 4 56 7 8 1 STANDBY-ON switches the unit on or to standby (off) 2 IR sensor for the remote control 3 INTERNET, PC LINK: multifunction button (same function as red button on the remote control) 4 display 5 INTERNET, PC LINK: multifunction button (same function as RECENT on the remote control) 61234 moves left, right, up or down in the menus, selects favorite radio stations 79 stops playback 8p 6.3 mm headphones jack 9 VOLUME adjusts the volume 0; pauses playback ! 2OK starts playback, resumes playback, or confirms a selection @ SOURCE ...
English Controls ^ %$ #@ ! 09 12 3 4 56 7 8 1 STANDBY-ON switches the unit on or to standby (off) 2 IR sensor for the remote control 3 INTERNET, PC LINK: multifunction button (same function as red button on the remote control) 4 display 5 INTERNET, PC LINK: multifunction button (same function as RECENT on the remote control) 61234 moves left, right, up or down in the menus, selects favorite radio stations 79 stops playback 8p 6.3 mm headphones jack 9 VOLUME adjusts the volume 0; pauses playback ! 2OK starts playback, resumes playback, or confirms a selection @ SOURCE ...
User manual
Page 11
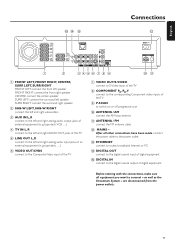
tape deck, ...) 6 VIDEO OUT/CVBS connect to the Composite Video input of the TV 7 VIDEO OUT/S-VIDEO connect to S-Video input of the TV 8 COMPONENT P , P ,Y RB connect to the corresponding Component video inputs of digital equipment Before starting with the connections, make sure all equipment you want to switch on or off progressive scan 0 ANTENNA / AM connect the AM loop antenna ! g. ANTENNA / FM connect the FM antenna cable @ MAINS ~ After all other connections have been made, connect the power cable to the power outlet. # ETHERNET connect to router, broadband Internet, or PC $ ...
tape deck, ...) 6 VIDEO OUT/CVBS connect to the Composite Video input of the TV 7 VIDEO OUT/S-VIDEO connect to S-Video input of the TV 8 COMPONENT P , P ,Y RB connect to the corresponding Component video inputs of digital equipment Before starting with the connections, make sure all equipment you want to switch on or off progressive scan 0 ANTENNA / AM connect the AM loop antenna ! g. ANTENNA / FM connect the FM antenna cable @ MAINS ~ After all other connections have been made, connect the power cable to the power outlet. # ETHERNET connect to router, broadband Internet, or PC $ ...
User manual
Page 12
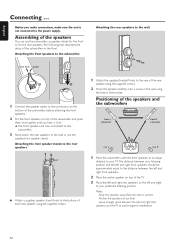
Positioning of the speakers and the subwoofers centre front L, subwoofer front R, subwoofer rear L rear R q Attach a supplied speaker stand firmly to the bottom of each rear speaker using the hole in the bracket. Attaching the mini speaker stands to the rear speakers 1 Attach the supplied bracket firmly to the left and right front speakers and the TV to the power supply. Notes: Keep the speakers away from the room´s corners. Leave enough space between the left and right front speakers. 2 Place the center speaker on top of the subwoofers in the wall, using...
Positioning of the speakers and the subwoofers centre front L, subwoofer front R, subwoofer rear L rear R q Attach a supplied speaker stand firmly to the bottom of each rear speaker using the hole in the bracket. Attaching the mini speaker stands to the rear speakers 1 Attach the supplied bracket firmly to the left and right front speakers and the TV to the power supply. Notes: Keep the speakers away from the room´s corners. Leave enough space between the left and right front speakers. 2 Place the center speaker on top of the subwoofers in the wall, using...
User manual
Page 13
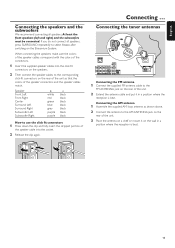
Speaker Front Left Front Right Center Surround Left Surround Right Subwoofer Left Subwoofer Right + − white black red black green black blue black grey black purple black purple black How to use the click fit connectors 1 Press down the clip and fully insert the stripped portion of the connectors. 1 Insert the supplied speaker cables into the socket. 2 Release the clip again. Connecting the tuner antennas ➠ ETHERNET CVBS L R AUX IN TV IN AUDIO LINE OUT S - Connecting ... At least the front speakers (left and right) and the subwoofers must ...
Speaker Front Left Front Right Center Surround Left Surround Right Subwoofer Left Subwoofer Right + − white black red black green black blue black grey black purple black purple black How to use the click fit connectors 1 Press down the clip and fully insert the stripped portion of the connectors. 1 Insert the supplied speaker cables into the socket. 2 Release the clip again. Connecting the tuner antennas ➠ ETHERNET CVBS L R AUX IN TV IN AUDIO LINE OUT S - Connecting ... At least the front speakers (left and right) and the subwoofers must ...

User manual
Page 14
Otherwise, set Video Output to OFF. Using S-Video AUDIO OUT COMPONENT VIDEO IN S-VIDEO IN Pr/Cr VIDEO IN Pb/Cb Y AUDIO OUT COMPONENT VIDEO IN S-VIDEO IN Pr/Cr VIDEO IN Pb/Cb Y FRONT LEFT FRONT RIGHT CENTRE SURR LEFT SURR RIGHT ETHERNET SUB-W LEFT SUB-W RIGHT DIGITAL OUT DIGITAL IN CVBS L R AUX IN TV IN AUDIO LINE OUT S - See chapter "No picture or distorted picture." The progressive scan video quality is only possible through the COMPONENT PR PB Y output. 1 Use the composite video cable (yellow) to connect the Streamium System's CVBS jack to the video ...
Otherwise, set Video Output to OFF. Using S-Video AUDIO OUT COMPONENT VIDEO IN S-VIDEO IN Pr/Cr VIDEO IN Pb/Cb Y AUDIO OUT COMPONENT VIDEO IN S-VIDEO IN Pr/Cr VIDEO IN Pb/Cb Y FRONT LEFT FRONT RIGHT CENTRE SURR LEFT SURR RIGHT ETHERNET SUB-W LEFT SUB-W RIGHT DIGITAL OUT DIGITAL IN CVBS L R AUX IN TV IN AUDIO LINE OUT S - See chapter "No picture or distorted picture." The progressive scan video quality is only possible through the COMPONENT PR PB Y output. 1 Use the composite video cable (yellow) to connect the Streamium System's CVBS jack to the video ...
User manual
Page 15
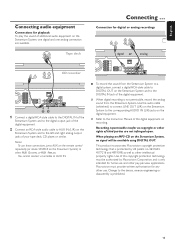
You cannot connect a turntable to the DIGITAL IN jack of additional audio equipment on the Streamium System, one digital and one analog connection are not infringed upon. VIDEO ON OFF AUDIO VIDEO OUT COMPONENT ~ AC M q To record the sound from the Streamium System. Recording is permissible insofar as other pay-per-view applications. This product incorporates Macrovision copyright protection technology that is protected by Macrovision Corporation, and is only intended for playback To play the sound of the digital equipment. 0 When digital recording is prohibited. ...
You cannot connect a turntable to the DIGITAL IN jack of additional audio equipment on the Streamium System, one digital and one analog connection are not infringed upon. VIDEO ON OFF AUDIO VIDEO OUT COMPONENT ~ AC M q To record the sound from the Streamium System. Recording is permissible insofar as other pay-per-view applications. This product incorporates Macrovision copyright protection technology that is protected by Macrovision Corporation, and is only intended for playback To play the sound of the digital equipment. 0 When digital recording is prohibited. ...
User manual
Page 16
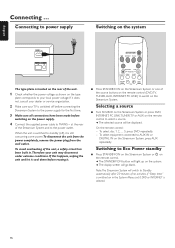
When the unit is still consuming some power. If this happens, unplug the unit and let it cool down before switching on the Streamium System. DVD INTERNET PC LINK TUNER TV AUX (UN) MARK VIEW FAVORITES SUBTITLE ANGLE ZOOM AUDIO SYSTEM MENU DISC MENU q Press STANDBY-ON on the Streamium System or one of the unit. 1 Check whether the power voltage as shown on in .Therefore your unit may disconnect under extreme conditions. On the remote control: - To select equipment connected to the power supply for the first time. 3 Make sure all connections have been made before reusing ...
When the unit is still consuming some power. If this happens, unplug the unit and let it cool down before switching on the Streamium System. DVD INTERNET PC LINK TUNER TV AUX (UN) MARK VIEW FAVORITES SUBTITLE ANGLE ZOOM AUDIO SYSTEM MENU DISC MENU q Press STANDBY-ON on the Streamium System or one of the unit. 1 Check whether the power voltage as shown on in .Therefore your unit may disconnect under extreme conditions. On the remote control: - To select equipment connected to the power supply for the first time. 3 Make sure all connections have been made before reusing ...
User manual
Page 17
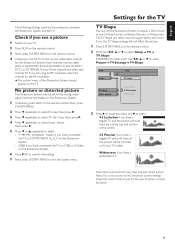
Next, press 2. 5 Press 4 or 3 repeatedly to select Picture ➜ TV Settings ➜ TV Shape. The TV Shape you select must be called AUX or AUXILIARY IN, AUDIO/VIDEO or A/V IN, EXT1, EXT2 or EXTERNAL IN, etc.These channels are using an RF modulator, select the channel for the Streamium System. DVD Setup Stop TV View TV shape Program TV shape Video output Surround R Size 4:3 NPTaSnCscan 4:3 Letterbox Widescreen Use ± or ≠ to select other options, = to enter the option 3 Press 2 to enter the menu and 4 to COMPONENT PR PB Y on the Streamium System, - Y PB...
Next, press 2. 5 Press 4 or 3 repeatedly to select Picture ➜ TV Settings ➜ TV Shape. The TV Shape you select must be called AUX or AUXILIARY IN, AUDIO/VIDEO or A/V IN, EXT1, EXT2 or EXTERNAL IN, etc.These channels are using an RF modulator, select the channel for the Streamium System. DVD Setup Stop TV View TV shape Program TV shape Video output Surround R Size 4:3 NPTaSnCscan 4:3 Letterbox Widescreen Use ± or ≠ to select other options, = to enter the option 3 Press 2 to enter the menu and 4 to COMPONENT PR PB Y on the Streamium System, - Y PB...
User manual
Page 18
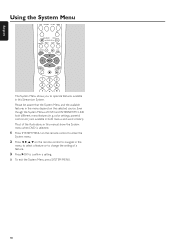
g. English Using the System Menu DVD INTERNET PC LINK TUNER TV AUX (UN) MARK VIEW FAVORITES SUBTITLE ANGLE ZOOM AUDIO SYSTEM MENU DISC MENU RETURN RESUME -- Even though the System Menus of a feature. 3 Press 2OK to confirm a setting. 0 To exit the System Menu press SYSTEM MENU. 18 Most of the illustrations in this Streamium System. Please be aware that the System Menu and the available features in both menus and work similarly. color settings, parental control, etc.) are available in the menu depend on the remote control to navigate in the menu, to select a feature...
g. English Using the System Menu DVD INTERNET PC LINK TUNER TV AUX (UN) MARK VIEW FAVORITES SUBTITLE ANGLE ZOOM AUDIO SYSTEM MENU DISC MENU RETURN RESUME -- Even though the System Menus of a feature. 3 Press 2OK to confirm a setting. 0 To exit the System Menu press SYSTEM MENU. 18 Most of the illustrations in this Streamium System. Please be aware that the System Menu and the available features in both menus and work similarly. color settings, parental control, etc.) are available in the menu depend on the remote control to navigate in the menu, to select a feature...