Leaflet
Page 3
Specifications are the property of Koninklijke Philips Electronics N.V. or their respective owners. All Rights reserved. Trademarks are subject to change without notice. DVD Micro Theater Specifications MCD708/37 Sound • Output Power: 2x50W RMS / 100watts total power • ...; Eco Power Standby: 1 watt • Indications: DIM mode Accessories • Included Accessories: Composite video cable (Y), Control cable, AM/FM Antenna • Remote control: 49-key with 2xAAA batteries Dimensions • Set dimensions (W x H x D): 240 x 160 x 230 mm • Main speaker dimensions (W...
Specifications are the property of Koninklijke Philips Electronics N.V. or their respective owners. All Rights reserved. Trademarks are subject to change without notice. DVD Micro Theater Specifications MCD708/37 Sound • Output Power: 2x50W RMS / 100watts total power • ...; Eco Power Standby: 1 watt • Indications: DIM mode Accessories • Included Accessories: Composite video cable (Y), Control cable, AM/FM Antenna • Remote control: 49-key with 2xAAA batteries Dimensions • Set dimensions (W x H x D): 240 x 160 x 230 mm • Main speaker dimensions (W...
User manual
Page 7
... Step 6: Connecting the power cord 15 Additional: Connecting additional equipment15 Functional Overview DVD player and power amplifier 16 Remote control 17~18 Getting Started Step 1: Inserting batteries into the Remote Control 19 Using the Remote Control to operate the Player Step 2: Setting up the TV 19~20 Setting up Progressive Scan feature To...
... Step 6: Connecting the power cord 15 Additional: Connecting additional equipment15 Functional Overview DVD player and power amplifier 16 Remote control 17~18 Getting Started Step 1: Inserting batteries into the Remote Control 19 Using the Remote Control to operate the Player Step 2: Setting up the TV 19~20 Setting up Progressive Scan feature To...
User manual
Page 9
..., allow about 10cm (4 inches) of free space all around the player for adequate ventilation. 9 Remote control with 2.0 channel full digital amplifier creates the same dynamic sound qualities that you set a ratings level so that your retailer or Philips. Installation ● Place the player on /off automatically at a preset time. Other features include...
..., allow about 10cm (4 inches) of free space all around the player for adequate ventilation. 9 Remote control with 2.0 channel full digital amplifier creates the same dynamic sound qualities that you set a ratings level so that your retailer or Philips. Installation ● Place the player on /off automatically at a preset time. Other features include...
User manual
Page 13
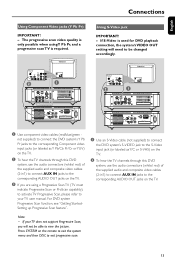
... audio and composite video cables (2-in1) to connect AUX IN jacks to the corresponding AUDIO OUT jacks on the TV. Note: - Press SYSTEM on the remote to exit the system menu and then DISC to view the picture. English Using Component Video jacks (Y Pb Pr) IMPORTANT! - The progressive scan video quality...
... audio and composite video cables (2-in1) to connect AUX IN jacks to the corresponding AUDIO OUT jacks on the TV. Note: - Press SYSTEM on the remote to exit the system menu and then DISC to view the picture. English Using Component Video jacks (Y Pb Pr) IMPORTANT! - The progressive scan video quality...
User manual
Page 15
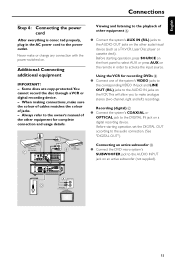
... panel to select AUX or press AUX on the other equipment A ● Connect the system's AUX IN (R/L) jacks to the AUDIO OUT jacks on the remote in the AC power cord to the playback of the system's VIDEO jacks to the corresponding VIDEO IN jack and LINE OUT (R/L) jacks to the...
... panel to select AUX or press AUX on the other equipment A ● Connect the system's AUX IN (R/L) jacks to the AUDIO OUT jacks on the remote in the AC power cord to the playback of the system's VIDEO jacks to the corresponding VIDEO IN jack and LINE OUT (R/L) jacks to the...
User manual
Page 16
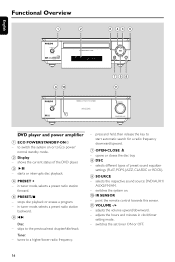
... or to the previous/next chapter/title/track. adjusts the volume upward/downward. - selects the respective sound source: DVD/AUX1/ AUX2/FM/AM. - point the remote control towards this sensor. ! DVD player and power amplifier 1 ECO POWER/STANDBY-ON y - press and hold, then release the key to a higher/lower radio frequency...
... or to the previous/next chapter/title/track. adjusts the volume upward/downward. - selects the respective sound source: DVD/AUX1/ AUX2/FM/AM. - point the remote control towards this sensor. ! DVD player and power amplifier 1 ECO POWER/STANDBY-ON y - press and hold, then release the key to a higher/lower radio frequency...
User manual
Page 17
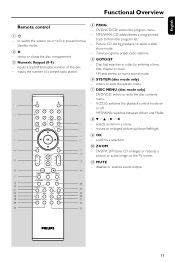
English Functional Overview Remote control 1B - inputs the number of the disc. - selects an item in a disc by entering a time, title, chapter or track. - confirms a selection. 0 ZOOM - to switch ...
English Functional Overview Remote control 1B - inputs the number of the disc. - selects an item in a disc by entering a time, title, chapter or track. - confirms a selection. 0 ZOOM - to switch ...
User manual
Page 19
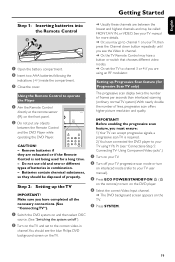
...Setting up the TV IMPORTANT! IMPORTANT! Before enabling the progressive scan feature, you are using Y Pb Pr (see the blue Philips DVD background screen on interlaced mode (refer to your TV using an RF modulator. Remove batteries if they should see "Connections..., or VIDEO. CAUTION! - Step 2: Setting up Progressive Scan feature (for a long time. - English Getting Started Step 1: Inserting batteries into the Remote Control 3 1 2 1 Open the battery compartment. 2 Insert two AAA batteries following the indications (+/-) inside the compartment. 3 Close the cover. Do ...
...Setting up the TV IMPORTANT! IMPORTANT! Before enabling the progressive scan feature, you are using Y Pb Pr (see the blue Philips DVD background screen on interlaced mode (refer to your TV using an RF modulator. Remove batteries if they should see "Connections..., or VIDEO. CAUTION! - Step 2: Setting up Progressive Scan feature (for a long time. - English Getting Started Step 1: Inserting batteries into the Remote Control 3 1 2 1 Open the battery compartment. 2 Insert two AAA batteries following the indications (+/-) inside the compartment. 3 Close the cover. Do ...
User manual
Page 20
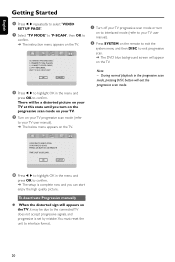
... a distorted picture on your TV at this state until you turn on to interlaced mode (refer to your TV user manual). 2 Press SYSTEM on the remote to exit the system menu and then DISC to exit progressive scan. ➜ The DVD blue background screen will appear on the TV. During normal...
... a distorted picture on your TV at this state until you turn on to interlaced mode (refer to your TV user manual). 2 Press SYSTEM on the remote to exit the system menu and then DISC to exit progressive scan. ➜ The DVD blue background screen will appear on the TV. During normal...
User manual
Page 21
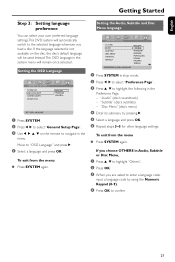
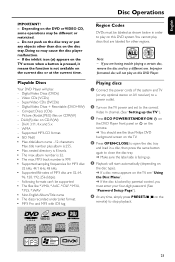
..., input a language code by pressing 2. 5 Select a language and press OK. 6 Repeat steps 3~5 for other language settings. If the language selected is not available on the remote to navigate in Audio, Subtitle or Disc Menu, 1 Press 3 4 to confirm. 21 "Disc Menu" (disc's menu) 4 Enter its submenu by using the Numeric Keypad (0-9). 4 Press...
..., input a language code by pressing 2. 5 Select a language and press OK. 6 Repeat steps 3~5 for other language settings. If the language selected is not available on the remote to navigate in Audio, Subtitle or Disc Menu, 1 Press 3 4 to confirm. 21 "Disc Menu" (disc's menu) 4 Enter its submenu by using the Numeric Keypad (0-9). 4 Press...
User manual
Page 22
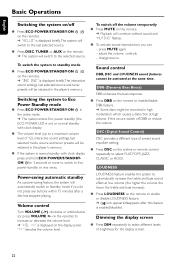
...or normal standby with clock display. ● The volume level (up to standby mode ● Press ECO POWER/STANDBY-ON B (B on the remote). ➜ "BYE BYE" is enabled/disabled. LOUDNESS LOUDNESS feature enables the system to automatically increase the treble and bass sound effect at low ...select: FLAT, POPS, JAZZ, CLASSIC or ROCK. English Basic Operations Switching the system on/off the volume temporarily ● Press MUTE on the remote. ➜ Playback will continue without sound and "MUTING" flashes. ● To activate sound reproduction, you do not press any buttons within 15...
...or normal standby with clock display. ● The volume level (up to standby mode ● Press ECO POWER/STANDBY-ON B (B on the remote). ➜ "BYE BYE" is enabled/disabled. LOUDNESS LOUDNESS feature enables the system to automatically increase the treble and bass sound effect at low ...select: FLAT, POPS, JAZZ, CLASSIC or ROCK. English Basic Operations Switching the system on/off the volume temporarily ● Press MUTE on the remote. ➜ Playback will continue without sound and "MUTING" flashes. ● To activate sound reproduction, you do not press any buttons within 15...
User manual
Page 23
... In channel. (See "Setting up . 5 Playback will start automatically (depending on the disc type). ➜ If a disc menu appears on the TV, see the blue Philips DVD background screen on the TV. 4 Press OPEN•CLOSE to open the disc tray and load in order to close the disc tray. ➜...; Make sure the label side is facing up the TV"). 3 Press ECO POWER/STANDBY-ON B on the DVD Player front panel or B on the remote. ➜ You should see "Using the Disc Menu". ➜ If the disc is not available on CDR(W) - Digital Video Discs (DVDs) - English Disc Operations ...
... In channel. (See "Setting up . 5 Playback will start automatically (depending on the disc type). ➜ If a disc menu appears on the TV, see the blue Philips DVD background screen on the TV. 4 Press OPEN•CLOSE to open the disc tray and load in order to close the disc tray. ➜...; Make sure the label side is facing up the TV"). 3 Press ECO POWER/STANDBY-ON B on the DVD Player front panel or B on the remote. ➜ You should see "Using the Disc Menu". ➜ If the disc is not available on CDR(W) - Digital Video Discs (DVDs) - English Disc Operations ...
User manual
Page 24
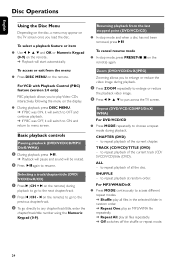
...allows you load the disc. to resume. To select a playback feature or item ● Use 1 2 3 4 and OK or Numeric Keypad (0-9) on the remote. Basic playback controls Pausing playback (DVD/VCD/CD/MP3/ DivX/WMA) 1 During playback, press ÉÅ. ➜ Playback will pause and sound will be ... image during playback. CHAPTER (DVD) - ALL - English Disc Operations Using the Disc Menu Depending on the disc, a menu may appear on the remote) to go to the previous chapter/track. 3 To go directly to any chapter/track/title, enter the chapter/track/title number using the Numeric Keypad...
...allows you load the disc. to resume. To select a playback feature or item ● Use 1 2 3 4 and OK or Numeric Keypad (0-9) on the remote. Basic playback controls Pausing playback (DVD/VCD/CD/MP3/ DivX/WMA) 1 During playback, press ÉÅ. ➜ Playback will pause and sound will be ... image during playback. CHAPTER (DVD) - ALL - English Disc Operations Using the Disc Menu Depending on the disc, a menu may appear on the remote) to go to the previous chapter/track. 3 To go directly to any chapter/track/title, enter the chapter/track/title number using the Numeric Keypad...
User manual
Page 25
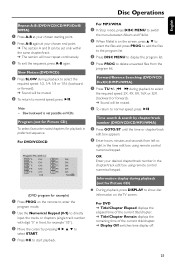
...(backward or forward). ➜ Sound will be muted. 2 To return to right in the time edit box using remote control numerical keypad. (DVD program for example) 1 Press PROG on the remote to enter the program mode. 2 Use the Numerical Keypad (0-9) to directly input the tracks or chapters (single track ...DivX/ WMA) 1 Press A-B at your chosen starting point. 2 Press A-B again at your desired chapter/track number in the chapter/track edit box using remote control numerical keypad. For DVD/VCD/CD For MP3/WMA 1 In Stop mode, press DISC MENU to switch the menu between Album and Filelist. 2 When...
...(backward or forward). ➜ Sound will be muted. 2 To return to right in the time edit box using remote control numerical keypad. (DVD program for example) 1 Press PROG on the remote to enter the program mode. 2 Use the Numerical Keypad (0-9) to directly input the tracks or chapters (single track ...DivX/ WMA) 1 Press A-B at your chosen starting point. 2 Press A-B again at your desired chapter/track number in the chapter/track edit box using remote control numerical keypad. For DVD/VCD/CD For MP3/WMA 1 In Stop mode, press DISC MENU to switch the menu between Album and Filelist. 2 When...
User manual
Page 26
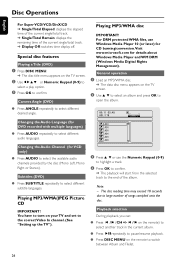
... album. Playing MP3/WMA/JPEG Picture CD IMPORTANT! Playback selection During playback, you can: ● Press ¡ / ™ (CH on the remote) to select another track in the current album. ● Press ÉÅrepeatedly to pause/resume playback. ● Press DISC MENU on the TV...to select different subtitle languages. Special disc features Playing a Title (DVD) 1 Press DISC MENU. ➜ The disc title menu appears on the remote to open the album. Playing MP3/WMA disc IMPORTANT! General operation 1 Load an MP3/WMA disc. ➜ The data disc menu appears on your...
... album. Playing MP3/WMA/JPEG Picture CD IMPORTANT! Playback selection During playback, you can: ● Press ¡ / ™ (CH on the remote) to select another track in the current album. ● Press ÉÅrepeatedly to pause/resume playback. ● Press DISC MENU on the TV...to select different subtitle languages. Special disc features Playing a Title (DVD) 1 Press DISC MENU. ➜ The disc title menu appears on the remote to open the album. Playing MP3/WMA disc IMPORTANT! General operation 1 Load an MP3/WMA disc. ➜ The data disc menu appears on your...
User manual
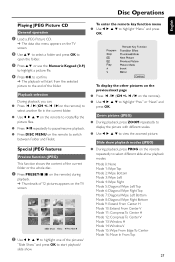
Page 27
...This function shows the content of the current folder or the whole disc. 1 Press PRESET-/9 (9 on the remote) during playback. ➜ Thumbnails of 12 pictures appears on the remote repeatedly to highlight one of the folder. Slide show playback modes (JPEG) ● During playback, press ... 3 4 to select different slide-show . To display the other pictures on the previous/next page ● Press ¡ / ™ (CH on the remote to highlight "Prev" or "Next" and press OK. Zoom picture (JPEG) ● During playback, press ZOOM repeatedly to display the picture with different scales....
...This function shows the content of the current folder or the whole disc. 1 Press PRESET-/9 (9 on the remote) during playback. ➜ Thumbnails of 12 pictures appears on the remote repeatedly to highlight one of the folder. Slide show playback modes (JPEG) ● During playback, press ... 3 4 to select different slide-show . To display the other pictures on the previous/next page ● Press ¡ / ™ (CH on the remote to highlight "Prev" or "Next" and press OK. Zoom picture (JPEG) ● During playback, press ZOOM repeatedly to display the picture with different scales....
User manual
Page 28
... from your computer onto a CD-R/RW (see "System Menu Options-DIVX(R) VOD registration code" for your selection. ● In this case, pressing SUBTITLE on the remote control will turn on or off the subtitle. ● If multilingual subtitles are supported but do not appear on the TV screen for more information...
... from your computer onto a CD-R/RW (see "System Menu Options-DIVX(R) VOD registration code" for your selection. ● In this case, pressing SUBTITLE on the remote control will turn on or off the subtitle. ● If multilingual subtitles are supported but do not appear on the TV screen for more information...

User manual
Page 34
... -/+ clockwise or anticlockwise or press VOLUME +/- Setting the clock 1 In Standby mode, press and hold ¡ / ™ (CH on the remote) until the frequency indication starts to change, then release. ➜ The system automatically tunes to the next strong radio station. ● To tune to... a weak station, press ¡ / ™ (CH +/à / á on the remote) to select the desired preset number. ➜ The preset number, radio frequency, and waveband are displayed. Other Functions English Radio Reception Tuning to radio stations...
... -/+ clockwise or anticlockwise or press VOLUME +/- Setting the clock 1 In Standby mode, press and hold ¡ / ™ (CH on the remote) until the frequency indication starts to change, then release. ➜ The system automatically tunes to the next strong radio station. ● To tune to... a weak station, press ¡ / ™ (CH +/à / á on the remote) to select the desired preset number. ➜ The preset number, radio frequency, and waveband are displayed. Other Functions English Radio Reception Tuning to radio stations...

User manual
Page 35
...TIMER to confirm the time setting. ➜ "OFF" flashes on the display screen. 6 Turn VOLUME -/+ clockwise or anticlockwise or press VOLUME -/+ on the remote to select "ON". ➜ icon appears on automatically at Step 6. English 2 When you reach the desired length of time, stop pressing SLEEP/TIMER. &#...; "TIME SET" scrolls.Then, the hour digits flash on the display screen. 2 Turn VOLUME -/+ clockwise or anticlockwise or press VOLUME -/+ on the remote to set the hours. 3 Press SLEEP/TIMER to confirm. ➜ The minute digits flash on the display screen. 4 Turn VOLUME -/+ clockwise or ...
...TIMER to confirm the time setting. ➜ "OFF" flashes on the display screen. 6 Turn VOLUME -/+ clockwise or anticlockwise or press VOLUME -/+ on the remote to select "ON". ➜ icon appears on automatically at Step 6. English 2 When you reach the desired length of time, stop pressing SLEEP/TIMER. &#...; "TIME SET" scrolls.Then, the hour digits flash on the display screen. 2 Turn VOLUME -/+ clockwise or anticlockwise or press VOLUME -/+ on the remote to set the hours. 3 Press SLEEP/TIMER to confirm. ➜ The minute digits flash on the display screen. 4 Turn VOLUME -/+ clockwise or ...

User manual
Page 36
...; V/m AM S/N 40dB SPEAKERS Impedance 4 Ω Sensitivity 80 ± 4dB Frequency response 80Hz-16kHz Dimensions . 160 (W) x 270 (H) x 225 (D) mm 6.3" (W) x 10.6" (H) x 8.8" (D) inch Weight 3.1 kg/each/6.8 pounds each REMOTE Distance 6m Angle 300 Specifications subject to change without prior notice 36
...; V/m AM S/N 40dB SPEAKERS Impedance 4 Ω Sensitivity 80 ± 4dB Frequency response 80Hz-16kHz Dimensions . 160 (W) x 270 (H) x 225 (D) mm 6.3" (W) x 10.6" (H) x 8.8" (D) inch Weight 3.1 kg/each/6.8 pounds each REMOTE Distance 6m Angle 300 Specifications subject to change without prior notice 36


