

User Manual
Page 2
EN Contents 3 Safety Instructions 5 Included with Antenna 5 Mounting Antenna 6 Connecting to your TV 7 Warranty 8 Technical Support 2
EN Contents 3 Safety Instructions 5 Included with Antenna 5 Mounting Antenna 6 Connecting to your TV 7 Warranty 8 Technical Support 2
User Manual
Page 3
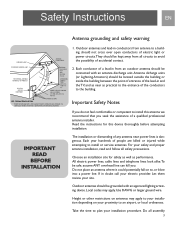
... you . IMPORTANT READ BEFORE INSTALLATION The installation or dismantling of a lead-in from an outdoor antenna should be grounded with an antenna discharge unit. For your proximity to avoid the possibility of people are enclosed in and the TV, and as near power lines is permanently and effectively grounded. 2. All electric power lines...
... you . IMPORTANT READ BEFORE INSTALLATION The installation or dismantling of a lead-in from an outdoor antenna should be grounded with an antenna discharge unit. For your proximity to avoid the possibility of people are enclosed in and the TV, and as near power lines is permanently and effectively grounded. 2. All electric power lines...

User Manual
Page 4
... CONTACT WITH THE POWER LINE, or you too can become electrocuted. Instead, use a metal ladder. Important installation information The MANT950 uses a power injector that sends a low power DC voltage to the antenna to push or pull the victim away from it and let it . Do NOT work on the... help . Do NOT use a DRY board, stick, or rope to drive the signal amplifier built into " by yourself. Be sure that the antenna mast and cable are two other people available for help . Remember that there are all excellent conductors of electrical current. EN 4 Safety Instructions work ...
... CONTACT WITH THE POWER LINE, or you too can become electrocuted. Instead, use a metal ladder. Important installation information The MANT950 uses a power injector that sends a low power DC voltage to the antenna to push or pull the victim away from it and let it . Do NOT work on the... help . Do NOT use a DRY board, stick, or rope to drive the signal amplifier built into " by yourself. Be sure that the antenna mast and cable are two other people available for help . Remember that there are all excellent conductors of electrical current. EN 4 Safety Instructions work ...

User Manual
Page 5
...MANT950 Antenna 1 2. 12VDC, 200mA Power Injector 1 3. Wing-nuts 4 7. For best results the antenna should be facing to the transmitter.To determine the transmitter(s) location you can consult the website http://www.antennaweb.org. Raise the completed antenna after assembly. 1. Using the L brackets as shown in figure B. If studs are adjustable laterally for the antenna...Installation determine the best location for the two 2" wood screws. Wall mounting the unit (indoor or outdoor) Do all the antenna assembly work on the ground. Attach the main bracket to the unit as shown at ...
...MANT950 Antenna 1 2. 12VDC, 200mA Power Injector 1 3. Wing-nuts 4 7. For best results the antenna should be facing to the transmitter.To determine the transmitter(s) location you can consult the website http://www.antennaweb.org. Raise the completed antenna after assembly. 1. Using the L brackets as shown in figure B. If studs are adjustable laterally for the antenna...Installation determine the best location for the two 2" wood screws. Wall mounting the unit (indoor or outdoor) Do all the antenna assembly work on the ground. Attach the main bracket to the unit as shown at ...

User Manual
Page 6
... weather protection boot over the connection. 5. At this point tighten the wood screws fully into position and tighten the L bracket screws. Raise the completed antenna after assembly. 1. Place the 4 wing-nuts on the ground. loosely allowing space for the last step. 4. Attach the cable to the F connector... to allow for the mast. 5. Hook the top of the mast under the clamps - EN Fig B Fig C 6 Mounting Antenna screws into the wall but leave about 1/2" to your TV. 3. Make sure the screws are at the top of the main bracket. 2. Install the two U-bolt s from the power injector...
... weather protection boot over the connection. 5. At this point tighten the wood screws fully into position and tighten the L bracket screws. Raise the completed antenna after assembly. 1. Place the 4 wing-nuts on the ground. loosely allowing space for the last step. 4. Attach the cable to the F connector... to allow for the mast. 5. Hook the top of the mast under the clamps - EN Fig B Fig C 6 Mounting Antenna screws into the wall but leave about 1/2" to your TV. 3. Make sure the screws are at the top of the main bracket. 2. Install the two U-bolt s from the power injector...

User Manual
Page 7
...of the product, and is not transferable. Alternate connections 1. This warranty extends only to 300 Ohm transformer. If your TV has only two screw type antenna inputs you will need to the place of purchase, must be free from state to your needs we recommend for ...best possible picture and overall performance. The power injector and power supply is to replace the cable with the specifications and warnings, for indoor use , in material, workmanship and assembly, under normal use only! Warranty Limited Lifetime Warranty The manufacturer warrants that you own this cable...
...of the product, and is not transferable. Alternate connections 1. This warranty extends only to 300 Ohm transformer. If your TV has only two screw type antenna inputs you will need to the place of purchase, must be free from state to your needs we recommend for ...best possible picture and overall performance. The power injector and power supply is to replace the cable with the specifications and warnings, for indoor use , in material, workmanship and assembly, under normal use only! Warranty Limited Lifetime Warranty The manufacturer warrants that you own this cable...


