User Manual
Page 5
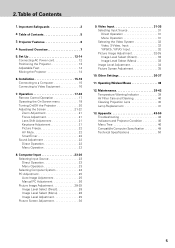
... 6. Computer Input 23-30 Selecting Input Source 23 Direct Operation 23 Menu Operation 23 Selecting Computer System 24 PC Adjustment 25 Auto Image Adjustment 25 Manual PC Adjustment 26 Picture Image Adjustment 28-29 Image Level Select (Direct 28 Image Level Select (Menu 28 Image Level Adjustment 29 Picture Screen Adjustment...
... 6. Computer Input 23-30 Selecting Input Source 23 Direct Operation 23 Menu Operation 23 Selecting Computer System 24 PC Adjustment 25 Auto Image Adjustment 25 Manual PC Adjustment 26 Picture Image Adjustment 28-29 Image Level Select (Direct 28 Image Level Select (Menu 28 Image Level Adjustment 29 Picture Screen Adjustment...
User Manual
Page 17
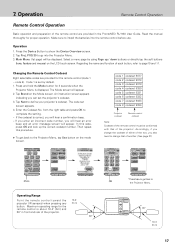
... message screen will hear a confirmation beep. - Enter the Codeset No. If you enter an incorrect code number, you can set the projector's codeset. 3. Read the manual thoroughly for 3 seconds when the Projector Menu is about 16.4' (5m) and 60° in the ProntoNEO RU 930 User Guide. Make sure to the...
... message screen will hear a confirmation beep. - Enter the Codeset No. If you enter an incorrect code number, you can set the projector's codeset. 3. Read the manual thoroughly for 3 seconds when the Projector Menu is about 16.4' (5m) and 60° in the ProntoNEO RU 930 User Guide. Make sure to the...

User Manual
Page 24
...27) The systems on Page 49.) Note : The projector may be selected. Refer to set in this projector is not provided properly, manual adjustment may display one of computer signals including VGA, SVGA, XGA and SXGA. Note: If the image is shown on this projector,... PC SYSTEM MENU System Menu icon Displays system being selected. Custom Mode (1~5) set , and then press OK button. Select Computer System Manually PC system can be required. Auto When the projector cannot recognize connected signal as a signal source, it automatically detects the signal format and...
...27) The systems on Page 49.) Note : The projector may be selected. Refer to set in this projector is not provided properly, manual adjustment may display one of computer signals including VGA, SVGA, XGA and SXGA. Note: If the image is shown on this projector,... PC SYSTEM MENU System Menu icon Displays system being selected. Custom Mode (1~5) set , and then press OK button. Select Computer System Manually PC system can be required. Auto When the projector cannot recognize connected signal as a signal source, it automatically detects the signal format and...
User Manual
Page 25
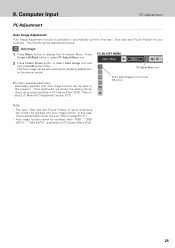
... function cannot be operated as follows. In this projector. Once parameters are stored, the setting can be also executed by selecting Mode in this case, manual adjustments will be done just by pressing auto button on PC System Menu (P24). 25 PC Adjust Menu icon Select Auto Image icon and press... to select PC Adjust Menu icon. Press Cursor Left/Right button to display the On-Screen Menu. Fine sync, Total dots and Picture Position of "Manual PC Adjustment" section (P27).
... function cannot be operated as follows. In this projector. Once parameters are stored, the setting can be also executed by selecting Mode in this case, manual adjustments will be done just by pressing auto button on PC System Menu (P24). 25 PC Adjust Menu icon Select Auto Image icon and press... to select PC Adjust Menu icon. Press Cursor Left/Right button to display the On-Screen Menu. Fine sync, Total dots and Picture Position of "Manual PC Adjustment" section (P27).
User Manual
Page 26
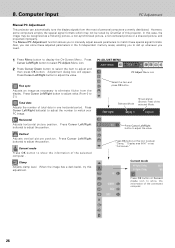
...adjust value.(From 0 to match your PC image. Select the item and press OK button. Current mode Press OK button at this projector. The Manual PC Adjustment function allows you need. 1 Press Menu button to match these special signal formats. Press Cursor Left/Right button(s) to adjust the ...31.) Total dots Adjusts the number of total dots in the 5 independent memory areas, enabling you to call up whenever you to manually adjust several parameters to display the On-Screen Menu. Vertical Adjusts vertical picture position. Clamp Adjusts clamp level. Computer Input PC Adjustment...
...adjust value.(From 0 to match your PC image. Select the item and press OK button. Current mode Press OK button at this projector. The Manual PC Adjustment function allows you need. 1 Press Menu button to match these special signal formats. Press Cursor Left/Right button(s) to adjust the ...31.) Total dots Adjusts the number of total dots in the 5 independent memory areas, enabling you to call up whenever you to manually adjust several parameters to display the On-Screen Menu. Vertical Adjusts vertical picture position. Clamp Adjusts clamp level. Computer Input PC Adjustment...
User Manual
Page 29
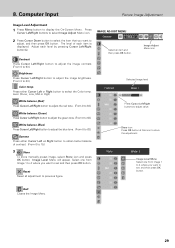
... Cursor Left or Right button to set and then press OK button. Select one from Image 1 to 4 where you want to 15.) 3 Store To store manually preset image, select Store icon and press OK button. Select an item and then press OK button. Quit Closes the Image Menu. 29 Computer Input...
... Cursor Left or Right button to set and then press OK button. Select one from Image 1 to 4 where you want to 15.) 3 Store To store manually preset image, select Store icon and press OK button. Select an item and then press OK button. Quit Closes the Image Menu. 29 Computer Input...
User Manual
Page 32
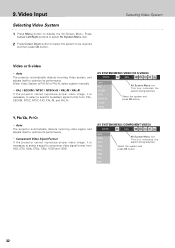
... Video or S-video - PAL / SECAM / NTSC / NTSC4.43 / PAL-M / PAL-N If the projector cannot reproduce proper video image, it is PAL-M or PAL-N, select system manually. - 9. Press Cursor Left/Right buttons to select AV System Menu icon. 2 Press Cursor Down button to select the system to display the On-Screen Menu...
... Video or S-video - PAL / SECAM / NTSC / NTSC4.43 / PAL-M / PAL-N If the projector cannot reproduce proper video image, it is PAL-M or PAL-N, select system manually. - 9. Press Cursor Left/Right buttons to select AV System Menu icon. 2 Press Cursor Down button to select the system to display the On-Screen Menu...
User Manual
Page 42
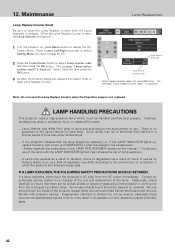
... Down button to reset the Lamp Replace Counter after the projector has cooled down. ( Follow carefully the instructions in the LAMP REPLACEMENT section of this manual. ) Continuous use . Select [Yes] and then press the OK button. 3 Another confirmation dialog box appears and select [Yes] to an end. Improper handling may explode...
... Down button to reset the Lamp Replace Counter after the projector has cooled down. ( Follow carefully the instructions in the LAMP REPLACEMENT section of this manual. ) Continuous use . Select [Yes] and then press the OK button. 3 Another confirmation dialog box appears and select [Yes] to an end. Improper handling may explode...


