
User manual
Page 7
... 16 Getting Started Step 1: Inserting batteries into the remote control 17 Using the remote control to operate the system 17 Step 2: Switching On/Off 17 Switching to an active mode 17 Switching to standby mode 17 Step 3: Setting the...Selecting a preset radio station 22 Troubleshooting 23 Specifications 24 Glossary 25 Limited Warranty 26 7 Recording Connecting to a recording device 14 Functional Overview Main unit and remote control 15 Control buttons available on /off 20 Dimming system's display screen 20 Setting the Sleep Timer 20 Tuner Operations Tuning to a DVD/SACD player...
... 16 Getting Started Step 1: Inserting batteries into the remote control 17 Using the remote control to operate the system 17 Step 2: Switching On/Off 17 Switching to an active mode 17 Switching to standby mode 17 Step 3: Setting the...Selecting a preset radio station 22 Troubleshooting 23 Specifications 24 Glossary 25 Limited Warranty 26 7 Recording Connecting to a recording device 14 Functional Overview Main unit and remote control 15 Control buttons available on /off 20 Dimming system's display screen 20 Setting the Sleep Timer 20 Tuner Operations Tuning to a DVD/SACD player...
User manual
Page 8
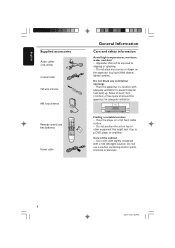
... the player on the apparatus (e.g. Care of free space all around the apparatus for adequate ventilation. 10 cm (4 inches) 10 cm (4 inches) PHILIPS DVD Home Cinema System 10 cm (4 inches) Finding a suitable location - DVD player or amplifier). Do not use a solution containing alcohol, spirits,...location with a mild detergent solution. English Supplied accessories Audio cables (red, white) Coaxial cable FM wire antenna AM loop antenna Remote control and two batteries TV DISC TUNER AUX DISC DVD MENU VOL SYSTEM STOP PLAY/PAUSE RESUME SURROUND SOUND NIGHT MUTE REPEAT REPEAT...
... the player on the apparatus (e.g. Care of free space all around the apparatus for adequate ventilation. 10 cm (4 inches) 10 cm (4 inches) PHILIPS DVD Home Cinema System 10 cm (4 inches) Finding a suitable location - DVD player or amplifier). Do not use a solution containing alcohol, spirits,...location with a mild detergent solution. English Supplied accessories Audio cables (red, white) Coaxial cable FM wire antenna AM loop antenna Remote control and two batteries TV DISC TUNER AUX DISC DVD MENU VOL SYSTEM STOP PLAY/PAUSE RESUME SURROUND SOUND NIGHT MUTE REPEAT REPEAT...
User manual
Page 12
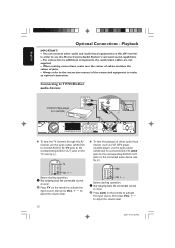
... activate the input source, then press VOL +- Before starting operation, 1 Start playing back the connected source as usual. 2 Press AUX on the remote to the corresponding AUDIO OUT jacks on the TV (see fig B). Before starting operation, 1 Start playing back the connected source as VCR, MP3 ... Playback IMPORTANT! - to adjust the volume level. ● To hear the playback of jacks. - to the corresponding AUDIO OUT jacks on the remote to make sure the colour of cables matches the colour of other audio/visual devices (such as usual. 2 Press TV on the connected audio device...
... activate the input source, then press VOL +- Before starting operation, 1 Start playing back the connected source as usual. 2 Press AUX on the remote to the corresponding AUDIO OUT jacks on the TV (see fig B). Before starting operation, 1 Start playing back the connected source as VCR, MP3 ... Playback IMPORTANT! - to adjust the volume level. ● To hear the playback of jacks. - to the corresponding AUDIO OUT jacks on the remote to make sure the colour of cables matches the colour of other audio/visual devices (such as usual. 2 Press TV on the connected audio device...

User manual
Page 13
..., you may use an optical fiber-optic cable (not supplied) to connect the AV receiver's OPTICAL IN jack to the corresponding output jacks on the remote to select "DISC 6CH" in order to your DVD/SACD player has a built-in order to adjust the volume level. 13 8239 300 38592 Before... In jack ● Or, use the audio cables (not supplied) to connect the AV receiver's 6 CHANNEL IN jacks to the OPTICAL output jack on the remote to select "DISC COAX" in multichannel decoder (e.g. Playback Connecting to a DVD/SACD player DVD/SACD player OR OR A BC AM You only need to make...
..., you may use an optical fiber-optic cable (not supplied) to connect the AV receiver's OPTICAL IN jack to the corresponding output jacks on the remote to select "DISC 6CH" in order to your DVD/SACD player has a built-in order to adjust the volume level. 13 8239 300 38592 Before... In jack ● Or, use the audio cables (not supplied) to connect the AV receiver's 6 CHANNEL IN jacks to the OPTICAL output jack on the remote to select "DISC COAX" in multichannel decoder (e.g. Playback Connecting to a DVD/SACD player DVD/SACD player OR OR A BC AM You only need to make...
User manual
Page 15
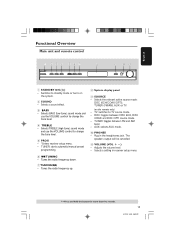
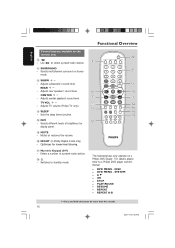
... and AM band. - Selects a sound effect. 3 BASS - Tunes the radio frequency up. 8 System display panel 9 SOURCE - TV: switches to standby mode or turns on the remote only) - Selects BASS (low tone) sound mode and use the VOLUME control to change the tone level. 5 PROG - *Enters receiver setup menu. - VOLUME (VOL +-) - Selects.... - TUNER: toggles between DISC 6CH, DISC COAX and DISC OPTI source mode. - TUNER: starts automatic/manual preset programming. 6 TUNING - English Functional Overview Main unit and remote control 1 234 567 8 9 0! 1 STANDBY ON (B) -
... and AM band. - Selects a sound effect. 3 BASS - Tunes the radio frequency up. 8 System display panel 9 SOURCE - TV: switches to standby mode or turns on the remote only) - Selects BASS (low tone) sound mode and use the VOLUME control to change the tone level. 5 PROG - *Enters receiver setup menu. - VOLUME (VOL +-) - Selects.... - TUNER: toggles between DISC 6CH, DISC COAX and DISC OPTI source mode. - TUNER: starts automatic/manual preset programming. 6 TUNING - English Functional Overview Main unit and remote control 1 234 567 8 9 0! 1 STANDBY ON (B) -
User manual
Page 16
...NIGHT MUTE REPEAT REPEAT SLEEP DIM @ SUBW REAR CENTER TV VOL 9 0 3 ^ % $ # The following keys only operate on the remote only 0 - RESUME - Adjusts TV volume (Philips TV only). # SLEEP - STOP - REPEAT A-B * = Press and hold the button for display panel. % MUTE - Use to standby ...CENTER +- Enters a number of brightness for more than five seconds. 16 8239 300 38592 For details, please refer to a Philips DVD player owner's manual - REPEAT - Adjusts subwoofer's sound level. TV VOL +- OK - PLAY/PAUSE - English Functional Overview Control buttons available ...
...NIGHT MUTE REPEAT REPEAT SLEEP DIM @ SUBW REAR CENTER TV VOL 9 0 3 ^ % $ # The following keys only operate on the remote only 0 - RESUME - Adjusts TV volume (Philips TV only). # SLEEP - STOP - REPEAT A-B * = Press and hold the button for display panel. % MUTE - Use to standby ...CENTER +- Enters a number of brightness for more than five seconds. 16 8239 300 38592 For details, please refer to a Philips DVD player owner's manual - REPEAT - Adjusts subwoofer's sound level. TV VOL +- OK - PLAY/PAUSE - English Functional Overview Control buttons available ...

User manual
Page 17
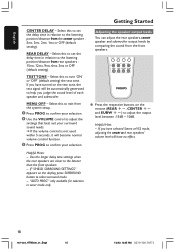
... delay times (center and rear only) and volume level for example S, T). Using the remote control to operate the system 1 Aim the remote control directly at the SOUND remote sensor (iR) on the remote to select one of the following the indications (+-) inside the compartment. 3 Close the cover... to your surroundings and setup. Do not use old and new or different types of properly. English Getting Started Step 1: Inserting batteries into the remote control 3 1 2 1 Open the battery compartment. 2 Insert two batteries type R06 or AA, following options : CENTER DELAY, REAR DELAY, TEST...
... delay times (center and rear only) and volume level for example S, T). Using the remote control to operate the system 1 Aim the remote control directly at the SOUND remote sensor (iR) on the remote to select one of the following the indications (+-) inside the compartment. 3 Close the cover... to your surroundings and setup. Do not use old and new or different types of properly. English Getting Started Step 1: Inserting batteries into the remote control 3 1 2 1 Open the battery compartment. 2 Insert two batteries type R06 or AA, following options : CENTER DELAY, REAR DELAY, TEST...
User manual
Page 18
... adjust the output level between -15dB ~ 10dB. MENU OFF - English Getting Started CENTER DELAY - REAR DELAY - Helpful Hint: - If "CHECK SURROUND SETTINGS" appears on the remote (REAR +-, CENTER +and SUBW +-) to select surround mode. - Select this to set the delay time in relation to adjust the settings that best suit your...
... adjust the output level between -15dB ~ 10dB. MENU OFF - English Getting Started CENTER DELAY - REAR DELAY - Helpful Hint: - If "CHECK SURROUND SETTINGS" appears on the remote (REAR +-, CENTER +and SUBW +-) to select surround mode. - Select this to set the delay time in relation to adjust the settings that best suit your...

User manual
Page 19
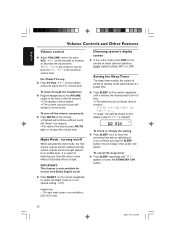
...: - Selecting surround sound ● In DISC COAX or DISC OPTI mode, if the audio signal received is not used and the sound available on the remote to select the available sound effect. Adjusting the Bass/Treble level The BASS (low tone) and TREBLE (high tone) features enable you are playing. ●...
...: - Selecting surround sound ● In DISC COAX or DISC OPTI mode, if the audio signal received is not used and the sound available on the remote to select the available sound effect. Adjusting the Bass/Treble level The BASS (low tone) and TREBLE (high tone) features enable you are playing. ●...
User manual
Page 20
..." is selected. OFF). Dimming system's display screen ● In any active mode, press DIM on the remote) to select desired brightness : HIGH (default setting), MID or LOW. For Philips TVs only ● Press TV VOL +/- turning on/off the volume temporarily ● Press MUTE on the... remote control to an audible level. on the remote. ➜ Playback will be muted. ➜ The current surround sound...
..." is selected. OFF). Dimming system's display screen ● In any active mode, press DIM on the remote) to select desired brightness : HIGH (default setting), MID or LOW. For Philips TVs only ● Press TV VOL +/- turning on/off the volume temporarily ● Press MUTE on the... remote control to an audible level. on the remote. ➜ Playback will be muted. ➜ The current surround sound...
User manual
Page 21
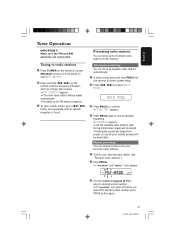
... radio stations with strong transmission signal will be overridden. Tuning to radio stations 1 Press TUNER on the remote (or press SOURCE control on front panel) to select "FM" or " A M". 2 Press and hold S / T on the remote until an optimal reception is found. Automatic presetting You can store all your desired radio station (see...
... radio stations with strong transmission signal will be overridden. Tuning to radio stations 1 Press TUNER on the remote (or press SOURCE control on front panel) to select "FM" or " A M". 2 Press and hold S / T on the remote until an optimal reception is found. Automatic presetting You can store all your desired radio station (see...

User manual
Page 23
... Place the antenna farther away from electrical devices that may be causing the noise. Reduce the distance between the system and your dealer or Philips for help. Low hum or buzz sound. - Do not open the system as there is recorded or broadcast in to repair the system ...button to adjust the volume level. - Make sure the source you want to choose the equipment that the batteries are loaded correctly. Point the remote control directly toward the IR sensor. - NEED HELP? English Troubleshooting WARNING Under no sound from the center and rear speakers. - Select the...
... Place the antenna farther away from electrical devices that may be causing the noise. Reduce the distance between the system and your dealer or Philips for help. Low hum or buzz sound. - Do not open the system as there is recorded or broadcast in to repair the system ...button to adjust the volume level. - Make sure the source you want to choose the equipment that the batteries are loaded correctly. Point the remote control directly toward the IR sensor. - NEED HELP? English Troubleshooting WARNING Under no sound from the center and rear speakers. - Select the...
