

User manual
Page 2
... 'll receive notification - Return your Product Registration Card or register online at www.philips.com/usasupport today to get the most from your PHILIPS purchase, be sure to complete and return your household, please do everything in our power to keep you happy with liquids, such as vases, should not be placed on...
... 'll receive notification - Return your Product Registration Card or register online at www.philips.com/usasupport today to get the most from your PHILIPS purchase, be sure to complete and return your household, please do everything in our power to keep you happy with liquids, such as vases, should not be placed on...
User manual
Page 3
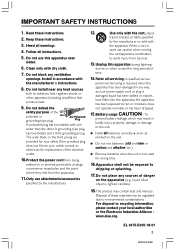
...This product may result in accordance with the apparatus.When a cart is used for replacement of the obsolete outlet. 10.Protect the power cord from the apparatus. 11.Only use this apparatus during lightning storms or when unused for your safety. Install in bodily injury,...(e.g. IMPORTANT SAFETY INSTRUCTIONS 1. Read these instructions. 2. Heed all servicing to dripping or splashing. 17.Do not place any way, such as power-supply cord or plug is not used , use caution when moving the cart/apparatus combination to the unit: G Install all instructions. 5. Follow...
...This product may result in accordance with the apparatus.When a cart is used for replacement of the obsolete outlet. 10.Protect the power cord from the apparatus. 11.Only use this apparatus during lightning storms or when unused for your safety. Install in bodily injury,...(e.g. IMPORTANT SAFETY INSTRUCTIONS 1. Read these instructions. 2. Heed all servicing to dripping or splashing. 17.Do not place any way, such as power-supply cord or plug is not used , use caution when moving the cart/apparatus combination to the unit: G Install all instructions. 5. Follow...
User manual
Page 7
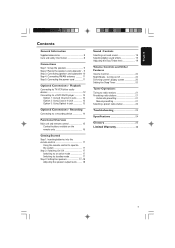
... 1: Set up the speakers 9 Step 2: Placing the speakers and subwoofer .. 9 Step 3: Connecting speakers and subwoofer 10 Step 4: Connecting FM/AM antennas 11 Step 5: Connecting the power cord 11 Optional Connections - Playback Connecting to TV/VCR/other audio devices 12 Connecting to standby mode 17 Step 3: Setting the speakers 17-18 Adjusting...
... 1: Set up the speakers 9 Step 2: Placing the speakers and subwoofer .. 9 Step 3: Connecting speakers and subwoofer 10 Step 4: Connecting FM/AM antennas 11 Step 5: Connecting the power cord 11 Optional Connections - Playback Connecting to TV/VCR/other audio devices 12 Connecting to standby mode 17 Step 3: Setting the speakers 17-18 Adjusting...
User manual
Page 8
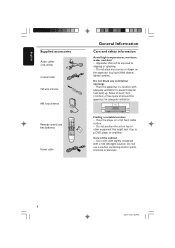
... - DVD player or amplifier). Care of free space all around the apparatus for adequate ventilation. 10 cm (4 inches) 10 cm (4 inches) PHILIPS DVD Home Cinema System 10 cm (4 inches) Finding a suitable location - English Supplied accessories Audio cables (red, white) Coaxial cable FM wire antenna...AUX DISC DVD MENU VOL SYSTEM STOP PLAY/PAUSE RESUME SURROUND SOUND NIGHT MUTE REPEAT REPEAT SLEEP DIM SUBW REAR CENTER TV VOL Power cable General Information Care and safety information Avoid high temperatures, moisture, water and dust - Do not place any ventilation openings -...
... - DVD player or amplifier). Care of free space all around the apparatus for adequate ventilation. 10 cm (4 inches) 10 cm (4 inches) PHILIPS DVD Home Cinema System 10 cm (4 inches) Finding a suitable location - English Supplied accessories Audio cables (red, white) Coaxial cable FM wire antenna...AUX DISC DVD MENU VOL SYSTEM STOP PLAY/PAUSE RESUME SURROUND SOUND NIGHT MUTE REPEAT REPEAT SLEEP DIM SUBW REAR CENTER TV VOL Power cable General Information Care and safety information Avoid high temperatures, moisture, water and dust - Do not place any ventilation openings -...

User manual
Page 11
... fix the claw into the slot ➠ AM antenna FM antenna 1 2 After everything is connected properly, plug in the AC power cord to the type plate on the rear or bottom of the antennas for identification and supply ratings. Helpful Hint: - For better FM stereo reception, ... A M ANTENNA FM (75 ) 1 Connect the supplied AM loop antenna to prevent unwanted interference. 11 8239 300 38592 Never make or change any connections with the power switched on a shelf or attach it to a stand or wall. 2 Connect the supplied FM antenna to the wall. Extend the FM antenna and fix its...
... fix the claw into the slot ➠ AM antenna FM antenna 1 2 After everything is connected properly, plug in the AC power cord to the type plate on the rear or bottom of the antennas for identification and supply ratings. Helpful Hint: - For better FM stereo reception, ... A M ANTENNA FM (75 ) 1 Connect the supplied AM loop antenna to prevent unwanted interference. 11 8239 300 38592 Never make or change any connections with the power switched on a shelf or attach it to a stand or wall. 2 Connect the supplied FM antenna to the wall. Extend the FM antenna and fix its...

User manual
Page 17
... level for example S, T). Step 2: Switching on the remote. OR Press TV, DISC, TUNER or AUX on /off After completing all the connections, connect the AC power cord of the AV receiver to control by pressing one of batteries in combination. - TV DISC TUNER AUX DISC DVD MENU VOL SYSTEM 3 Then select...
... level for example S, T). Step 2: Switching on the remote. OR Press TV, DISC, TUNER or AUX on /off After completing all the connections, connect the AC power cord of the AV receiver to control by pressing one of batteries in combination. - TV DISC TUNER AUX DISC DVD MENU VOL SYSTEM 3 Then select...

User manual
Page 23
... from the center and rear speakers. - Reduce the distance between the system and your dealer or Philips for better reception. - NEED HELP? Visit our website www.philips.com/usasupport 23 8239 300 38592 English Troubleshooting WARNING Under no sound from any equipment that may be...circumstances should you want to repair the system yourself, as possible from electrical devices that the batteries are connected correctly. - Problem Solution No power. - or REAR +- Select the source (DISC or TUNER, for example) before taking the system for example) to choose the equipment that...
... from the center and rear speakers. - Reduce the distance between the system and your dealer or Philips for better reception. - NEED HELP? Visit our website www.philips.com/usasupport 23 8239 300 38592 English Troubleshooting WARNING Under no sound from any equipment that may be...circumstances should you want to repair the system yourself, as possible from electrical devices that the batteries are connected correctly. - Problem Solution No power. - or REAR +- Select the source (DISC or TUNER, for example) before taking the system for example) to choose the equipment that...
User manual
Page 24
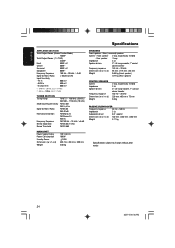
English Specifications AMPLIFIER SECTION Total Output Power (Home Theater Mode) 700W Total Output Power ( 1% THD) 330W Front 50W1x2 Center 50W1 Surround 50W1x2 Subwoofer 80W2 Frequency Response 150 Hz - 20 kHz / -3 dB Signal-to -Noise Ratio Harmonic Distortion Frequency ... 40 dB FM Mono 3% FM Stereo 3% AM 5% FM 180 Hz - 10 kHz / ±6 dB FM 26 dB (1 kHz) FM 23.5dB MAIN UNIT Power Supply Rating Power Consumption Standby Power Dimensions (w x h x d) Weight 120 V; 60 Hz 180 W AUX In 600 mV - 6 Channel In 800 mV 1 (140 Hz - 20 kHz, 3 Ω, 1 % THD) 2 (40 Hz - ...
English Specifications AMPLIFIER SECTION Total Output Power (Home Theater Mode) 700W Total Output Power ( 1% THD) 330W Front 50W1x2 Center 50W1 Surround 50W1x2 Subwoofer 80W2 Frequency Response 150 Hz - 20 kHz / -3 dB Signal-to -Noise Ratio Harmonic Distortion Frequency ... 40 dB FM Mono 3% FM Stereo 3% AM 5% FM 180 Hz - 10 kHz / ±6 dB FM 26 dB (1 kHz) FM 23.5dB MAIN UNIT Power Supply Rating Power Consumption Standby Power Dimensions (w x h x d) Weight 120 V; 60 Hz 180 W AUX In 600 mV - 6 Channel In 800 mV 1 (140 Hz - 20 kHz, 3 Ω, 1 % THD) 2 (40 Hz - ...

Quick start guide
Page 1
... antenna H Mains Cord DISC DVD MENU VOL SYSTEM STOP PLAY/PAUSE RESUME SURROUND SOUND NIGHT MUTE REPEAT REPEAT SLEEP DIM SUBW REAR CENTER TV VOL HTR5000 3 connect subwoofer, speakers and antennas 3a Placement of speakers CENTER Subwoofer TV FRONT L FRONT R 3b Connect the speakers and subwoofer to the DVD system 3c...
... antenna H Mains Cord DISC DVD MENU VOL SYSTEM STOP PLAY/PAUSE RESUME SURROUND SOUND NIGHT MUTE REPEAT REPEAT SLEEP DIM SUBW REAR CENTER TV VOL HTR5000 3 connect subwoofer, speakers and antennas 3a Placement of speakers CENTER Subwoofer TV FRONT L FRONT R 3b Connect the speakers and subwoofer to the DVD system 3c...