
Leaflet
Page 3
...: 120V, 60Hz • Power consumption: 30 W • Standby power consumption: < 3 W Accessories • Included Accessories: Quick start guide, Remote Control, User Manual, RF antenna cable, 2 x AAA Batteries, Product Registration Card, Audio/Video cable Audio Playback • Playback Media: Audio CD,... CD-R/RW • Compression format: Dolby Digital, MP3, WMA • Number of Koninklijke Philips Electronics N.V. www.philips.com DVD recorder/VCR with i.LINK digital input Specifications DVDR3435V/37 Picture/Display • A/D converter: 10 bit, 54 MHz • D/A converter: 10 bit...
...: 120V, 60Hz • Power consumption: 30 W • Standby power consumption: < 3 W Accessories • Included Accessories: Quick start guide, Remote Control, User Manual, RF antenna cable, 2 x AAA Batteries, Product Registration Card, Audio/Video cable Audio Playback • Playback Media: Audio CD,... CD-R/RW • Compression format: Dolby Digital, MP3, WMA • Number of Koninklijke Philips Electronics N.V. www.philips.com DVD recorder/VCR with i.LINK digital input Specifications DVDR3435V/37 Picture/Display • A/D converter: 10 bit, 54 MHz • D/A converter: 10 bit...

User manual
Page 6
6 Table of contents Before you start Precautions 2 Table of contents 6 Features 7 Symbol in this User Manual 7 Functional overview 8 Installing batteries in the remote control 10 Using a remote control 10 The VCR/DVD recorder switching 10 Setup menus 11 Display menu 12 Connections Connection to a TV 14 Connection to a cable box or satellite ...
6 Table of contents Before you start Precautions 2 Table of contents 6 Features 7 Symbol in this User Manual 7 Functional overview 8 Installing batteries in the remote control 10 Using a remote control 10 The VCR/DVD recorder switching 10 Setup menus 11 Display menu 12 Connections Connection to a TV 14 Connection to a cable box or satellite ...

User manual
Page 8
... ANT-OUT 1. TV ANTENNA OUT jack (DVD/VCR) Use to connect an antenna cable to pass the signal from the TV ANTENNA IN to your remote control so that you wish to operate. 14.VCR indicator Lights up when the VCR output mode is selected. 15.CHANNEL L / K buttons (DVD/VCR) ... touch the inner pins of external equipment with an S-Video cable. 9. Red LED lights up and down. 16.Display Shows various information and messages. 17.Remote control sensor (DVD/VCR) Receive signals from your TV monitor. 6. EJECT A button Press to remove the videotape from the cassette compartment when the power is...
... ANT-OUT 1. TV ANTENNA OUT jack (DVD/VCR) Use to connect an antenna cable to pass the signal from the TV ANTENNA IN to your remote control so that you wish to operate. 14.VCR indicator Lights up when the VCR output mode is selected. 15.CHANNEL L / K buttons (DVD/VCR) ... touch the inner pins of external equipment with an S-Video cable. 9. Red LED lights up and down. 16.Display Shows various information and messages. 17.Remote control sensor (DVD/VCR) Receive signals from your TV monitor. 6. EJECT A button Press to remove the videotape from the cassette compartment when the power is...

User manual
Page 9
...Press repeatedly to stop playback or recording. Also while setting "HIFI" and "MONO". (DVD/VCR) playback is paused, press to Press to the Philips brand TV PREV PAUSE NEXT 26* products, you can 6. adjust the picture blurred vertically. 31. Press once to set the Display menu on .... reverse. VCR button to cancel the programming for CD, to pause playback or recording. PAUSE F button (DVD/VCR) Press to activate the remote control clear the highlighted marker number Press to 28. in forward step by pressing these buttons. 13. Press to call up and 4. CH ...
...Press repeatedly to stop playback or recording. Also while setting "HIFI" and "MONO". (DVD/VCR) playback is paused, press to Press to the Philips brand TV PREV PAUSE NEXT 26* products, you can 6. adjust the picture blurred vertically. 31. Press once to set the Display menu on .... reverse. VCR button to cancel the programming for CD, to pause playback or recording. PAUSE F button (DVD/VCR) Press to activate the remote control clear the highlighted marker number Press to 28. in forward step by pressing these buttons. 13. Press to call up and 4. CH ...

User manual
Page 10
...STEREO ONE TOUCH RECORDING • LONG PLAY STOP/EJECT PLAY REC OPEN/CLOSE CHANNEL VCR DVD SOURCE DVD RECORDER STOP PLAY REC OPEN Remote control BACK REW SEARTCVH/ VIDEO VCR DISC MENU AUDIO OK DVD TITLE RAPIDOPPELNAY/CLOSE SETUP PREV .@/: GHI PQRS VOTLV COSMKIMPERCIAL DUBDBIRINEGCT ABC...operate with each battery match the indications in the battery compartment. • Remove batteries from the unit are as leakage and bursting. Using a remote control Keep in mind the following : • Do not mix new and old batteries together. • Do not use of batteries can...
...STEREO ONE TOUCH RECORDING • LONG PLAY STOP/EJECT PLAY REC OPEN/CLOSE CHANNEL VCR DVD SOURCE DVD RECORDER STOP PLAY REC OPEN Remote control BACK REW SEARTCVH/ VIDEO VCR DISC MENU AUDIO OK DVD TITLE RAPIDOPPELNAY/CLOSE SETUP PREV .@/: GHI PQRS VOTLV COSMKIMPERCIAL DUBDBIRINEGCT ABC...operate with each battery match the indications in the battery compartment. • Remove batteries from the unit are as leakage and bursting. Using a remote control Keep in mind the following : • Do not mix new and old batteries together. • Do not use of batteries can...
User manual
Page 15
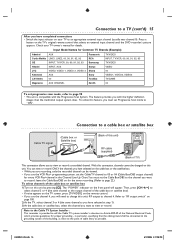
...supplied) E (Back of the cable box or satellite box). • If noise appears on the TV screen, press [TV/VIDEO] on the remote control. • If you use the VCR Plus+ programming system, set Progressive Scan mode to page 22.) To select channels of the National Electrical ...that selects an external input channel until the DVD recorder's picture appears. To utilize this connection, channels cannot be changed on the TV's original remote control that the cable ground shall be viewed. • If you use the channel 4, you have completed connections • Switch the input selector...
...supplied) E (Back of the cable box or satellite box). • If noise appears on the TV screen, press [TV/VIDEO] on the remote control. • If you use the VCR Plus+ programming system, set Progressive Scan mode to page 22.) To select channels of the National Electrical ...that selects an external input channel until the DVD recorder's picture appears. To utilize this connection, channels cannot be changed on the TV's original remote control that the cable ground shall be viewed. • If you use the channel 4, you have completed connections • Switch the input selector...

User manual
Page 17
... This operation may take a while to record repeatedly on the same disc, select the rewritable DVD+RW/DVD-RW type disc. There are in the remote control and you want to be your TV. Step 4: Select the recording speed. For example, when you want to DVD discs. When you have...+ TIMER REC MODE TIMER DVD REC SET DVD RECORDER HQ (1Hr) 0:58 E9A90UD_EN.indb 17 Instructions continue on the unit. Step 1: Choose a disc type. Remote Control TV/VIDEO VCR DVD OPEN/CLOSE SEARCH AUDIO TITLE RAPID PLAY DISC MENU SETUP OK BACK PLAY DISPLAY Select the input to which the...
... This operation may take a while to record repeatedly on the same disc, select the rewritable DVD+RW/DVD-RW type disc. There are in the remote control and you want to be your TV. Step 4: Select the recording speed. For example, when you want to DVD discs. When you have...+ TIMER REC MODE TIMER DVD REC SET DVD RECORDER HQ (1Hr) 0:58 E9A90UD_EN.indb 17 Instructions continue on the unit. Step 1: Choose a disc type. Remote Control TV/VIDEO VCR DVD OPEN/CLOSE SEARCH AUDIO TITLE RAPID PLAY DISC MENU SETUP OK BACK PLAY DISPLAY Select the input to which the...
User manual
Page 20
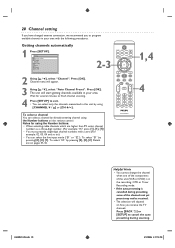
... will start getting channels available in this unit by directly entering channel using the Number buttons: • When selecting cable channels which are on the remote control. To select "E2" by pressing [0], [0], [1]. To select "E1" by pressing [0], [0], [2]. 20 Channel setting If you have changed antenna connection, we recommend you receive the...
... will start getting channels available in this unit by directly entering channel using the Number buttons: • When selecting cable channels which are on the remote control. To select "E2" by pressing [0], [0], [1]. To select "E1" by pressing [0], [0], [2]. 20 Channel setting If you have changed antenna connection, we recommend you receive the...

User manual
Page 35
... Programming list will be highlighted even if you will be turned on a disc recorded by using the side of the main unit. [STOP C] on the remote control is in progress, that is impossible to stop the Timer Recording in the Timer Programming list. When the Timer Recording is not effective. VCR...
... Programming list will be highlighted even if you will be turned on a disc recorded by using the side of the main unit. [STOP C] on the remote control is in progress, that is impossible to stop the Timer Recording in the Timer Programming list. When the Timer Recording is not effective. VCR...

User manual
Page 36
... 30 seconds (at the end time of overlapped settings This unit records the programs according to priority if the Timer Programmings are recording on the remote control. A The first 30 seconds (at the longest) will be cut off . B The first 30 seconds (at the longest) will be cut off . A) has priority...
... 30 seconds (at the end time of overlapped settings This unit records the programs according to priority if the Timer Programmings are recording on the remote control. A The first 30 seconds (at the longest) will be cut off . B The first 30 seconds (at the longest) will be cut off . A) has priority...

User manual
Page 42
... select the input of this unit, select "E2" position by pressing [REC MODE]. Insert the videotape with the Number buttons or using [CH +/-] on the remote control, or [CHANNEL L / K] on the front panel. • To use the input jacks on the back of this unit, select "E1" position by...86 E9A90UD_EN.indb 42 6/12/2006 4:21:43 PM This operation may take a while to record properly. 3. For videotape: Press [STOP C] on the remote control or [STOP C / EJECT A] on the external source to which the external equipment is connected. Place the disc to be recognized. Select a ...
... select the input of this unit, select "E2" position by pressing [REC MODE]. Insert the videotape with the Number buttons or using [CH +/-] on the remote control, or [CHANNEL L / K] on the front panel. • To use the input jacks on the back of this unit, select "E1" position by...86 E9A90UD_EN.indb 42 6/12/2006 4:21:43 PM This operation may take a while to record properly. 3. For videotape: Press [STOP C] on the remote control or [STOP C / EJECT A] on the external source to which the external equipment is connected. Place the disc to be recognized. Select a ...

User manual
Page 43
... playback. E3 (DV-IN) 5 AB-1234 0:22:54 SP (2Hr) 1:35 34 The following instructions are described with the operations using [CH +/-] on the remote control or the [CHANNEL L / K] on the front panel and press [DISPLAY] to dub the sound with the IEEE1394 standards. Press [OK] again to activate....Stereo2" to show the DV dubbing information for the operating your DV camcorder • If the unit cannot recognize the input signal from the remote control of the current operation and the time counter Each icon means: DVC is in stop all operations if the DV camcorder is in recording...
... playback. E3 (DV-IN) 5 AB-1234 0:22:54 SP (2Hr) 1:35 34 The following instructions are described with the operations using [CH +/-] on the remote control or the [CHANNEL L / K] on the front panel and press [DISPLAY] to dub the sound with the IEEE1394 standards. Press [OK] again to activate....Stereo2" to show the DV dubbing information for the operating your DV camcorder • If the unit cannot recognize the input signal from the remote control of the current operation and the time counter Each icon means: DVC is in stop all operations if the DV camcorder is in recording...

User manual
Page 90
... Video cable (commercially available) to connect this unit to the TV. (See Method 3 on page 14.) Make sure the "P.SCAN" appears on the unit or remote control within 15 seconds at step 7, Progressive Scan remains to be selected. Press [OK]. 2-7 TV/VIDEO VCR DVD OPEN/CLOSE SEARCH AUDIO TITLE RAPID PLAY...
... Video cable (commercially available) to connect this unit to the TV. (See Method 3 on page 14.) Make sure the "P.SCAN" appears on the unit or remote control within 15 seconds at step 7, Progressive Scan remains to be selected. Press [OK]. 2-7 TV/VIDEO VCR DVD OPEN/CLOSE SEARCH AUDIO TITLE RAPID PLAY...
User manual
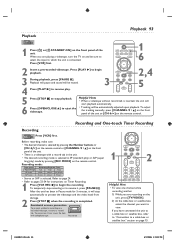
Page 93
...recorded videotape, remove its record tab. Press [VCR] first. BACK REW PLAY DISPLAY FFW 2,4 3 During playback, press [PAUSE F]. To record on the remote control. If you have connected the unit to a cable box or satellite box, refer to "Connection to which the unit is selected by pressing [REC... a videotape, turn the TV on and be muted. 4 Press [PLAY B] to resume play ) mode by pressing the Number buttons or [CH +/-] on the remote control or [CHANNEL L / K] on page 15. TV/VIDEO VCR DVD OPEN/CLOSE SEARCH AUDIO TITLE RAPID PLAY DISC MENU SETUP OK 1 6 2 Insert a ...
...recorded videotape, remove its record tab. Press [VCR] first. BACK REW PLAY DISPLAY FFW 2,4 3 During playback, press [PAUSE F]. To record on the remote control. If you have connected the unit to a cable box or satellite box, refer to "Connection to which the unit is selected by pressing [REC... a videotape, turn the TV on and be muted. 4 Press [PLAY B] to resume play ) mode by pressing the Number buttons or [CH +/-] on the remote control or [CHANNEL L / K] on page 15. TV/VIDEO VCR DVD OPEN/CLOSE SEARCH AUDIO TITLE RAPID PLAY DISC MENU SETUP OK 1 6 2 Insert a ...

User manual
Page 94
... power off automatically. (0:30) (Normal recording) (8:00) (1:00) (7:30) To change the recording length during the One-touch Timer Recording, press [VCR REC I ] on the remote control or on the display panel during Search, this unit will turn off . - Time search VCR This feature allows you to go to a specific point...
... power off automatically. (0:30) (Normal recording) (8:00) (1:00) (7:30) To change the recording length during the One-touch Timer Recording, press [VCR REC I ] on the remote control or on the display panel during Search, this unit will turn off . - Time search VCR This feature allows you to go to a specific point...

User manual
Page 95
...: If the noise bars appear on the TV screen, you can make . When you playback a videotape recorded in Hi-Fi stereo: Press [AUDIO] on the remote control to select Hi-Fi or MONO for playback sound mode. • If you have connected a monaural TV to the beginning, stop mode, press [REW...
...: If the noise bars appear on the TV screen, you can make . When you playback a videotape recorded in Hi-Fi stereo: Press [AUDIO] on the remote control to select Hi-Fi or MONO for playback sound mode. • If you have connected a monaural TV to the beginning, stop mode, press [REW...

User manual
Page 96
...life of any bunched antenna cables farther apart. TV channels cannot be changed . • Switch the input to cancel the timer standby mode. The remote control does not work. • Check the antenna or cable connection to a power failure that has priority. Then, try again. • ...8226; Re-connect all connections securely. • The connecting cord is in the Setup menu (pages 20-21). • Select a channel of the remote control. • Check if there is no picture. • Re-connect the connecting cord securely. • Check if the connecting cords are experiencing....
...life of any bunched antenna cables farther apart. TV channels cannot be changed . • Switch the input to cancel the timer standby mode. The remote control does not work. • Check the antenna or cable connection to a power failure that has priority. Then, try again. • ...8226; Re-connect all connections securely. • The connecting cord is in the Setup menu (pages 20-21). • Select a channel of the remote control. • Check if there is no picture. • Re-connect the connecting cord securely. • Check if the connecting cords are experiencing....

User manual
Page 98
... No Repairing Remedy • If there is not recognized after you record to 12 bits. D Do you intend to 12 bits or 16 bits. The remote control does not function. To record an audio signal, set to cancel the V Repairing process. V The tape does not play. message is disappeared), a Repairing process...
... No Repairing Remedy • If there is not recognized after you record to 12 bits. D Do you intend to 12 bits or 16 bits. The remote control does not function. To record an audio signal, set to cancel the V Repairing process. V The tape does not play. message is disappeared), a Repairing process...
User manual
Page 100
... on this unit. JPEG (Joint Photographic Experts Group) JPEG is split up into digital audio data. This unit can play back the files on the remote control. • If noise appears, change the RF output channel of display that conveys each signal of color (C) and luminance (Y) to -digital converter, generating a stream...
... on this unit. JPEG (Joint Photographic Experts Group) JPEG is split up into digital audio data. This unit can play back the files on the remote control. • If noise appears, change the RF output channel of display that conveys each signal of color (C) and luminance (Y) to -digital converter, generating a stream...

Quick start guide
Page 1
Then press [OK]. 3 Using [K / L], select your area. DVDR3435V/37 First connect ... Also refer to the Recorder's owner's manual, which the unit is ready for use! Select the input to follow "Auto Clock Setting" ... Clock Setting" on page 25 in the User Manual. • If a Public Broadcasting Station (PBS) is finished, "Clock Setting" will start Channel Preset. Prepare the remote control 1 2 3 Complete Initial Setup Turn on this unit) Antenna Cable TV signal or 1 Remove the Antenna or Cable TV signal from your area, follow these...
Then press [OK]. 3 Using [K / L], select your area. DVDR3435V/37 First connect ... Also refer to the Recorder's owner's manual, which the unit is ready for use! Select the input to follow "Auto Clock Setting" ... Clock Setting" on page 25 in the User Manual. • If a Public Broadcasting Station (PBS) is finished, "Clock Setting" will start Channel Preset. Prepare the remote control 1 2 3 Complete Initial Setup Turn on this unit) Antenna Cable TV signal or 1 Remove the Antenna or Cable TV signal from your area, follow these...


