
Brochure
Page 2
...component video or DVI inputs to a DTV set-top box and set to screen. all your viewing pleasure. Dimensions • Product weight (+stand) (lb): 37.5 lb • Product weight (+stand): 17 kg VGA input VGA input provides a connector to the non-degraded signal, ...of Koninklijke Philips Electronics N.V. Thanks to accommodate input of an analog signal for a theater-like audio experience. 32MF605W/17 32" LCD HD flat TV Product specifications Picture/Display • Aspect ratio: 16:9 • Brightness: 500 cd/m² • Contrast ratio (typical): 800:1 • Display screen type:...
...component video or DVI inputs to a DTV set-top box and set to screen. all your viewing pleasure. Dimensions • Product weight (+stand) (lb): 37.5 lb • Product weight (+stand): 17 kg VGA input VGA input provides a connector to the non-degraded signal, ...of Koninklijke Philips Electronics N.V. Thanks to accommodate input of an analog signal for a theater-like audio experience. 32MF605W/17 32" LCD HD flat TV Product specifications Picture/Display • Aspect ratio: 16:9 • Brightness: 500 cd/m² • Contrast ratio (typical): 800:1 • Display screen type:...

User Manual
Page 4
...) Output 13 Digital Satellite Receiver with DVI connector 14 PC (Monitor) Connection 15 AV Output 16 Install Menu Language Settings 17 Tuner Mode Control 18 Auto Program (Setting Up Channels 19 Channel Edit Control 20 Factory Reset 21 Smart Picture and Smart ...Introduction Welcome/Registration of Your TV 2 IMPORTANT SAFETY INSTRUCTIONS 3 Table of Content 4 Getting Started Before Installation 5 Installing LCD TV on -screen text. On-screen Menus: Helpful messages (in this manual will match those of available channels. Remote Control: Works your new LCD TV. Audio/Video In ...
...) Output 13 Digital Satellite Receiver with DVI connector 14 PC (Monitor) Connection 15 AV Output 16 Install Menu Language Settings 17 Tuner Mode Control 18 Auto Program (Setting Up Channels 19 Channel Edit Control 20 Factory Reset 21 Smart Picture and Smart ...Introduction Welcome/Registration of Your TV 2 IMPORTANT SAFETY INSTRUCTIONS 3 Table of Content 4 Getting Started Before Installation 5 Installing LCD TV on -screen text. On-screen Menus: Helpful messages (in this manual will match those of available channels. Remote Control: Works your new LCD TV. Audio/Video In ...

User Manual
Page 8
...Number buttons Press to select either Personal, Movie, Sports, Weak signal, Multimedia or Night picture setting. The LCD TV will appear on the screen when the sound is muted. C.C button Press the C.C button to select CC on or off. Sleep button Press to set the LCD.... Smart Sound button Press repeatedly to toggle among the 4 settings; Picture Format button Press the FORMAT button repeatedly to select among the four screen format sizes; 4:3, SUPERWIDE, ZOOM 16:9 or WIDESCREEN. PIP button Press repeatedly to navigate left/right in the onscreen menu. When selecting single...
...Number buttons Press to select either Personal, Movie, Sports, Weak signal, Multimedia or Night picture setting. The LCD TV will appear on the screen when the sound is muted. C.C button Press the C.C button to select CC on or off. Sleep button Press to set the LCD.... Smart Sound button Press repeatedly to toggle among the 4 settings; Picture Format button Press the FORMAT button repeatedly to select among the four screen format sizes; 4:3, SUPERWIDE, ZOOM 16:9 or WIDESCREEN. PIP button Press repeatedly to navigate left/right in the onscreen menu. When selecting single...

User Manual
Page 11
... the remote control to select AV 1 (or AV2, AV3, S-Video1, or S-Video2 if you select S-Video via Source select, even there appears no image on screen. • Select weak signal mode via the smart picture settings in video playback. 1 AV Player with Component (Y, Pb, Pr) Output Jacks, please refer to "Connecting...
... the remote control to select AV 1 (or AV2, AV3, S-Video1, or S-Video2 if you select S-Video via Source select, even there appears no image on screen. • Select weak signal mode via the smart picture settings in video playback. 1 AV Player with Component (Y, Pb, Pr) Output Jacks, please refer to "Connecting...
User Manual
Page 16
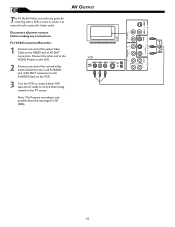
Disconnect all power sources before making any connections. Connect the other end to the VCR VIDEO IN jack on the TV screen. For VCR Connection/Recorder: 1 1 Connect one end of the red and white Audio Cable from the L and R AUDIO jack of AV OUT connection to the ...
Disconnect all power sources before making any connections. Connect the other end to the VCR VIDEO IN jack on the TV screen. For VCR Connection/Recorder: 1 1 Connect one end of the red and white Audio Cable from the L and R AUDIO jack of AV OUT connection to the ...

User Manual
Page 17
...the INSTALL menu. 4 Press the (VOL+) button to select English, French or Spanish. 5 Press the MENU MENU button repeatedly to clear the menu from the screen. It does not change the other onscreen text features, such as Closed Captioning (CC), with TV shows. � � � MAIN CONTROLS PICTURE AUDIO...FACTORY RESET MENU �� SOURCE CC � PIP � INSTALL LANGUAGE TUNER MODE AUTO PROGRAM CHANNEL EDIT MANUAL FINE TUNE FACTORY RESET ENGLISH 17 The LANGUAGE control enables you to set the TV's onscreen menu to be shown in English, French or Spanish text.
...the INSTALL menu. 4 Press the (VOL+) button to select English, French or Spanish. 5 Press the MENU MENU button repeatedly to clear the menu from the screen. It does not change the other onscreen text features, such as Closed Captioning (CC), with TV shows. � � � MAIN CONTROLS PICTURE AUDIO...FACTORY RESET MENU �� SOURCE CC � PIP � INSTALL LANGUAGE TUNER MODE AUTO PROGRAM CHANNEL EDIT MANUAL FINE TUNE FACTORY RESET ENGLISH 17 The LANGUAGE control enables you to set the TV's onscreen menu to be shown in English, French or Spanish text.

User Manual
Page 18
... menu. 5 Press the (VOL+) or (VOL-) buttons to select CABLE, AIR (antenna), or AUTO. 6 Press the MENU MENU button repeatedly to receive channels from the screen. It's important for antenna and cable channels. 18 button to Cable or Air (antenna). Before making adjustment, press SOURCE button on your remote control to...
... menu. 5 Press the (VOL+) or (VOL-) buttons to select CABLE, AIR (antenna), or AUTO. 6 Press the MENU MENU button repeatedly to receive channels from the screen. It's important for antenna and cable channels. 18 button to Cable or Air (antenna). Before making adjustment, press SOURCE button on your remote control to...

User Manual
Page 19
... run Auto Program, check out the results. Remember, an antenna or cable TV signal must first be connected to clear the menu from the screen, after AUTO STORE has finished. HELPFUL HINT After you can automatically set itself for local area (or cable TV) channels.
... run Auto Program, check out the results. Remember, an antenna or cable TV signal must first be connected to clear the menu from the screen, after AUTO STORE has finished. HELPFUL HINT After you can automatically set itself for local area (or cable TV) channels.

User Manual
Page 20
.... 2 Press the (CH-) INSTALL menu. You can add or remove a channel in the LCD TV's memory. 1 Press the Menu MENU button to or from the screen.
.... 2 Press the (CH-) INSTALL menu. You can add or remove a channel in the LCD TV's memory. 1 Press the Menu MENU button to or from the screen.

User Manual
Page 21
.... 5 Press the (VOL+) button to reset the TV to the original factory settings. 6 Press the MENU MENU button repeatedly to clear the menu from the screen. FACTORY RESET Your TV can be reset to the original factory settings by the manufacture's default settings.
.... 5 Press the (VOL+) button to reset the TV to the original factory settings. 6 Press the MENU MENU button repeatedly to clear the menu from the screen. FACTORY RESET Your TV can be reset to the original factory settings by the manufacture's default settings.

User Manual
Page 22
In the Personal smart picture mode you can create your own preferred video settings. 1 Press the PICTURE button on the screen. Note:The settings of the Personal smart picture mode can be adjusted in sound control within the onscreen menu. SMART SOUND CONTROL S mart Sound...showing a lot of the Personal smart sound mode can be adjusted in picture options within the onscreen menu. Personal 1 Press the Sound button on the screen. 2 Press the Sound button repeatedly to toggle among the four setting: Personal, News, Music, or Theatre. Following these steps to select any of programs...
In the Personal smart picture mode you can create your own preferred video settings. 1 Press the PICTURE button on the screen. Note:The settings of the Personal smart picture mode can be adjusted in sound control within the onscreen menu. SMART SOUND CONTROL S mart Sound...showing a lot of the Personal smart sound mode can be adjusted in picture options within the onscreen menu. Personal 1 Press the Sound button on the screen. 2 Press the Sound button repeatedly to toggle among the four setting: Personal, News, Music, or Theatre. Following these steps to select any of programs...

User Manual
Page 26
... prompt you to confirm the code you (a child, for your code has been changed by inputting the default code (0711). The screen will appear on the screen. 6 Enter a four-digit code using the Number buttons. HELPFUL HINT Remember that blocked channel may have forgotten the code, you can always ... 7 Press MENU MENU repeatedly to see the onscreen menu. First, set an access code. 1 Press the MENU MENU button to remove the menu from the screen. NOTE TO PARENTS: It is the default Auto Lock code. AUTO LOCK ACCESS CODE Over the next few pages you have been viewed. 26 MENU...
... prompt you to confirm the code you (a child, for your code has been changed by inputting the default code (0711). The screen will appear on the screen. 6 Enter a four-digit code using the Number buttons. HELPFUL HINT Remember that blocked channel may have forgotten the code, you can always ... 7 Press MENU MENU repeatedly to see the onscreen menu. First, set an access code. 1 Press the MENU MENU button to remove the menu from the screen. NOTE TO PARENTS: It is the default Auto Lock code. AUTO LOCK ACCESS CODE Over the next few pages you have been viewed. 26 MENU...

User Manual
Page 27
.... 27 MAIN CONTROLS PICTURE AUDIO FEATURES INSTALL SOURCE PICTURE FORMAT PICTURE ALIGNMENT AUTOLOCK CLOSED CAPTION 6 3 Press the (VOL+) button to remove the menu from the screen. Note:You can block additional channels by using Number buttons to jump to highlight the FEATURES menu.
.... 27 MAIN CONTROLS PICTURE AUDIO FEATURES INSTALL SOURCE PICTURE FORMAT PICTURE ALIGNMENT AUTOLOCK CLOSED CAPTION 6 3 Press the (VOL+) button to remove the menu from the screen. Note:You can block additional channels by using Number buttons to jump to highlight the FEATURES menu.

User Manual
Page 28
... R NC17 X G PG PG13 R NC17 X NO 9 Press MENU MENU repeatedly to remove the menu from viewing (i.e.: If "R" is selected to be blocked, NC-17 and X will automatically be blocked.) When a rating is set to unblock, only the selected rating will be unblocked (Ratings lower will not automatically be (ON... be unblocked). 28 HELPFUL HINT When a rating is chosen to see the onscreen menu. When highlighted, all these options can block programming based on the screen: 1 Press the MENU MENU button to be blocked, any of the Movie Rating options. MENU OK SOURCE CC 2 4 7 3 PIP 5 8 Press the (...
... R NC17 X G PG PG13 R NC17 X NO 9 Press MENU MENU repeatedly to remove the menu from viewing (i.e.: If "R" is selected to be blocked, NC-17 and X will automatically be blocked.) When a rating is set to unblock, only the selected rating will be unblocked (Ratings lower will not automatically be (ON... be unblocked). 28 HELPFUL HINT When a rating is chosen to see the onscreen menu. When highlighted, all these options can block programming based on the screen: 1 Press the MENU MENU button to be blocked, any of the Movie Rating options. MENU OK SOURCE CC 2 4 7 3 PIP 5 8 Press the (...

User Manual
Page 29
...HINT When a rating is set to highlight AUTO Lock. 5 Press the (VOL+) button, INPUT USER CODE will not automatically be blocked from the screen. When highlighted, all these options can block programming based on the TV Industry ratings.Once you've entered your access code. 7 Press the (CH... MENU repeatedly to remove the menu from viewing (i.e.: If "R" is selected to be blocked, NC-17 and X will automatically be blocked.) When a rating is chosen to be unblocked (Ratings lower will appear on the screen: 1 Press the MENU MENU button to see the onscreen menu. 2 Press the (CH-) buttons...
...HINT When a rating is set to highlight AUTO Lock. 5 Press the (VOL+) button, INPUT USER CODE will not automatically be blocked from the screen. When highlighted, all these options can block programming based on the TV Industry ratings.Once you've entered your access code. 7 Press the (CH... MENU repeatedly to remove the menu from viewing (i.e.: If "R" is selected to be blocked, NC-17 and X will automatically be blocked.) When a rating is chosen to be unblocked (Ratings lower will appear on the screen: 1 Press the MENU MENU button to see the onscreen menu. 2 Press the (CH-) buttons...

User Manual
Page 31
... control. Note:Closed Caption can also be activated by broadcast stations during the transmission of shows being used by pressing CC button on the TV screen. MAIN CONTROLS PICTURE AUDIO FEATURES INSTALL SOURCE PICTURE FORMAT PICTURE ALIGNMENT AUTOLOCK CLOSED CAPTION 1 6 MENU OK SOURCE CC 2 4 6 3 PIP 5 FEATURES SOURCE PICTURE FORMAT PICTURE ALIGNMENT...
... control. Note:Closed Caption can also be activated by broadcast stations during the transmission of shows being used by pressing CC button on the TV screen. MAIN CONTROLS PICTURE AUDIO FEATURES INSTALL SOURCE PICTURE FORMAT PICTURE ALIGNMENT AUTOLOCK CLOSED CAPTION 1 6 MENU OK SOURCE CC 2 4 6 3 PIP 5 FEATURES SOURCE PICTURE FORMAT PICTURE ALIGNMENT...

User Manual
Page 32
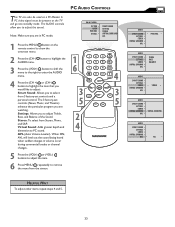
A PC video signal must be used as it appears on the remote control to see the onscreen menu. Select from the screen. Brightness: Adjust to "sharpen" the Picture quality. MENU OK SOURCE CC � � PIP � PICTURE SMART PICTURE BRIGHTNESS CONTRAST AUTO ADJUST MANUAL ADJUST... you to highlight the item that you are in darkness and the white become richer in PC mode. 1 Press the MENU MENU button on the screen. Vertical-adjust the vertical placement of the picture. The PC Picture controls allow you to remove the menu from Normal, Cool, or Warm. The...
A PC video signal must be used as it appears on the remote control to see the onscreen menu. Select from the screen. Brightness: Adjust to "sharpen" the Picture quality. MENU OK SOURCE CC � � PIP � PICTURE SMART PICTURE BRIGHTNESS CONTRAST AUTO ADJUST MANUAL ADJUST... you to highlight the item that you are in darkness and the white become richer in PC mode. 1 Press the MENU MENU button on the screen. Vertical-adjust the vertical placement of the picture. The PC Picture controls allow you to remove the menu from Normal, Cool, or Warm. The...
User Manual
Page 33
... FEATURES INSTALL SMART SOUND S E T T I N GS STEREO VIRTUAL SURROUND AVL YES HELPFUL HINT To adjust other items repeat steps 4 and 5. 33 Stereo: To select from the screen. 1 6 MENU 3 OK SOURCE 5 CC 2 4 4 3 PIP 5 AUDIO SMART SOUND S E T T I N GS STEREO VIRTUAL SURROUND AVL PERSONAL AUDIO SMART SOUND S E T T I N GS STEREO VIRTUAL SURROUND AVL TREBLE BASS BALANCE...
... FEATURES INSTALL SMART SOUND S E T T I N GS STEREO VIRTUAL SURROUND AVL YES HELPFUL HINT To adjust other items repeat steps 4 and 5. 33 Stereo: To select from the screen. 1 6 MENU 3 OK SOURCE 5 CC 2 4 4 3 PIP 5 AUDIO SMART SOUND S E T T I N GS STEREO VIRTUAL SURROUND AVL PERSONAL AUDIO SMART SOUND S E T T I N GS STEREO VIRTUAL SURROUND AVL TREBLE BASS BALANCE...

User Manual
Page 37
... • Video game images and scoreboards • Television station logos cause a problem if they are less likely to scratch or damage the screen surface. Moving or low-contrast graphics are bright and stationary. Cleaning • To avoid possible shock hazard, remove the TV's power cord from... common examples of stationary images: • DVD menus list DVD content. • Letterbox black bars appear at the bottom of time. Wipe the screen with a clean cloth dampened with a dry, non-scratching duster. • When cleaning the TV, take care not to damage the picture tube....
... • Video game images and scoreboards • Television station logos cause a problem if they are less likely to scratch or damage the screen surface. Moving or low-contrast graphics are bright and stationary. Cleaning • To avoid possible shock hazard, remove the TV's power cord from... common examples of stationary images: • DVD menus list DVD content. • Letterbox black bars appear at the bottom of time. Wipe the screen with a clean cloth dampened with a dry, non-scratching duster. • When cleaning the TV, take care not to damage the picture tube....

User Manual
Page 41
Magnavox authorized service centers will provide removal and installation of the parts under the specified labor warranty. (PTV screens carry a thirty (30) day replacement warranty.) TO OBTAIN WARRANTY SERVICE IN THE U.S.A., PUERTO RICO, OR U.S. VIRGIN ISLANDS... You may not apply to rental purposes). • ...
Magnavox authorized service centers will provide removal and installation of the parts under the specified labor warranty. (PTV screens carry a thirty (30) day replacement warranty.) TO OBTAIN WARRANTY SERVICE IN THE U.S.A., PUERTO RICO, OR U.S. VIRGIN ISLANDS... You may not apply to rental purposes). • ...


