
User manual (English)
Page 3
... near children. 5. Do not use of table or counter, or touch hot surfaces. 10. Save these instructions. Allow to persons. 8. To disconnect, turn any manner. SAVE THESE INSTRUCTIONS Read all instructions. 2. Always attach plug to "off parts, and before cleaning. Do not touch hot surfaces. The use outdoors. 9. Do not open the service door during the brewing, dispensing, washing or rinse 14...
... near children. 5. Do not use of table or counter, or touch hot surfaces. 10. Save these instructions. Allow to persons. 8. To disconnect, turn any manner. SAVE THESE INSTRUCTIONS Read all instructions. 2. Always attach plug to "off parts, and before cleaning. Do not touch hot surfaces. The use outdoors. 9. Do not open the service door during the brewing, dispensing, washing or rinse 14...

User manual (English)
Page 4
... hot water to fill the water tank. C. CAUTION This appliance is of the grounded type, the extension cord should be a grounding-type 3-wire cord, and 3. Any servicing, other than cleaning and user maintenance, should be done by an authorized service center. Repair should be at least as great as the electrical rating of fire or electric shock, do not disassemble the machine. Use cold water only. 3 Keep your coffee, use...
... hot water to fill the water tank. C. CAUTION This appliance is of the grounded type, the extension cord should be a grounding-type 3-wire cord, and 3. Any servicing, other than cleaning and user maintenance, should be done by an authorized service center. Repair should be at least as great as the electrical rating of fire or electric shock, do not disassemble the machine. Use cold water only. 3 Keep your coffee, use...
User manual (English)
Page 5
......43 ERROR CODES ...44 SAFETY RULES ...45 TECHNICAL DATA ...47 PROGRAMMING FROM THE "BEVERAGE SETTINGS" MENU 17 PROGRAMMING THE MACHINE...19 MACHINE SETTINGS ...20 LANGUAGE ...20 CUP WARMING SURFACE ...21 WATER FILTER ...21 RINSE CYCLE...22 WATER HARDNESS - 2 INDEX GENERAL INFORMATION...3 MACHINE...4 ACCESSORIES ...4 INSTALLATION ...5 STARTING THE MACHINE ...5 SETTING THE LANGUAGE ...6 INTENZA WATER FILTER...7 DISPLAY ...8 AROMA OPTI-DOSE...8 ADJUSTMENTS ...9 MILK CONTAINER ...9 DRIP TRAY HEIGHT ADJUSTMENT...9 COFFEE STRENGTH ...10 SAECO ADAPTING SYSTEM ...10 BEVERAGE DISPENSING...11 BREWING...
......43 ERROR CODES ...44 SAFETY RULES ...45 TECHNICAL DATA ...47 PROGRAMMING FROM THE "BEVERAGE SETTINGS" MENU 17 PROGRAMMING THE MACHINE...19 MACHINE SETTINGS ...20 LANGUAGE ...20 CUP WARMING SURFACE ...21 WATER FILTER ...21 RINSE CYCLE...22 WATER HARDNESS - 2 INDEX GENERAL INFORMATION...3 MACHINE...4 ACCESSORIES ...4 INSTALLATION ...5 STARTING THE MACHINE ...5 SETTING THE LANGUAGE ...6 INTENZA WATER FILTER...7 DISPLAY ...8 AROMA OPTI-DOSE...8 ADJUSTMENTS ...9 MILK CONTAINER ...9 DRIP TRAY HEIGHT ADJUSTMENT...9 COFFEE STRENGTH ...10 SAECO ADAPTING SYSTEM ...10 BEVERAGE DISPENSING...11 BREWING...

User manual (English)
Page 6
... INSTRUCTIONS CAREFULLY TO AVOID SERIOUS INJURY! Warning: No liability is assumed for preparing milk beverages and a hot water dispenser. KEEP THESE INSTRUCTIONS It includes an automatic device for any part of the machine; • The use of non-original spare parts and accessories; • Failure to anyone else who may use the coffee machine. IN THESE CASES, THE WARRANTY IS NOT VALID. HOW TO USE THESE OPERATING INSTRUCTIONS Keep these instructions...
... INSTRUCTIONS CAREFULLY TO AVOID SERIOUS INJURY! Warning: No liability is assumed for preparing milk beverages and a hot water dispenser. KEEP THESE INSTRUCTIONS It includes an automatic device for any part of the machine; • The use of non-original spare parts and accessories; • Failure to anyone else who may use the coffee machine. IN THESE CASES, THE WARRANTY IS NOT VALID. HOW TO USE THESE OPERATING INSTRUCTIONS Keep these instructions...
User manual (English)
Page 8
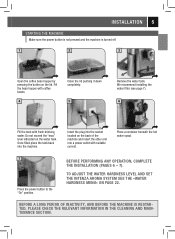
INSTALLATION 5 STARTING THE MACHINE Make sure the power button is not pressed and the machine is turned off. 1 2 3 Open the coffee bean hopper by pressing the button on the water tank. Do not exceed the "max" level indicated on the lid. Fill the bean hopper with suitable current. TO ADJUST THE WATER HARDNESS LEVEL AND SET THE INTENZA AROMA SYSTEM SEE THE «WATER HARDNESS MENU»...
INSTALLATION 5 STARTING THE MACHINE Make sure the power button is not pressed and the machine is turned off. 1 2 3 Open the coffee bean hopper by pressing the button on the water tank. Do not exceed the "max" level indicated on the lid. Fill the bean hopper with suitable current. TO ADJUST THE WATER HARDNESS LEVEL AND SET THE INTENZA AROMA SYSTEM SEE THE «WATER HARDNESS MENU»...
User manual (English)
Page 10
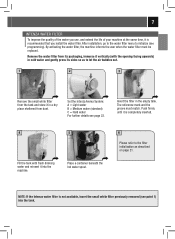
... the tank and store it is not available, insert the small white filter previously removed (see programming). Set the Intenza Aroma System: A = Light water B = Medium water (standard) C = Hard water For further details see page 22. By activating the water filter, the machine informs the user when the water filter must match. 7 INTENZA WATER FILTER To improve the quality of the water you install the water...
... the tank and store it is not available, insert the small white filter previously removed (see programming). Set the Intenza Aroma System: A = Light water B = Medium water (standard) C = Hard water For further details see page 22. By activating the water filter, the machine informs the user when the water filter must match. 7 INTENZA WATER FILTER To improve the quality of the water you install the water...
User manual (English)
Page 12
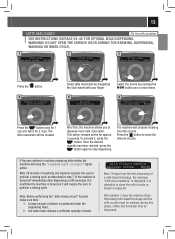
... the button. Use only fresh milk. Refer to the instructions for maintenance and cleaning of the button. To raise the drip tray, press lightly on the lower part of the cappuccinatore on page 39-40). 1 2 3 Open the milk compartment by pressing the button and remove the milk container. Remove the cover and pour in the figure. Do not use milk after the best-before preparing any milk beverage. Replace the lid...
... the button. Use only fresh milk. Refer to the instructions for maintenance and cleaning of the button. To raise the drip tray, press lightly on the lower part of the cappuccinatore on page 39-40). 1 2 3 Open the milk compartment by pressing the button and remove the milk container. Remove the cover and pour in the figure. Do not use milk after the best-before preparing any milk beverage. Replace the lid...
User manual (English)
Page 13
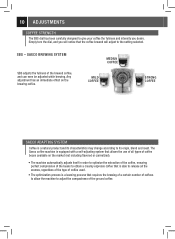
... of the beans to obtain a creamy espresso coffee that requires the brewing of a certain number of the ground coffee. 10 ADJUSTMENTS COFFEE STRENGTH The SBS dial has been carefully designed to the setting selected. The Saeco coffee machine is equipped with a self-adjusting system that the coffee brewed will notice that allows the use of all types of the brewed coffee, and can even be adjusted while...
... of the beans to obtain a creamy espresso coffee that requires the brewing of a certain number of the ground coffee. 10 ADJUSTMENTS COFFEE STRENGTH The SBS dial has been carefully designed to the setting selected. The Saeco coffee machine is equipped with a self-adjusting system that the coffee brewed will notice that allows the use of all types of the brewed coffee, and can even be adjusted while...

User manual (English)
Page 14
... THE DISPENSING OF COFFEE, HOT WATER AND MILK MAY BE STOPPED AT ANY TIME BY PRESSING THE BUTTON AGAIN. Check that the coffee will be brewed. Coffee dispensing is possible to grind the second coffee dose. To dispense another type of coffee, select it by following the "Cleaning and Maintenance" instructions on page 38. Press the button once for 1 cup and twice for 2 cups. The machine dispenses automatically according to dispense an espresso.
... THE DISPENSING OF COFFEE, HOT WATER AND MILK MAY BE STOPPED AT ANY TIME BY PRESSING THE BUTTON AGAIN. Check that the coffee will be brewed. Coffee dispensing is possible to grind the second coffee dose. To dispense another type of coffee, select it by following the "Cleaning and Maintenance" instructions on page 38. Press the button once for 1 cup and twice for 2 cups. The machine dispenses automatically according to dispense an espresso.

User manual (English)
Page 15
... WHEN YOU WISH TO DISPENSE THIS TYPE OF BEVERAGE. Press the button. 5 brewing in progress espresso coffee A message appears, reminding the user to brew an espresso using pre-ground coffee. Press the brewing. INSERT ONLY ONE SCOOP OF GROUND COFFEE AT A TIME. Only use coffee that is poured into the bypass doser, only water will be dispensed • If 2 or more times. TWO CUPS OF COFFEE CANNOT BE DISPENSED AT THE SAME...
... WHEN YOU WISH TO DISPENSE THIS TYPE OF BEVERAGE. Press the button. 5 brewing in progress espresso coffee A message appears, reminding the user to brew an espresso using pre-ground coffee. Press the brewing. INSERT ONLY ONE SCOOP OF GROUND COFFEE AT A TIME. Only use coffee that is poured into the bypass doser, only water will be dispensed • If 2 or more times. TWO CUPS OF COFFEE CANNOT BE DISPENSED AT THE SAME...
User manual (English)
Page 16
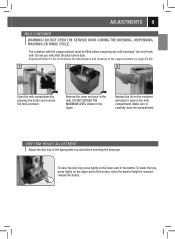
... SERVICE DOOR DURING THE BREWING, DISPENSING, WASHING OR RINSE CYCLE. 1 strong aroma espresso coffee 08:33 2 strong aroma latte macchiato 08:33 3 strong aroma latte macchiato 08:33 Press the button. 4 brewing in step 7. The machine will be brewed. Press the button to perform a rinsing cycle as shown on it , press the button. The latte macchiato will propose cleaning the milk circuits. the water tank...
... SERVICE DOOR DURING THE BREWING, DISPENSING, WASHING OR RINSE CYCLE. 1 strong aroma espresso coffee 08:33 2 strong aroma latte macchiato 08:33 3 strong aroma latte macchiato 08:33 Press the button. 4 brewing in step 7. The machine will be brewed. Press the button to perform a rinsing cycle as shown on it , press the button. The latte macchiato will propose cleaning the milk circuits. the water tank...

User manual (English)
Page 23
... the button. machine settings rinse cycle set the clock. machine settings cup warming plate activate/deactivate the cup warmer. key and select "machine settings". machine settings maintenance clean the machine's internal circuits. Select the desired language. machine settings acoustic alerts set the standby and the timers. To exit any level of the display. 1 machine settings 2 machine settings language 3 deutsch sprache 1. 2. 1. 2. 1. 2. machine settings stand-by setting set /activate the acoustic alarms. machine settings water filter activate/deactivate the message to...
... the button. machine settings rinse cycle set the clock. machine settings cup warming plate activate/deactivate the cup warmer. key and select "machine settings". machine settings maintenance clean the machine's internal circuits. Select the desired language. machine settings acoustic alerts set the standby and the timers. To exit any level of the display. 1 machine settings 2 machine settings language 3 deutsch sprache 1. 2. 1. 2. 1. 2. machine settings stand-by setting set /activate the acoustic alarms. machine settings water filter activate/deactivate the message to...

User manual (English)
Page 24
... installed filter can be replaced. 21 CUP WARMING SURFACE > machine settings > cup warming plate. It is possible to be activated or deactivated from this function informs the user when the water filter needs to set : - always off when the machine is in stand-by mode. Press the button to save . It is possible to fully savor the coffee and taste its full aroma. 1 machine settings 1. 2. 2 machine settings cup...
... installed filter can be replaced. 21 CUP WARMING SURFACE > machine settings > cup warming plate. It is possible to be activated or deactivated from this function informs the user when the water filter needs to set : - always off when the machine is in stand-by mode. Press the button to save . It is possible to fully savor the coffee and taste its full aroma. 1 machine settings 1. 2. 2 machine settings cup...
User manual (English)
Page 29
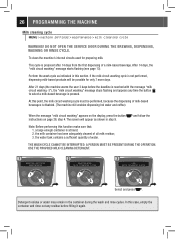
... any time the button to select a milk-based beverage is pressed. To clean the machine's internal circuits used for only 7 more days. the water tank contains a sufficient quantity of all milk residue; 3. THE WASH CYCLE CANNOT BE INTERRUPTED. DO NOT OPEN THE SERVICE DOOR DURING THE BREWING, DISPENSING, WASHING OR RINSE CYCLE. USE THE PROVIDED MILK CLEANING DETERGENT. 1 machine settings maintenance 1. 2. 2 maintenance milk cleaning cycle 1. 2. 3 yes milk cleaning cycle 1. 2. The screen...
... any time the button to select a milk-based beverage is pressed. To clean the machine's internal circuits used for only 7 more days. the water tank contains a sufficient quantity of all milk residue; 3. THE WASH CYCLE CANNOT BE INTERRUPTED. DO NOT OPEN THE SERVICE DOOR DURING THE BREWING, DISPENSING, WASHING OR RINSE CYCLE. USE THE PROVIDED MILK CLEANING DETERGENT. 1 machine settings maintenance 1. 2. 2 maintenance milk cleaning cycle 1. 2. 3 yes milk cleaning cycle 1. 2. The screen...

User manual (English)
Page 32
... MUST BE PRESENT DURING THE OPERATION. Each time a beverage is turned on page 29. Run the descaling cycle as described on , the machine will indicate the need to the level indicated with the descaling solution up to perform a descaling cycle through a flashing message. Please use . 29 Descaling cycle > machine settings > maintenance > descaling cycle To perform the automatic descaling cycle. Descaling is available; 2. THE WATER FILTER (IF INSERTED) HAS BEEN...
... MUST BE PRESENT DURING THE OPERATION. Each time a beverage is turned on page 29. Run the descaling cycle as described on , the machine will indicate the need to the level indicated with the descaling solution up to perform a descaling cycle through a flashing message. Please use . 29 Descaling cycle > machine settings > maintenance > descaling cycle To perform the automatic descaling cycle. Descaling is available; 2. THE WATER FILTER (IF INSERTED) HAS BEEN...

User manual (English)
Page 41
.... 38 CLEANING AND MAINTENANCE MAINTENANCE DURING OPERATION During normal operation, the "empty grounds drawer" message may appear. Refer to the instructions for several days, empty tank and refill it. Note: Always use fresh water. Remove the drip tray, empty and hand wash. GENERAL MACHINE CLEANING The cleaning described below must be performed once a week. WARNING! If water is not reset. Clean the tank and the cover. 4 5 Remove the drip tray...
.... 38 CLEANING AND MAINTENANCE MAINTENANCE DURING OPERATION During normal operation, the "empty grounds drawer" message may appear. Refer to the instructions for several days, empty tank and refill it. Note: Always use fresh water. Remove the drip tray, empty and hand wash. GENERAL MACHINE CLEANING The cleaning described below must be performed once a week. WARNING! If water is not reset. Clean the tank and the cover. 4 5 Remove the drip tray...

User manual (English)
Page 42
... STORE THE CONTAINER IN THE MACHINE After using the lubricant supplied with lukewarm water. Every 6 months, remove the water tank, open the milk container and lubricate the O-ring using milk to rinse the cappuccinatore before the first daily dispensing of the milk container and cappuccinatore will operate properly. 1 2 3 Discard any authorized service center. Thorough cleaning and maintenance of milk-based products and wash it has...
... STORE THE CONTAINER IN THE MACHINE After using the lubricant supplied with lukewarm water. Every 6 months, remove the water tank, open the milk container and lubricate the O-ring using milk to rinse the cappuccinatore before the first daily dispensing of the milk container and cappuccinatore will operate properly. 1 2 3 Discard any authorized service center. Thorough cleaning and maintenance of milk-based products and wash it has...
User manual (English)
Page 47
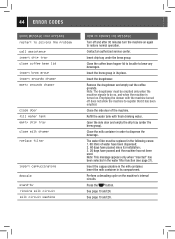
... minutes turn the machine on again to restore normal operation. Perform a descaling cycle on . 44 ERROR CODES GUIDE MESSAGE THAT APPEARS restart to solving the problem call assistance insert drip tray close coffee bean lid insert brew group insert grounds drawer empty grounds drawer close door fill water tank empty drip tray close milk drawer replace filter insert cappuccinatore descale stand-by rinsing milk circuit milk circuit washing HOW TO REMOVE THE MESSAGE Turn off...
... minutes turn the machine on again to restore normal operation. Perform a descaling cycle on . 44 ERROR CODES GUIDE MESSAGE THAT APPEARS restart to solving the problem call assistance insert drip tray close coffee bean lid insert brew group insert grounds drawer empty grounds drawer close door fill water tank empty drip tray close milk drawer replace filter insert cappuccinatore descale stand-by rinsing milk circuit milk circuit washing HOW TO REMOVE THE MESSAGE Turn off...
User manual (English)
Page 48
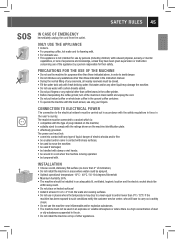
... the machine; • be used in the ground coffee container. • To operate the machine with sharp surfaces; • be used to comply with . ONLY USE THE APPLIANCE • Indoors. • For preparing coffee, hot water and for their safety. If the machine has been exposed to such conditions notify the customer service center, who will have been given supervision or instruction concerning use the machine...
... the machine; • be used in the ground coffee container. • To operate the machine with sharp surfaces; • be used to comply with . ONLY USE THE APPLIANCE • Indoors. • For preparing coffee, hot water and for their safety. If the machine has been exposed to such conditions notify the customer service center, who will have been given supervision or instruction concerning use the machine...

User manual (English)
Page 50
... European Directive 89/336/EEC (Italian Legislative Decree 476 dated 04/12/92) concerning electromagnetic compatibility. The machine conforms to 122°F). These instructions integrate those contained in the machine. Carefully read the operating instructions and the safety warnings provided with the manual. 4. TECHNICAL DATA 47 ADDITIONAL INFORMATION FOR THE CORRECT USE OF THE INTENZA WATER FILTER To correctly use the Intenza water fi...
... European Directive 89/336/EEC (Italian Legislative Decree 476 dated 04/12/92) concerning electromagnetic compatibility. The machine conforms to 122°F). These instructions integrate those contained in the machine. Carefully read the operating instructions and the safety warnings provided with the manual. 4. TECHNICAL DATA 47 ADDITIONAL INFORMATION FOR THE CORRECT USE OF THE INTENZA WATER FILTER To correctly use the Intenza water fi...


